Purpose and content of the technical map
If for an amateur GOST and SNiP are a “dark forest”, then for a professional the technological map is a universal guide on how to technically and quickly assemble a frame and screw drywall.
- This instruction will save the master from studying these very norms and requirements and will speed up the delivery of the work to the customer. If you follow all recommendations, the work will comply with fire and environmental safety standards, GOST, SNiP requirements.
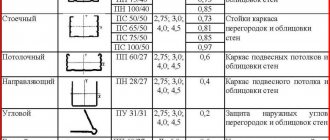
- The Knauf technological map contains tables with ready-made initial data of the main components of the frame structure for the ceiling.
Ceiling Knauf
Important! If the work is performed under a contract, then when placing and submitting an order you cannot do without the recommendations of the Knauf technical map for drawing up project documentation.
- The manual specifies the required material and algorithm for assembling a frame of one type or another, and describes methods for performing individual design tasks.
The latest current Knauf technological map (series 1.045.9-2.08.1) is comprehensive on how to design and install a suspended ceiling structure under plasterboard and gypsum fiber boards. All work is divided into separate sequential stages, so understanding the technology will not be difficult.
Fasteners
Profile connection work is performed using the following elements:
- Multi-level transverse connector for PP profile (60×27). It is sold flat, so it must be bent before installation.
- Single-level cross connector "Crab".
- One-way cross connector. The upper side clings to the supporting profile.
- A rotating multi-level connector that allows you to connect the supporting profile at any angle.
- Longitudinal single-level connector. It is used when it is necessary to increase the supporting profile.
- Universal connector. Necessary in order to connect the supporting profile in one plane at any angle.
Connectors
The work of installing the frame on the Knauf ceiling is carried out using the following elements:
- Straight U-shaped suspension.
Important! Not everyone knows that U-shaped hangers are produced under the profile and under the beam. Although they are similar in appearance, they have different nominal sizes after folding the side strips. For wood it is 50 mm, and for a profile – 60 mm.
- Anchor suspension with adjustable clamp, quick suspension. They are similar due to the presence of a fastening rod. Its length can reach 1500 mm, which allows you to adjust the required ceiling gap in a wide range. The disadvantage is that the load is limited to 25 kg. This is considered a low figure, since all average calculations in the Knauf technical map are based on a load of 40 kg.
Vernier suspension
- Adjustable vernier suspension. It is a telescopic structure made of two parts. Designed for a load of 40 kg.
- A combined suspension, in which there is both a rod and a retractable element of the vernier suspension.
- To connect metal elements, you need an LN screw (with a sharp tip) and an LM screw (with a self-tapping tip).
- Installation of a heavy profile in the P131 system is carried out using FN self-tapping screws.
- Installation of guides to the wall is carried out with metal or nylon dowels.
- Installation to hollow structures in a sheet of Knauf plasterboard is performed with multifunctional dowels or butterfly dowels.
- Installation of attachments to the sheets is carried out using a dowel with a screw thread.
- Drywall is screwed with TN screws (in a standard profile) or TB (in a thick sheet profile). The MN screw is used for screwing into a gypsum fiber sheet.
Finishing work
At the end of the cladding, the manufacturer proposes to enhance the properties of gypsum fiberboard by additional surface treatment with water-repellent compounds (Tiegenrgund primer) and Uniflot or Fugenfüller putty.
Sealing seams:
- Filling the seams with putty using a narrow spatula, removing residues and excess thickening of the mixture;
- Installation of seam tape;
- Cover the tape with a thin layer of putty, after 45 minutes remove any residue from its surface;
- Puttying screw heads;
- Secondary filling of the seam with a wide spatula, removal of residues;
- Manual grinding to eliminate unevenness;
- Installation in the area of the outer corners of an aluminum corner, PVC corner or aluminum tape, puttying;
- Installation of Knauf dividing tape between sheets of plasterboard and the internal corner, puttying;
- After drying, the material is painted and plastered.
If all requirements and recommendations are met, the installation of partitions, walls or ceilings using Knauf materials will be successful and durable. But remember when doing this: the smoother you set the structure of the profiles, the smoother the surface will be in the end.
Anton Tsugunov
Reading time: 4 minutes
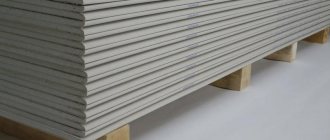
Drywall is widely used in apartment renovations. It is used to level walls and ceilings, construct niches and boxes, modernize doorways, and perform many decorative elements. There are certain rules for installing these structures that must be followed. Leading drywall manufacturers have developed entire kits for the convenience of consumers. Knauf technology has gained particular popularity in our country.
Types of drywall
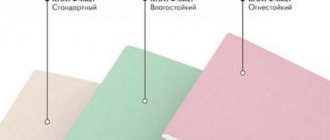
Depending on the operating conditions, the required Knauf drywall is selected from the following varieties:
Type A. Regular construction plasterboard. This sheet is used for heated rooms with normal humidity levels (up to 60%).
Type H2. Drywall with increased moisture resistance. The leaf has a low level of water absorption (up to 10%). Room humidity can be up to 75%.
Type DF. Flame resistant drywall.
Type DFH2. Drywall with the properties of the two previous types.
Important! Initially, it is customary to design the frame specifically for ceiling plasterboard measuring 1.2 × 2.5 m and 9.5 mm thick. But drywall comes in other sizes.
The drywall has a factory-made longitudinal edge. The most technologically advanced and therefore widespread is the semicircular thinned one, but there is plasterboard with other types of edges:
- Sheet with straight edge.
- Sheet with a cut corner.
- Sheet with a thinned edge.
- Sheet with a rounded one-sided chamfer.
- Sheet with a semicircular edge.
Types of edges
Each type of edge is needed to solve specific structural problems. In particular, installation of figured corner protrusions.
Recommendations for assembling the frame
The work is carried out in a dry and heated room at an air temperature of at least +10 degrees.
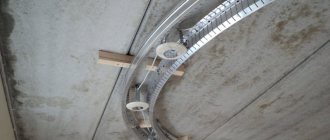
Work on the implementation of any frame begins with marking the design position of the ceiling surface. Using a level and a tapping thread, mark the corresponding line on the walls around the perimeter.
Next, depending on which Knauf plasterboard is selected for the suspended ceiling, work is done to mark the location of the guides and mounting points for the suspensions. The lines of the supporting guides are marked in accordance with the length of the sheet so that the end joint falls on the profile.
At the marked points, hangers are attached to the ceiling with dowels or anchors.
The wooden frame is mounted in two ways:
- Installation of the guide beam to the base using a direct or quick-mount suspension. When using a quick suspension, alternately change the side of attachment to the beam.
- Installation of the guide bar with anchor dowels directly on the ceiling. In this case, in places where there are differences in the base, pads are used.
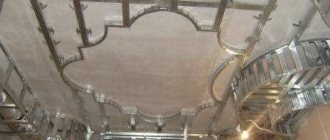
Installation of a profile frame:
- The P112 ceiling is mounted in the same way, only in order to connect the guide and supporting profile, two-level suspensions are used. When cutting the guides, an expansion gap of 10 mm is made. It will prevent surface deformation due to temperature changes.
- The installation of the Knauf P 113 single-axis system is different in that the technology involves placing a sealing tape under the guide profile.
- The work of assembling the P 131 system differs from that described above in that a wall profile is used, and the installation of guides is carried out along the long wall of the room. These structures are usually mounted under a heavy ceiling, so the required spacing for fastening the dowels is no more than 30 cm. Only solid guides are used. The supporting profile must fit into the guide by at least 3 cm.
Installation staggered
What are the advantages of Knauf technology?
The main difference between Knauf products is their high durability and excellent quality. Therefore, Knauf technology for installing drywall must be performed at the appropriate level. Technology does not allow negligence and poor quality work. When starting to build partitions using this technology, you should adhere to all its principles:
- Before screwing the plasterboard sheets, it is necessary to cover the outer part of the profile with thermal insulation tape. This will prevent the possibility of dampness forming on the wall surface if the profile freezes.
- The step of fastening the guide and installing the rack profile should be no more than 60 cm if no loads are applied to the wall. If furniture or equipment will be hung on the wall, then the number of racks and the mounting step should be increased.
Fastening drywall sheets
The Knauf technological map recommends fastening drywall across the supporting profile. Self-tapping screws rotate into the sheet at right angles.
Important! The edge of the sheet, not covered with cardboard, is processed with a plane to remove the chamfer.
The manufacturer has prepared a video in which craftsmen demonstrate the principle of assembling a suspended structure
The work of screwing Knauf sheets is performed in pairs or using a lifting mechanism. Plasterboard is mounted on the ceiling without T-shaped joints, staggered. In this case, the sheet is shifted by the step of the supporting profile. Installation is carried out so that the sheet lies in the longitudinal direction without a gap, and in the transverse direction there is a small gap. This way the putty will completely fill the joint, and the seam will be strong.
When temperature changes, the plasterboard sheet expands, so in large rooms it is necessary to provide expansion joints with a pitch of 15 m.
To make it easier to putty the self-tapping screws, screw them in with the head slightly recessed into the sheet – 1 mm. The work of sealing joints is carried out using reinforcing tape.
Drywall is a universal material, and the Knauf technological map will help even a novice craftsman perform high-quality installation of any structure.
Rules for the design and covering of the ceiling
The suspended ceiling system made of Knauf profiles and plasterboard is used to level, decorate, reduce the height of the room, and hide utility lines.
Key points:
- Install a sound insulator (Knauf self-adhesive tape) between the UD profile and the base of the ceilings;
- Use a pin dowel as a fastening element for the UD profile (1 piece for every 50 cm);
- Suspensions are installed at a distance of 90 cm along the line of fastening of the supporting profile;
- The step between the supporting profiles is 40-50 cm, it is inserted with the base of the backrest to the side of the UD plank and fixed to the ceiling with a suspension;
- The distance between the screws for arranging the ceiling trim is 17 cm.
Installation of the gypsum board sheet to the ceiling starts from the corner of the room
Plasterboard partitions using Knauf technology
Plasterboard partitions using Knauf technology have many undeniable advantages:
- the materials used comply with the best European standards,
- prices are moderate,
- There are no wet processes during installation,
- every stage of work is controlled,
- reliability is ensured by the design of the system itself,
- service life is long.
The Knauf integrated system is a special set of carefully selected materials from which a partition with gypsum plasterboard sheathing is mounted on a metal frame, which is attached around the perimeter to building structures. The entire system is assembled element by element and has increased structural rigidity. Each of its elements is produced using modern technologies, is functionally oriented, and undergoes strict quality control.
The main area of application of gypsum plasterboard partitions using Knauf technology is finishing the room using the dry method. Depending on the specific construction tasks that require solving, partitions of several designs are used. Their installation, accordingly, also has some features.
Partition C112
The Knauf S112 system is a composition of materials that create a partition with a two-layer cladding and one metal frame. Partition features:
- the frame is made of metal profiles and sheathed on both sides with two layers of plasterboard;
- with the help of the created product, an important task is solved - dividing the room into zones;
- installation of a plasterboard partition is carried out without the use of “wet” methods;
- the surface of the product is fireproof;
- the ability to create a design solution;
- the finished partition can be covered with any material: wallpaper, paint, tiles;
- when creating a partition, thermal insulation and sound permeability are improved.
Considering all the features of Knauf, we can say with confidence that its service life is long.
Names of Knauf partition elements
Installation of partition C112
The partition installation technology is carried out in compliance with step-by-step instructions. Installation work should begin when all work with electricity and laying all cables under the drywall has been completed. After completion of repair work on the flooring, as well as completion of water procedures in the required room. Installation of the Knauf partition is carried out as follows:
- Using a laser and upholstery cord, markings are applied to the clean surface of the floor, walls and ceiling.
- The lines mark the location of the rack profiles, as well as the doorway.
- The guide profiles are attached first. Metal cutting scissors are used to cut the profile to the required length.
- To improve sound insulation on the NP, it is necessary to glue a sealing tape according to the width of the profile.
- Using 35 mm dowels, the profile is attached to the floor. The fastening step is no more than 1 meter.
- Similarly, the NP is mounted on the ceiling.
- After this, you should measure the length of the rack profile from the ceiling to the floor.
Wall cladding with the Knauf system for partitions
1) The design position of the partition is marked along the ceiling, floor and base walls.
2) Right before installing the profiles, you should stick a special tape or apply sealant for partitions in several strips on the side on which they come into contact with the building structures.
3) Fix the PN profiles (frame guide profiles) to the ceiling and floor using dowels in increments of 1 m (no more!). It is worth following the instructions on the official Knauf website. Unfortunately, most workers do not follow or simply do not know about the existence of these instructions.
4) Install the rack profiles in contact with the base walls and secure them with dowels.
5) In the PN profiles, install and secure the PS frame profiles with LN screws or using the cutting method, maintaining a distance between the PS profiles of around 60 cm.
6) Mount embedded parts and electrical wiring inside the frame for subsequent installation of stationary equipment. If the length of the plasterboard sheet is less than the height of the partition, PN profiles are mounted horizontally at the joints of the gypsum boards. The joints of the sheets should be spaced one relative to the other, and a chamfer for putty should be made on the end edges in the area of the joint.
7) On one side of the frame, gypsum boards are installed vertically and secured in increments of 75 cm using TN screws up to 25 mm long.
 If provided by the design, insulating material is fixed in the space between the racks.
9) On the other side of the frame, gypsum boards are attached in a similar way.
10) After installing the plasterboard sheets, the seams are sealed and priming is performed for further finishing.
11) After the finished floor is completed, the necessary decorative finishing of the partition is performed.
Sealing seams can be done using various methods depending on the type of gypsum board edge and the putty used.
Factors influencing the choice of partition
The Knauf company offers a large selection of partitions. And each of them is unique in its own way. Each partition is designed for different rooms, with different temperatures and humidity levels. Before purchasing a Knauf partition system, you should pay attention to:
- The height of the room where the partition will be mounted.
- How noisy is the room, and should the noise be removed? If yes, then a Knauf acoustic baffle is required.
- Load on load-bearing walls or a wall lined with plasterboard.
Knauf plasterboard partition frame
Scheme for attaching a plasterboard partition to the wall
Scheme of covering a partition with plasterboard sheets
When choosing a Knauf partition, you should think about everything. After all, this design should fit into the room, and not become an obstacle for the people living there. The interior of the apartment should emphasize the zoning of the room. The partition can be equipped with lighting, covered with paint or covered with wallpaper. If desired, you can make through windows or niches for decoration in the partition.
Drywall is the most popular material for building partitions, decorative structures, niches in walls, openings, arches and much more. But all this requires a reliable supporting structure. They can be made from either wood or profile. Today, Knauf partitions are very popular. This is a plasterboard structure, the frame of which is made exclusively of a metal profile. At the same time, all sorts of nuances are observed that can harm the integrity and overall reliability.
Partition diagram
GKL partition on a double metal frame with space for communications
Composition of the complete system - quantity per 1 m2:
- (1) KNAUF-Fireboard – 1.0 m2;
- (2) KNAUF sheet GSP-A (GSP-H 2, GSP-DF) – 3.0 m2;
- (3) KNAUF profile PN 50×40 (75×40, 100×40) – 1.4 linear meters;
- (4) KNAUF profile PS 50×50 (75×50, 100×50) – 4.0 linear meters;
- (5) screw TN 25 – 18 pcs.;
- (6) screw TN 35 – 29 pcs.;
- (7) KNAUF-Fireboard putty Putty for KNAUF-Fireboard or KNAUF-Uniflot slabs - 0.05 kg;
- (8) KNAUF-Fugen putty for KNAUF sheets – 1.0 kg;
- (9) fiberglass reinforcing tape for KNAUF-Fireboard slabs – 0.75 linear meters;
- (10) paper reinforcing tape for joints of KNAUF sheets - 1.5 linear meters;
- (11) dowel K 6/35 – 3.2 pcs.;
- (12) sealing tape – 2.4 linear meters;
- (13) mineral wool slab – 1.1 m2;
- (14) KNAUF profile PU 31×31 – according to customer needs.
It is used in premises for various purposes as an internal enclosing structure in new construction and reconstruction. This design, in addition to high strength and fire resistance, makes it possible to hide sanitary communications (heating, water supply, sewerage) and equipment. After installation, the surface of such partitions requires additional finishing (painting, wallpapering, tiling, panels, etc.).
Installation
Installation of a gypsum plasterboard partition on a double metal frame with space for communications almost completely repeats the technological process of installing a two-layer partition, only sanitary communications are installed inside along with electrical wiring and equipment.
All work on the installation of gypsum plasterboard partitions using Knauf technology is carried out at operating humidity and a temperature of at least 15 degrees.
Hello, dear readers! Not long ago, the following situation happened: a friend finally got into the hands of an album of standard drawings from a materials manufacturer. For the first time, a person learned that using Knauf technology, drywall is sometimes mounted on profiles in two rows! He came to me for an explanation, and I said that the manufacturer offers different options so that builders can reduce the likelihood of cracks. If you do not set yourself the goal of saving on important nuances, but want to install a durable structure, study all the intricacies. I’ll help you figure them out now, since drywall is my favorite material.
Knauf partition design
Let's look at some Knauf plasterboard partitions made using the following technology:
Single frame and one layer of gypsum fiber board
- S-361 is a partition made on a single frame and sheathed with one layer of moisture-resistant Knauf plasterboard sheets. It uses proprietary moisture-resistant 12.5 mm thick plasterboard on both sides, and mineral wool acts as a filler. The main element in such structures are sheets with double-sided treatment with a water repellent. The weight of 1 m2 of the finished structure without finishing with mixtures is about 18 kg, which indicates sufficient lightness of the entire partition as a whole.
Double frame with two-layer cladding
Technology for working with Knauf plasterboard: basic principles
Important to remember. Separately, it is worth talking about the installation of all the specified gypsum board partitions using the Knauf Tigi technology; this method involves the arrangement of sheets of different layers overlapping each other. Or take a running start, as they also say. That is, the joints of sheets at different levels should not intersect. The instructions for constructing partitions using this technology indicate that the joints of slabs of different levels should be at a distance of at least half a meter from each other. This applies to both vertical and horizontal joints. By following this rule, you will greatly increase the strength of the finished structure.
When choosing Knauf, you get not individual elements, but ready-made engineering systems.
The use of Knauf plasterboard systems implies a complete closed-cycle operation in which all materials and components are used only from this manufacturer. This approach is useful in many ways. The fact is that Knauf does not just produce various elements, this company supplies ready-made engineering systems in which everything is thought out.
Each small part individually, in its place, forms the overall monolithic result. Here is what is needed to work using this technology:
- Profiles. At Knauf, the supporting and guide profiles are made in such a way that when installing one to the other, no distortions, distortions or other anomalies occur. The finished frame, built from the specified material, is always smooth, strong and reliable.
- Filler or insulator. It is recommended to use only mineral wool from the specified manufacturer to fill the space between the walls. It does not spread fire, does not rot, and does not support organic life forms, which means that mice will not grow in such walls. In addition, such wool is made to fit the width of the inter-wall space and does not require additional processing.
- The plasterboard itself from this manufacturer, which meets all European quality standards, in combination with the other elements of this construction kit, is capable of providing many years of high-quality service.
- Rough and finishing compounds for grouting and sealing, created taking into account the composition of cardboard and gypsum filler of this particular brand, successfully complement plasterboard from this manufacturer, exhibiting excellent adhesion properties to its surface. Thus, the finished wall with rough finishing already looks complete.
- Insulating tape of the required width for a specific profile, as well as all hardware for work, should also be selected from the products of the specified brand. After all, the quality of these elements is checked and certified, and also tested by many years of use. Do not doubt the quality of the finished wall by saving on fasteners. After all, it is on it that all these components are held.
As can be understood from the above, the Knauf technology for walls and partitions made of plasterboard is a reliable and calculated engineering system, which is purchased in parts, but, when installed on site, represents a direct integration of German quality into the Russian interior.
What is Knauf technology?
Knauf technology for plasterboard walls consists primarily of using high-quality and reliable materials:
The advantages of the Knauf profile include the fact that when connecting the rack to the guide, no irregularities or protrusions are formed on the wall surface. And this is a definite advantage, because it allows you to save money on finishing mixtures.
Knauf drywall installation technology involves the use of proprietary moisture-resistant sheets. Materials from this manufacturer also have increased resistance to both mechanical factors and moisture. The range of this type of product includes sheets of 5 standard sizes, which greatly speeds up the installation process. And exclusively mineral wool is used as insulation and sound insulator.
Heat and sound insulation Knauf
Knauf fasteners and hardware are made from durable types of plastic, and metal products undergo anti-corrosion treatment.
The company produces a huge number of products, so almost everything needs to be used from this brand.
Ceiling installation technology using the Tigi Knauf system
When installing ceilings of this type, you should adhere to certain rules that will allow you to complete the work without flaws and errors. These requirements take a lot from the standard ones, but there are also some peculiarities.
Features of using Tigi Knauf systems when installing ceilings:
- It is not necessary to prepare the surface for installation.
- The Tigi Knauf system is mounted on a finished ceiling. Drywall is pre-installed on it.
- Tigs are installed on a frame made of wood, metal or a base already covered with materials.
- Cut the material carefully. using tools appropriate for these purposes. A chamfer is created on the outside, which is subsequently puttied.
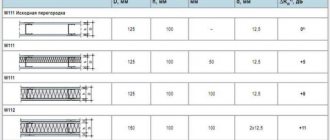
- The drywall is positioned so that the seams are staggered. The spacing for fastening the seams of the material corresponds to 60 cm. This allows you to avoid cross-shaped joints, which are prohibited when working with the profile.
- Gaps 0.5-0.7 cm wide are left between the pieces of material. This approach to fixation makes it possible to reduce the influence of mechanical load on the sheets, which provides protection against chips and cracks.
- The sheathing is fixed using self-tapping screws. They are located in increments of 200-300 mm. This indicator depends on the total load of the structure. It is allowed to use mechanical, pneumatic, and electric tools.
Knauf technologies when working with drywall
The Knauf company firmly holds its position as a leader in the modern building materials market. True German quality allows you to install durable and reliable plasterboard structures - ceilings, walls, partitions and arches. The assortment includes Knauf and GKL, and all the “consumables”: profiles, hangers, putties, primers. It is about profiles that will be discussed in the next material.
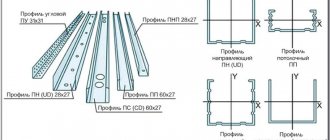
What is a profile for drywall from Knauf? This is an element made of high-quality galvanized steel intended for fastening gypsum boards in various types of structures. Their classification and technical characteristics are given in Table 1.
Table 1. Types of Knauf metal profiles
| Name | Features of application | Section, mm | Length, mm |
| Guide (PN) | Is a guide for rack profiles, necessary for creating jumpers | 50×40 65×40 75×40 100×40 | 3000 |
| Rack-mount (PS) | Used for the construction of vertical frame posts, connected to the corresponding Knauf guide profile for fastening drywall | 50×50 65×50 75×50 100×50 | 3000 |
| Ceiling (PP) | Has a C-shape, used to form a frame | 60×27 | 3000 |
| Ceiling guide (PN) | Serves as a guide for the PP; when installing ceilings, it is attached along the perimeter of the walls. | 28×27 | 3000 |
| Corner defensive | Protects corners from external damage | 25x25x0.4 31x31x0.4 31x31x0.4 | 3000 |
| Arched (PA) | Necessary for the formation of arches, domes and other curved structures | bending radius 500,1000 | 3000 |
| Corner plasterer | Installed at the ends of walls for protection during operation | 35x35 | 3000 |
| Mayachkovy (PM) | It is the basis for the surface plastering process. | 22×6 23×10 62×6,6 | 3000 |
| Enhanced (UA) | Used as a rack element when forming doorways | 50x40 75x40 100x40 | 3000 |
What is needed to install Knauf profiles: technologies
From the table above it can be seen that there are many options for manufacturing metal profiles, depending on the specific application as frame elements. Each type has its own installation features, so you can consider the whole process using the example of installing a suspended ceiling.
To begin with, you should familiarize yourself with a number of rules:
- carry out all repair work in a dry room;
- choose ceiling profiles for plasterboard from a well-known manufacturer (Knauf, for example);
- accurate marking is mandatory, as it will allow you to avoid gross mistakes and save material;
- Before installing the profile, you must additionally check the markings using a level;
- Before covering, you need to make sure that the entire frame is strong, as this will avoid “distortions”.
Once the design of the plasterboard ceiling has been chosen and the budget has been calculated, you can go to the construction supermarket. It is advisable to purchase there:
- laser level;
- measuring tool;
- drill or hammer drill;
- metal scissors;
- two types of profiles (guides and ceiling);
- pendants;
- dowels (anchors).
In addition, to create smooth lines, you need an auxiliary tool for bending drywall and metal profiles. For example, an awl, a needle roller and special equipment for cutting metal. An arched profile will be the best solution for curly structures, since it is easier to bend than other types.
Ceiling installation technology when working with Knauf plasterboard
There are several stages of installing a frame made from Knauf plasterboard profiles. First you need to determine the angle that is lower than all the others in level. To do this, you will need a simple measuring tool - a tape measure.
They retreat at least 5 cm from the selected point and place a mark along the perimeter of the room. All milestones are connected in a line using a painting cord. Using the applied markings, you can now attach the guides, then the hangers, the ends of which should be bent. After this, ceiling profiles are mounted using self-tapping screws and lintels are installed. That's it, the frame is ready. You can begin covering the gypsum boards and finishing work.
Installation of Knauf profiles will not be a problem for careful craftsmen, but the problem of choosing a manufacturer remains relevant. The fact is that building elements from well-known companies cost a lot of money, so the average person is always looking for an alternative. Finding it is not so easy, but it is quite possible to take correct measurements and installation. This approach will help save up to 10% of money. Are there any other ways to make reasonable savings without losing quality?
Knauf plasterboard production technology
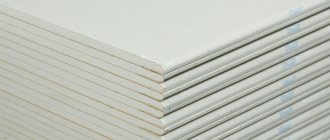
Construction sheet-gypsum boards of type A - this is the correct name for the gypsum boards familiar to everyone. This is a high-quality construction and finishing material that is used for cladding walls, constructing partitions, ceiling structures and products whose task is sound absorption and sound insulation.
Each Knauf sheet necessarily contains the following information:
- Letter marking of sheet type - GSP - A;
- The type of longitudinal edges of the sheet is indicated;
- Indicates the standard;
- Numbers that display the width, length and thickness of the sheet (dimensions are indicated in millimeters).
If we talk about technical characteristics, Knauf plasterboard is a rectangular building element consisting of two layers of special cardboard with a gypsum layer and the addition of reinforcing inclusions. The side edges of the strip are folded with the edges of cardboard.
The core of such a sheet is gypsum binder under the designation G4 (GOST 125-79).
Knauf plasterboard sheets have:
- A semicircular thinned edge, which is considered a good technological solution;
- Cladding cardboard, which adheres perfectly to the core, is “organized” by adhesive additives;
- Cardboard is used not only as a building frame, but also as a base for applying any finishing.
By the way, the technical characteristics of cardboard meet all the requirements for using this material in residential premises.