At the same time, laying 1.5 bricks is the most popular method of constructing multi-storey buildings. Externally, it has slight differences from the usual type of single-brick masonry, with a clearly defined pattern of ligating the seams.
A wall of one and a half bricks is laid out from the corner using an individual masonry scheme. Masonry involves performing a perpendicular joining of 2 blocks placed first in a row.
Preparation and selection of one of the methods
After acquiring all the necessary materials and tools, they move on to the initial stage. In order to do everything correctly, there are small secrets, namely, these are the masonry rules and preparatory stages that cannot be missed. Before laying the wall with silicate or ceramic bricks, choose a masonry method. When building the outer layer of the wall, if plastering or other decorative finishing is not planned in the future, the mason lays the bricks pressed or butted together with trimming. If the master has good skills and construction experience, this is a serious plus, but every person can master the basic simple masonry techniques. The main thing in work is accuracy. Learn how to lay bricks correctly from online resources or learn from an experienced developer.
Before laying the bricks, you need to learn how to make the mortar correctly so that it can be easily applied to the wall in an even layer of the required thickness, and also master the techniques of hemming or cutting bricks of the required shape and size using a pick or grinder. You should remember the need to soak building materials prepared for work in advance. Dry brick sucks the liquid out of the cement composition too quickly.
How to put
Experts recommend laying bricks fairly close to each other.
During advancement, subsequent bricks need to be moved back a few centimeters. The entire solution should be distributed evenly, without a large accumulation in one place. Only some movement can achieve the desired result.
After this, the bricks need to be moved to the previously prepared one. During such actions, one part of the brick moves the cement base into the seam that is formed between the bricks. This method allows you to get a very high-quality and durable seam.
After all this, you need to press the brick as best as possible in all directions. This is necessary to align the bricks relative to each other.
For high-quality adhesion to the solution, you can tap the surface. Experts recommend knocking in the central part of the brick to avoid distortion. Remove unnecessary mortar using a trowel.
This technology is used for the construction of the first five rows. Then you need to lay down the reinforcement mesh and continue construction.
It turns out to be a very strong foundation that will last for centuries. Don't forget about monitoring the wall surface. If you do not do this, the result will be very disastrous.
The accuracy and durability of one and a half brick masonry can only be ensured by a vertical seam, which may not coincide and overlap the upper part of the brick. This is called ligation. Its meaning is very simple.
When laying material using this method, you distribute the load across the entire wall. If this is not done, the load will be concentrated in one place, which will lead to collapse. Knowledge of dressing allows you to obtain very durable structures.
Experts recommend attaching a half-brick wall to the main wall.
If this is not done, then after a few years the partition will move away from the base. Fixing such a puncture is very difficult, almost unimportant. A ready-made work scheme allows you to get good results for several years to come.
Laying lighthouse rows at the ends of the wall
Installation of the first bricks of the outer mile (front row)
Hose down approximately 25 bricks and allow surface moisture to evaporate. (Always do this procedure before laying bricks.) Prepare 0.01 cubic meters of mortar. Remove the soil from the surface of the foundation, moisten about a meter of its length with water and wait until the moisture from the surface evaporates. Place a strip of mortar next to the chalk line, then place three bricks on top of the mortar. (below in the image) These bricks will be the start of the corner or edge of the wall.
Carefully check the position of these three bricks relative to the chalk line, as well as the height relative to the foundation (10 mm). To do this, you can use level and order. Check the order of the height of each brick when laying subsequent rows.
Laying the inner verst (inner row)
Lay a strip of mortar parallel to the three bricks you have laid in the outer row, missing them by about 10mm. Place the brick at the end of the mortar strip at a distance of 10 mm from the first brick of the front row or at the distance determined during test laying. Lay down two more bricks. Using a level, level the row of three bricks, ensuring that the surfaces of both rows of bricks are in the same horizontal plane.
Lay the second row of the front and inner versts, starting the laying with interlocking bricks. (Every second row starts with the outermost interlocking brick). Lay two bricks of spoon rows so that a step is formed between the first and second rows of masonry.
Laying the first metal strips
Accordion-shaped metal strips to connect the rows are laid along the entire wall on every second row. Place a layer of mortar on the second row and lay strips in it at a distance of about 450 mm, pressing them down with the end of a trowel. Then place two spoons on the strips, which will begin the third row of the front and inside versts.
Completing the laying of the first edge of bricks
Lay five rows of front and back versts, making connections between the fourth and fifth rows. The end must be stepped with a step width equal to the width of the brick. Check the masonry with a level. When you find a protruding brick, tap the level with the end of a trowel handle to force the brick into place. If the brick is too deep in the wall, knock it forward. Do not pay attention to minor inaccuracies; correct them only if they are serious enough.
Laying the second edge
At the opposite end of the foundation, repeat steps 1 to 4 to create an end of five rows
At this stage, it is especially important to carefully check the level and order of the masonry. The two ends must be completely identical, otherwise the wall will be unstable and the only way to correct the problem will be to dismantle the wall
Mortar for brickwork
The brick is laid on a cement-sand mortar. Cement is used not lower than M400, sand is clean, gully. The proportions for the specified brand are 1:4 (for M500 - 1:5). Mixing is done manually or using a concrete mixer, but the order does not change.
First, the sand is sifted, a binder is added to it, everything is mixed in a dry state until a uniform color is achieved. Then add water. Its quantity is 0.4-0.6 parts, but it is determined by the plasticity of the solution. It is more convenient to work with plastic mortar than with rigid mortar, but when laying hollow bricks, in this case the consumption of mortar greatly increases: it fills the voids. In this case, it is more practical to make a rigid solution.
To improve plasticity and more convenient work, add lime, clay or liquid detergent to the composition (you can use hand soap, available in large flasks). The amount of additives is quite small - no more than 0.1 part, but the characteristics of the solution improve significantly: it is easier to install, it does not delaminate longer.
It’s worth warning right away: do not mix large volumes at once. The mixture must be used within two hours. And in the last half hour it can be difficult to work with it: water may begin to separate, or it may begin to set. It depends on weather conditions and the quality of cement, on the thoroughness of the batch. If laying bricks with your own hands is your first experience in this area, it will be slow. Therefore, it is better to make small portions of the solution.
Often, beginners who plan to lay bricks themselves have a question: at what temperature can they work. Without special additives you can work at positive temperatures. In the best case – not lower than +7°C. This is the threshold at which cement sets normally. At lower temperatures, the hardening process practically stops; as a result, the solution may crumble and the strength of the wall will be low. To lower the bar, there are special antifreeze additives, but the cost of such a solution is already high: the price of these additives is considerable.
Cost of work
The estimate for laying walls includes the volume of basic and auxiliary materials that will be needed in the laying process and the cost of the work itself. The cost of erecting walls of 1.5 bricks depends on the volume of construction, the height of the building, transport interchange and region.
The most expensive services of builders are in Moscow and the northeast of the country. In other regions, prices are almost equal, with a discrepancy of up to 10%.
Average prices for operations for laying the walls of a 1.5 brick house by region of the country:
| Type of construction operation | Dimension | Moscow prices | Perm prices | Prices for Severomorsk |
| Dismantling work on walls 1.5 bricks | rub. per m2 | 1100 | 700 | 900 |
| Masonry, facing brick | rub. per m2 | 3200 | 2300 | 2100 |
| Exterior wall masonry | rub. per m2 | 1800 | 1600 | 1700 |
| Masonry of external walls with insulation | rub. per m2 | 2800 | 2400 | 2500 |
All the most important and useful information about the types of brick walls is presented in this section.
Brick laying technique
Before use, the solution is stirred, since heavy particles can sink down and water can rise to the top. The mixed solution is placed in buckets and transported to the masonry site, where it is distributed. Immediately lay a strip of mortar - a bed - for one row. For a bond row the bed width is 200-220 mm, for a spoon row - 80-100 mm. If the seam is filled completely, about 10-15 mm are removed from the edge, the height of the mortar is 20-25 mm, which, when laying, provides a seam of 10-12 mm. Before installing the brick, the mortar is leveled with a trowel.
There are three techniques for bricklaying. On hard, low-plasticity mortar, the “squeeze” technique is used. In this case, the seams are completely filled. If the solution is plastic, use the “butt” technique.
Back-to-back bricklaying technique
As already mentioned, this method of laying bricks is used with plastic mortar. It should be mobile, easy to apply and move. This is achieved by adding additives. You can spread the solution over the entire surface of the wall at once: additives allow you to extend the time before setting begins.
The bed is laid with a thickness of about 20 mm, with a gap of about 15-20 mm left from the edge. This indentation allows you to avoid squeezing out the mortar onto the front surface, but at the same time the edges of the seams often remain unfilled. This significantly reduces the strength of the wall, therefore, in regions with seismic activity, laying milestone courses (external and internal) using this method is prohibited.
When laying a spoon row, take a brick, holding it with a slight slope. Approaching what has already been laid, at a distance of 8-10 cm they begin to rake up the solution with the edge (poke). When joining, it turns out that the seam is already partially filled. The brick is pressed down a little (settled), pressing it to the bed. The excess is removed with a trowel and sent either to a bucket or to the wall.
With this technique, it often turns out that the vertical seams are only partially filled. That’s why this method is also called “wasteland”. They are filled in when laying the bed for the next row. If the technique is not yet well developed, it is better to fill the seams before laying the next row: voids reduce the strength and thermal insulation characteristics.
When laying a bonded row, everything is exactly the same, only the mortar is raked with a spoon edge. The zabutka is laid, like the bonded rows, and then pressed with the palm of your hand. It is necessary to ensure that all the stones are at the same level. This is done using a building level, and the verticality of the wall is checked with a plumb line every 3-4 rows.
"Press" technique
When working with hollow bricks, hard mortars are usually used. In this case, bricks are laid using the “squeeze” technique. In this case, you also have to work with a trowel.
The bed is laid at a distance of 10 mm from the edge, the thickness is still about 20 mm. Since such a composition does not stretch well, it is raked to the edge of the laid brick with the edge of the tool. With your left hand, take the brick and press it against the trowel, while simultaneously pulling it up. At the same time, they continue to press with bricks, achieving the required seam thickness (10-12 mm).
Excess mortar is picked up with a trowel. Having laid several fragments, take a level, checking the horizontality of the row, tapping the trowel handle to straighten the position. The solution that has been squeezed out is picked up. The result is a dense masonry, but the process takes longer: more movements are required.
Butt-together with trimming
The average method in terms of productivity is butt jointing with cutting of seams. With this method, the bed is laid out close to the edge (10 mm), as when laying pressed, and the laying technique is flush: the mortar was raked with brick, placed, pressed down, and the excess was removed. If the wall is not subsequently planned to be finished with anything, after several rows it is necessary to take a jointer - a special tool and give the seams the required shape (convex, concave, flat).
As you can see, this is a kind of symbiosis. To make it more convenient to work, the solution is also made with “intermediate” plasticity. If it is too liquid, it will flow down the wall, leaving streaks, so it needs to be kneaded a little more tightly than when laying end-to-end.
Dressing systems
In order to combine rows of brickwork into a single strong monolithic structure, seam dressing systems are used. For theory, we suggest that you familiarize yourself with the basic rules of bricklaying.
The following vertical seams are ligated:
- transverse,
- longitudinal.
The strength and reliability of brickwork largely depends on the quality of the ligation of vertical longitudinal and transverse seams.
The ligation of vertical longitudinal seams is carried out by laying bonded rows and helps to avoid longitudinal destruction of the masonry.
Ligament of vertical transverse seams is performed by alternating spoon and butt rows, and in adjacent rows it is necessary to move the bricks by a quarter or half. This dressing ensures: uniform distribution of the load on the nearest sections of the masonry and the longitudinal relationship of adjacent bricks, which in turn gives the brickwork solidity and strength under uneven temperature deformations and precipitation.
Hand tool
Most often, when making brickwork, hand tools are used; without a mason's kit, it is impossible to perform this type of work. Brickwork Tools:
A trowel (trowel) is a metal flat blade, triangular in shape, attached to a plastic or wooden handle. A trowel is necessary for a mason to apply cement mortar for masonry to the surface of a brick, then level it. This tool is also used to grout and fill the joints between bricks, followed by removing the remaining plastic cement mass.
It is very convenient to use a hand trowel when leveling laid bricks by tapping with the back of the handle. A hammer-pick differs from a standard tool in the shape of its metal striking surfaces. On the one hand, there is a striking part, shaped like a standard chisel or chisel; on the other side of the striking part, there is a striker in the shape of a rectangular block. The blunt end of a hammer is used to split a brick or block into two parts or to level the masonry.
But the sharp end of the hammer serves as a convenient device for breaking off small parts from bricks. The jointer acts as a special device for decorative design of brickwork seams. The use of jointing mainly involves working with facing bricks. Depending on the type of brickwork, jointing of various sizes and shapes is used.
There is another group of tools that is actively used in the construction of brickwork, which can be called measuring.
Laying rows of bricks between the edges of the wall
Mooring line
When laying bricks between the edges of a wall, use a mooring cord - a device consisting of two wooden or plastic blocks to which a cord is attached. If you didn't buy these pads at the store, make them yourself. Tie a nylon or other synthetic cord to the shoe by inserting it into the groove.
Hook the blocks onto the outermost brick of the first row, aligning the cord exactly with the top edge of the brick. Pull the cord to the other end of the wall, attach it to the second block and hook the block to the brick of the first row. Align the cord with the edge of the first brick.
Laying a row of bricks between the ends of the wall
Lay out the first outer course between the edges of the wall along the cord, which should be located at the level of the edges of the bricks and at a distance of one to two millimeters from the surface of the wall. Lay the masonry on both sides and place the closing brick in the center, with a layer of mortar applied to both ends. Then lay out the first inner row along the cord installed on the inside of the wall.
Masonry to the top of the wall ends
Always lay the masonry from the ends to the center and thus lay the next four rows of bricks of the outer and inner verst. After laying each row, move the cords up one row. On the second and fourth rows, lay row dressing strips with an interval of 450 mm between them. After installing the end bricks in the last row, the wall will be approximately 375mm high - the exact height will depend on the size of the bricks. If this height is sufficient, lay the closing row on top on edge and fill the seams between the bricks of the top row with mortar.
Continuation of brickwork
If you want to build a taller wall, make new edges of five rows and then lay rows between them from the ends to the center of the wall. As before, when laying the outer lighthouse bricks, check their height by ordering them, and lay the rows between the outer bricks along the cord. The next five rows will give a total wall height of about 750mm. Laying five more rows will give you a height of 1.125 m. Another row of bricks and you will have a wall with a height of 1.2 m.
Do-it-yourself brickwork tools, order and features
Now that you have an idea of how to lay bricks with your own hands, you need to talk about the procedure as well as some technical nuances.
Let's start with the tool. You will need:
- mason's trowels - apply and level the mortar onto the bricks;
- concrete mixer or container for mixing mortar;
- mortar shovel - for kneading and periodic mixing;
- two or three buckets for the solution;
- plumb line - check the verticality of walls and corners,
- building level - to check the horizontality of the row of masonry;
- cord-mooring - for beating rows;
- jointing (for molding seams);
- hammer-pick for breaking incomplete bricks (halves, 3/4 and checks - 1/4);
- The rule is a flat metal or wooden strip to check the plane of the wall.
Next we will talk about the features of the technology. First: it is advisable to soak the brick before use. This is especially true in hot, dry weather. Then it will “pull” less moisture from the solution. If there is not enough moisture, the cement will not be able to gain the required strength, which will affect the strength of the building.
Second: the corners are driven out first. First the first two. They are connected with 2-3 rows of bricks according to the chosen masonry pattern. Then the third corner is kicked out. The second and third are also connected in several full rows. Afterwards the fourth corner is placed and the perimeter is closed. This is how walls should be built, going around them around the perimeter, and not pushing walls out one by one. This is one of the most common mistakes.
Third: there are two row control technologies. The first is that nails are inserted into the seams of the corners, to which strings are tied. It needs to be pulled so that it marks the top edge of the brick, and also limits the outer (and, if necessary, inner) surface of the wall.
The second way is to use wooden or metal orders. This is a flat strip or corner on which marks are applied every 77 mm - marks on wood or cuts on metal. They mark the required row thickness: brick height + seam. They are installed using flat mounting brackets that are inserted into the seam. If necessary, they are then simply removed and rearranged higher.
There is another way - a mason's corner. It has a slot on one side, into which there is a solution at an angle.
The disadvantage of this method is the same as just using a nail in the seam: the height of the row must be controlled “manually” when drawing out the corners. If you lack experience (and where can you get it if you are doing bricklaying with your own hands for the first time), this is difficult. Having (having done it yourself) everything is easier.
Fourth: preparation of incomplete bricks. As you have seen, when laying, they use halves, three-quarter bricks and checks - 1/4 parts. To ensure that the work does not slow down, it is necessary to prepare them before starting masonry. This is done using a hammer-pick. When preparing, high precision in size is required, otherwise the dressing will go wrong. To make it easier to control the length, marks of the appropriate length are made on the handle. By placing the pen on the brick, marks are made on both sides of the spoon. Then, placing a pickaxe blade on the mark, they hit the reverse side with a hammer, making notches. Having made notches on both spoons, they break the brick with a strong blow of the pick.
General rules
The brick material used in the construction industry is distinguished by its correct geometric dimensions, taking into account which the design task for construction is carried out and the necessary calculations are carried out.
The general requirements for construction work using brick material include:
- precise maintenance of ratios, use of high-quality components. During the process of laying bricks, deviations from the manufacturer’s instructions, which determine the procedure for mixing the finished dry composition or introducing modifying additives into the solution, are unacceptable;
- equal distribution of mortar mass in rows and between adjacent stones. By violating this requirement, you will not only spend extra money on the mixture, but also deviate from the specified level. In addition, the wall edges will turn out unattractive;
- checking the correct location of the rows, the formation of strictly horizontal and vertical lines by brick edges, located parallel to each other;
- laying out the brick material on the one laid below with the necessary offset;
- control of the correct placement of rows and corner sections at the building level.
Particular attention is paid to climatic conditions.
On hot and frosty days, masonry work is not recommended - the mortar mixture will not harden properly.
In the summer, the brick material will have to be moistened before laying, and in the winter, anti-frost additives will have to be added to the masonry mortar.
Features of corner forcing
Scheme of ligation of longitudinal seams.
First, two bricks are taken (or a brick and an insert) and placed in the corner, pressed against the mortar. When laid, they should form a right angle. Use the handle of a trowel to lightly tap them, and then fill the gap between them with mortar. Be sure to check the horizontal lines using a level.
Then the masonry is carried out according to the chosen scheme. The thickness of horizontal joints between rows after hardening of the mortar should not exceed 10-15 mm, vertical joints between individual bricks - 6-8 mm. You need to place 3-4 bricks on each side of the corner, making sure to control the evenness of their horizontals and verticals. Then, following the dressing scheme, row 2 is laid on top, then row 3, etc.
We should not forget about aligning the seams. This is done by scraping and jointing while the solution is still soft. The easiest way is to slightly recess the seams into the masonry, for which you just need to run a jointer over them and wipe off the excess mortar from the wall.
The direction of the work does not really matter; do it the way that is most convenient for you. For right-handed people, it is better to build a brick house from right to left, for left-handed people - vice versa. If a team of masons is working, then 5-6 rows are simultaneously driven out in all 4 corners, and then the walls are built up row by row, observing the initial gap (the corners should be 5-6 rows ahead of the wall) until the work is completed.
Well brick masonry walls according to the A.S. system. Vlasova.
But you can’t cope with such a volume of work at the same time. Therefore, use the following order: first, drive out 2 corners to the desired height, then place 1-2 rows of bricks between them, drive out the 3rd corner and connect it with the same number of rows to 2, then drive out the 4th corner and connect it to 3 and 1 corners. And so continue to work, after each circle raising the brick walls of the house along the entire perimeter by 1-2 rows until the masonry is completed.
When forcing corners, you will inevitably have to make stepped cliffs, the so-called. fines. Partly this will be due to the fact that it will be necessary to use cut-down bricks - inlays, partly - to ensure a more durable connection of corners and walls in the future.
For a future brick house, it is extremely important that the corners are straight and strictly vertical. The angle is checked with a square, the brick should fit tightly to it
The verticality of the corners, especially above 7-8 rows, is controlled using a plumb line, and the horizontal - using a building level. Professionals take measurements every 4-5 rows, but if you do not have enough experience, do not be lazy to take them more often.
Calculation
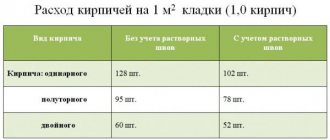
A standard brick is a product 25 centimeters long, 12 centimeters wide and 6.5 centimeters high. The proportions are quite harmonious. Knowing the dimensions of one brick, it is easy to determine the quantitative need for its use. It is believed that if the mortar seam is 1.5 centimeters, at least 112 bricks will be used for each square meter of masonry. However, the brick that is available after production and transportation may not be ideal (with chips, etc.), plus the layer may not have very good skills. In this case, it is appropriate to add 10-15% of the required amount of material to the calculated quantity.
112 bricks per square meter turn into 123-129 pieces. The more experienced the worker, the fewer additional bricks. Thus, 112 bricks per 1 meter is the theoretical minimum, and 129 pieces is the practical maximum. Let's consider the simplest example of calculation. A wall height of 3 meters and a length of 5 meters gives an area of 15 square meters. It is known that 1 square meter of single-row masonry requires 112 standard bricks. Since there are fifteen square meters, the number of bricks (1680) needs to be increased by another 10-15%. As a result, no more than 1932 bricks will be needed to lay this wall.
Brick wall design
The brick wall shown here is a combination of several simple designs. Like all walls, it rests on a foundation - in this case, a concrete strip 250 mm deep and 400 mm wide. The top of the foundation is 100 mm below ground level so that soil can be laid next to the wall and plants can be planted. Some walls consist of a single course of brick; for increased strength and better proportions, this wall consists of two parallel rows of bricks, separated by a narrow air gap and connected by metal strips. Both rows are spooned, that is, the bricks are laid end to end with seams 10 mm thick. The upper butted row of bricks laid on edge ties both rows together.
Basic terms
Let's start with general concepts. Everyone knows exactly what a brick looks like, and that it is ceramic and silicate, too. But not many people know how the edges of this material are correctly called. And in the description of masonry technology they appear very often.
The largest edge is called “pastel”, the middle side is called “spoon”, and the smallest is called “poke”.
The dimensions of the brick are, in principle, standardized (250 * 125 * 66 mm - single and 250 * 125 * 88 mm - one and a half), but the technology of its production is such that they can differ significantly from different manufacturers: by 2-3 mm in each edges, and this is quite a significant difference, considering the number of pieces in one row. Therefore, before ordering a batch, it is advisable to measure samples from several firings in order to determine how accurately the technology is maintained.
It is also important to pay attention to the geometry: the edges must be positioned strictly at 90°. Otherwise, bursting loads will occur and the wall may crumble.
Possible difficulties and errors in the process
This masonry is a complex type of wall construction and can only be performed by highly qualified masons. The main difficulties arise due to the need to accurately create angles.
The most common mistakes when laying 1.5 brick walls:
- Low quality bricks with a density of less than 650 kg/m3, curved edges, defects and different geometric dimensions are used in construction;
- the insulation layer between the base and the wall is not completed;
- when raising corners, the rule of perpendicularity of the first blocks is not fulfilled;
- no reinforcing layer;
- The layout of the butt and spoon sides has not been completed.
Marking masonry
Test laying of the first two rows
Mark a line for the outside surface of the wall using the wall of your home, a walkway, or a red line as a horizontal reference line. Drive stakes at the ends of this line and stretch the cord between them. Then place the first front (front) row of bricks on the ground along the cord with 10 mm gaps between them. If necessary, move the stakes so that a whole number of bricks fit exactly between them.
Lay the inner (back) row of bricks with a gap of 10 mm between it and the front row. After laying several bricks, place one brick on edge across parallel rows. If it doesn't fit exactly on both rows, change the gap between them. Lay out two rows of bricks completely, checking the gaps.
Summarize
As you can see, making bricklaying devices with your own hands is very simple and inexpensive. Although it will serve you for a very long time.
Brickwork is a job that should be done with at least some experience. If you do it haphazardly, then the strength of the walls will not be sufficient, and this is risky, as you yourself understand. In addition, the quality of the masonry will determine how the house will look from the outside.
It is necessary to use various devices and tools to control the work being carried out. It is not reasonable to think that if you can do without them, then you are a professional. Mechanical devices are designed to make our lives easier.
The device is designed for laying bricks in order to maintain the same thickness of the seam. Thanks to this very simple and uncomplicated design, you can easily make beautiful and very even masonry while maintaining all the distances between the bricks. Moreover, the device greatly facilitates and speeds up the work. The device consists of:
- two horizontal strips 11x25 mm; two horizontal strips 19x40 mm; four vertical strips 19x40 mm; two studs with a diameter of 10 mm with wings, bolts and nuts, with which the vertical strips are connected; two screws with heads with a diameter of 20 mm with nuts and washers; finishing 40 mm nails for fastening parts (the ends of the nails on the inside will need to be bitten off with wire cutters).
The total length of the structure is 850 mm. Horizontal strips are attached in the shape of the letter G. The areas from the edge to the vertical strips are 130 mm. The height of the vertical strips above the level of the entire structure is 100 mm. This height was chosen so that when laying bricks, the thread would pass 15 mm above the vertical strips and would not interfere with the use of the device. To install vertical strips on the inside of the device, you will need to select two grooves in a horizontal 11x25 mm strip using a chisel. All wooden parts are made of laminated pine timber. To prevent the absorption of moisture from the solution, the surface is varnished. Note: using the thumbwheels on the studs, you can adjust the width of the structure and work with wider or narrower bricks. The inner part is tightly fixed, only the outer side of the device can move.