Finishing facades with finishing decorative relief plaster is extremely popular. This is an inexpensive, durable coating used for the primary finishing or repair of facades of public, industrial and residential buildings, as well as interior spaces.
There are many types of plaster mixtures for facades on the market. The finishing decorative plaster “American” enjoys well-deserved popularity among them. Based on the material, the façade technology is called “American”.
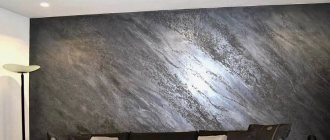
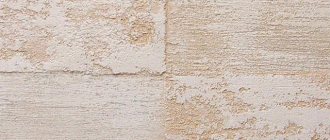
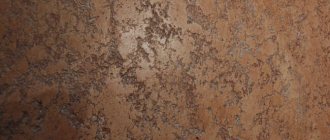
This is a relief plaster mixture that came to the Russian market from Latin American countries. It consists of binders - lime, silicate resin, cement, gypsum and fillers with different grain sizes. Due to the filler, a relief pattern is formed on the wall. After applying the finishing layer, the walls take on the “after rain” look. The filler resembles drops from a tropical rainfall, forever frozen on the wall.
What is an American
American decorative plaster is a finishing material used for exterior and interior decoration of premises. It appeared many centuries ago in Latin America (hence the name “American”), but it came to the CIS countries only in the 90s.
How to apply “American”, video
You may be interested in a very detailed description of Venetian plaster and how to apply it
Similar articles
- Cladding the facade of a house: choosing which material is better
You can decorate
the facade
of a house
with plaster
systems.
Textured plaster
of the “lamb” type: “
American
” texture Read more - Planken facade
Planken is a wooden board that is chamfered on each side. Recently, this material has been especially popular among craftsmen... Read more
- Facade plaster: features and types
Construction of houses is not only the construction of basic structures and finishing of premises, but also work related to the improvement of
facades
. Read more - How is reinforcing mesh used for a wet facade?
Before the advent of the technology of
facade
plastering on a grid,
the plaster
layer was strengthened using thin wooden planks. Read more - Which is better: siding or plaster
Facade
of a private house.
Which is better: siding or plaster
.
...
When making your own
plaster
mixture, you should not forget about the need... Read more - Universal technology for plastering facades using…
Therefore, a dowel with a plastic head is used for
façade
plastering
systems . To ensure the quality of thermal insulation… Read more
Advantages and features
The “American” gained high popularity among customers and builders not by chance, but for its many advantages:
- Suitable for almost any material: chipboard, concrete, brick, wood and others.
- Has good thermal insulation.
- Suitable for both external and internal work.
- It is resistant to high humidity, so it is often used, for example, in shower rooms.
- Hides small wall defects.
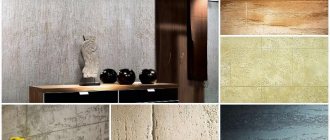
- Thanks to different fillers, it can imitate different materials: wood, leather, marble and others.
- Interesting design solution.
- Looks great in person and in photos.
Variety of shades
The palette of silk plaster is represented by a huge number of available colors. The basic tone is white, there are also standard shades - silver, golden, milky, beige, peach, grayish, light blue, pale pink. There are colors in the palette for bright interiors - options of green, burgundy, orange, yellow, turquoise, blue, brick and sand tones. You can choose cool grayish shades or warm mint, coral, caramel and lilac. It all depends on the imagination and sense of taste of the designer.
Blue plasterSource remont-decor.in.uaVarieties by composition
“American” is usually divided into four main types based on composition:
- Mineral. It is distinguished by the presence of lime and cement in its composition. Walls covered with such plaster are considered “breathable”, since one of the key properties of this plaster is vapor permeability.
- Polymer. This plaster contains a polymer resin, which protects the plaster from various negative influences of the external environment. Also, thanks to special additives, the material can be given a variety of textures, creating, for example, the effect of leather or fabric.
- Silicate. Contains glass and also has excellent protection against mechanical stress and an antifungal effect.
- Silicone. Includes silicone resins and fine filler such as sand or marble dust. It has the best protection from weather influences, therefore it is used in external work.
The facade of the house is made by American
Kinds
Depending on the size of the filler and the area of application, there are several types of dry plaster mixture:
- Facade - characterized by large filler. It does not collapse under the influence of precipitation, does not crack due to temperature changes and the negative effects of ultraviolet radiation.
- Office - has a medium filler size and high resistance to abrasion and mechanical destruction. Used for finishing interior hangings with high traffic volumes.
- For finishing residential premises - it is distinguished by a small filler. Not used for finishing facades.
Application
Most often, “American” is used for external work on private and public facilities. However, due to its low maintenance and ease of use, it has become popular for interior decoration of both residential and office premises. Thanks to it, external walls are protected from moisture and heat-resistant properties at low temperatures are increased.
Depending on the type of plaster and the additives included in the composition of the “American”, its individual qualities are improved, for example: protection from mechanical stress, heat resistance, moisture resistance and others.
Also, using plaster, you can make various decorative elements: arches, columns, figures and combinations with other materials. Therefore, “American” is used in many design styles.
American in the interior
Advantages
Cladding a house with “American” provides a number of advantages compared to the use of other finishing facade materials:
- The plaster mixture can be applied mechanically using a portable or stationary pneumatic sprayer. This significantly increases the speed of surface processing and reduces labor costs.
- High strength and wear resistance. The plaster layer protects well from precipitation, while maintaining a high level of vapor permeability. This is an important parameter for a material that is used to decorate the walls of rooms with high air humidity.
- Decorative plaster acts as a heat-insulating material. Finishing the facade with “American” significantly increases the energy efficiency of the entire building.
- Attractive appearance. Relief plaster can be painted in any color, making the interior or exterior of the building unique and memorable.
- The facade of the house, finished with “American”, does not require special care. Dust settles on the outer surface without penetrating into the structure of the material. The façade is easy to clean using household cleaning products.
- Finishing walls with “American” type plaster is cheaper than using similar materials and technologies. Its structure allows you to remove small irregularities and differences in height within the boundaries of one wall.
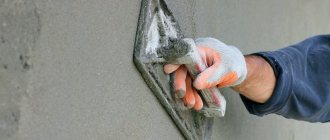
Application technology
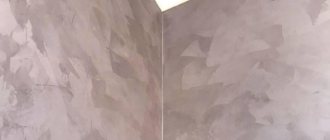
The composition is applied to the surface in the form of an uneven coating, after which a pattern is formed that resembles frozen raindrops. Depending on individual preferences, it can be applied both to a painted surface and to dried plaster.
Smoothed splashes of plaster on an already painted wall
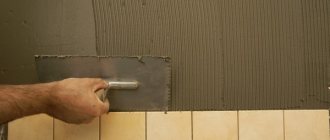
Manually
If the wall is prepared, then the first step is to apply a preparatory layer of plaster. After it has dried, the wall is re-primed, and after drying, a new layer of mortar is applied with a spatula. Then, using a roller or grater, you need to create the necessary texture.
Note! It is necessary to create a relief immediately after applying the solution. This is due to the fact that after it begins to dry out, it will no longer be possible to form a high-quality texture.
After this, the walls dry for approximately 24 hours. The dried surface is then treated with a sanding block, giving it a more pleasant appearance. It is also advisable to coat the surface with varnish, as this will significantly simplify the care of the wall and protect it from stubborn stains.
Splashes are smoothed with a trowel
Mechanized method
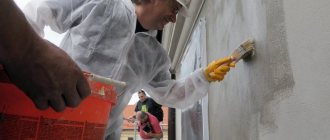
For the mechanized method, you will need a pneumatic sprayer, the tank of which is filled with a plaster solution. With its help, the entire prepared surface is evenly covered.
It is better to keep the spray nozzle at a sufficient distance from the wall so that too much solution does not get there. Otherwise, it will drain and the work will have to be done again.
But you should not hold the sprayer too far away, otherwise a significant part of the solution will be sprayed into the air or onto the floor. Also, do not forget about personal protection: a respirator and goggles.
The closer the sprayer, the larger the droplets
The main advantages of this method are simplicity and speed. Therefore, this work is often trusted even to inexperienced builders. A trained specialist is able to cover about 250 square meters per shift. m. surface. As a rule, this method is used only for working with external facades of buildings, when it is necessary to quickly cover a large surface area.
It is not advisable to use this method in small rooms at home, since the solution splashes too much.
Tools for work
To dilute the mass, you will need a container, a construction mixer or a drill with a mixer attachment, or a wooden spatula (for manual mixing). The material is applied to the walls with a regular spatula, smoothed with a plastic trowel or grater, although professionals prefer to use a special triangular spatula with rounded edges. You will also need a roller with thick, medium-length bristles to give it a characteristic texture.
To apply the primer, you need to buy a regular foam roller or brush. The mechanized method uses a hopper bucket and a compressor.
American lining
Frame assembly
Frame for American lining
Cladding with clapboard begins with the assembly of the supporting frame on which it will be attached. Since the outer part of the building will be sheathed, it will be subject to dampness and additional load; therefore, special attention should be paid to the assembly of the frame.
To install the sheathing you will need:
- Hammer drill;
- Drill with attachments or screwdriver;
- Wooden beam 50x40 mm;
- Screws with plastic dowels 75 mm;
- Mounting brackets;
- Wood screws 25 mm;
- Level;
Initially, it is necessary to impregnate the beams for the frame with an antiseptic, so they will be outdoors and may be subject to the destructive effects of moisture.
Pre-impregnation of timber
After impregnation, you can proceed directly to the installation of the supporting frame.
Since this type of lining is mounted horizontally, the frame will accordingly have a vertical structure.
- First of all, at the corner of the building, using a level, a vertical line is drawn, onto which mounting brackets are attached using a hammer drill and screws with dowels. The brackets are fastened in a horizontal position in increments of about half a meter; at least two screws are used for fixation.
- Then the side legs of the brackets are bent so that a kind of groove is formed for the beam. Here it is advisable to make sure that the resulting groove matches the width of the beam.
- After fixing the brackets, a beam is inserted into them, which is secured in the brackets using wood screws. The remains of the fastening are bent outward.
In the same way, a beam is mounted on the other corner of the building, then a thread is pulled between them in several places, this will serve as a guide for you to install the intermediate beams. The distance between the beams should be about half a meter.
Note! You should be most careful when installing the first and last carriers, since they will serve as a guide for creating a single plane.
Insulation
Wall insulation
In addition to wooden lining, which in itself is a good heat insulator, in this case it is permissible to use mineral wool to create an additional barrier.
- The gaps between the sheathing are filled with cotton wool, however, if the space under the beams allows you to insert cotton wool between them, then, if possible, it is necessary to preserve the integrity of the insulation structure. This will make the insulation more effective. If this cannot be done, then the cotton wool should be cut into the necessary components.
- Then the insulation is fixed with screws or glue, and the seams are necessarily foamed with polyurethane foam.
- Lastly, the structure is covered with a hydro or vapor barrier which will isolate the insulation from external moisture.
Note! In some cases, the insulation is installed before installing the supporting frame, but this causes some difficulties with the subsequent assembly of the sheathing.
Do-it-yourself lining: let's look at the essence of the process - read here.
Frame covering
Method of fastening the lining
Cladding with clapboard of this type is carried out in a horizontal position, both from top to bottom and from bottom to top. A prerequisite is the installation of the lining with an overlap, when the upper mounting panel rises slightly above the lower one.
Thus, the seam will be protected from water ingress during rain.
- A hole about 2 cm deep is drilled from the side of the tenon; its diameter should correspond to the diameter of the head of the screw with which the lining will be attached.
- Then the self-tapping screw is screwed into the drilled hole and driven to its depth. After that, a wooden dowel of diameter is inserted into the hole so that it is slightly higher than the surface of the lining (1 mm is enough).
- Once the panel is installed, the hole with the dowel is carefully sanded, masking the fastening.
Note! Unfortunately, hidden fastening is not rational when installing this type of lining, since subsequently such fixing may not be reliable enough.
American paneling will allow you to create a truly Western style, without requiring the special costs of siding with solid wood. In addition, as you read above, its installation is quite within the capabilities of every person. By following the prescribed recommendations, you can get a truly worthy result of your efforts.
We set the dimensions in the turn signals of the VAZ 2114
Many people want to improve their front optics, because with good light, driving is much more comfortable and safer for you, as long as your light does not interfere with oncoming drivers. There are many ways to do this. But some people want to get a unique and unusual look by tuning their headlights. To do this, for example, they install additional dimensions in the turn signals or completely transfer them there, creating the so-called American style.
The American style is that the lights are constantly on, their bulbs are in the turn signals and most often they are orange.
American cars on the VAZ 2114 are a very common practice, with them the car really looks more interesting, besides, in the dark, any additional light will not hurt. In poor visibility, a car with such tuning is more noticeable on the road. But you need to understand that such a change can mislead other road users and sometimes cause accidents.
The yellow lights merge with the turn signals, and some road users may misjudge the situation. Therefore, it is better to use white dimensions, then the orange turn signals will stand out clearly.
The attention of traffic police officers to a car with such modification is increased, and they may stop you to check your documents more often.
When making an American VAZ 2114, everything must be done within the law; there are clear restrictions on any changes to the front optics. For example, you definitely cannot install red lamps, reflectors and any other devices with inappropriate color and operating mode. For such violations, a fine of 2,500 rubles was imposed.
Wall finishing methods
“putty” and “plaster”
The American method of applying is considered one of the simplest among decorative materials. At the same time, the price is also low. The first step is to prepare the solution according to the instructions on the package. The instructions will also include the recommended method of application and the tools needed. Typically, professionals use a special triangular spatula with rounded edges.
Advice! It is not necessary to treat the entire wall area with decorative plaster. It can be used to decorate fragments of a room: niches, doors, windows. Upon completion of the work, the wall will acquire a texture according to the selected mixture.
The main advantage of American is the ability to use it for walls in the bathroom, kitchen and swimming pool. An example of using this solution in the kitchen can be seen in the following photo.