If the tap does not turn off the water: what to do?
In life, unpleasant situations often occur related to water dripping from the tap in the bathroom or kitchen. Such a problem brings with it not only annoying sounds, but also significant material losses, which is especially disadvantageous for those people whose apartments have meters installed. Regular dripping of liquid from the tap leads to unsightly stains on the sink or sink, and, as you know, lime deposits are not easy to remove. Situations when the tap does not turn off the water happen quite often. What can be done in this case?
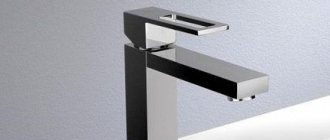
Installation of a water tap.
Problems that arise when operating a single-lever mixer
Although single-lever faucets are considered very reliable, they can also cause problems. Most often, repairs are required for leaks, cracks, decreased pressure, unsatisfactory adjustment (sharp transition from cold to hot water).
Problems under the sink
You notice constant dampness and notice water accumulating under the sink. What to do? The first thing suspicion falls on is the siphon or corrugated stainless steel hoses. If everything is fine with them and the sink is well sealed, then check the faucet itself.
Problems from above - troubleshooting faucets
- A typical problem with ball mixers is the rapid wear of the rubber or Teflon seats on which the ball rests. This causes water to leak. To prevent this malfunction of the mixer, you can change the seals every two to three years.
- Disc faucets break due to hard, clogged water. Chips and scratches occur on ceramic surfaces that fit tightly together. All this leads to leaks and reduced mixing accuracy. In this case, the cartridge needs to be changed.
- Another common problem with disc mixers is poor adjustment. This is a common problem with inexpensive models that have too low a setting angle. Choose cartridges and mixers from trusted brands and manufacturers, with a long service life, with an adjustment angle of up to 15°.
General problems - water leaking through the faucet
- An incorrectly installed lever can cause constant leaks in the kitchen. If this is the reason for unsatisfactory operation, then the tap must be rebuilt and the lever must be tightly adjusted during installation.
- Some faults require the installation of a new faucet. These are cracks in the mixing ball or in the housing. If there are cracks, then there is always a puddle of water near the faucet. The same can happen if the sealing rings in the spout block wear out.
- Also, the problem may not be related to the mixing chamber. A decrease in pressure usually occurs due to clogging of the aerator at the outlet of the tap.
Main Factors
The main reason that caused a plumbing fixture to leak would be:
- gasket wear;
- abrasion of the rod thread, as a result of which the gasket is not tightly connected to the saddle;
- loss of the initial qualities of the cushioning base, complete decay and other reasons.
Tools for changing the gasket in the faucet.
The faulty faucet must be disassembled, after which the indications for leakage should be determined. Whatever the consequences of a malfunctioning plumbing product, the water should first be shut off, and after that you can begin repair work.
If a completely new faucet leaks, we can talk about the presence of a manufacturing defect.
To solve this problem, you can consult a specialist and, if the diagnosis is confirmed, return the mixer to the store.
If similar troubles occur with a ball valve, then a number of problems arise here. Their main reason is associated with the entry of debris into the product body.
Tool kit
To carry out high-quality repair work, you need to take care of the following equipment:
- additional crane axle boxes;
- a set of keys;
- glue;
- screwdrivers of different diameters and types;
- several gaskets;
- fum tape or rags for plumbing work;
- electric drill;
- silicone seals.
Almost any person has most of the listed tools. If you don't have them, you can buy them in the store.
Instructions for repair and preparation for it
Once the cause of the leak has been determined, repairs can begin. But before that, you should stock up on the necessary tools and consumables. Most often, the following may be useful for eliminating leaks:
- fum tape as a sealant for threads;
- an adjustable wrench (or a set of open-end wrenches) to unscrew the nuts;
- screwdrivers with Phillips and flat heads. The latter is most often needed for old taps or to pry something off;
- pliers can be useful for unscrewing nuts in hard-to-reach places, as well as for removing faucet elements if they fit tightly in the grooves;
- gaskets for faucets and pipes if leakage occurs due to damage or wear;
- Cleaning and polishing agents (sponge, brush, detergents, wd-40) can be useful for cleaning faucet elements from limestone deposits or rust. You also need a rag to wipe away water or dirt in hard-to-reach places.
If the faucet was purchased not so long ago or a box was left behind, then it may contain a kit for fixing the faucet included by the manufacturer, for example, gaskets or replacement parts.
Fum tape can be used as a sealant Source kanalizaciyaseptik.ru
Replacing the gasket
Scheme for replacing the gasket in the faucet.
Having found out the main cause of the leak, you can resort to replacing the worn gasket. When the valve stem is tightly closed, the valve will allow water to pass through. The situation is aggravated by the excessive application of force when closing the mixer, which is unacceptable. Such phenomena can be observed when using taps from Soviet manufacturers, the seats of which were poorly milled, as a result of which the valve had to be tightened very tightly.
First, you should shut off the water that drives the flow to the faulty plumbing facility. Before carrying out work, you should still check that the shutdown has been completed completely. The old gasket is removed and a new one is installed. If a situation arises in which this spare part is not in the house, you should not start work with a complete replacement of the entire faucet. This small and important element can be made by yourself from any materials. A piece of leather or rubber is suitable as such a raw material.
First, take the old gasket and cut out a similar base on it, with a slightly larger diameter. After cutting, it is inserted into the socket. It is worth noting that the rubber element is unable to fit closely, so good density will be difficult to achieve. A leather gasket is necessary when the saddle edge is damaged. The new part must have a thickness of more than 3.5 mm.
If the tap is excessively noisy during operation, the edge of the gasket is cut at an angle of 45 degrees.
Step-by-step process for replacing the gasket in the mixer.
The new part is placed so that it is most closely connected to the saddle. Then the plumbing device will work without noise.
The best rubber to use would be sheet rubber; if you don’t have one, you can use a regular shoe heel. In this case, overly flexible plastics or porous rubbers should be avoided.
All the described methods for changing the gasket are associated with repairing a cold faucet.
With the constant movement of hot water, such parts gradually deteriorate and fail. So, for hot taps you can use car tires, their surface is the strongest.
Key Usage
If, after removing the screw and wing, it was not possible to turn the rod manually, this can be done using an adjustable or open-end wrench that strictly matches the size of the screw. Using little effort, gradually loosen the rod from side to side. This will clear the surface of the ball from deposits.
Do not use pliers or pliers. Ball valves are made of fragile materials that are easily damaged.
All actions should be carried out carefully and with little effort, literally one millimeter at a time. Sudden movements and excessive use of force can lead to complete destruction of the valve or failure of the system, which will lead to dire consequences.
Do not carry out independent measures to open a jammed mechanism on the riser with hot water and heating system!
Crane installation
The majority of property owners resort to replacing plumbing equipment on their own. Often such actions need to be carried out during renovation work or when moving to another place of residence. Here you can see water leaking from under the stem. The basis for such phenomena will be the stuffing box, which does not fit tightly to the surface. It requires replacement or a stronger foundation.
To achieve maximum sealing, it is worth tightening the stuffing box. It is not recommended to use excessively sharp and rigid tools in the form of pliers or pliers. They can ruin the boundaries of the sleeve. To achieve better fixation, use a wrench or adjustable wrench. When tightening the stuffing box, do not apply too much pressure, otherwise the thread will be damaged, and then the valve will need to be completely replaced.
Diagram for replacing the oil seal packing.
After tightening the bushing completely, it is important to ensure that there are no more water leaks. If this phenomenon is still present, it is necessary to turn off the water and change the tap or bushing, you can add an stuffing box.
When carrying out repair work related to replacing a tap, it is necessary to ensure that the water is completely shut off, which will prevent flooding of neighbors.
Then you should pull out the sleeve and union nut, after that, using a convenient device in the form of a sharp knife or a small screwdriver, you need to remove the old oil seal and screw on the new packing material.
For such purposes you should use:
- linen thread or thin twine;
- burlap fibers;
- a rubber tube of a certain cross-section and dimensions.
Thin threads are wound in the direction of clockwise movement, carefully winding the turns. In order to improve the stuffing, the threads used are treated with a natural base drying oil.
You should show interest in the height of the recorded layer. Separate 2-3 turns should be free from packing, thereby avoiding the faucet being torn off when it is tightened. Water leakage can be eliminated by sealing the oil seal. Here you need to tighten the valve, then unscrew the cap nut and wrap the base with any suitable material. Once the union nut is secured, the faucet will no longer drip. Such actions do not guarantee long-term results, but as a temporary measure this option is not bad at all.
Features of the crane restoration procedure
It is worth understanding that the process of restoring a ball valve is quite simple, but it still requires careful attention. The big risk of this procedure is that during its execution there is a high risk of completely breaking the tap or injuring your hands, which is possible if the valve does come off.
In order not to break the edge on the rod, it is recommended to use a high-quality open-end tool rather than an adjustable wrench. During the installation of the handle, the threads of the fastening element and the rod should be lubricated with any grease or graphite lubricant. This will make it much easier and faster to remove the butterfly next time.
To avoid problems with the operation of the ball valve, you should turn it several times a month. The use of high-quality fittings at the time of installation of the element also helps to avoid its sticking.
In order for the ball valve to serve as long as possible, it is necessary to screw it on at least 4-5 turns.
Mixer installation
Mixer installation diagram.
The beginning of such work is associated with the installation of decorative overlays on the flanges. The gaskets are then placed on the flanges, with the black soft rubber piece being the first. Then you should fix the solid base of paronite in color. This installation procedure protects the rubber gasket during the process of screwing on the eccentric fitting.
The final stage of installation work involves tightening the union nuts manually and tightening them with a wrench or adjustable wrench. It is important to ensure that the rubber gasket does not bend due to excessive force. Otherwise, water will leak and the gaskets in the taps will have to be replaced.
The installation of a kitchen faucet must ensure that the spacer ring remains in its original form during operation and is not allowed to be crushed. The shower in the bathroom is fixed in a similar way. Two gaskets are used here: rubber and parotin. In some types of shower such parts are not installed.
If changing the gasket does not bring the expected results, you can resort to replacing the tap itself. Before installing a new plumbing fixture, the water should be turned off and the broken tap should be unscrewed.
When the cross-section of water pipes is such that the outlet pipes of the tap do not correspond to the established dimensions, the problem is solved by using adapter bushings; they have threads on both sides. Here the axis of symmetry shifts, and this makes it possible to connect pipes of a different size and diameter. As soon as the new tap is installed and the union nuts are screwed in, its condition can be checked.
Typical causes of malfunctions
Failures of plumbing fixtures are largely associated with low quality products. You should not save money when purchasing by purchasing cheap faucets from little-known manufacturers. As a rule, when assembling them, low-quality components and consumables are used, which quickly fail.
It may be advisable to abandon the usual sealing options in favor of new analogues: instead of rubber gaskets, it is better to use modern analogues made of paronite or silicone. Their service life is much longer, and they are less deformed over time.
Installing a filtration system on water pipes will not only allow you to use high-quality water, but can also increase the service life of plumbing products
A common cause of malfunctions of mixing devices is also water flowing in pipes. Foreign inclusions and a high content of mineral particles lead to the formation of deposits, clogged filters, and cracking of seals.
Repair of soured ball valve.
It is important to understand that this method only works in not very advanced cases. After such manipulations, the fluoroplastic seals inside the faucet may be scratched by salt deposits, and the faucet may not hold water pressure.
Never try to close it using pliers or brute force. In the best case, you will break the faucet handle or the internal mechanism will collapse - the ball itself or its rod. In the worst case, the valve body may burst and fall apart with all the ensuing consequences.
And so, in order to revive a soured ball valve, you must first unscrew the nut from the valve stem and remove its handle.
Under the handle there is a nut that compresses the fluoroplastic seal of the valve stem. We unscrew this nut a little with a wrench, literally half a turn, no more is needed. Here it must be said that such a nut is not available on all taps.
The valve stem itself has two flat parallel surfaces. We take hold of them using an adjustable wrench and begin to slowly and carefully turn the tap in different directions. First, a little in one direction, then in the other and gradually increasing the amplitude until it completely opens and closes. You don't need to put in a lot of effort. It is better to do everything more slowly, then there is a greater chance that the tap will not break.
Because the stem seal is loose, water droplets may appear from under the stem. It’s not scary, after all the manipulations we’ll tighten the nut and there will be no more drops.
If there is no clamping nut on the tap, then we try to unscrew it as is. If such a faucet begins to leak water from under the stem, it will have to be replaced.
To check the serviceability of the ball valve, you need to put a handle on the stem and turn the valve from lock to lock. If the tap rotates, then tighten the clamping nut and the nut on the rod.
Useful tips for operating a ball valve.
- To prevent the ball valve from turning sour, it needs to be serviced once a month. Just close it and open it all the way. This simple action will clear the salt build-up on the internal parts of the faucet, and then it will last a long time. It is convenient to do preventive scrolling by taking water meter readings.
- During preventive scrolling, you need to open the tap smoothly, first open it slightly, and then open it all the way. This is due to the fact that a sudden opening of the tap can provoke a water hammer due to water pressure and the water line can collapse in some place. This is mainly true for residents of high-rise buildings, where water is supplied to high floors under high pressure, and for owners of apartments with old metal water pipes. Metal pipes rust from the inside as the wall thickness decreases, and water hammer can lead to their destruction.
- If you have a sour faucet at the entrance to the apartment, then it is best to first turn off the water supply to the vertical main, the so-called riser. Only after this can you try to revive the soured faucet. If you don’t do this, there is a chance that the faucet will collapse and you will flood your neighbors. If you are determined, then be sure to prepare some kind of drain hose, tape, or rag. For example, a plastic corrugated hose from a siphon. It will be convenient to secure the hose with tape. If the faucet breaks, you can try to direct the flow of water into the sink, toilet or bathtub.
- It is also advisable to do work on crane resuscitation in the morning. In the event of an accident, you will have a better chance of calling emergency services and blocking the main line in the basement of the house, etc. Before doing this, you need to at least find out the phone numbers where to call.
- When choosing a ball valve, you need to be guided by its appearance and weight; the heavier it is and the thicker its walls, the more reliable the valve. The faucet must be made of brass.
- You can tell if a faucet is brass or not by looking into it. The inside of the faucet should be yellow. It is also worth paying attention to its weight. Brass ones are usually heavier than faucets made of silumin.
- If possible, choose faucets with a handle rather than a butterfly. They are easier to open and close, which is especially important for women.
- If the handle on a new faucet is difficult to turn, then you need to slightly unscrew the nut located under the handle, and the faucet will be easier to open and close.
- It is better to install a brass valve-type tap at the entrance to the apartment. Such valves are much more reliable than ball valves.
At the end of the article, I recommend watching a video on this topic.
Faucet broken? Causes of malfunctions and do-it-yourself mixer repairs
A faucet is a necessary attribute of any kitchen or bathroom. Cooking, cleaning and water procedures, of course, cannot do without his participation. Due to the fact that the mixer is subject to such frequent use, breakdowns associated with operation will not bypass any owner of a house or apartment. Since there are three types of faucets (single-lever, double-valve and touchless), the faults of each of them should be considered separately.
Breakdowns of single-lever mixers and their elimination
Reducing the flow volume from a faucet
Most likely, the cause of the malfunction was a clogged aerator - a special nozzle that is attached to the end of the gander designed for water outlet. The aerator saturates the stream with oxygen, and also helps to ensure that it is smooth and splashes water around as little as possible. The aerator can be made of either plastic or metal. To fix this problem, you need to remove the aerator from the spout and wash it. Often water has increased hardness, which contributes to clogging. After cleaning the aerator, you need to screw it into place.
Faucet leaking
This problem may be caused by a foreign body stuck in the valve discs or ball sleeve area. Since the valve plays the role of a regulator for opening and stopping the supply of drinking water, the foreign body located between its disks contributes to the fact that water continues to flow into the gander, despite the fact that the valve is closed. To fix the problem, you will need to disassemble parts of the mixer body. If the shutter is a ceramic cartridge, then it is impossible to disassemble and repair it. In this case, it is advisable to replace this part with a new one. A mixer with a ball cartridge can be easily repaired with your own hands. During disassembly, it is necessary to carefully inspect the seal, springs and other parts of the internal structure of the ball cartridge, remove blockages, and replace worn parts with new ones.
Breakdowns of two-valve mixers and their elimination
Leaks in double-valve faucets that have a ceramic cartridge inside can be eliminated in the same way as in the case of single-lever faucets - by replacing the cartridge. Since in this case the mixer has not one lever, but two, breakdowns are often associated with the valve system.
Water leaking from valve
Most often, the cause of this malfunction is a pin flying out of the rod. This situation can occur if the pin was initially inserted loosely into the rod, or if the hemp wound around it has worn out over time. To eliminate the leak, you need to turn off the water, then remove the flywheel from the valve head and remove the fallen pin. In order for it to fit tightly into the rod again, it is necessary to remove the old hemp and replace it with a new one. If hemp is not required, the pin just needs to be reinserted into the rod.
Leakage from under the spout union nut
The cause of such a breakdown is the wear of the rubber gasket. The union nut must be removed from the spout and the old rubber ring removed. The only correct solution to the breakdown is to replace the rubber ring with a new one. Most often, it becomes unusable due to the hardness of the water and due to the fact that a two-valve mixer often has a movable spout, the use of which contributes to abrasion of the rubber gasket located under the union nut. By the way, you can make a rubber ring yourself if you have rubber 2 mm thick.
Since the cause of faucet leakage is often precisely problems with the faucet axle, the simplest solution in some cases will be to replace the entire faucet axle - you will save a lot of time, which will be spent on finding the necessary parts and repairing the faucet by replacing individual worn out parts with new ones.
Breakdowns of touchless faucets
As a rule, touch faucets are the most durable, in contrast to single-lever and double-valve faucets. This is not surprising: they do not have parts that are subject to mechanical impact from humans. For touchless faucets, even the warranty period is set at 5 years and above. Of course, if it breaks, it will be difficult to find a repairman, because not every plumber will be able to understand how it works and what caused the problem.
Over a long period of operation, the sensors (infrared or with a photocell) that are responsible for supplying water when your hands approach the tap may fail. In this case, it is better for you to contact a specialist, because repairing such parts requires special knowledge. If the aerator breaks down, you can fix the problem by following the instructions, which are suitable for all other types of faucets.
Regardless of what type of faucet is in your kitchen or bathroom, from time to time it will require care and repair, because not a single thing can last forever, especially one that has to be used so often in everyday life.
And in conclusion, I advise you to watch a detailed video about the repair of mixers, which clearly demonstrates all the stages of troubleshooting their faults.
muzhik-v-dome.ru
Valve repair.
Hello dear subscribers and guests of the blog. In this article we will look at how to repair a water valve.
Previously, I wrote an article “How to shut off the water yourself,” in which I briefly discussed the issue of repairing the valve yourself if it is impossible to turn off the water supply. After some time, I noticed that people often came to this article from search engines using the queries: “how to fix a faucet”, “turned off the faucet and water flowed”, “the valve doesn’t hold, what should I do” and the like, but the essence came down to one thing — the average person doesn’t know how a valve or faucet works, doesn’t know whether it’s possible to restore the functionality of this important element of the water supply system, and when he came to my blog, he couldn’t find an answer to his question.
I decided to fill this gap and make a separate post on valve repair; plumbers call this an audit.
So, you are faced with the problem of turning off the water, I will try to help solve it.
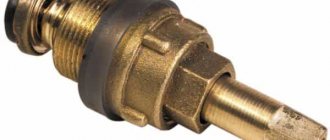
Regardless of what material it is made of, be it bronze, cast iron, or polypropylene, the device is identical. If a ball valve fails, it is easier to replace it with a new one rather than bother with an inspection. But let's talk about everything in order. Here is a cross-section of the diagram (click the mouse to increase the size).
1 - body; 2.13 - nut; 3.12 - washer; 4 — rubber gasket; 5 - valve; 6 - plumbing flax or gasket; 7 — rod; 8 — rod bushing; 9.16 — stuffing box; 10.15 - sealing sleeve; 11 - flywheel; 14 - clamping nut.
Possible valve malfunctions:
- wear of the rubber gasket, or its complete absence; - the valve has fallen off the stem; - there is a piece of scale, which prevents the gasket from being pressed evenly to the “mirror”; - the rod is bent; - the “mirror” of the case has scratches and pores. You can deal with the first three possible reasons yourself. I explained in detail how to replace the gasket in the video, located at the very end of the article. If the valve has fallen off the stem, you will have to tinker a little, but how to fix it will become intuitive when identified. I had a chance to fix it by tightening the top of the valve “seat” with pliers. If there is scale, remove it. If the rod is bent, it is necessary to replace it, or the valve axlebox completely. Be sure to make sure there are no scratches, chips, or pores on the “mirror” of the case; if there are any, there is nowhere to go - you need to change the valve. Another malfunction also occurs: a pin is screwed into the valve, onto which a gasket is placed and tightened with a nut; after long-term use, it sometimes breaks off, the rest of it must be drilled out, the threads must be driven out with a sword, and a new one screwed in - in general, you can deal with this problem yourself, of course. that this will take some time. If time is limited, then you will have to change the axlebox valve - this takes a matter of minutes.
How to fix a bathroom faucet: categories of faults,
The topic of this article is the elimination of simple malfunctions of shut-off mixers and fittings. How to fix a bathroom faucet if it starts turning? Is it possible to repair a valve that has stopped shutting off the water? What to do with a faucet that doesn't want to switch to the shower? We have to answer these and other questions.
Fault categories
First, let's list the main categories into which common problems with shut-off valves can be classified.
- The valve does not hold water.
Let us clarify: within the framework of this article we will consider only malfunctions of screw valves. Ball ones fail very rarely, while cork ones are actually not used in private and apartment buildings.
- Water is leaking from under the valve stem.
- The faucet or mixer lever does not turn off the water.
- Water does not flow when the faucet taps are open.
- Water does not switch to shower.
solutions and problems
valve
So, it’s given: when the tap on the water supply is turned off, water flows to the mixer.
What does DIY bathroom faucet repair look like in this case?
- We close and reset the corresponding water supply riser.
Advice: the riser in the basement is easy to find, based on its placement along a flight of stairs.
- After making sure that the water is shut off, unscrew the valve head with an adjustable wrench.
- We clean the valve seat from debris and deposits. If necessary, change the gasket. In the absence of a factory gasket, a replacement can be cut from a car inner tube.
- We assemble the valve by wrapping the head with a polymer sealing thread, FUM tape or paint-soaked flax.
- We start the riser and control the operation of the valve.
What to do if the faucet in the bathroom is broken and water invariably flows down its stem? In the vast majority of cases, it is enough to open the valve all the way. The thread of the rod with the help of a washer will also press the stuffing box or rubber seal to the stuffing box, and the leak will stop.
When the oil seal is completely worn out, it must be refilled:
- Close the valve.
- Open the mixer tap to make sure that the valve is closed.
- Sequentially remove the wing and unscrew the oil seal nut.
- We take out the seal itself - the bushing pressed between the valve head and the stem.
- We wind one or two threads of graphite seal around the rod.
- Reassemble the valve in reverse order.
Cranebooks and cartridge
Next up is the mixer. First, let's look at the main circumstances of different leaks.
Now it’s time for various blockages.
- How to clean the faucet in the bathroom if cold water does not flow to the gander ? To begin with, it is enough to open both taps completely and close the spout (gander) with a hardened finger. For most of the year, the pressure in the DHW system is higher than in the cold water system, and the clogging is often carried out of the supply by countercurrent.
- What to do if trying to push through the blockage with a counterflow did not help ? After turning off the water, remove the mixer and try to clean the pipes directly through the eccentrics with an improvised cable made from a metal string. At one end of the string, a handle is bent, which allows it to be rotated; on the other, a hook the size of a pinhead is made, which practically scratches movement in the lime deposits.
How to tighten the faucet in the bathroom after the pipes are cleaned? Use new gaskets under the eccentric nuts, if necessary, completely unscrew the eccentrics (clips), rewind them with synthetic Tangit sealing thread and center them on the mixer nuts.
- How to clean the faucet in the bathroom if both cold and warm water flow with minimal pressure ? In most cases, the clogging is caused by a filter on the gander. It is enough to unscrew it manually or with a key and clear it of accumulated sand.
By the way: filter blockages will become much less frequent if you remove the stainless mesh from it, leaving only the plastic aerator. The downside of the modification is that the sand will pass through the filter without being retained in it.
Switch to shower
Here are the common problems with shower switches.
Button
If it does not switch the water partially or completely, then the problem is most likely in the destroyed rubber valve. Either the rubber ring on the valve is changed, or, in the absence of appropriate spare parts, the entire switch. The price of a switch for domestic, Chinese and Polish faucets rarely exceeds 300 - 400 rubles.
Lever
If the lever switch does not switch to a shower or a gander with limited lever travel, the reason is the wear of the switch barrel or the guides in the mixer body.
How to unscrew the faucet in the bathroom to replace the barrel?
- The switch lever is removed.
- The nut and gooseneck with the shower adapter are unscrewed.
- The nut with the rod seal is unscrewed.
- The rod with the eccentric is removed.
- The barrel is pushed out with a pencil or screwdriver through the top hole.
How to repair a dripping faucet
Even the most reliable taps eventually begin to leak water - leaking or dripping. To fix a faucet, you don't always need to call a plumber. Most breakdowns can be fixed on your own. But, before you repair a dripping faucet, you need to understand its design and work procedure.
Repairing a faucet with your own hands is a task of average difficulty
Let's start with definitions. There are taps and mixers in the bathroom and not in the kitchen. Taps only supply water; mixers also allow you to regulate its temperature by mixing two streams - cold and hot water. In this article we will talk specifically about taps and how to repair them. Faucet repair is very similar, but has its own characteristics. By the way, you can read about repairing single-lever faucets here.
Do-it-yourself valve repair
Valve taps can be called classics of water supply. And, although they are gradually being replaced by new designs, there are still plenty of them. Their internal structure has not changed over the decades. Only the design has changed - it has become more diverse and sophisticated. Today you can find both the most ordinary models and very exotic ones.
Structure of valve taps
Water taps of this type are still used today, as they are simple and reliable, serving not for years, but for decades. If all the “filling” is of proper quality, all that can fail during this time is the gaskets. Replacing them is the main way to repair a valve.
Replacing the rubber gasket
If the faucet in the kitchen or bathroom continues to drip when the valve is completely closed, most likely the reason is that the gasket on the valve has lost its elasticity (see photo in the next paragraph). It no longer presses tightly against the saddle, which is why water continues to flow and sometimes the faucet not only drips, but even flows. To repair the faucet in this case, replace the gasket. To do this, you will need a wrench, or better yet, an adjustable wrench and a set of spacers.
Before fixing a dripping faucet, turn off the water supply (you can completely, you can only in this thread, if possible). Next, it’s a good idea to make sure that the water is turned off. The water doesn't flow - we're starting repairs. You will need a wrench or wrench. They will need to unscrew the head housing (the top part of the housing).
It is better to work with an adjustable wrench. To avoid damaging the surface during the operation, wrap it with a soft cloth and then apply the key. Unscrew the head and remove the valve. Now you can replace the gasket or install a new valve. You pry off the old one with something sharp - you can use a screwdriver with a flat blade, you can use an awl, etc.
When choosing a gasket, please note that its edges should be beveled at approximately 45°, otherwise the water supply will make noise during operation. If you don’t have one like this in your arsenal, you can trim the edge with something sharp - a knife or scissors.
Replacing the gasket in a faucet in pictures
If there is no suitable gasket, it can be cut from a sheet of dense rubber (porous is not suitable). The thickness of the rubber sheet or gasket is 3.5 mm, the inner diameter is slightly less than the diameter of the rod, the outer one should not protrude. Don't forget about the 45° beveled edges.
Having installed the gasket, put the valve in place and tighten the head. New models do not require winding on the thread. Moreover, winding is contraindicated - it can cause a crack in the body. If an old tap from the times of the USSR is being repaired, tow is placed on the threads, lubricated with packaging paste, and then tightened. After this, you can turn on the water little by little.
Sometimes the opposite story happens with this gasket on the valve - water does not flow or barely oozes out. In this case, the gasket came off the stem and blocked the flow of water. First, you can try opening/closing the tap a couple of times, and if that doesn’t help, you need to repeat the operation described above, that is, repair the tap by replacing the gasket. Just remember to remove the old one stuck to the saddle.
Water seeps out from under the stem
If water drips from under the valve, the seals are most likely worn out. There are two ways to repair a faucet with a leaking stem. To begin with, you can try to tighten the head housing more strongly. They do this again with an adjustable wrench. It is not advisable to use pliers, as they leave marks. Tighten the head as much as possible (just don't overdo it).
Valve valve structure
If the threads are tightened as much as possible and water continues to ooze out, the gaskets on the oil seal must be replaced. To do this, first tighten the tap to the limit, then remove the tap head again, pry it with something sharp and remove both rubber rings, replacing them with new ones.
The water does not shut off
If the gasket is changed, but the water does not shut off, when the tap is rotated, the thread breaks, the rod needs to be changed - the thread on it has worn off. There are two options here - replace the stem itself or the entire valve head.
There may be a hole in the saddle
If the threads are not worn, the gasket is new, but the valve is leaking, inspect the seat. There may be a hole in it. It forms gradually - it is washed away by water supplied at high pressure. If the gasket is not pressed tightly in some place, a sink will form in this place. Sometimes water completely undermines the entire circumference, forming sharp edges that quickly damage the gasket. The hole and sharp edge must be removed. Take a regular screwdriver and run it along the edge to dull the sharp edge. The same operation can be done using a natfil or a piece of fine-grain sandpaper. The main thing is to achieve a smooth (as much as possible) and non-sharp edge.
Tapping
To start, you can try tapping the stuck area using a small hammer, wrench or other suitable tool. The movements should be numerous, but not very strong, so as not to damage the structure. This process will help if the scale layer is small. In this way, the surface of rust and deposits can be deformed, which will help unscrew the mechanism.
How to fix a faucet with a cartridge
Most often, faucets with one lever are installed in the bathroom or kitchen. They are also called flag or single-lever. A special device, a cartridge, is responsible for opening/closing the water in it, which is why they are also called cartridge ones.
Cartridge tap
There are two plates with holes inside the cartridge. The lower one is fixed rigidly, and the upper one is movable. A rod is attached to it, and it, in turn, is attached to the handle. By turning the handle, we move the rod, and it moves the movable plate, which opens/closes the water and changes its pressure.
If there are problems with such a faucet, it can only be repaired by replacing the cartridge. The main problem with them is that they start to leak - water oozes or drips from under the handle. To repair a leaking or dripping cartridge faucet, you need to replace the cartridge. The only way.
Replacing the cartridge
The first step is to turn off the water, then remove the handle. To do this, first remove the colored plug - it covers the screw. After unscrewing the screw, pull the handle up, separating it from the stem. After the handle is removed, unscrew the pressure ring - it holds the cartridge. Now all that remains is to take it out.
Then, along with the cartridge, you need to go to the store or market and buy exactly the same one. The new one must match in size, the holes in its lower part must have the same shape and location. Basically, you need to find an exact copy.
How to disassemble a faucet with a cartridge
Assembly occurs in reverse order:
- place the cartridge (strictly vertically, twisting it a little around its axis so that the protrusions in the body fit into the recesses on the cartridge),
- tighten the clamping nut;
- install the handle;
- screw in the fixing screw;
- insert the plug.
An initial check can be done after the pressure ring has been installed. You can turn on the water and check if the tap is now flowing.
If the water flow becomes too weak
Most modern faucets are equipped with a mesh on the spout that traps solid particles that may be contained in the water supply. If the stream of water gradually becomes less elastic, and the pressure on other taps does not change, the reason is that this very mesh is clogged. In this case, you can fix the faucet in a couple of minutes.
Need to clean the mesh
Unscrew the nut with the mesh, which is located at the end of the spout. Rinse it, clean out clogged holes (you can use a needle or an old toothbrush). Place the cleaned mesh in place.
Types of lever faucets
The joystick mixer is a compact body with a lever handle. According to their internal structure, single-lever mixers come in ball and cartridge types.
Sectional view of the ball-type mixer mechanism
The design of a mixer with a ball mechanism means that water is mixed in a small ball located in the body and resting on sealing gaskets (seats). Three holes in the ball are designed for hot, cold and already mixed water. The space inside the ball is called the mixing chamber. When you turn the adjusting rod (mixer switch), the pressure of the incoming water, both cold and hot, changes, and its temperature and pressure at the outlet also change. It all depends on how much the hole in the ball and the corresponding incoming hole overlap each other.
To mix water, a cartridge-type faucet uses a cartridge made of a pair of ceramic plates (disks) with holes. In this design, discs replace a ball: the pressure and temperature of the water flowing from the tap depends on the degree to which the holes in the upper and lower discs overlap each other. If you have cartridge-type taps, then repairing a faucet in the kitchen or bathroom usually comes down to replacing the cartridge.