Nuances of repairing loggias
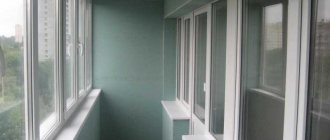
When arranging a loggia, it is important to remember that it can perform any function, but much depends on whether it is planned to be combined with a room. If combination is assumed, then the design solution will be similar to the one in which the living space is designed.
As well as functionality. Speaking of an isolated loggia, it can be turned into an additional room for any purpose.
If you have a small loggia, this is not a reason to despair. It is up to you to use the modest footage to your advantage. For example, you can make a comfortable seating area.
- In this case, it is better to choose a light color scheme – this will help visually expand the room.
- You should also avoid overly massive furniture and overly bulky accessories.
- Instead of bulky chairs, you should place comfortable soft poufs.
A couple of floor lamps, a compact coffee table, a warm blanket, several plants in pots - your interior will change beyond recognition.
Do-it-yourself step-by-step instructions for finishing a balcony with plasterboard
Step-by-step finishing of the balcony with plasterboard will be quick and easy. Just follow the recommendations below.
Step one. We install the sheathing.
If you are planning to cladding a gypsum board balcony, then remember: the result of all your work depends on the quality of installation of the sheathing. Under the plasterboard, the sheathing can be made of mounting wooden planks. You can also make a metal frame from a profile for gypsum plasterboard, it depends on your preferences.
We mount the lathing on the wall horizontally, at a pitch of 40–60 cm, taking into account the width of the insulation. Perform a double laying of the sheathing where the vertical joint of the plasterboard slabs occurs. The sheathing is secured with dowels or nails. The most important thing is that the planks on the surface must be attached as firmly and evenly as possible relative to the wall and the general level.
Step two. We lay insulation.
After the frame for the plasterboard is built, we fill it with insulation. We use polystyrene foam, mineral wool or other high-quality material.
We lay the insulation between the planks and secure it. We simply drive the foam between the wooden sheathing, this will be quite enough. If you use mineral wool, then to secure it you will need L-shaped hooks or dowels with a wide round mushroom-type cap.
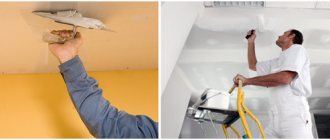
Step three. We provide vapor barrier.
At this stage, it is necessary to carry out simple manipulations with the rolled foil vapor barrier. It will protect the material from moisture. We place the vapor barrier along the sheathing on top of the insulation, attach it to the staples using a mounting stapler. The joints between the parts of the vapor barrier should be taped, this is the only way the coating will be airtight.
Step four . Installation.
It is better to start installing drywall from the side where you can fix the whole sheet or most of it. Thanks to this approach, you can use the material more economically without having to cut the gypsum plasterboard again.
Even a beginner can handle installing gypsum boards on wooden sheathing. Simply fix the bottom edge of the gypsum board onto the beam (sheathing), starting from the wall, level the sheet, and press it against the wall (sheathing). Screw in 3-4 self-tapping screws around the entire perimeter and check using a level.
As soon as the first sheet of material is mounted, focus on it and secure subsequent sheets. If necessary, the sheet can be cut to complete the surface finish.
So, your balcony is covered with plasterboard. What's next?
First of all, the gypsum board surface must be primed, seams and joints sealed, and putty applied. After this, we proceed to grouting and priming again, using steklohost where required.
Project development
Repairing a turnkey loggia requires a responsible approach. It is necessary to think through every detail in advance and take into account many points, including the architectural and planning features of the room.
- When creating a project, the first thing you need to do is decide on a budget. Then you should develop an idea, choose a color scheme and furniture items.
- Next, you need to decide whether to do thermal insulation work or not, and also clarify the type of repair and calculate the required amount of materials.
- After all the steps described above have been completed, it’s time to go shopping.
- When purchasing building materials, you need to focus on the established budget, measurements taken and the chosen style concept.
If you have doubts about your abilities, then when repairing balconies and loggias in an apartment, design work should be entrusted to specialists. This will help avoid disappointment.
Instructions for DIY interior step-by-step finishing of a balcony with wooden clapboard
Only using wood as a finishing material can you create an environmentally friendly, prestigious and respectable balcony. If you like natural materials, then feel free to choose wood for your balcony renovation.
It doesn’t matter how glazed your balcony is, in any case you will need to insulate the space from moisture and sudden temperature changes. How to achieve this? You can use wooden or plastic lining, depending on your taste. Either way, follow the recommendations below.
If you are looking for a material for finishing a balcony that will suit metal-plastic windows and create an atmosphere of comfort, then lining is exactly what you need.
The long service life of wooden lining is another significant advantage. The fact is that during the production of this finishing material it is impregnated with a special composition that preserves the wood.
Elegance and style are the best descriptions of a clapboard balcony. However, this material has a number of advantages:
- Step-by-step finishing of a balcony with wooden clapboard will go quickly, and the result will please you. The uneven surface of the balcony will be hidden under the lining;
- environmental friendliness of the material used;
- limitless flight of fancy in balcony design;
- increased heat and sound insulation;
- a natural microclimate is created in the balcony space: if the air humidity changes, the lining easily absorbs and evaporates moisture;
- The panels are attached to each other using the tongue and groove technology. This means that installation will be easy and the cost of work will be reduced. Since the joints are invisible, visually the coating appears solid. In addition, such a finish will not allow dirty air, dust, etc. to pass through.
Step-by-step finishing of the balcony with clapboard means that you will need to create a special design in advance. Lathing is required when laying a frame made of wooden bars (metal profiles). This design is located perpendicular to the wooden panels. If the installation will be carried out horizontally, then lay out the frame vertically. Due to this frame, the walls are insulated. To create it, you will need bars 60 by 60 mm, fixed in increments of 0.5 meters. Using insulation, we fill the space between them; mineral wool slabs or mats are suitable.
How is wood paneling installed? To do this, use grooves and ridges (when available) or the joint-to-joint method.
It is better to choose chrome screws with a semicircular head for fastening; nails are also suitable. Of course, the hats will be visible from the front side. To make it look nice, attach the nails at the same distance. Is there a tongue and groove? Then the nails will not be visible.
Wooden cladding should be varnished. If wooden elements are attached externally, then a special oil varnish is used to protect them.
Examples of design projects
Below are the most popular loggia designs.
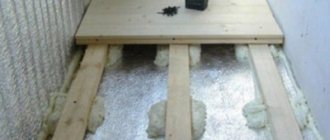
Laying lags
Often the balcony floor has an uneven surface because the house is not new. During operation, many cracks, potholes and irregularities form in it. Also, the floor is often not completely horizontal; it runs with a slight slope in the outer direction, designed to divert precipitation that gets inside.
If the unevenness on the floor is very pronounced, then leveling it with a cement screed means that the mass of the entire structure will increase noticeably. Also, after the screed is completed, the cement will dry, which will take a certain period; during this time, work will not be possible, so the repair will be delayed.
There is another option, leveling using logs made of natural wood (light wood species). Floor joists are wooden blocks with a square cross-section of 50x50 millimeters; you will also need plastic spacer wedges and anchor dowels.
Before laying the logs, you need to make sure that they do not rot. For this purpose, the workpieces are treated with impregnation or an antiseptic, then dried.
Before laying the logs on the balcony floor, it is covered with a layer of waterproofing film. Alternative methods are laying roofing felt or mastic with a bitumen base.
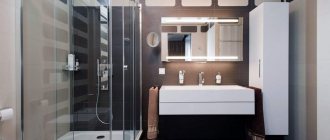
Loggia 3 sq. m.
Limited space requires rational use of every square centimeter and the use of a restrained nude palette.
Repair of loggia windows is required, which consists of installing “warm” double-glazed windows and a 10 cm wide window sill.
- The walls and ceiling should be painted light gray. When dry, the paint should form a matte surface. Gloss is unacceptable here.
- Designers recommend lining the partition under the windows with modified plywood in a dark gray shade, stylized as an old tree.
- It looks very beautiful and is ideal for a balcony interior.
- Porcelain stoneware is considered the ideal floor covering for a loggia. But it can be replaced with ordinary ceramic tiles.
- The main thing is that the color of the floor matches the color of the wall decoration.
The highlight of the loggia is 3 sq. m is a medium-width table with a rectangular top. It should be supplemented with a small bench.
Roman curtains, decorative pillows and fashionable panels are suitable as accessories. A modern lamp should be installed on the ceiling.
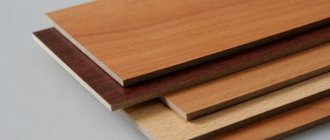
Step-by-step instructions for finishing a balcony with laminate yourself
Laminate is made from wood with increased resistance to mechanical stress. Laminate consists of many layers, the top of which is a protective decorative coating.
The main advantages of this material are as follows:
- increased wear resistance;
- fire resistance;
- a huge selection of panel appearance;
- ease of use.
Step-by-step finishing of a balcony with laminate consists of two stages:
- We install the sheathing.
The better the installation of the sheathing is done, the more reliable the structure will be. Using the slats, we will make sure that the walls are even. To do this, we run the strip vertically along the surface. If there are depressions, mark them with a pencil. We remove all bulges with a chisel or scrape them off. Apply a layer of plaster.
We place an emphasis on the bottom so that the first row of panels can be laid on it. Using a plumb line we find the horizontal. We are looking for a place for a vertical supporting structure, taking into account the dimensions of the laminate. If the panels are large, the sheathing profile will run along the edges and in the middle of the board. Typically, the profile installation step is 40 cm. Using a drill, we drill holes into which we then insert self-tapping screws.
We begin installing the metal sheathing from the outer parts. We stretch a rope between them and use it as a guide for the intermediate profiles. Wooden slats will be attached to the sheathing. We lay insulation between the parts of the sheathing.
- Let's start installation.
We attach the first panel to two clamps. To do this, insert them into the grooves of the laminate and fasten them using self-tapping screws. You can also nail small nails, leaving a small gap, otherwise the material will begin to peel off and swell during the cold season.
We continue facing, moving clockwise. We rotate each subsequent panel relative to another board, so the locks will close. We apply sealant to the fastening areas to extend the life of the laminate and prevent moisture from entering. We fix the aluminum corners along the edge of the panels, also applying sealant to them.
Laminate is suitable for finishing a balcony only if you follow the technology for laying this material in a given room. You can do the installation yourself, just follow the described sequence. This step-by-step finishing of the balcony with laminate will delight you with a luxurious design that will not lose its attractiveness for many years.
Loggia 6 sq. m.
Photo of the renovation of the 6 sq.m. loggia. m clearly illustrate the fact that a large space opens up a wide field for the imagination.
Here you can not only functionally use square meters, but also introduce into the interior those decorative details that would hardly be appropriate if there were space restrictions.
- The recommended color scheme for a room of this size is warm, pleasant shades. They will create an indescribably cozy atmosphere.
- The walls should be finished with Venetian plaster, choosing a composition in beige-pearl tones. It looks impressive and stylish. In this case, you can do without any decorative addition.
- The partition under the double-glazed window should be coated with white paint and decorated with square panels in pinkish-chocolate tones, stylized as compact cabinets.
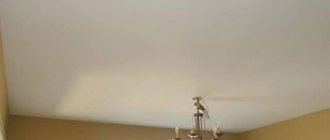
- A glossy stretch ceiling would be appropriate in such a loggia. It will allow you to visually expand it. As for the lamps, it is worth stopping at a chandelier with semicircular shades and several sconces. As for the floor, it is better to use laminate. It should be darker than the decorative panels.
- Blinds should be installed on the windows - they will protect the room from the hot sun. Wicker chairs and drawers, a round tea table, and a couple of modern linens will perfectly complement the decor.
Floor insulation
The floor should be given considerable attention, because comfort and coziness as a whole will depend on this in the future. And the first thing you need to do is level the base and eliminate all defects. If the loggia or balcony has old flooring, it will have to be removed down to the concrete slab. Next, a screed is applied to the base. In this case, it is recommended to use cement-sand self-leveling mixtures. This solution allows you to achieve the most even and smooth surface without much effort.
Do-it-yourself insulation of the floor on the balcony
Depending on the finishing floor covering, the subfloor parameters also vary. So, for tiles (ceramic or marble), you need to lay a layer of foam plastic on top of the screed, and then cover it with a thick film, on which the tile will be mounted. If parquet or laminate was chosen as the covering, it is recommended to use a cork-based substrate; such a layer also has heat-insulating properties. In the modern world, the “warm floor” system is increasingly used for installing floors on balconies. This design allows you to adjust the temperature according to your preferences and create a cozy atmosphere in the room in the most severe frosts.
Do-it-yourself laminate flooring for the balcony
Electrical wiring installation
It is recommended to wire electricity to the balcony, even if you do not plan to use it in the near future. After all, there is a high probability that you will need to connect some equipment, and then you will either have to start repair work again, or pull adapters from the next room, which worsens the appearance of the room. In addition, due to lighting, the balcony can easily be turned into a study or library, where it is convenient to spend time when it is dark outside.
Of course, the exact placement of outlets and lights should be carefully considered. After all, the comfort of the room will depend on this. With incorrectly located switches and sockets, it is quite difficult to arrange the necessary interior items. Since they often completely block access to the electrical element. Therefore, before you begin installation, you should draw at least an approximate design project, thanks to which the work will not only speed up, but will also be completed efficiently.
You should not carry out electrical work yourself. It is best to entrust the procedures to electrical installation specialists. Firstly, this way you can avoid injuries while connecting the equipment, and secondly, you won’t have to worry about the fire safety of the room in the future.
Oblique loggia
A room of this shape looks very unusual and opens up scope for the designer’s imagination. It is recommended to install panoramic glazing in such a loggia.
Double-glazed windows can be complemented with exquisite lilac tulle curtains. They will make the interior light and airy. But if necessary, you can hang thicker curtains.
- You will have to work hard on the floor design. The ideal option is ash and slate colored tiles. It is better to lay it in a checkerboard pattern.
- For walls, a lavender shade is preferred. White brick cladding is suitable as decor.
- Closer to the tapering part, you should organize a narrow desk on two legs.
- Wicker chairs without armrests will also fit perfectly into the interior.
- It is advisable to complement them with a glass coffee table.
- Shelves with live plants in pots, as well as hanging pots with flowers that match the color scheme of the room would be appropriate.
A good repair of a slanting loggia will allow you to enjoy being in it every day.
When decorating loggias and balconies, it is important to know that there are no strict rules here. This is a matter of taste, harmony and financial capabilities. You should also be prepared for the fact that prices for repairing a loggia can vary greatly, as they depend on its size, chosen style and purpose.
Step-by-step instructions for finishing a balcony with MDF panels
Balcony finishing with MDF panels is the most common. This material combines good design and high performance. Look at the photographs of balconies, the finishing of which is made of MDF panels: this material suits almost any interior style.
To begin with, we prepare the surface by marking sectors on it for the convenience of calculating the area for cladding. We determine the required volume of MDF panels. The panels have different sizes, so first you need to choose the material that suits you, and only then, based on your area, calculate how many units you need to buy. To complete the interior decoration of the MDF balcony, we add an additional 1-2 strips to the calculated amount of material.
Using putty, we eliminate unevenness on the walls and achieve a perfectly flat surface.
Where does the step-by-step finishing of a balcony with MDF panels begin? First of all, we mount the frame. Its base is made of metal profiles or wooden planks. We fix the structure to the wall using self-tapping screws or nails. We begin cladding the walls from the bottom up, securing the panels from the corner to the end of the row. Leave a distance of 2-3 mm between the sheets. We use sealant to strengthen the seams.
The balcony can also be lined with MDF sheets. In this case, 1-2 whole MDF sheets are enough to completely cover the balcony. However, installing such a layer of material will not be easy due to its heavy weight. It is recommended to buy several small sheets. This material is installed according to the same principle as the previous one. First, the frame is installed.
As soon as you finish attaching the MDF panels, you will immediately see the result of the work. Balcony finishing is complete! Even a beginner can perform such repairs on his own, without turning to professionals for help, and will require ordinary materials.
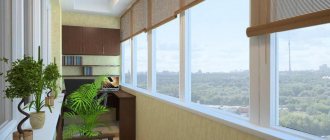
Photo of a beautiful loggia renovation
Lighting and socket connections
If the householder decides to connect the balcony to the electrical network, then this stage of work is carried out at the same time as the installation of the sheathing. Inside the balcony, electrical cables and other communications are laid, and the points where sockets and switches will be located are also determined.
Even before performing all operations, you need to decide how many lighting fixtures will be located on the balcony. You need to know, preferably accurately, about the total illumination power. Taking into account this value, the method of power supply is selected. It could be:
- Socket in the apartment, which is located at the shortest distance from the balcony;
- Junction box;
- Electrical panel
To protect these communications from any accidents, it is necessary to take the electrical wires into special metal sleeves, which will significantly complicate access to them.
Glazing
When it comes to how to make repairs on a balcony, first of all, the question of its glazing arises. To perform this type of work you can use the following materials:
- Metal-plastic. This is the best option for glazing your balcony yourself. The advantages of the material are a long service life and reasonable cost. In addition, it retains heat for a long time.
- Aluminum. This material can only be used if there are no plans to insulate the balcony.
- Tree. The main advantage of this material is environmental friendliness. Among the disadvantages, the following points are highlighted: high cost, short operational period, the need for regular restoration, lack of moisture resistance.
After choosing the glazing option, you can proceed directly to installing the profiles. The algorithm of actions will be as follows:
- A window frame is placed on the foam block fence. To do this, it is recommended to use an industrial level to fix the profile evenly. The frame is attached to the base using self-tapping screws or anchors.
- A window sill is fixed inside the balcony under the frame. A low tide is installed outside. Only after this the glass is installed.
- All cracks are sealed. For this, it is recommended to use polyurethane foam. This manipulation increases the sound and heat insulation of the balcony.
- Take a break to allow the polyurethane foam to harden. After this, using a stationery knife, carefully remove all protruding parts. The material is covered with special overlays to improve the aesthetics of the glazing.
Walls
Only those sides of the loggia that are not adjacent to the apartment should be insulated. Sheets of insulation can either be glued with glue and additionally secured with dowels, or placed in the spaces between the pre-arranged frame.
Then (in both the first and second cases) a layer of vapor barrier is laid. Finally, the finishing coating is installed, which can be used, for example, plastic panels or other materials.