A balcony or loggia for residents of cramped apartments is an auxiliary additional territory. It can be effectively used for various purposes, from storing unnecessary items to expanding useful living space. On the existing balcony you can grow flowers, create a cozy corner for relaxation, set up a workshop, office, or expand the space of the kitchen or living room. A prerequisite for transforming a balcony and increasing its functionality is high-quality thermal insulation. Insulating the floor on the balcony is an important stage when carrying out this type of repair work.
Materials used for insulating floors on balconies and loggias
Before starting work on insulating the floor on the balcony, you need to select the type of material for thermal insulation. The technological process and the choice of additional tools and parts directly depend on this.
Floor insulation with penofol
The following types of materials are used:
- Penofol is a roll insulation consisting of layers of foamed polyethylene and reflective foil. It is quite thin, used mainly as an additional element in combination with other insulating materials;
- Polystyrene foam is a well-known building material, rigid, and retains heat well. It comes in different densities and thicknesses, which allows you to use it economically, and the installation technology is quite affordable;
- Expanded polystyrene is foamed plastic, the second name is penoplex. Compared to conventional foam, it has an increased density, smaller pores, and a ridge profile, which eliminates the occurrence of cold bridges. This is the most expensive insulation compared to others;
- Mineral wool is a soft insulation that cannot hold its shape. When using mineral wool, it is necessary to make lathing with logs. A significant advantage is that small gaps can be filled with such insulation. Available in roll packs or in the form of mats. Before working with mineral wool, it is necessary to glaze the balcony, since it is a hygroscopic material.
- Expanded clay is a bulk heat insulator. It has obvious advantages - environmental friendliness, non-flammability. Produced in granules of various sizes, it is used as filling the space between joists, for mixing mortar for ceramic concrete screed.
Floor insulation with mineral wool
The type of insulation is selected taking into account the technical condition of the concrete slab of the balcony. The climate also influences the choice, since when the atmospheric humidity level is too high, it is not advisable to use soft insulation.
Materials and tools
Before starting work, you need to buy basic and auxiliary materials and prepare a set of tools. Materials you will need:
- insulation (its quantity is equal to the insulated area);
- Chipboard, plywood or OSB (chipboard is better, since it only exhibits linear expansion during fluctuations in humidity and temperature);
- waterproofing material (the specific choice of waterproofing agents will be discussed in a separate work);
- vapor barrier film (needed when using soft insulation);
- primer;
- wooden beam (specific dimensions depend on the thickness of the insulation);
- metal U-shaped supports for attaching timber or studs;
- polyurethane foam;
- self-tapping dowels for fixing supports to the base of the balcony;
- electrical tape (painting tape) for gluing insulation joints;
- wood screws for connecting the timber to the supports.
Attention: the tiles are laid on a screed, which requires completely different materials and tools, which you can read about in the material “Technology of wet floor screed with expanded clay.”
The tools you need to have on hand are:
- electric drill or powerful screwdriver;
- hammer drill (needed only for leveling the base of the balcony and removing the plaster layer from the bottom of the walls to the thickness of the thermal insulation);
- jigsaw or wood saw;
- construction knife with replaceable blade;
- roulette;
- construction pencil.
Preparation for thermal insulation
Do-it-yourself insulation of the floor on the balcony begins with preparing the surface. It is necessary to inspect the balcony slab and assess its condition. It may require some minor repairs. But first it is necessary to strengthen the outer wall and install aluminum or plastic double-glazed windows.
If the balcony fencing is a lattice covered with lightweight fencing material, then it is recommended to line the outer wall with foam concrete blocks. When cantilevering the slab, it is necessary to coordinate these actions with the architecture department, since it may be necessary to strengthen the load-bearing capacity of the balcony. If you need to insulate the floor on the loggia, approval is not required.
Possible mistakes
Problems can be caused by poor glazing. If there are gaps in it, no amount of insulation will protect sufficiently. And also misses are:
- using gypsum putty on the seams instead of polyurethane foam (putty contributes to the appearance of cold bridges and condensation);
- refusal to use vapor barriers;
- insulation of only external surfaces while ignoring internal walls;
- insulation work without permission and drawing up adjusted plans;
- performing work in winter (only very few top-level professionals can do this correctly);
- excessive thinning of the insulating layer;
- removal of the battery.
Repairing the floor before starting insulation work
If the surface of the slab is smooth, without flaws, or is lined with well-fitting tiles, then this step can be skipped. If there are cracks, gaps between the floor and walls, unevenness and other defects, they must be eliminated:
- Protrusions and irregularities need to be chipped off;
- Cracks on the surface of the slab should be widened and split to be more densely filled with repair mortar, then primed;
- Wide cracks near the walls can be filled with special polyethylene foam rollers, which tightly fill the gaps, and then cover with polyurethane foam;
- After drying, the entire surface must be leveled with cement mortar.
How to insulate a balcony floor from the street
Insulation of a balcony slab is carried out according to the following instructions:
- Initially, inspection work is carried out on the outer part of the balcony slab, eliminating defects, chips, and cracks. There are many of these if the screed is old. Be sure to strengthen the edges of the structure with cement mortar. It is unacceptable for the reinforcement to be visible and for the concrete to crumble in these places.
- Afterwards, cobwebs, dust and debris are removed from the outer surface. For this purpose it is better to use a special soft brush.
- Then the structure is measured and determined with a sufficient amount of external insulation. It is cut in accordance with the specified dimensions and shapes of the concrete slab. Be sure to make fragments 10-20 cm wide. They will be necessary to reach the lower part of the walls.
- Then the concrete base is primed, then glue is applied to the heat-insulating layer and attached to the balcony base. An assistant will be required for this manipulation, since it is necessary to hold each edge of the insulation pressed against the concrete screed for several minutes. Gluing the insulation begins from the wall of the house. Finally, the parapet is edged using pre-cut fragments of thermal insulation and placed on the same glue.
- The entire surface is sealed in the same way, and after complete drying, the seams are coated with Tilit or special mounting tape that is suitable for the selected thermal insulation material.
- Upon completion of the insulation work, the heat insulator is hidden under the finishing coating. This can be a special plaster with waterproofing.
On a note! It is better to entrust the work of gluing the balcony base from the outside to specialists, especially if it is at a sufficient height. Also, in case of high climate humidity, before attaching the insulation, it is recommended to cover the concrete slab with a liquid waterproofing agent.
Balcony slab that needs external repairs and thermal insulation Source troitsk.okna-servise.com
Floor waterproofing
If there is a neighbor’s insulated balcony or loggia below, then waterproofing will not be needed. In other cases, moisture may penetrate through the reinforced concrete slab structure and must be corrected.
You can perform waterproofing when insulating the floor on a balcony in the following ways:
- cover the surface with a special composition that closes microcracks and pores of concrete, preventing the diffusion of moisture. This is "Penetron" or "Hydrotex". They are applied with a roller or a brush on a long handle in several layers, with a new layer being rolled on only after the previous one has dried;
- perform coating waterproofing with a mixture based on bitumen or polymer. First, the primed surface must be degreased with a brush or brush. Apply waterproofing hot or cold, following the instructions, in at least two layers. After drying, the compositions form a dense film.
Important: Bitumen coating is not durable, it does not withstand negative temperatures well and begins to crack. It is recommended to use more elastic compounds for waterproofing.
When waterproofing with film, a dense film material is laid in one large sheet on the surface to be treated. In this case, the edges of the film are raised 10 cm above the level of the future floor and secured to the walls with masking tape.
With this method, the most important thing is to ensure the safety of the film; cutting and piercing it is unacceptable;
Waterproofing with roll materials is a reliable and easy-to-use type of insulation. With this method, hot bitumen mastic is rolled onto the surface of the balcony slab, onto which the rolled material is glued. You can also perform this operation in several layers, coating each with hot mastic. The sheets of each next layer are laid perpendicular to the previous one. Another, more convenient option for roll waterproofing is a modern material with an adhesive strip. I lay the canvases overlapping, having first removed the protective film, and fix them tightly.
After completing the waterproofing of the floor, you can begin insulation work.
Tips for installing Penoplex
- If installation of insulation in two layers is required, then the slabs are arranged in a checkerboard pattern;
- recommended screed thickness is at least 4 cm;
- if the screed is reinforced, then the distance from the insulation to the reinforced fabric should be at least 1-1.5 cm.
Using Penoplex, you will reduce heat loss in the room, a significant part of which occurs on the floor.
And with a “warm floor” system, the material will not allow the loss of precious heat, heating the ceiling to the neighbor below.
Installation of Penoplex is easy, and the result will please you for many years.
Source: floordigest.ru/ustroystvo-montazh/uteplenie/uteplenie-pola-penopleksom.html
Insulation of the floor of a balcony or loggia with lathing
There are various options for performing such work. Regardless of the type of insulation, the insulation process is carried out according to the same principle: a sheathing of bars or boards is installed, and insulation is placed or poured into the resulting cells.
First you need to find out the distance by which the floor will need to be raised, not counting the thickness of its finishing coating. Usually the balcony covering is made at the same level as the floor of the room or slightly lower. Then you need to choose a method that will raise the level. Next, you should prepare the elements of the sheathing - mark them, cut the bars and boards. All wooden elements must be treated with an antiseptic and dried. Now you can start installing the sheathing.
Installation of sheathing using U-shaped parts
As support posts, it is practiced to use bent U-shaped strips of metal, which are rigidly attached to the concrete surface with anchor bolts. They are installed first along the long side in increments of 50 - 60 cm, one or two rows in the middle, which depends on the size of the balcony. You need to mark the slab. It must be taken into account that a gap of at least 50mm must be left between the timber and the wall.
Using a level, a zero mark is made on the wall, along which the top of the joists and cross members will be leveled. The bars are inserted between the profile flanges and secured with self-tapping screws to the required height. Holes are cut in the insulation, it is “put on” the racks and pressed against the slab. The remaining areas are also filled with insulating material. After this, a second layer of insulation is applied.
Installation of sheathing using studs
The studs cut into the concrete surface of the slab. In their upper part they have a thread that allows you to conveniently install logs and adjust the height. Marking is carried out similarly to the first method.
Lathing made of bars
You can build a sheathing without using metal stands using wooden blocks fastened with corners. The bars laid near the walls are attached to them with anchor bolts. In this case, the difficulty is that the surface of the slab must be carefully leveled, since it is quite difficult to adjust individual positions in height.
Lathing made of two layers of bars
If you do not need to raise the structure high, then you can build a sheathing from two layers of bars, which are laid mutually perpendicular. It is recommended to install the second row after laying insulation in the cells between the lower guides.
Lathing from boards
This is a simple method when even, fairly wide and thick boards are placed on edge, retreating from the wall by 5 cm. Insulation is placed in the gaps to form a protective layer. The exposed boards are attached to each other and to the slab with a metal corner profile.
With any method of installing the sheathing, the insulation used is poured or laid out between the guides. If there are unsealed cracks, they are sealed with foam or caulked with mineral wool.
It is recommended to lay a film on the finished insulation to protect against dust penetration. After this, you can begin constructing a rough or finished version of the floor.
Insulation with penofol and expanded polystyrene
With combined insulation, the procedure is slightly different:
- unwind a roll of penofol and cut a piece along the length of the balcony + 40 cm;
- lay the material on a clean and dry base, placing the edges on the walls of the balcony;
- the joints are sealed with aluminum tape;
- sawing timber along the width of the balcony;
- install the outermost logs at a distance of 5 cm from the walls;
- having retreated 50 cm from the first log, fasten the second one, and so on to the opposite wall;
- The location of the beams is checked with a level and screwed to the floor;
- the openings between the logs are filled with polystyrene foam boards to the thickness of the timber, the joints are foamed;
- cut off the penofol again and lay it on the insulation with the foil facing up, sealing the joints.
At this point the insulation process ends and the installation of the finished floor begins. If everything is done according to the rules, the balcony room will remain dry and warm even in severe frost. But the appearance of condensation will indicate an incorrectly selected insulation thickness or poorly executed waterproofing.
| Insulation | Thermal conductivity coefficient of insulation (W/m 0C) |
| Mineral (basalt) wool | 0,034-0,040 |
| Polyurethane foam slab | 0,022-0,026 |
| Sprayed polyurethane foam | 0,019-0,030 |
| Expanded polystyrene (foam) | 0,038-0,042 |
| Penofol | 0,047-0,050 |
Laying insulation
Each type of insulation is laid close to the sheathing beams. There are some features when laying different types of insulation:
- Insulation with foam plastic. It can easily be cut with a regular knife. The slab is cut to the size of the cells formed by the logs. If you plan to install a thick layer, then it is recommended to buy polystyrene foam not 100mm, but 50mm, and install it in two layers, shifting one above the other. All joints of foam plastic with beams, walls, all gaps should be closed with polyurethane foam to eliminate cold bridges;
- Insulation with penoplex. Its installation is similar to working with polystyrene foam;
- Laying penofol. It is usually used as a secondary material. It is attached to the surfaces using double-sided tape, and the sheathing is mounted above. Its protective foil surface prevents heat loss through the walls, but reflects it into the structure. Penofol sheets are joined with foil tape, forming a single sheet. Any other material can be used with it.
- Mineral wool. The most popular type of insulation, especially for installation on loggias and balconies. The undeniable advantages are light weight and environmentally friendly material. It is produced in the form of rolls or mats, which, when flattened during installation, fill all the gaps. It is recommended to lay a special vapor barrier film on top of it so that moisture from the balcony does not penetrate into the insulation;
- Expanded clay insulation is produced in three fraction sizes - large, medium and small. With large fractions - great for filling the free space between joists. Expanded clay of the middle fraction is used for mixing expanded clay concrete, which is also poured into the gaps. Ceramic concrete mortar, after leveling along the beacons, can be used as a basis for laying ceramic tile flooring. Expanded clay with small granules is used as a bulk floor.
Insulation with mineral wool
No. 2. Mineral wool
Mineral wool is a whole class of materials, the production of which is carried out from mineral raw materials by heating it until it melts, drawing it into separate threads and forming fibers. If blast furnace waste was used as a raw material, then the result is slag wool , if the basis was glass waste or silicon-containing rocks, then glass wool . Often, mineral wool is understood as stone wool , which is produced from basalt rocks. It has the best performance properties, and that is what we will talk about.
Stone wool is produced in slabs and rolls, but can also be in granular form and directed with a special installation onto the insulated surface to fill all the cracks. Whatever the form of mineral wool, its main advantages are:
- good thermal insulation properties. The thermal conductivity coefficient is approximately on the same level as polystyrene foam, so the material will provide excellent protection and will not release valuable heat;
- ability to pass air - the microclimate of the balcony will be in perfect order;
- non-flammability;
- noise insulation properties;
- resistance to mechanical damage;
- rock wool is not touched by rodents;
- durability;
- affordable price.
The combination of all these advantages explains the wide distribution of the material. It is worth noting that glass wool and slag wool will be cheaper, but they are more fragile, and all work will need to be carried out in protective equipment.
Insulation without lathing
How to insulate the floor on a balcony or loggia without lathing. To do this, you need to use the so-called “dry screed” method. This type of insulation has become widespread, especially in individual construction. Bulk flooring is perfect for balconies and loggias.
In this case, waterproofing made of polyethylene film is a prerequisite. It is laid out over the entire surface of the balcony. Along the perimeter, the film is attached to the wall with double-sided tape and damper tape to compensate for temperature fluctuations.
Beacons must be placed on the walls. After constructing the base, you need to carefully pour expanded clay onto the film in parts, and a little higher than the exposed beacons. Next, the bulk insulation is leveled using the rule. Plaster panels with a lock for connection are placed on top.
To reliably fix the joints of the plates, they are glued with a special compound. Any coating can be used as a finished floor.
Preparatory work
The first thing you need to do before insulating the floor on a loggia or balcony is to check whether the ceiling is well reinforced. For example, if the balcony is not reinforced with a lower support, then this deficiency will have to be compensated for, for which support brackets are used. Unfortunately, it is not always possible to install them, since this requires the consent of the neighbors below.
You can strengthen the balcony using a metal frame, which is mounted on top of a concrete slab and attached to the wall of the building. Installing such a frame allows you to reduce the load on the floor. However, in most cases, the balcony slab is initially laid on concrete supports, and problems do not arise with such a design.
The next important point is the material from which the outer wall of the balcony is made. Often, a metal lattice covered with sheets of thin material is used to make the outer wall.
If the floor slab rests on a reliable support, then the outer wall will need to be laid with foam concrete. True, such work will require coordination with architectural services so that problems do not arise in the future. The situation will be much better if the outer balcony wall is made of concrete - such a structure will not have to be changed or remodeled.
Next, the balcony needs to be glazed with high quality. The meaning of this stage is clear: in the absence of high-quality window frames or their poor-quality installation, all the heat will escape from the balcony to the street. The choice of suitable frames is completely individual: most often apartment owners choose reliable double-glazed windows with low thermal conductivity, but sometimes good wooden frames are chosen for balconies, which, if properly processed, can also retain heat well.
In any case, after installing the balcony frames, you need to start eliminating cracks and crevices. In addition to protecting against heat leakage, sealing various openings and sealing them will prevent moisture from entering the room.
This is important: any leaky joint can cause dampness, which will significantly worsen the performance of the insulation. After some time, mold will appear and all building materials will begin to deteriorate, and sealing the cracks is needed precisely to prevent such effects.
Wide gaps in slabs are best eliminated using special rollers made from polyethylene foam. By placing such rollers in the gaps and sealing them with sealant, you can achieve good tightness.
Often, insulation rollers are used instead of polyurethane foam to save money. This is done like this: first, a little foam is applied to the required place, and a roller is placed on top of it. When the foam expands, it will fill all the free space and provide a good connection to the seal. Small gaps can be eliminated using conventional sealant.
Having dealt with the problems at the joints and walls of the balcony, you need to start eliminating similar flaws in the floor. All cracks are cleaned of dust and various debris, after which the floor surface must be treated with a primer. After this, each crack is filled with a sealant or cement-based adhesive mixture.
Having noticed deep and narrow cracks, you need to widen them with a drill or grinder, and then fill them with sealant: in this case, the composition will penetrate well into the surface and fill the entire space.
When the repair composition has hardened, the entire surface of the floor and the lower part of the walls should be primed. This rule only works for concrete surfaces: if the outer wall is made of foam blocks, then it is primed along its entire height.
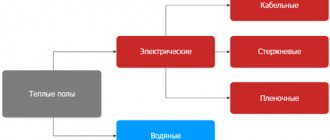
Installation of heated floors on the loggia
When repairing and insulating the loggia, you can build an electric heated floor. This will be an effective solution for creating a comfortable, warm environment, as it evenly distributes heat throughout the space. Before installing the electrical system, it is necessary to perform a screed to level the floor.
Then the cable is laid out in the form of a “snake” and attached to the tie with a special tape. The heating elements are poured with a leveling mixture in a layer of 15 mm. The covering is laid on top. Heating from the electrical network through a thermostat. Such flooring on a balcony or loggia can replace a heating radiator.
Balcony vapor barrier
After installing the sheathing (regardless of the method of assembly and fastening) and filling the voids with thermal insulation, it is necessary to lay a layer of film to prevent saturation of the protective layer with water vapor.
The material is rolled out over the surface and secured to the crossbars with staples for a construction stapler. The edges of the panels should overlap each other by 100-150 mm. Boards or plywood are placed on top of the insulation under linoleum or another type of finish.
Performing a vapor barrier on the balcony.
Comparison of thermal insulation materials
The table below gives a comparative description of popular heat-insulating materials. A meter-thick brick wall was taken as a standard for comparison: in the climatic conditions of the central zone of the Russian Federation, this thickness is considered sufficient for high-quality thermal insulation at average (not record!) winter and summer temperatures.
| Material name | Layer thickness providing thermal insulation equivalent to 1 m of brickwork, mm | Advantages | Flaws |
| Wood (timber, board) | 380 | Environmental friendliness, aesthetic appearance, you can do without finishing, high-quality sound insulation | Combustible, requires sheathing for fastening or leveling walls (floor, ceiling), not resistant to moisture, large thickness and high price |
| Mineral wool | 140 | Inexpensive and proven material, good sound dampening, low flammability | Requires sheathing for fastening, has a large thickness, surface finishing is required |
| Penofol, foil-coated on one side | 107 | High-quality thermal and sound insulation, resistance to moisture, ease of installation (especially for the self-adhesive version), environmental friendliness | The high price, due to foil when in contact with exposed wiring, can provoke a short circuit. Requires a ventilation gap, cannot be finished with wallpaper or plaster due to the softness of the material |
| Penofol, foil-coated on both sides | |||
| Penofol self-adhesive | |||
| Basalt fiber | 87 | Does not burn, has high sound and heat insulating properties, the slab version is quite easy to install | High price, need for lathing for soft rolled varieties |
| Fiberglass | 85 | Inexpensive, with good insulating characteristics | In case of fire, it melts and releases toxic substances; it requires protection in residential areas and during installation. |
| Styrofoam | 83 | Good thermal insulation, long service life, very low price, easy installation | Toxicity at high temperatures (depending on manufacturer), low sound absorption coefficient |
| Extruded polystyrene foam | 65 | Easy to install, good thermal and sound insulation, moisture resistance | High price, toxicity during combustion and high heat, fire hazard |
| Penoplex | |||
| Penoizol | 55 | Inexpensive, high-quality insulator, non-flammable, saves space | Requires pouring into prepared cavities, so it is of little use without major restoration of the balcony |
In the absence of strict financial restrictions and the desire to carry out all the work independently, mainly slab and roll materials are considered - mineral or basalt fiber, extruded polystyrene, polystyrene foam, penoplex, penofol. Next, the total area of the room and its permissible reduction are taken into account. For small sizes, it is advisable to insulate and sheathe the balcony with minimal loss of space, without installing sheathing or with a small cross-section. Thus, with relatively flat floors, ceilings and walls, we will consider in detail for the walls and ceilings: extruded polystyrene and polystyrene foam for plaster, double-sided foil foam for lathing with subsequent cladding. For the floor, we will accept two options - mineral wool in a lathing for a subfloor made of OSB, followed by laminate flooring, and self-adhesive mats for installation of an electric (cable) heated floor, followed by laying tiles.
We believe that balcony frames have an acceptable coefficient of heat and sound insulation and do not require additional insulation along the contour.