Why do you need wall primer?
The primer consists of water and mineral solvents. The primer covers the wall with a special film. First of all, the primer improves adhesion; it also smoothes out minor irregularities and strengthens loose walls. The primer acts as an antiseptic for walls, which is very important for rooms with high humidity.
When applying wallpaper to a treated wall, less glue is consumed. It is also important to prime the walls before plastering. The paint applies more evenly to the prepared surface and its color does not change.
The type of primer is chosen based on the functions assigned to the material.
Do I need to prime the walls before painting?
Novice finishers do not always understand why preparatory work is carried out. It seems to them that the most important thing is to level the base, then they can safely paint. In fact, this is not entirely true. Indeed, before painting it is very important to level the coating. There should be no differences, cracks or other defects. Therefore, the first step of proper preparation is alignment. It can be made in different ways: drywall, plaster, etc.
At the last stage, finishing putty is most often applied, which will become the base for painting. The next required step is priming. It is necessary because the soil:
- Strengthens the base. It binds weak, porous and loose surfaces into a single whole, making them more durable. Deep penetration formulations cope especially well with this. They are capable of going deeper by 80-100 mm, while conventional preparations do not go deeper than 20-30 mm.
- Improves adhesion or bonding of finishing material and base coat. Thanks to the primer, the paint stays better on the surface, preventing it from peeling and cracking. Moreover, during subsequent repainting it will be easier to prepare the base for work.
- Reduces coating consumption. After treatment, the absorbent properties of the base are significantly reduced. Thanks to this, about a third less composition will be required for finishing.
There are materials with special properties. They can increase the moisture resistance of the surface, prevent mold, etc.
Special primer Tikkurila Otex Akva 0.9 l
1 567
Buy
- Walls
How to prepare walls for finishing
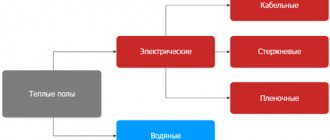
Types of primers for walls
Soil mixtures are divided into several categories.
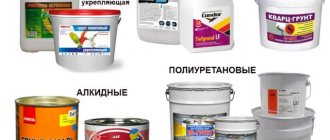
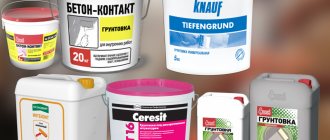
By composition (TOP 6 popular)
- Epoxy;
- Shellac;
- Latex;
- Water-dispersed;
- Alkyd;
- Acrylic.
By function (TOP 4 popular)
- Anti-corrosion;
- Deep penetration;
- Adhesive;
- Universal.
On the primer packaging, the manufacturer always indicates for which surfaces it is used and the primer consumption per wall per 1 m2. Universal primers are suitable for all surfaces, including iron and wood, but their effectiveness is average.
Conclusions on the topic
Let's summarize. The primer is undoubtedly a very important element in the repair chain. Although many masters often underestimate this mixture, it creates an excellent base, a strong foundation, so that your subsequent layers of the pie rest on it. We realized that it is impossible to replace the primer with water, and it can only be diluted with water if the manufacturer himself informs about this on the packaging; moreover, it must be diluted in the proportions specified by the manufacturer.
Thus, if you still have questions on the topic, we are waiting for them in the comments to this article.
Choosing a primer for different surfaces
The type of primer is chosen based on the material of the walls and the coating that is planned to be applied over them.
For fragile, crumbling walls, a deep penetration primer is used. It holds the wall together and prevents it from crumbling. A film forms on top of the wall, which repels water but allows steam to pass through.
For walls in the bathroom and kitchen, it is better to use a primer with an antifungal effect.
The composition of the primer solution for walls to be painted must match the composition of the paint. For example, if you purchased acrylic paint to decorate the walls, the primer underneath should also be acrylic-based.
To pre-treat the walls with primer on which the wallpaper will be glued, use a universal primer. If the walls are strong, it is enough to simply improve the adhesion between them and the wallpaper. In this case, there is no point in spending money on a more expensive soil mixture.
When can painting and gluing be done?
After applying the composition, the walls and ceiling must dry completely.
During this period, all repair work must be suspended to ensure the surface remains clean. Drying time depends on the type of base, humidity and room temperature, sometimes it takes 4 hours, and sometimes the whole day. If the place where the product is applied no longer sticks to your hands, it’s time to finish it with facing materials. A primer is necessary for high-quality repairs and durability of the result. Neglecting this procedure will lead to surface defects and imperfections, which will become visible to the naked eye after final finishing. In addition to the ideal appearance, the walls and ceiling will strengthen their strength characteristics and mold will not appear on them.
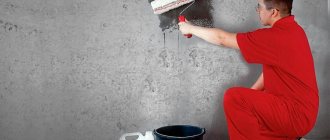
Applying a primer yourself (step by step)
The primer is applied to the wall in the same way as paint. Before application, the wall is cleaned of dirt and dust, and a protective film or paper is laid on the floor so that the solution does not stain the floor.
To work you will need:
- Brush;
- Roller on telescopic handle;
- Tray for solution;
- Ladder.
The primer begins to be applied from below. The primer strips are applied overlapping so that there are no dry spots left between the strips.
It is most convenient to apply the primer with a roller with a long handle, and in the corners with a brush.
The primer must be applied in two layers. The next layer is applied only after the first one has completely dried. How long it takes for the primer to dry on the walls is indicated on the packaging. Depending on the type of solution and room temperature, this can take from 4 to 12 hours. Paint or wallpaper should be applied only 24 hours after applying the second coat of primer.
Specific characteristics of solutions
If the room has special conditions, you may need to choose a special purpose primer. This could be a primer:
- Antiseptic. It contains an antiseptic that prevents the development of microorganisms. Protects the wall from the appearance of fungus or mold.
- Moisture-proof. Gives the surface water-repellent properties, which is necessary in rooms with high humidity.
- Deep penetration. Strengthens loose and porous substrates. Prevents peeling and cracking of decorative coating.
- Non-contact or adhesive. Improves adhesion to finishing composition. Used for non-absorbent smooth surface.
The packaging of the drug will necessarily contain recommendations for its use. The types of materials with which it is combined and the application conditions are indicated. This information should not be neglected. If the product needs to be prepared for use in some way, this should also be indicated.
Primer for dry and wet areas Axton, 10 l
324
Buy
- Walls
How to prime walls before puttying: simple instructions and tips on choosing a material
Primer consumption
The price of a wall primer largely depends on its consumption. The consumption of the material depends on its composition. The average is indicated on the packaging. The averages are:
- Deep penetrating primer – 160 – 180 g/sq.m.;
- Water-dispersed composition - 120 g/sq.m.;
- Acrylic primer – 130 – 150 g/sq.m.
Consumption is calculated as the wall area multiplied by the average. If the room has many corners or niches, add another 10-15%. If the primer will be applied in two layers, multiply the resulting figure by two.
Why prime an already painted surface?
You can also paint over a previously painted surface, although this is incorrect, such treatment is still practiced. In this case, priming the walls before painting is done if you plan to apply paint over the old layer of water-based emulsion, but in a different color. The primer will not allow the old shade to show through the new layer. We can say that the adhesive composition will act as a barrier.
If you prime a painted surface, the old shade will not show through the new layer.
If you are going to paint a wall that has previously been treated with nitrocellulose enamel or oil paint, you must first ensure that the surfaces are rough and then apply an adhesive compound. Without the sanding process, the painted surface will not last long, because roughness improves the adherence of the applied material. If a primer for water-based paint is applied to a surface painted with other types of paints, then it is best to use a composition called Betonokontakt.
Above we discussed penetrating primers, which are used to compact a porous or loose plaster layer. Concrete contact is an adhesive substance, the component of which is an acrylic binder. Cement, quartz sand and other components are also used as fillers in the composition, which help to increase the adhesion of plaster, putty or adhesive substances to concrete and other smooth and poorly absorbent surfaces.
Instructions for applying primer
Preliminary priming occurs in several stages:
- 1. The walls are cleaned of remnants of the previous coating and dust;
- 2. If the wall is uneven, it is first leveled using putty and plaster;
- 3. The plaster is allowed to dry completely within 24 hours;
- 4. The primer is applied first in the corners with a brush, then with a roller on large areas of the walls.
Types of surfaces
As a rule, when performing repairs, drywall, plaster, and wallpaper are painted for painting. Despite the fact that plaster is a moistened coating, ready for subsequent finishing work, experts recommend priming it before applying paint. This is due to the fact that the surface treated with a primer will not crack or crumble, thanks to the strengthening polymer components.
In addition, plaster is a porous material that can absorb a lot of liquid and therefore priming will help reduce the consumption of paint material.
Useful recommendations from the master
If the color of the walls is too dark, before applying primer, plaster them with a thin layer of white plaster. Then the concrete will not show through the wallpaper and finishing plaster.
To save money, you can buy not a ready-made primer mixture, but a powder that needs to be diluted with water. Preparing the solution will require additional time, but if we are talking about renovating a large room, powder mixtures greatly save the budget.
Always pay attention to the primer consumption indicated on the package. In pursuit of profit, you can buy cheap soil in a large bucket, which is only enough for half the room.
Before covering plasterboard walls with wallpaper, you need to cover the wall with primer in one layer, apply a thin layer of plaster, and apply another layer of primer. This is necessary so that in the future you can remove the wallpaper without damaging the drywall.
In order for the primer to adhere well to the wall, the room must be from +5 to +30 degrees with a relative humidity of no more than 75%.
Photos of the process of priming walls often depict not priming, but painting the walls. This misleads home craftsmen. Never replace primer with dispersion or water-based paint. It has completely different properties.
Alkyd primer cannot be used for drywall.
Never dilute the prepared primer solution with water.
It is not for nothing that the manufacturer indicates the drying time of the soil. This time is needed for the aqueous part of the solution to evaporate, and the dispersed parts remain on the wall. If time is not maintained, the finish will hold up even worse than on a wall without primer.
The primer allows you to make the walls more durable, and the decorative coating durable and beautiful. Priming the walls will not take much time if you choose a suitable solution, calculate its consumption in advance and follow our application recommendations.
Preparation for application
The primer goes on sale in a dry and ready-to-use state, which can be applied immediately. They also sell concentrated solutions, which are brought to readiness by diluting with water.
A ready-to-use product (for example, an acrylic primer) is stirred so that all components are correctly distributed throughout the composition, and then the required amount is poured into a container and processed.
Water-dispersed soil concentrate is diluted in a ratio of 1:4 (add 4 parts of water to one part of concentrate). The required amount of concentrate is poured into a clean container, and then water is added - thus obtaining the necessary portion of soil to treat a certain surface area.
The two-component primer is diluted in the following sequence: first, the hardener is introduced, and then the thinner is added to obtain the desired viscosity.
Dry soil is diluted with water in a ratio of 1:4. Alkyd primer compositions are diluted with solvent 649, 650, xylene, solvent (the proportions are indicated on the packaging). Oily soils are diluted with drying oil.
It is important to remember that the instructions for diluting the composition are consistent with the requirements of GOST; deviation from the proportions may lead to a violation of the work technology, and the base will not acquire the necessary qualities.
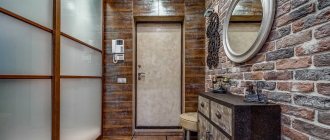
Photo of ideal application of primer on walls
Preparation and necessary tools
The method of applying the mixture is universal and is no different from applying other finishing materials. Immediately before applying the primer, any surface is cleared of the old coating, cleaned, sanded, and also degreased. It is worth noting that the number of approaches to priming walls is always strictly individual, but this must be done at least twice.
To apply the primer you will need:
- roller;
- brush;
- spray;
- capacity.
In each individual case and for each specific task, different tools can be used. For example, you can apply the mixture to a brick surface using a brush, but to smooth walls or plasterboard walls using a roller.
A spray bottle is also an excellent tool for solving such problems, but it is used less often, since after using it it is quite difficult to clean the entire room.
Application in plastering works
Plastering is the application of a finishing leveling layer to the primary stone surface. For example, a newly erected wall made of cauldron, fortan or aerated concrete must definitely be plastered with something, otherwise in a few years its destruction will begin due to erosion and weathering.
Moreover, such a building stone in itself is not a protective agent; it is only capable of bearing large static-mechanical loads, but in no way to be any kind of shield. That's why it is plastered on the outside.
You can say that cement plaster adheres well to all these materials and lasts a long time. Yes, it’s a long time, but how long? The real figures are that plaster in interior finishing conditions lags behind the main cauldron wall after 25 years. From gypsum partitions - after 20 years.
Outside, where thermal changes and humidity are particularly noticeable, these periods are reduced by another five years. And here physics begins to take its toll. Diffusion of mineral stone bases and cement mortars is minimal. Cement adheres to a stone wall only due to the presence of absorbent capillaries on the building stone. Water is absorbed into it, and it already contains the adhesive components of cement.
As you all know, cement dries within 30 days. This is, on average, plus or minus five days. But this is only what we see - so to speak, short-term ordinary people. In practice, cement takes 25–50 years to dry! Throughout that time he becomes stronger. And after this period, the reverse process begins, the cement begins to age and deteriorate. First, 50 dries and gets stronger, and then another 50 years crumbles and dies. For this reason, not a single modern building can stand for a long time, purely physically. Anything built on cement foundations will soon crumble. Of course, there are brands of cement, such as 900 or the fantastic 1200. This is not just cement, its strength is akin to basalt. Yes, this one will last for 400 years. It’s just that there is no such thing in the public domain, it costs fabulously and is used to create specific reinforced-stressed structures. So, we’re done with the excursion into the fate of cement, let’s move on.
That’s the point: cement does not always have ideal parameters, and sometimes 25 years are reduced to 15–20. And then the reverse process starts, in which the basic structure begins to collapse. Where is it least concentrated, in your opinion? Of course, in the same capillaries that hold the coating to the main wall.
In general, I think the process is clear to you. I won’t explain the physics of how soil works now, but that’s not the point. The main thing is that you know: when applying primer, you will extend this period by at least 5-10 years.