A small part of the apartment, located outside the load-bearing walls (balcony, loggia), can become another living room. But this requires a lot of effort: glazing and then insulating the balcony or loggia. However, reliable double-glazed windows and insulated walls do not provide the expected comfort without heating. As a last resort, such a room can be used in the summer and turned into a storage room in the winter. As a result: the efforts made do not correspond to the results obtained. You need a warm balcony that can be turned into a study, relaxation area or dining room.
It will not be possible to install balcony heating using central heating: there is a ban on moving the central heating system (radiators with pipes) outside the apartment. Therefore, there is only one option left: installing a “warm floor”.
For reference: the Housing Code of the Russian Federation states that in order to remove central heating pipes from a residential premises to a non-residential one, you first need to obtain the consent of all (namely all, not just one family member) residents of the apartments through which the riser passes, order a project and submit all documents to the BTI for permission. The chance of getting the go-ahead is less than 1%. It usually ends with the residents.
There are many nuances here: which of the available heating systems to choose, how to calculate its power and install it yourself. All this will be discussed below.
Warm floor on the loggia and balcony. Selection and installation features
In conditions of high housing costs, we value every meter and approach planning the furnishings of an apartment with special responsibility.
For this reason, the decision to install heated floors on the logjam and balcony, which can become another full-fledged room - a dining room, an office or a relaxation area, has become popular.
Insulating loggias and balconies is a smart investment that will allow you to expand your home recreation opportunities and also give your apartment individuality.
Within the framework of our article, we do not separate the concepts of loggias and balconies, since the process of insulating them is almost the same.
Installation of an electric heated floor on a loggia and balcony consists of the following steps:
- Strengthening the parapet. Refers mainly to the balcony and is required if the fence is a lattice. The parapet can be strengthened with brickwork.
- Glazing. Most often, double-glazed windows are installed, since they are the most airtight and, therefore, retain heat better.
- Insulation of ceilings and walls. At this stage you will need reflective thermal insulation material (with a foil coating), foam boards or other similar materials. They are attached to the wall and ceiling either with dowels or with a frame made of beams. The top of the slabs is covered with plasterboard, which is suitable for any decorative finish. Please note that at all stages of work it is necessary to carefully seal all joints! Without due diligence at this stage, the idea will lose its meaning.
- Installation of heated floors. Additional heating of the loggia or balcony is necessary because... thermal insulation only traps air, but does not heat it. The main problem of insulation is solved by the “warm floor” system. According to the housing code of the Russian Federation, it is prohibited to remove central heating outside the apartment; this threatens the failure of the entire system. Warm floors are the most logical option for choosing a heating system for a loggia or balcony, because both in size and in terms of energy consumption, it is much more convenient than IR heaters and radiators.
There are 2 options for turning a loggia into a living space:
- combination with a kitchen/room and subsequent insulation;
- insulation without combination.
Insulation and combination of a loggia (balcony) with a room
If you decide to make a loggia or balcony part of a common living space, you will need to dismantle the balcony door, and possibly also the window sill block.
This work will require additional resources, but in return there will be more options for interior and functional solutions.
Attaching a balcony to a room forms a single room with a common microclimate, for which the standard power of a heated floor is sufficient. This makes the choice of a heated floor for a balcony combined with a room or kitchen similar to the choice of a heated floor for any other living space.
For example, for a loggia combined with a bedroom or living room, under floor coverings such as laminate, carpet, parquet, the CALEO Line infrared film floor is suitable - the simplest and most economical model in the line of infrared film.
In the case of combining a balcony with a kitchen, on the floor of which it is planned to lay tiles, one of the possible options for a warm floor is a thin heating mat IQ FLOOR Mat.
Insulation of balconies and loggias (without combining them with a room)
If you do not combine a balcony with a room or kitchen, you do not have to dismantle the door, therefore, this option saves time and money.
There are four types of underfloor heating systems available for insulating a loggia or balcony. The choice depends on the type of flooring and installation method.
Heating cable is a classic system of electric underfloor heating, reliable and durable. Suitable for any type of floor covering. At the same time, this is the most labor-intensive option, since its installation requires pouring a sand-cement screed 3-5 cm thick.
The heating mat is the same cable, but of a smaller diameter, already attached to the mounting grid. Such a warm floor is installed in a layer of tile adhesive under the tiles (1-1.5 cm) or porcelain stoneware.
More on the topic: We insulate the floor on the balcony and loggia with your own hands
Due to the fact that the balcony is still an artificially insulated room, heating it requires a mat of greater power. That's why we recommend Thermomat 180, with which the temperature in your new room will definitely be comfortable.
Film flooring is designed specifically for dry-installed coatings - laminate, parquet boards, carpet. In addition, the warm film floor can be turned on immediately after installation.
The combination of these two characteristics is the advantage of infrared heated floors.
We have provided more detailed information about installing film flooring in this article. It is worth mentioning that it is possible to additionally insulate the walls and ceiling of the loggia with infrared film.
Rod floor also applies to infrared heating systems. It is mounted in two ways: in a layer of tile adhesive (for tiles or porcelain stoneware) and in a layer of thin screed in the form of a leveler (for laminate, carpet, parquet).
If you have chosen this floor heating system, then pay special attention to insulating the walls and ceiling to avoid heat loss. For cold rooms, such as loggias and balconies, the UNIMAT Boost infrared floor is designed. Installation of Unimat underfloor heating is shown in our article.
Also, for each of the heated floor options you will need a thermostat (thermostat). This device is designed to turn the floor heating system on and off, and also allows you to regulate the temperature and use electricity economically.
Only rooms with the most similar microclimate can be connected to one thermostat. This is important to know if you decide to combine a balcony with a room in which a heated floor is already installed: in this case you will not need a second thermostat.
If your loggia remains an independent room, a separate thermostat is required for it.
Source: teplyypol.ru/publikacii/stati-i-obzory/teplyy-pol-na-lodzhii-i-balkone
Purpose
Soviet-era apartment layouts provided space for installing a radiator. Today, most modern buildings with furnished apartments are built without them. Both in old premises and in new ones, the owners want to preserve maximum free space.
Central heating radiators take up a lot of space and are difficult to fit into the interior unnoticed. If this succeeds, the structure will take up at least 50 cm of area under the window sill. And if the room is large, then the lost territory adds up to tens of square meters.
Heating the floor on the loggia and directly in the apartment is an excellent alternative to central heating. The heat is distributed evenly over the area and the meters remain free for any fantasies of the apartment owners. The air in the apartment is heated from bottom to top, thereby creating a pleasant atmosphere in the room.
The most popular type of heated design is connected to a central heating system. The innovative type is called infrared and is powered by electrical power.
Types of heated floors
Electric heated floor on the balcony
You won’t surprise anyone by converting your balcony into a work office or a cozy relaxation area.
This idea is increasingly being used by owners not only of new buildings, but also of old apartment buildings. When arranging a new room on the loggia, you will need to install heating in it yourself, because... developers, as a rule, do not even provide electricity here.
Next, we will tell you how to make an electric heated floor on a balcony with your own hands, providing several short instructions with video examples!
Heating cable
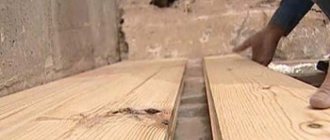
The most labor-intensive process is laying the heating cable on the balcony or loggia. If you decide to make just this version of an electric heated floor (as in the photo), then keep in mind that the height of the room will be reduced by 12-15 cm (due to the screed and insulation).
You should also understand that installing the heating cable and pouring the screed under it will take quite a lot of time. If you understand all this and still decide to heat your balcony with cable, then follow the following instructions:
- Remove the old floor covering and level the surface for the screed.
- Insulate the floor and walls using foil-coated polyethylene foam. Be sure to seal the joints with metal tape.
- Glue a damper tape around the perimeter of the balcony, which will protect the floor from deformation during thermal expansion of the screed.
- Attach a mesh or mounting tape to the insulation layer to attach the electric heated floor to the loggia.
- Attach the heating cable with the same pitch, which must be calculated based on the area of the room and the recommended heating power - 250 W/m2.
- Install the thermostat and temperature sensor in a suitable location.
- Test the circuit to make sure everything is connected and working properly.
- Take a photo of the finished electrical heating system so that if repairs are needed, you will know exactly where everything is.
- Take a photo of the finished electrical heating system so that if repairs are needed, you will know exactly where everything is.
- When the solution has completely hardened (in summer it is enough to wait a few days), you can proceed to laying tiles or laying linoleum.
If you decide to make an electric heated floor on your balcony using a heating cable, keep in mind that laminate and parquet boards in this case cannot be used as flooring.
More on the topic What you need to know before insulating a loggia and balcony with your own hands
Heating mats
Installation of thermomats on the balcony is much easier, because
This does not require calculating the conductor laying step and pouring a concrete screed. The advantage of heating mats is that they do not reduce the ceiling height as much.
If you decide to heat your loggia with electric thermomats, use the following technology:
- Prepare a suitable piece of mat to cover the entire area of the room. As a rule, thermomats are produced half a meter wide and up to 30 meters long. You can cut a suitable piece for your conditions. The main thing is not to touch the heating cable on the mesh.
- Lay the material on old tiles or concrete screed.
- Connect the temperature sensor and temperature controller.
- Check that the connection is correct.
- Paving tiles on top of the mats using special tile adhesive.
As you can see, installing an electric heated floor on a balcony with your own hands in this case is quite simple. Please note that thermomats are installed without the use of insulation!
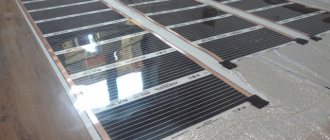
Infrared film
Well, if you decide to use laminate or parquet boards as flooring on your balcony, then the only option is to lay infrared film heated floors. Its advantage is the minimal thickness of the material, which will not affect the height of the ceiling in any way.
So, you can make an infrared heated floor on your loggia yourself using the following technology:
- Level the surface by making a rough screed (if the old floor has defects and unevenness).
- Lay down a layer of insulation.
- Install infrared film.
- Install the temperature sensor and thermostat.
- Connect the wires to the film, carefully insulate the connection points with bitumen.
- Cover the finished heated floor on the balcony with laminate or parquet.
This option for heating a loggia with electricity is the most modern and economical. The film has better heat transfer, because Some of the heat will not be spent on heating the concrete screed.
As evidenced by reviews on thematic forums, installing film heated floors on the balcony is the most effective option for electric heating.
So we have provided all the existing options for heating a room through the floor covering. We hope the material provided helped you find out what material to choose for your own conditions and how to make an electric heated floor on the balcony with your own hands!
Source: samelectrik.ru/kak-sdelat-teplyj-pol-na-balkone.html
Operational benefits
In cold weather, the flooring evenly heats the air and prevents the apartment residents from freezing. The air temperature in the lower part of the room will always be warmer than in the upper part. The heated surface conducts and releases heated air well. This ability is determined by the correct operation of the structure.
Another advantage is the surface area, which is much wider than the radiator area. The system itself was invented in ancient Rome. Since then, it has undergone major changes and been modified to suit modern realities.
The heating design does an excellent job of heating loggias and balconies. The area of these premises is small, and so is the consumption of materials. And the comfort from having a heated floor is immediately noticeable.
Main advantages:
- A modified heating system does its job much better than a standard one. More heat is released into the atmosphere, making living in an apartment more comfortable.
- Considering the amount of heat that is released into the room, the temperature of the heating element is low.
- The design looks stylish and invisible to the eye, saving valuable square meters of living space. It also does not require special care; all elements are hidden under the cladding.
- The heat is regulated by the apartment residents independently. This happens using an automated control panel. It allows you to keep the air in the apartment in optimal condition for a person, regardless of weather changes.
- The flooring has a long service life; immediate replacement is not required; the structure can serve for decades.
- You can install a heating system yourself, even if you have never done this before. No special equipment is required for installation.
- One of the most pleasant feelings is coming home from the cold and standing on a warm floor with cold feet.
But the heating design also has its unpleasant sides.
Installation of a water floor on the balcony
A warm floor on the balcony is a wonderful opportunity to make this room more convenient and comfortable, to create the most optimal conditions for the life and hobbies of home owners.
This article will discuss all the features and nuances of such a process as installing a heated floor on a balcony.
Which underfloor heating option is suitable for a balcony?
The best option, according to experts, is a water floor. Hydronic floor heating is one of the most popular heating systems; its popularity is due to its high availability and efficiency.
And installing such a warm floor on a balcony will not be difficult if you follow the instructions given below.
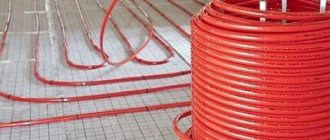
What are the steps involved in installing a warm water floor on a balcony?
- Surface preparation. The floor must be cleaned of dirt, dust and construction debris such as crushed stone. If there are any visible irregularities, they must be eliminated using a new sand-cement screed. Make markings on the cleaned surface: mark the areas between which you will draw so-called expansion joints.
- Insulation. Before laying a water floor, it is necessary to provide thermal insulation (otherwise the heat will go down). The thickness of the heat insulator material is usually from 30 to 150 mm. Choose the strongest thermal insulator for a water floor. Examples of such heat insulators include polystyrene foam and polystyrene foam. If you choose a poor thermal insulator, the heating efficiency will be reduced to almost zero. This is especially true for a water floor, since in most cases it is under this room that there is a layer of cold air and free space.
- We install the pipeline fastening elements. The next step is to install special fasteners for the pipeline. This design should hold the pipeline and ensure the stability of the system as a whole. Reinforcing mesh can be used as fastenings. In this case, the diameter of the reinforcement should be 4-5 mm, and the cells should be 150 mm in size. Sometimes in practice the double reinforcement technique is used. Thus, the mesh can be placed both under and above the pipes. This guarantees increased reliability of the water floor system, in which the likelihood of its deformation is reduced to zero.
- Collector installation. Before starting the pipeline installation, you need to install the manifold and the underfloor heating control group. The choice of system control system depends entirely on the type of heated floor. The control is installed on the wall or in a special cabinet.
- Pipeline installation. The most optimal options for laying underfloor heating pipes are the “Snake” or “Spiral” scheme. The pitch of the pipes should be smaller closer to the walls and wider in the center of the room. The maximum pipe pitch can be 30 cm, and loops should be made no further than 10 cm. This must be done for high pressure in the system and good heat transfer from the floor. Installing a warm water floor also involves connecting to a heat source, as well as conducting hydraulic tests. The tightness is checked for at least 24 hours. Otherwise, you may face a lot of troubles in the future.
- Screed layer. Next, a concrete screed is made, which must be prepared in advance. The minimum layer thickness is 3 cm. To increase thermal conductivity, special substances - plasticizers - must be added to concrete. The screed is poured only at the moment when the system is under pressure. This pressure must be maintained throughout the curing time of the screed. And this ranges from 28 to 35 days. It is important to maintain pressure so that a breakdown does not occur when trying to put the water floor system into operation and, as a result, redo all the work performed.
- Flooring. Once the concrete screed has dried, you can begin laying the finishing layer, for example, tiles. Instead of tiles, you can use any other floor covering - a water floor does not impose restrictions on the covering; the choice of a specific floor covering for a balcony depends only on the preferences of its owner.
Water heated floors are the best solution for heating a balcony. Only thanks to this system can you ensure maximum comfort in the room.
https://www.youtube.com/watch?v=GPDTFtvh-Go
With all this, installing a warm water floor on a balcony will not take much time and effort - all the steps from preparing the base to laying the finishing layer are quite simple and can be done independently.
And the last drop in the sea of advantages of a water floor is, perhaps, its cost. A warm water floor is quite affordable in all respects.
Source: half-with-your-hands.rf/montazh-vodyanogo-pola-na-balkone
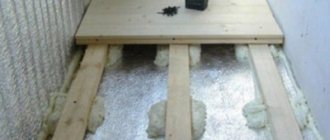
Preparatory work
Having decided what type of heated floor will be used, we begin preparatory work. These could be the following activities:
- Determining a convenient location for installing the thermostat, which will not be blocked by furniture and decoration. Connecting the power cable to this point.
- Dismantling the old coating to the slab, removing construction waste, leveling the resulting surface.
- Insulation of the entire balcony structure (except for the adjacent wall of the building) to obtain a space completely isolated from the street. On loggias, only cold surfaces are insulated (depending on the layout and the presence of insulation from neighboring apartments).
- If necessary, cover the base with a layer of vapor barrier and transfer the material to the walls along the entire perimeter.
Installing an infrared floor
Some nuances are possible. But in general, after carrying out the above work, the balcony (loggia) room is ready for installation of a heated floor system.
Is it possible to install underfloor heating from central heating in an apartment?
A floor heating system using coolant is one of the best ways to distribute heat evenly throughout the entire room.
Using modern materials and following installation technology, you can achieve optimal temperature conditions.
But this only applies to systems with autonomous heating.
Owners of apartments with a centralized heating system have wondered more than once - is it possible to install a water-heated floor connected to heating pipes?
It should be immediately warned that according to current legislation, modernization and changes in the pipeline layout in apartments with central heating are prohibited. However, there are many craftsmen who can perform this procedure unnoticed even by inspection authorities.
However, during the operation of such systems, problems arise not only in a single apartment, but in the entire house as a whole. So this system is recommended for owners of their own houses with central heating, but this is the exception rather than the rule.
Possible problems and their causes
The first thing encountered when designing this type of underfloor heating connection is the difference in water temperature in the system.
For radiator heating, the coolant temperature ranges from 70°C to 90°C. Heated floor pipelines are designed for 45-50°C. Consequently, with a direct connection, failure of the entire system is inevitable.
If this system is detected by the inspection bodies of the housing office, penalties and dismantling of all heated floor equipment will necessarily follow.
But, if, nevertheless, the desire to increase the efficiency of central heating is great, then there are theoretical schemes for implementing such a connection.
Theoretical connection diagram
To connect underfloor heating to central heating, it is necessary to install a heating point with a circular pump. This point will connect the water from the heating system with the tap water to achieve the optimal temperature.
If the apartment has only one entrance and exit of the heating main, then connecting the heated floor can be done according to the principle of connecting radiators. For a larger number of risers, a separate calculation is required.
PVC plastic pipes can be used as the pipeline material. However, it is quite problematic to arrange them in a snake for uniform heating of the floor. For this, corner connectors are used, which affects the reliability of the system.
Since the technology requires filling the entire floor area, in the event of a leak, prompt dismantling work will be problematic.
There is an option for parallel connection from the radiator return pipe. In this case, it is necessary to provide for the installation of shut-off valves (tap) both at the inlet and outlet.
The safest, but most labor-intensive way is to install an autonomous underfloor heating system with closed water circulation. The coolant can be heated through a heat exchanger, which is installed on the central heating pipe.
But the efficiency of this system will be low due to large heat losses.
Flaws
- It is illegal to install such a system.
- High probability of breakdown.
- Inability to adjust the floor heating temperature.
- The emergence of areas of uneven distribution of coolant throughout the entire heating system of the house.
- The complexity of the process.
As an alternative, you can consider installing an electrical underfloor heating system. It's easy to install and completely legal. In addition, electric heated floors do not need to be filled with cement screed.
Of course, this will result in additional energy costs. But they will be much less than fines for illegal connection to central heating.
Source: dearhouse.ru/sistemy-otopleniya/teplyj-pol-ot-centralnogo-otopleniya/
Collector system
The collector is a distribution unit consisting of two combs with a pump. It supplies hot water through pipes and regulates the entire system. The installation is carried out in a special collector cabinet. If possible, then into a hollowed-out niche on the balcony. It is recommended to place the cabinet in a place where the supply and return pipes can easily enter.
Collectors are:
- Electronic. Specially programmed for a specific temperature in the system.
- Mechanical. The temperature is controlled manually.
Boiler selection
Before purchasing a boiler, you should calculate the power. It must cope with the system load and have additional power reserves. Therefore, the boiler power should be equal to the power of the underfloor heating plus 10-15%.
When carrying out any additional work, in order not to drain liquid from the system, the boilers have shut-off valves.
We install infrared heated floors on the balcony with our own hands
Have you decided to insulate your balcony yourself? Film infrared heated floors on the balcony are an excellent solution to your problem. In just two hours, without any special skills and with a minimal set of tools, you will make your balcony even more comfortable.
For a long time there has been a desire to equip a balcony not only for storing a bicycle, sled and tools, but also to try to use it more efficiently. Especially if you consider its area - about 5 m2, almost an entire room!
On an insulated balcony you can easily set up a winter greenhouse, a playroom for children or a personal office. I will share my own experience on how to independently install a film heated floor on an ordinary balcony.
I’ll make a reservation right away - all the work was done by women’s hands, which indicates that new technologies are accessible even to non-professionals (I have a humanities education). So don't judge strictly, men!
Of the many options for insulating a balcony and making it cozy even in winter, I settled on infrared film heated floors, as they are distinguished by their energy efficiency, ease of installation and reasonable pricing.
Consumables
Consumables for installing a heated film floor on a balcony require:
- film flooring sheet of the required length ordered through the online store (width options 0.5; 0.8; 1.0 m.)
- thermostat (the kit must include a sensor for measuring floor temperature)
- heat-reflecting substrate (polyethylene with a mirror surface)
- two-core copper wire based on the length from the edge of the film floor to the thermostat (a cross-section of at least 1.5 is required)
- insulation kit (sold on the Internet in addition to the film floor).
Laying infrared heated floors on the balcony
We begin installation from the surface of the balcony floor, which should be as level as possible (I have chipboard and foam plastic under it for insulation).
An uneven floor surface can cause the film floor to break through in the future.
At the first stage of work, it is necessary to install the thermostat temperature sensor. To do this, we cut a groove on the floor surface into which we place the temperature sensor, fixing it.
The sensor should be located directly under the heating elements, 15-20 centimeters from the edge of the film. We connect the sensor contacts to the thermostat.
It is better to cover the sensor in the groove on top with a dense material (I used an old plastic ruler).
At the second stage, we lay a heat-reflecting underlay over the entire floor area. Do not forget to cut a rectangular hole above the temperature sensor so that the substrate does not interfere with the adequate operation of the sensor. We secure the backing around the perimeter with double-sided tape.
Pipe laying and trial run
To insulate the joints of the insulation, you need to use aluminum tape.
Before laying the pipes, we put foil-coated thermal insulation material. It plays the role of a heat shield. The joints of the insulation must be taped with aluminum tape. The edges of the thermal insulation should extend onto the walls by about 3-4 cm. Excess insulation must be cut off. Then we lay the pipes according to the diagram. You can bend the pipe using a pipe bender, which prevents it from bending.