Home » Building a house » Headings » Heating
Vladimir 03/28/2020
7647 Views 1 comment
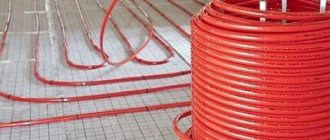
Underfloor heating is used as the main or additional source of heat in an apartment or house. If the system is supposed to be actively used, preference should be given to the water circuit - this is the most economical and health-safe option, since it does not require connection to the electrical network and does not create electromagnetic radiation. You can install a water floor yourself to reduce the cost of installing the heating system of a private home.
Water underfloor heating in the apartment
Underfloor heating – comfort in the home
In most cases, local legislation prohibits the installation of an underfloor heating circuit connected to a DHW or central heating system.
This is due to the fact that the temperature of hot water or coolant drops when passing through the circuit, which will cause discomfort to neighbors. In addition, the pressure in the system decreases.
In those regions where there is no ban on installing a hydraulic floor circuit in apartment buildings, the project must be submitted for examination - specialists will issue permission only after making sure that the operation of the central heating system or hot water supply will not be affected.
Technical solution for an apartment
Technically, the installation of water underfloor heating is possible with the obligatory installation of a pumping and mixing unit , which will allow maintaining pressure in the system. There may be restrictions on the material used to make pipes - propylene and metal-plastic cannot be installed if a jet pump (elevator) is used in the heating system of an apartment building.
Water heated floor installation
The heated water floor has a multi-layer complex structure, each layer has its own function. Consists of: base, hydro and thermal layer, reinforcing product, heating element and concrete screed.
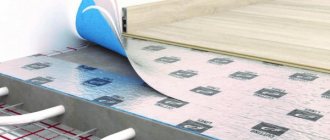
A substrate is placed on the screed on which the floor covering is mounted; it must have a special symbol indicating the possibility of laying it on warm systems.
The junction of the walls and the screed, as well as the boundaries of the water circuit, should be laid with damper tape, this will help compensate for the expansion of concrete with temperature changes.
More often, independent installation of this heating structure is carried out using the “wet” method, that is, by pouring a cement-concrete screed. But “dry” installation is possible; it is used in houses with wooden floors.
Base and finishing coating for heated floors
Covering heated floors with ceramic tiles
The water circuit can be laid on a concrete or wooden base. In the first case, the pipes are embedded in a cement-sand screed, which promotes uniform heating of the entire floor area. If the base is wooden, it is necessary to use foil or aluminum plates to dissipate heat radiation from the pipes.
When designing a heated floor, you should immediately decide on the type of finishing coating.
It could be:
- ceramic or porcelain tiles
- parquet board
- laminate
- linoleum
- PVC tiles
Tile and porcelain tiles are an ideal option, since heating does not in any way affect the durability and technical characteristics of the material. Warm tile floors are appropriate in almost any room.
When choosing a parquet board or laminate, you must make sure that the material is marked as suitable for installing heated floors. Otherwise, there is a high risk that the coating will dry out and warp over time.
PVC tiles and linoleum at temperatures above 30°C can emit harmful substances - such coating options are suitable for rooms where moderate heating is provided.
Using carpet in combination with a water floor does not make sense - the material blocks heat and releases harmful substances when heated.
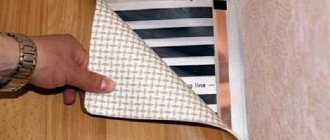
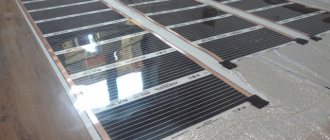
Electric floor based on thermomat
For the production of thermomats, a cable no thicker than 45 mm is used. It is fixed on a fiberglass mesh 0.5 m wide. The cable has a shielded core and protected by an outer sheath. For residential premises, heating mats with double cores are used due to their significantly lower level of electromagnetic radiation.
If tiles are chosen as the finishing coating, instead of concrete mortar, glue for this type of material, specially designed for heated floors, is poured over the cable
Principle of operation and construction
The heating mat includes 2 elements: the thermomat itself with a cable and a corrugation. A sensor is inserted inside it, and it protects it from moisture and aggressive influences. If the adhesive layer is so thin that it cannot completely cover the corrugation, you need to use a moisture-resistant sensor.
The thermostat complete with an external temperature sensor, mounting boxes, and wires are purchased additionally. When choosing the first element, maximum energy consumption is taken into account. The cross-section of the wires is selected based on the power of the system and the material of manufacture.
If the cable needs to be wrapped, the mesh is cut. The cable itself cannot be cut or shortened. During installation, it should be at the top; the mesh is attached to the floor using tape or staples
The installation process is extremely simple, because thermomat is a product completely ready for installation. There is no need to attach a heating cable, and uniform laying is ensured by the structure itself. Its cost is higher than that of a cable floor, but it has many advantages, including faster heating of the surface.
Installation of thermal mats
Before laying out the thermal mat, the floor is covered with a layer of primer. This will increase the adhesion of the glue to the concrete surface. Usually the glue is applied directly to the mat, but if it is a damp room, then after a thin layer of glue has been applied and dried, it is covered with waterproofing and then glued again.
In order not to damage the integrity of the cable and to apply the adhesive evenly, you need to distribute the adhesive composition using a plastic comb. The tiles are laid on the glue and leveled.
The total of tiles plus glue should be 20 mm, although some manufacturers recommend a minimum of 50 mm. This is explained by the fact that with such a thickness of the layer, the heat is distributed more evenly.
The photo shows the sequence of laying a heated floor from thermal mats under the tiles, starting from choosing a location (1) to laying the tiles (7). Installation is simplified if the room has a rectangular shape
In accordance with the PUE, it is imperative to install a protective shutdown that guarantees safety and a circuit breaker. If the system is installed in a bathroom, the thermostat should be moved to an adjacent dry room.
Image gallery
Photo from
Step 1: Installing a screed along the base
Step 2: Laying mats over the hardened screed
Step 3: Pouring screed over electrical mats
Step 4: Flooring installation
Calculation of pipe length and cross-section
Dependency graph
It is recommended to entrust the calculation of contours to professionals in order to avoid critical errors that will affect the efficiency of the system. You can also use special programs (for example, Audytor CO from Sankom).
When making calculations, it is important to consider the following factors:
- the circuit is mounted at a distance of 20 cm from the walls
- in places where plumbing fixtures or permanent furniture will be installed, pipes are not laid
- the maximum length of the circuit depends on the pipe cross-section (for 16 mm – 100 m, for 18 mm – 120 m, for 20 mm – 125 m), exceeding the recommended values will prevent you from maintaining the required level of pressure in the system
- in large rooms two or more circuits are installed
- the difference between the lengths of the contours should not exceed 15 m
- the step between adjacent turns is 10-30 cm (in areas requiring increased heating, the minimum step is chosen; in the rest of the room the gap between turns can be increased)
For an accurate calculation, it is necessary to take into account the power of the heating system, the level of heat loss in the room for which the circuit is being designed, the thickness of the screed, and the heat flow density.
The graph allows you to clearly see how the heat flux density depends on the diameter of the pipe and the average temperature of the coolant. As the thickness of the screed increases, the heat flow density will decrease by 5-8% for each additional centimeter. Using parquet boards or laminate instead of ceramic tiles will also reduce the heat transfer of the floor.
To calculate the length of the circuit, the active heating area should be divided by the laying step (both values are in meters). The length of the bends and the distance between the circuit and the collector are added to the result obtained.
Required materials for system installation
Since first a rough screed is made , then a thermal insulation layer is created on its surface, and then the heated floor pipes are laid and the finishing screed is poured, then, accordingly, the following materials will be needed:
- Cement, expanded clay and concrete. It is better not to use crushed stone, otherwise the floors will be cold.
- Expanded polystyrene boards, glue. Polystyrene foam is not recommended because it is an easily deformable material. When pouring the finishing screed, a surface made of such material quickly deteriorates. Damaged areas create a gap in the thermal insulation layer, which reduces the effectiveness of the heated floor.
- Fastening brackets that secure pipes to the floor.
- Tow, various pipe fittings, silicone and manifold.
- Metal-plastic pipes with a diameter of 16 mm.
- Self-tapping screws and dowels of different lengths and diameters.
Selection of pipe material
XLPE pipe
To lay the water underfloor heating circuit, it is recommended to use pipes made of the following materials:
- metal-plastic - pipes hold bends well, are resistant to thermal deformation, are affordable, easy to install, and due to the aluminum reinforcing layer are characterized by high heat transfer
- cross-linked polyethylene (PEX-EVOH-PEX) – pipes are more difficult to install, as they do not hold bends well, but do not burst when the coolant freezes
- copper - pipes are strong and durable, transfer heat efficiently, but require protection from alkali when installed under a screed and are expensive
Advantages and disadvantages
The following other points count in favor of underfloor heating:
- savings during operation up to 45%;
- the ability to avoid installing radiators, which allows for better use of room space;
- The finishing coating is suitable from any material;
- the air warms up more evenly, there are no drafts;
- The comfort of being in a space heated by thermal radiation is much higher than with radiator heating.
However, there are also disadvantages, which include a drop in pressure in the heating system due to the coolant diverted to heated floors, as well as the inability to quickly find and repair a leak in the event of an accident.
In any case, the main argument in favor of underfloor heating is the ability to increase living comfort while saving significant money.
Selecting a contour laying scheme
Contour laying schemes
The maximum permissible temperature of the coolant in the underfloor heating system is 55°C. It is considered optimal if the temperature difference between the liquid at the inlet and outlet of the circuit is 5-10°C. When choosing a circuit laying scheme, it should be taken into account that some options allow you to evenly heat the entire floor area, while others primarily provide heating to the coldest areas.
The most popular options for laying the contour are:
- Single snake. The pipe is laid in loops in one go, as a result of which the floor is heated unevenly. It is recommended that the part of the pipeline into which the heated coolant enters be laid along the external wall (two or three external walls), where heat loss is maximum
- Double snake. In this scheme, loops with heated and cooled coolant alternate, which promotes uniform heating of the room
- Snail (spiral). Also an option for uniform heating of the entire floor surface. The spiral is laid from the edges to the center, and then in the reverse order. When laying the snail, you can go around places where heating is not required
- Combined option. You can combine both installation options by dividing the room into zones with different heating requirements - for example, use a spiral pattern in the central part of the room, and a snake at the exit
Before purchasing pipes, you need to draw a scale diagram with the layout, calculating the pitch of the turns and calculating the length of the pipeline. The heated floor circuit should not have joints; the pipe is laid in one piece to eliminate the risk of leaks.
Laying heating mats
Their installation is much easier, since the cable is already secured to the fiberglass mesh. All that remains is to roll them out like a film on a heated surface. The mat under the entire floor must be one piece, so to obtain the desired configuration, scissors are used to cut the fiberglass without disturbing the heating cable.
Otherwise, the entire scheme of work remains the same, as when laying the cable. After connecting and checking the functionality of the system, you can proceed to pouring the screed.
The installation of electric heated floors under tiles is shown more clearly in the video.
[smartcontrol_youtube_shortcode key=”installation of electric heated floor” cnt=”2" col=”2" shls=”true”]
Arrangement of the collector unit, connection to the boiler
Collector unit
The heating boiler is responsible for heating the coolant. Its power should be equal to the total power of all floor heating circuits (and heating radiators, if provided) plus 15-20% of the result obtained.
The house should be designed for installation of manifold cabinets , inside of which equipment for connecting heating circuits is located:
- 2 collector combs (supply and return)
- shut-off/control valves
- circulation pump
- air vent
- flow meter
- pressure gauges
The number of collector comb outlets must correspond to the number of connected circuits , so the distribution unit is installed after the underfloor heating project has been developed. The combs are connected to the supply and return pipelines connected to the boiler.
Principle of operation
Operation of the distribution unit
The heated coolant enters the floor circuit, gives off heat and returns through the return pipeline to the boiler, where it is heated again. The circulation pump is responsible for the constant movement of liquid. When the air in the room warms up to the set values, the temperature sensor installed in it is triggered, and the valve shuts off the flow of heated coolant into the corresponding circuit. In a simpler version, the heating of the heated floor is adjusted manually.
You should not save money by installing a manifold with shut-off valves instead of control valves - the installation of more expensive equipment will pay off due to energy savings and will automatically maintain a favorable microclimate in the house.
Connecting the system to a water heating source
This stage of work requires certain skills in working with plumbing fixtures. First, you should install a manifold, which is a tube with outlets for a warm floor. To do this, adapters, taps, plugs are screwed to the manifold and attached to the wall. The end of the heated floor pipe is connected to the adapter, into which hot water will subsequently be supplied. In the same way, a collector is installed, through which used water will also leave the system.
Quite often, the collector is not attached to the wall , but is left to rest on the main pipe. Under no circumstances should this be done. The collector is constantly exposed to mechanical stress, for example, changes in water pressure, turning taps, etc. As a result of the fact that the distribution tube is not properly secured, there is a high probability of it being torn off from the water pipe.
After this, you can begin testing the installed system.
Warm floor pie
Warm floor pie
The composition of the multilayer structure depends on the type of subfloor. This is usually a concrete slab or wooden floor, but the base of the floor can also be soil.
The composition of the cake on a concrete base includes:
- waterproofing
- damper tape around the perimeter of the room and around all structures
- slab insulation
- foil material that reflects heat (may be absent)
- reinforcing mesh for attaching pipes (may be missing)
- heating circuit
- screed
- fine coating
If the base is soil, then it is necessary to lay and compact thoroughly:
- layer of bulk soil 15 cm
- crushed stone layer 10 cm
- layer of sand 5 cm
Then the rough screed is poured, after which you can install the heated floor according to the same scheme as in the case of a concrete base.
Preparatory work
Before starting the installation of a warm water floor, it is necessary to carry out all the necessary measurements and calculations to find out the optimal power.
This indicator depends on many factors: room area, floor, quality of wall insulation, glazing area, etc. If the apartment is located on the first or last floor, there is a balcony, floor-to-ceiling window or bay window, the walls are poorly insulated, or you plan to use thick ceramic slabs as flooring, then it is better to provide a more powerful type of underfloor heating system.
After this, the base is prepared for laying the heated floor system itself. The old coating must be removed, and if there are floor differences of more than 10 mm, additional screed must be performed (self-leveling mixtures can be used), otherwise the heating system may not work correctly and heating will be uneven.
Wooden base
Warm floor pie on a wooden base
It is not recommended to lay concrete screed on a floor with a wooden base due to critical loads on the structure. The use of metal diffusion plates with channels (or their artisanal replacement with thick foil laid on top of the guide rails) allows you to make the cake as light as possible.
Its composition includes:
- vapor barrier along joists
- slab or roll insulation between joists
- waterproofing
- slatted base
- diffuser plates with channels
- water circuit
- vapor barrier layer
- finishing covering made of parquet boards or laminate or flooring made of plywood, chipboard or other sheet material for laying the finishing covering
Required tools for system installation
To install a water heated floor with your own hands, you will need the following tools:
- a shovel, as well as a shovel necessary for pouring a concrete base;
- two-meter rule with level;
- various wrenches necessary for twisting system connections;
- water level;
- buckets for glue and cement mixture;
- spatulas – regular and serrated;
- perforator;
- roulette;
- pencil.
During work, various situations often arise when other tools may be required.
Selection of materials and method of fixing pipes
Fixing clips for heated floors
The water circuit pipe must be secured in such a way that the loops do not unbend, the required distance between turns is maintained, and the fastening does not interfere with the thermal expansion of the material. The type of fixing elements directly depends on the chosen installation technology and the type of insulation.
| Retainer | Base | Installation principle |
| polyamide clamp | reinforcing mesh on top of the heat insulator | The clamp is tightened by hand, consumption is 2 pcs. per meter of pipe |
| steel fastening wire | reinforcing mesh on top of the heat insulator | the ends of the fastening wire have ears for quick twisting using a hook, consumption is 2 pcs. per meter |
| plastic U-shaped clamps | polymer heat insulator with a smooth surface | the legs of the element are securely fixed in the insulation; a special stapler is used for installation, consumption is 2 pcs. per meter |
| fixing track | polymer heat insulator with a smooth surface | PVC strips with U-shaped sockets are attached to the insulation and allow pipes to be laid according to the chosen pattern |
| thermal insulation mats with a relief surface | protrusions on the slab polymer insulation make it possible to lay pipes without additional clamps | |
| metal diffusion plates with channels (for wooden floors) | the pipe is laid in channels on straight sections of the contour without additional fastenings |
Laying the heating cable
Before installing a cable for a heated floor, you need to check its resistance. It must match the parameters indicated on the stickers or documentation. The further sequence of actions is as follows:
- A special mounting tape is attached to the surface in increments of 50 cm to a meter. Fastening elements are located on it in 20 mm increments, which allows you to create the desired installation configuration. Instead of such tape, you can use a metal mesh; in this case, the cable is fixed using plastic clamps.
- The cable is laid in a snake pattern, maintaining the required distances from the walls. Do not allow some turns of the cable to touch others or cross them.
Laying the heating cable
Cable fixation
- A temperature sensor is placed at an equal distance from adjacent turns. It is wise to place it in a corrugated tube, the end of which should be carefully sealed to prevent solution from entering.
- Controls for heated floors are connected. If you are not sure of your qualifications, it is better to call a professional electrician. If you want to do everything yourself, follow the connection diagram indicated on the back wall of the rheostat or in the instructions.
- Using a tester, the resistance of the heating circuit is checked again. It should match the values obtained before installation.
- To check the functionality of the underfloor heating system, turn on the heating for a short period of time. One minute is enough. The indicators on the rheostat should light up and the cable will begin to heat up.
USEFUL INFORMATION: How to level concrete and wood floors under laminate
Technology for installing underfloor heating on a concrete base
Installation of the heating circuit is carried out after the installation of the collector unit. Step-by-step instructions will help you correctly complete the entire complex of work.
1
Preparing the base
The surface of the concrete slab or screed must be cleaned of debris and dust; it is advisable to use a construction vacuum cleaner. Then the seams and cracks, depressions are sealed with a solution, and protruding irregularities are removed. The permissible height difference is 5 mm, otherwise a screed using a self-leveling mixture is required.
Cleaning the base with a vacuum cleaner
2
Waterproofing
Waterproofing can be laid under or on top of the insulation. In the second case, you will have to use reinforcing mesh to secure the pipeline so as not to break the tightness of the waterproofing coating.
If the waterproofing is laid on a concrete base, the panels should extend onto the walls by 15-20 cm (the excess will then be cut off). When joining the panels together, they are laid with an overlap of 10-15 cm, the joints on both sides are taped. Thick polyethylene film can be used as waterproofing.
Waterproofing made from polyethylene film
3
Damper tape
When heated, the concrete screed expands, and in order to prevent cracking and deformation of the monolithic slab, a damper tape is installed around the perimeter of the room and around all structures (columns, pipes, etc.).
It is also needed at the joints of room screeds on two sides of a doorway or floor areas with separate heating circuits in a large room. A special self-adhesive damper tape made of porous polymer material is available in a width of 10-15 cm and a thickness of about 8 mm. Instead, you can use strips of polyurethane foam insulation of suitable thickness. Homemade tape is glued to the wall or fixed with self-tapping screws.
Self-adhesive damper tape
4
Thermal insulator
Thermal insulation in an underfloor heating system prevents thermal energy from going down and heating the floors. Any foamed polymer insulation can be used as a heat insulator. Wherein:
- expanded polystyrene allows you to fasten pipes using tracks or U-shaped clips; the insulation can have a foil outer layer (reflects heat upward and promotes uniform heating of the screed) with markings for laying pipes
- foil penofol (foamed polyethylene) has a small thickness, but to fix the pipes, laying a reinforcing mesh is required
- polyurethane foam mats with ridges make installation easier, but their surface does not have a reflective layer
The recommended thickness of slab insulation with a density of at least 35-40 kg/m3 is 20-25 cm for the ceilings of the upper floors and 50-100 mm for the first floor. The slabs are laid according to the principle of brickwork, with a shift of half the width. This gives rigidity to the flooring. Rolled penofol, foil-coated mats are mounted end-to-end, the joints are taped with aluminum tape.
Aluminum is destroyed upon contact with an alkaline environment, including cement laitance. Foil rolled material for the reflective layer, aluminum tape must have an external polyethylene coating.
Thermal insulation material with foil coating and markings
5
Circuit installation
The complexity of installation depends on the chosen option for fixing the circuit. The simplest (and most expensive) option is to lay the pipe between the shaped protrusions of the heat insulator.
If you plan to use clips or tracks, use a heat insulator with markings applied - this will help maintain the gaps between the turns. Fastening to a reinforcing mesh is the most labor-intensive, but this classic method remains popular; it is ideal for installing elastic pipes made of cross-linked polyethylene that do not hold bends well. To avoid damage to pipes during operation, you must not:
- tighten clamps or twisted wires - it is important to leave room for thermal expansion
- bend pipes into narrow loops, lay a circuit with traces of creases - the pipe may burst under pressure
- join circuit pipes using couplings, welding
Water floor installation diagram
6
Connection and crimping
Laying the circuit begins by connecting one end to the collector, and ends by connecting the second end to the second comb of the collector assembly.
To connect pipes to the manifold, Eurocone clamp fittings are used. Having completed the installation of all circuits, it is necessary to test the system under pressure. The tightness test is carried out using a compressor of 6 bar or more. It is necessary to create a pressure of 4 bar in the underfloor heating system and leave it until all work on the installation of the heated floor is completed.
Pressure testing using an air compressor
7
Filling the screed
If the hydraulic tests are successful, the contour is filled with a concrete screed with a height of at least 3 cm above the pipe. This allows you to ensure the necessary strength of the floor and uniform distribution of heat over the surface.
A thick screed (7-10 cm) warms up more slowly, but releases heat longer. At the same time, to warm it up, a coolant at a higher temperature is required, which increases fuel consumption. For screeding use concrete grade M-300 and higher, washed sand, crushed stone with a fraction of 5-20 mm. The solution is mixed in the following proportions: Cement M-400: Sand: Crushed stone (kg) = 1: 1.9: 3.7
Instead of sand, it is recommended to use granite screening with a fraction of up to 5 mm , as it increases the heat transfer of the screed. Also, a plasticizer for heated floors is added to the working solution, thanks to which the screed will be more resistant to cracking due to temperature changes, fiberglass.
The screed is poured at a system pressure of 4 bar. You cannot turn on the heating until the mixture has completely hardened, otherwise the moisture will quickly evaporate and the concrete will not gain strength. The next day after pouring, cover the screed with polyethylene and leave it like that for a week.
Pouring screed onto heated floors
8
Expansion joints
To prevent the screed from collapsing during the operation of the heated floor, expansion joints should be provided. They are required if:
- The area of the room exceeds 30 square meters. m
- wall length more than 8 m
- the length of the room is 2 times or more the width
- the concrete base has expansion joints
- the room has a complex shape
Expansion joints divide the room between the contours; they are laid above the seams in the base, when dividing a complex room into sections of a simple geometric shape. At the design stage, the location of the seams should be determined - they can pass over the supply and return pipes, but cannot cross the contour itself. Pipes passing through the seam must be covered with a corrugated casing 30-50 cm long in each direction.
Full profile seams are arranged at the stage of laying the contour using damper tape. The reinforcing mesh should not cross the seam.
Expansion joints of incomplete profile are cut after laying the screed at 2/3 of the distance to the pipes. The cracks are filled with silicone sealant. If the screed cracks, the cracks will run along the seams inside the slab, and the floor covering laid on top will not be damaged.
Expansion joints
Installation errors and their consequences
Strict adherence to the recommendations of specialists when installing heated floors yourself is an important condition for the successful functioning of the system.
Most often, beginners make the following mistakes:
The height difference between the beginning and end of the pipe. If it exceeds half the diameter of the pipes, air pockets will form inside. As a result, the circulation of the coolant will be difficult and the quality of heating will decrease. To prevent this from happening, it is important to place the pipes strictly parallel to the floor.- Connection of pipes within one circuit. There is no point in installing a circuit of 2 pipe sections and filling it with concrete. This may cause leakage. Each circuit must consist of a whole piece of pipe. Connections should only be made to the collector group.
- Neglect of hydraulic testing. A test run of the system at maximum pressure must be carried out before pouring concrete into the pipes. Otherwise, it will be almost impossible to find a leak, if one occurs.
- Pouring screed onto empty pipes. The concrete pushes through the pipe material and the circulation of the coolant will subsequently be difficult.
- Premature heating start. Heating the pipes until the concrete gains strength will lead to cracking of the screed.
Installation of a water circuit on a wooden base
Laying the contour on a wooden base
The work is carried out in several stages:
- Checking the wooden base, replacing damaged elements, treating structures with antiseptic and fire retardant
- Laying a vapor barrier membrane along the joists (if mineral wool is used). The panels are mounted overlapping, with the joints sealed with tape
- Thermal insulation - mineral wool slabs are laid between the joists, if foamed polymer material is used, the gaps are filled with polyurethane foam
- Installation of waterproofing - a thick film or membrane is laid over the walls, the sheets are laid with an overlap of 10-15 cm, the joints are taped on both sides
- Wooden slats or strips of sheet material (chipboard, OSB, plywood) are laid along the joists. The thickness of the slats corresponds to the pitch between the turns of the contour, the width and height of the gaps allows for pipe laying. In places where the contour bends, the ends of the slats are rounded
- In straight sections, special aluminum dissipating plates are placed on top of the slats (can be replaced with thick foil). The circuit pipe is inserted into the grooves of the plates
- A vapor barrier membrane is laid on top, then a laminate or parquet board. If you plan to use ceramic tiles, linoleum or PVC tiles, you need to install a flooring made of plywood, gypsum fiber board or chipboard
Before purchasing wood-containing and finishing materials, make sure that they are suitable for use as part of a heated floor - they do not deform when heated, and do not emit harmful substances.
Laying infrared film
Finally, let’s look at how to install infrared-type heated floors.
The installation operation is not particularly difficult, but before installation it is necessary to carry out preparatory work.
It will be necessary to lay a thermal insulation layer on the floor surface. In this case, the layers of thermal insulation are secured to each other with mounting tape.
Next, an infrared film is spread on the surface of the thermal insulation.
If necessary, pieces are cut off; this should be done only in the places indicated on the film.
In this case, a distance of 4-5 cm must be maintained between the two strips of film.
Also, the film does not need to be placed in furniture locations; it should not come close to the walls or other heating elements of the house.