Today it offers a wide selection of new construction and finishing materials, but tiles have still not lost their relevance and are just as in demand as before. And all because the material has high performance characteristics and a lot of advantages that other materials cannot boast of.
Among the advantages of ceramic tiles are their service life, durability, attractive appearance, environmental friendliness and high moisture resistance, which allows them to be laid on any base, including wood.
But many argue that it is impossible to lay tiles on a wooden floor, because natural wood is flexible, which will not ensure reliable adhesion of the tiles to the wood. However, this is not so; a tiled floor will serve faithfully for years if, when laying on cement-bonded particle boards, you follow the installation technology, properly prepare the base and use the necessary glue. In this article we will talk about how to lay tiles on a concrete floor. First, let’s find out what the pros and cons of DSPs are.
Floor covering
Subfloors made of CBPB on logs device technology
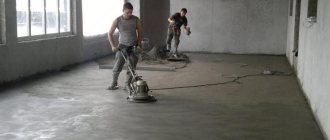
Leveling the subfloor for a decorative finishing coating can be done in more than one way. Cement screed for this case is the most labor-intensive and time-consuming process. Often sheets of particleboard are simply laid on the base. This material shows its weaknesses both in the process of working with it and in subsequent operation. Chipboard is quite fragile and tends to break at the ends and corners of sheets when cut and fastened. Floors with such a base do not tolerate excess moisture and are therefore not suitable for bathrooms and kitchens.
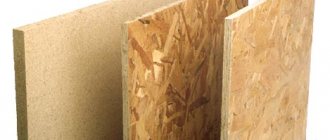
Due to its strength, density, environmental friendliness, resistance to moisture, fire, rot, and chemicals, fiberboard is considered one of the best sheet building materials and is an excellent basis for a subfloor.
For those who are already familiar with the relatively new construction product - DSP, the question of choosing a material for the rough base disappears by itself.
Preparation for floor covering with slabs
To lay the material on a wooden floor, you will need a subfloor (old wood), insulation, vapor barrier material, and DSP sheets. Before laying the CBPB, the base is equipped, the logs are laid, and to carry out the work it is necessary to prepare the following tools:
- hacksaw;
- nylon fishing line;
- pencil, felt-tip pen, ruler;
- nails, dowels, screws;
- drill;
- cipher machine.
You will need the following materials: timber, antiseptic, putty.
Base for joists
The base (soil, reinforced concrete) for laying the floor must be strong. In a private house on open ground, the surface is initially leveled, a sand and gravel cushion is laid with a layer of 20 cm, which is compacted well.
The supports for the logs are laid out on the ground in the form of brick columns, into which cement mortar is poured. The distance between the supports (0.5-1 m) depends on the timber used for the logs. To improve water and thermal insulation, lay a waterproofing material, for example, thick polyethylene film. It is laid with an overlap on the walls.
Concrete flooring is checked with a horizontal level. The floor is considered suitable if the deviation is no more than 3 cm, and differences are eliminated by adding spacers.
If there are serious unevennesses, then make a screed, otherwise the subfloor will be unstable and lead to deformations and damage to the decorative coating. Small cracks and holes are puttied and sealed with cement mortar.
Installation of logs under slabs
- The timber is installed horizontally against opposite walls and leveled. The rest of the logs are placed on them in increments of 50 cm - this is an acceptable distance for installing particle board materials.
- The same step is used for fastening the ribs of the transverse sheathing. The materials are fixed with self-tapping screws and dowel nails. Pieces of plywood are placed between the concrete and the joist, which adds strength.
- Lay insulation material using suitable material: polystyrene foam, mineral wool.
Cement-bonded sheets are laid on the installed logs.
Installation of DSP on the floor
Thanks to its excellent thermal insulation and waterproof qualities, DSP has established itself as an excellent material for rough floor construction in almost any room: on verandas, in the bathroom and toilet.
Scheme of floors with DSP
The use of DSP floor slabs is strongly recommended in the construction of frame houses using Canadian technology. Since the slab (26-40 mm) can withstand a fairly large load, floor joists can be made not 40 cm, but 50-60 cm (according to the width of the insulation).
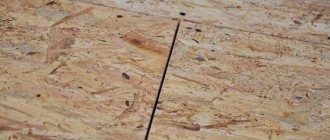
Lay the slab on joists 5 - 8 cm wide
Preparation for the CBPB before installation is not required (only cutting to the required dimensions); the slab can be laid on logs 50-80 mm wide, leaving a deformation gap of 2 mm (between the sheets).
Before attaching the DSP to the subfloor, you need to see if the sheet will cover the pipe hole. If the slab does cover the pipe, you need to make a marking 1 cm larger than the diameter of the pipe and cut out the opening with a jigsaw (if the diameter is large), after drilling a hole with a 6-8 mm drill or making a cut with a hacksaw for metal, and then knocking it out with a hammer (if the hole is with edge).
Leave a gap between the sheets during installation
Based on the characteristics of the rough floor, you can “put” the DSP on the floor using an adhesive solution, additionally securing the fastening with self-tapping screws.
Before installation, the glue is diluted in a certain proportion with water and mixed with a mixer to the desired consistency, after which it is evenly laid out on the floor surface (no less than the size of the sheet), only then the sheet is laid down. It is necessary to maintain a gap between the sheets (as when installing on joists). When the flooring is laid, all gaps are filled with glue. For details on finishing the walls and floor materials, see this video:
To summarize the article, we can confidently say that DSP is a new, absolutely effective material that helps simplify and speed up the installation of both the floor and the house as a whole without loss of quality.
Cement particle board, despite its heavy weight, has won a large army of “builder fans” who will never refuse to use this product due to the huge list of its positive advantages.
>
Application for floor
Cement particle board is very convenient for furnishing apartments and houses.
The use of DSP boards for floor installation is popular, especially if it needs to be leveled in a short time. It is this material that helps reduce the period of repair work. Due to the natural nature of the material, it is absolutely environmentally friendly, moreover, such slabs are in the affordable price segment, and the floor is reliable and durable. Due to their positive technical characteristics, CBPB slabs can replace concrete screed, but they are much lighter and easier to install. This fabric will last for many years, since it has a high ability to withstand heavy loads. Taking into account the traffic flow of the room, the slabs should be selected according to thickness.
The use of DSP is possible for insulation of buildings, interior decoration and exterior work. In addition, floor finishing is common today. This material can be used in rooms with high humidity.
Most often, DSPs are used for laying under tiles. This is due to the fact that tiles require an absolutely flat base. Even the smallest bump or depression can cause cracks to form on the surface of the tile.
Also, floors made of cement bonded particle boards are used to create a three-dimensional floor covering, since in this case a reliable rough layer is required. And if we consider the option of installing a “warm floor” system. then at the same time there appears a flat surface and good thermal insulation, which will not allow heat flows to go down under the floor.
When working with cement particle boards, the use of self-tapping screws is allowed. The canvases can be 1 cm thick, and it is possible to cut them with a fine-toothed hacksaw, which will avoid the formation of dust and uneven edges. Wood or concrete screed can be used as a rough covering on which the chipboard is laid.
The photo shows the laying of CBPB slabs on wooden logs
It is possible to install DSP on top of joists installed on the floor. In order to form the base, you will need logs with a cross section of 50 x 80 mm. The distance between them is usually 60 cm. Strong slabs with a thickness of 20-26 mm are laid on them. They can be used as a base or leveling layer. And slabs with a thickness of 24 to 26 mm can be laid on the ground of warehouses and utility rooms even in the cold season.
Initially, you only need to cut the construction sheet, then lay it on a flat surface. The slab should crack where the cut is made. If there is a problem with bypassing the pipeline, then it is necessary to lean an element of the same diameter against the slab, having previously treated it with grease. This is done to indicate the outline for cutting. To cut very large holes, it is better to make a cut around the perimeter, and then knock out the excess with a hammer.
Before laying, all sheets must be carefully prepared. They must fully comply with the parameters of the room. After cutting the canvases, markings are made on their surface. All sheets are laid out on the floor surface, leaving no empty spaces, and are numbered in order to avoid mistakes during installation.
Installation of DSP with glue
Depending on the characteristics of the subfloor, cement bonded particle boards are laid using glue or self-tapping screws. When working with glue, it is better to use a construction mixer to ensure uniformity of the substance. The rpm speed should be quite low. Unfortunately, you cannot achieve the desired result manually.
DSP boards are laid only after the glue has been evenly distributed over the surface of the rough base with a notched trowel. When laying subsequent sheets, gaps should be created that will help avoid thermal deformation of the sheets and changes in their size. These gaps are filled with adhesive mass. The surface is coated with a protective primer or water-repellent compound.
We suggest you read: How to stick tiles on a wooden wall?
Cement particle board is a very strong, reliable and durable material that can easily replace the usual concrete screed. Installing such material will require certain knowledge and skills, especially when it comes to insulating a room or doing some kind of external work. DSP is ideal for leveling the surface for any finishing coating.
It is very important to note that the cost-effectiveness of installing CBPB lies not only in the inexpensive material, but also in the fact that in this case the costs of purchasing heat-insulating and sound-proofing materials can be eliminated. Installation can be carried out in the shortest possible time in any room, at any time and in any weather.
We ask you to leave your opinion about the article in the comments!
Guide to working with floor leveler - from choosing a mixture to pouring a layer
Characteristics of cement bonded particle boards
DSP has a multilayer structure, as it is made by pressing from small shavings, wood fibers, cement, and plasticizers. This is a universal material that is used for various construction and repair work in any climate for any finish. It is not completely perfect, but it has a lot of advantages:
- High resistance to mechanical stress. Its mechanical strength is 3 times higher than the strength of chipboard.
- Immunity to the appearance of mold and fungi due to the alkaline environment.
- Ability to withstand humidity and critical temperatures.
- Fire safety due to the presence of additives in the composition that reduce the risk of fire.
- Long service life.
- Convenient installation, ease of drilling, fastening, cutting.
- There is no need for additional leveling - the surface is flat and smooth.
- Environmentally friendly - it contains natural wood and cement.
- Good noise insulation (up to 30dB).
- Low cost due to simple manufacturing technology; the formation of voids and internal defects is excluded during production.
There are only two disadvantages: when cutting the material, cement dust is released, and during installation, the large weight of the slab causes inconvenience.
Considering the characteristics of the material and the manufacturing method, it becomes clear why DSP laid on a wooden floor is popular.
Review of manufacturers
An example of dry mixtures with high elasticity
When deciding on the choice of the best plastic mortar for laying tiles, marble or other materials, it is advisable to give preference only to trusted manufacturers. These include:
- Ilmax. The Belarusian factory for the production of dry mixes produces high-quality adhesive solutions with high elasticity. Ilmax 3130 Superfix is in greatest demand among consumers. The mortar mixture contains special additives that affect the quality of the material. Thanks to them, glue is used for finishing not only “damp” rooms and heated floors, but also existing stoves and fireplaces;
- Moment. Compositions modified with special components are not only plastic, but also waterproof. This solution can be safely used for laying materials with any coefficient of water absorption;
- Ceresite. One of the most famous manufacturers of adhesive solutions based on polymer and cement bases. Elastic mortar cm16 has very high adhesion, which allows the mixture to be used for finishing old glossy tiles. Almost all brands of Ceresit tile adhesive have excellent characteristics.
Elastic adhesive is a reliable material that is not subject to destruction even when exposed to elastic deformation. This solution is universal because it is suitable for finishing any type of base.
Advantages of using cement bonded particle boards for flooring
This material is becoming more and more in demand, which is explained by its excellent parameters.
The main advantages of the product include:
- Strength. This quality ensures the product’s resistance even to severe mechanical stress. Point loads do not weaken the structure of the part.
- Environmentally friendly. The base, consisting of cement and a wood component, to which special modifiers are mixed, does not pose a threat to human health.
- Fire safety. The resulting coatings are highly fire resistant. Exposure to severe temperatures does not result in deformation or release of harmful substances.
- Resistant to mold and mildew. The presence of alkali in the composition prevents the development of microorganisms on the surface.
You can install the parts yourself without involving specialists, but the work has certain nuances.
Laying tiles on a wooden surface
Scheme for installing tiles on wooden floors.
Installation of a tiled covering on a wooden base is possible only if it maintains its integrity and does not rot. The weight of ceramic tiles, additionally increased due to the adhesive composition, can lead to deformation of the wooden floor, its cracking and destruction. Plank floors that, upon examination, appear unsuitable to withstand heavy loads, are best dismantled. It is more advisable to get rid of a rotten subfloor, which will no longer be helped by any surface preparation. If the wooden boards are of reliable strength, it is enough to make sure that they are well attached to the joists and that there are no too wide gaps between them.
Loose floorboards are secured with self-tapping screws or dowel nails, and the gaps between the boards are puttied, having previously been reinforced with thin wood chips. Preparing a floor made of chipboard or plywood is carried out in the same way. The use of a waterproofing underlay when laying tiles on a wooden surface is mandatory. Wood has the ability to absorb moisture well and change size with temperature changes, and insulating the subfloor will prevent the tile covering from becoming unstable.
https://kuhnyamoya.ru/youtu.be/ukXcbORkvWA
Why are elastic mixtures needed?
Elastic adhesive for ceramic tiles will not collapse under conditions of slight elastic deformation.
Many people mistakenly believe that when choosing a tile solution, you need to pay attention only to the strength characteristics of the material. However, one should not discount the importance of such a parameter as elasticity. Elastic adhesive for ceramic tiles will not collapse under conditions of slight elastic deformation, so the cladding will not begin to peel off.
According to many experts, when purchasing a mixture, it is better to give preference to polymer and epoxy compositions rather than cement-sand adhesives. The former are able to protect facing materials from cracking even in conditions of mobility of the base.
Which method is better to use?
A moisture-proofing layer must be laid between the wood and the monolith
For greater reliability, the “disconnected” screed method is used for wooden floors. At the same time, it is isolated from the floor covering and walls.
The floor is first leveled. A moisture-proof barrier is created between the moving part of the floor and the monolith.
For this we use:
- dense polyethylene film;
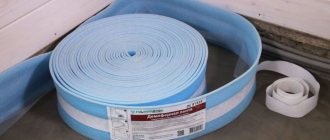
- material in the form of a damper tape, which is fixed at the bottom of the wall and floor;
- foamed polystyrene;
- roofing felt;
- material impregnated with bitumen.
The wood must be treated with an antiseptic and a layer of waterproofing, preferably bitumen mastic, must be applied. Then you can lay the film, leaving a 20 cm overhang on the walls and making sure to overlap. They are glued with tape, ensuring a complete absence of joints, holes and wrinkles. To learn how to make a screed on a wooden base, watch this video:
Useful tips
To achieve better results, you can use some recommendations:
- Installing DSP on the floor is most important when laying tiles: in this case, the highest quality adhesion is achieved.
- Before use, it is better to keep the material indoors for 24 hours. This will eliminate possible errors.
- If work is carried out on a “wet” screed, then you should wait for it to dry completely.
- It is better to carry out the procedures with an assistant, especially when using thick slabs.
If all work is performed correctly, the surface will be more reliable.
The world is structured in such a way that new materials and equipment are constantly being created, completely replacing outdated inventions. Such parallels can be drawn to many modern building materials that are successfully displacing their old competitors.
Such innovations include CBPB floor slabs, which are excellently used instead of cement-sand mortar screed as a rough floor covering, especially in wooden and frame houses.
How to prepare a slab surface for tiling
The surface of cement bonded particle boards is smooth, but there are imperfections, but the defects will remain under the tile adhesive. We are starting to install the tiles.
First treat the surface with a moisture-resistant compound.
In order for the tiles to adhere better to the cement-bonded particleboard, it is necessary to strengthen the adhesion of the materials; to do this, lay a plaster mesh over the cement-bonded particle boards and prime them. Use the primer that is designed for woodworking.
Glue is applied. It is important to prepare the glue correctly, otherwise the fixation of the tile will be poor and after a short time it will begin to slowly fall off and crack under the influence of gravity.
The slabs allow you to create a level base for installing floor coverings
Laying features
To correctly lay the products, you need to accurately select the thickness of the cement bonded particle boards:
- The optimal value when working with a concrete or plank base is 10–16 mm.
- If installation is carried out on logs with a pitch of 50–60 cm, then elements with a thickness of 20 to 26 mm are selected. On the ground floor, it is recommended to lay products with a thickness of 10–14 mm in two layers.
- Prefabricated floors in domestic and technical premises can be made in sheets with a thickness of 24 to 36 mm.
Preparatory work
To ensure that the installation of DSP floors does not take much time, you need to carry out all the preparatory procedures in advance.
Marking
The area of the room is measured and a detailed diagram is drawn up with the data obtained. It is very important to pay attention to difficult areas. If there are tapering parts or niches in the room, it is necessary to divide such places into several sections in order to get the right result. Temperature gaps are left from the walls, which level out deformations during shrinkage of the building. According to the plan, taking into account the selected size of the slabs, it is determined how the sheets will be attached. The technology of flooring on logs involves laying parts across. Cement particle boards are being prepared
To do this, the dimensions according to the location on the floor covering are transferred to the parts.
Sawing
Further work may cause some difficulties: you need to choose what to cut the CBPB with.
To cut the slab, the following tools are used:
- Bulgarian. This is the most effective option if panels thicker than 12–14 mm are used. The work will require special diamond discs that provide fast and reliable cutting.
- Jigsaw. The use of such a tool is limited: it can only cut thin parts. Thicker elements will require a set of good files, which are selected empirically, and a lot more time and effort.
- Construction knife. You can cut thin slabs with this device in the following way: using a blade resting on the edge of a ruler or slats, a depression is formed along the line, after which the product is moved beyond the edge of the table and broken off.
Installation of slabs
To lay parts on a horizontal base in a private house or apartment, you can use different methods, which depend on the type of surface.
Fastening with glue or self-tapping screws
The fixation method is selected based on the specific situation:
- Screws provide reliable fastening to wooden bases.
- When using self-tapping screws, it is recommended to pre-drill holes with a high-speed tool. They should be slightly larger to prevent shrinkage cracking.
- The parts must be glued with a special compound after preliminary priming of the surface of the slabs and the floor.
In some situations, methods can be combined.
Laying on joists
For the process, a wooden beam with a cross-section of 5*8 cm is selected, which will provide the best reliability and rigidity. Parts must be dried and treated with protective compounds.
- Logs are installed. All elements are aligned with each other and fixed. It is recommended to place under them insulation, cut into strips, which will avoid the appearance of cold bridges. If required, jumpers are installed.
- The empty space is filled with thermal insulation material. Dry screed is created in a similar way.
- DSP slabs are laid according to the drawn up diagram with a gap from the walls. If the house was recently built, it is advisable to leave a small distance between all the parts, sealing it with putty or sealant.
- The panels must be fastened with self-tapping screws in increments of 20 to 35 cm. The cap must be immersed flush.
Mounting on concrete screed
You can place the slabs on such a base as follows:
- The surface is cleaned of all excess, dirt and debris are removed. Work is carried out only when the humidity of the coating is low.
- Priming is carried out with a deep-penetrating compound, and the floor is dried.
- The mixture is being prepared. For installation, you will need a notched trowel, which will ensure uniform application without the formation of voids.
This method is excellent for warm water floors, but all gaps between the tubes are first sealed with a self-leveling mixture.
Choosing cement sheets for the floor
The choice of DSP boards is carried out in accordance with the conditions in which the material will be used, as well as the technology by which its installation will be carried out. For laying on logs, slabs with a thickness of 20-26 mm are used - they will perfectly cope with their function as a rough base. If installation is carried out directly on the ground, then 24-26 mm slabs are used. In general, almost any DSP board can be used to level floors.
Average market prices for material
On a note! DSP boards can be laid even in cold weather. It doesn’t matter if the air temperature outside the window drops below zero.
Requirements for CBPB slabs used for floor installation:
For the floor, DSP boards must be used that meet a number of requirements
Laying tiles on DSP boards
The process of laying tiles on the surface of a DSP board is not difficult; it is very similar to laying it on regular drywall or other flat prepared surface. After the primer layer has completely dried, you need to start preparing the adhesive composition, which must be done in small portions. One such portion should be enough for approximately 1 m² of surface. When choosing an adhesive, you need to take a special elastic solution, which is designed to work with cement-bonded particle boards; liquid nails are also suitable.
Floor tile laying diagram.
When laying tiles on DSP, it is best to use elastic adhesive. It provides excellent adhesion of the coating to the surface of the base. You can start laying from the corner or from the center of the first row - it all depends on the features of the chosen scheme and whether cutting the tiles is necessary. After laying the first row, you need to check its horizontalness and verticality with a building level. After 2-3 rows, it is recommended to stop working for about an hour. This is required not so much for rest, but to ensure that the CBPB board normally accepts all the loads. If you do not take such a break, then after installation during operation the surface may become deformed and the tiles may crack. To ensure evenness of the masonry and tile joints, it is necessary to use special plastic cross separators. They are placed in this way: one in the corners between the individual tile plates and two on each side.
When laying the tiles is finished, it is necessary to leave the facing surface for 24 hours. This is enough for the adhesive solution to set. After a day, you can proceed to the next stage of cladding, which consists of filling the seams with grout. All plastic dividers are removed and grouting begins. As you complete this work, you must carefully remove all the glue from the surface of the tile, otherwise it will harden and will be difficult to remove. To increase the moisture resistance of the coating, it is recommended to use a special sealant; it is applied using a thin, soft brush.
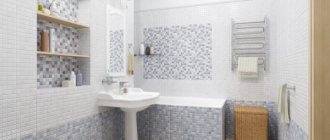
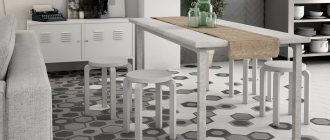
Tile covering is one of the most popular today for bathrooms, toilets, corridors, and kitchens. Some types of tiles can be used for flooring in bedrooms, living rooms, and offices. To lay tiles, you need a perfectly flat base, for which it is best to use DSP boards that have the required properties. The installation of the coating itself is quite simple, it is no different from facing plasterboard or a concrete base.
CSP or gypsum board in the bathroom
** Your personal data is protected by law and is not subject to publication or transfer to third parties. But despite this, we kindly ask you not to enter addresses, phone numbers, passport details, etc. in the question field! Gennady Sukhoi
Is it possible to install heated floors in a bathroom if the base of the floor is wooden? Yes, without any problems. Of course, it is advisable to screw something straight to the tree. GVL, DSP, OSB, the same reinforced gypsum plasterboard for not very experienced builders, the Finns have a lot of technologies and brands of gypsum plasterboard, which are generally used only.
If the floor is hard, screw the GVL to it - then lay your heated floor - install beacons and boldly lay down the screed and glue the tiles* Attention! We do not give any guarantees that your question will be answered, since it is quite possible that there will be no specialists of the relevant profile! Valentin Vedensky
The tiles in the bathroom are constantly swelling, cracking, tearing, what should I do? After our upstairs neighbors flooded us with hot water, the tiles behaved the same way. Then one fine day the entire wall collapsed (all the tiles were from one wall. Good - no one was in the bathroom at that time. When the tiles were removed, all three walls were cracked.
Since the wall is cracked, then it will be possible to build a type of shield on the wall and hang cladding or tiles on it. If you have any problems during the preparation, carrying out or as a result of the repair, you can ask your question through the form below and our consultants will answer if possible him. The basic rule that must be followed when installing tiles on CBPB is compliance with the laying technology and the use of a special adhesive composition. The smooth structure of sawdust slabs is an explanation of the reasons why they do not need to be leveled before laying ceramic tiles; applying one or two layers is sufficient priming mixtures. Pre-treatment with an emulsion composition will improve adhesion and allow the ceramic to firmly adhere to the wooden base. One of the best coatings for bathrooms, toilets, kitchens, and corridors is durable ceramic tiles, which are resistant to mechanical stress, stress, humidity and temperature changes.
It is recommended to lay tiles on cement-bonded particle boards, that is, cement-bonded particle boards that have the necessary characteristics of surface evenness, strength, and ability to withstand the weight of the cladding. The tiles are attached with a special tile adhesive. The DSP board is not afraid of humidity; it can even be doused with water, where it does not swell at all.
Another advantage is that the DSP has a smooth surface that does not require leveling or preparation for laying ceramic tiles. Simply apply a couple of coats of primer to improve adhesion, and then you can get to work. Today, there are many materials for interior wall decoration, and sometimes it is difficult to understand their advantages, disadvantages and differences from each other. Let's look at the three most popular materials for interior wall cladding and find out which is better - gypsum fiber board, gypsum board or plasterboard.
Like gypsum board, gypsum fiber sheet (GVL) consists of gypsum and cellulose. The difference is that the cellulose fibers are mixed directly into the gypsum, which therefore does not have a shell and has a homogeneous structure. The fiber strengthens the material and gives it additional strength.
How to treat the surface → Room decoration → How to choose the right paint → Surface treatment technologies → Leveling and finishing the walls → Selecting and applying a primer → Removal from the surface → Stretch ceilings and technologies → Reviews and testimonials
Preparing a linoleum floor for tiling
Before deciding on the suitability of linoleum as a base for laying tiles, you need to examine its reverse side, lifting the edges. If this material was poorly glued, mold and mildew could appear on the back surface. Small formations can be cleaned and treated with oil paint or primed. In case of a large accumulation of dirt and microorganisms, it is recommended to remove the old linoleum and lay the tiles on a concrete base.
https://kuhnyamoya.ru/youtu.be/WeVlg1fqn-g
The coating suitable for further work is processed with a sharp object, applying cross-shaped notches for better adhesion of the slippery surface to the tile. Processing with coarse sandpaper will enhance the effect, giving the material the desired roughness.
Characteristics of DSP: its advantages and disadvantages
Cement particle board (CPB) is a reliable construction flooring material that has excellent thermal insulation and water-repellent properties.
A DSP floor is characterized as a quickly installed structure, which has variations in thickness that directly depend on the traffic in the room. This type of subfloor has its own characteristics in installation and structure, as well as certain distinctive characteristics.
Characteristics of DSP
One of the most important indicators that characterize a DSP floor slab is density. For a standard cement bonded particle board, its value reaches 1300 kg per m2.
The slab density is high
Also, the most important property of the material can be considered humidity, which is always within 6-10% (the product undergoes factory testing). If the particle board has contact with water for a long time, its swelling percentage should not exceed 2%. Only if this requirement is met can the material enter the market. This property is one of the main advantages of DSP.
Answering the question: “What is DSP?”, we can say that it is a multi-component product. Indeed, a slab of this type contains 65% cement, 25% wood shavings of various species, 8% water or other moisturizing liquid and 2% liquid glass or its equivalent.
The content of a large amount of cement in the product allows it to be used for a long period without losing its properties and the integrity of the sheet (without delamination, like chipboard).
The choice of slab thickness depends on the purpose of the coating
DSP for flooring has a standard size of 3200x1250, but this does not mean that the product cannot be of other sizes (a cement bonded particle board of any parameters can be made to order at the factory).
This type of product has differences in the thickness of the building material, which can be 10, 20, 25, 30 and 40 mm, which adds versatility to the product and makes it possible to be used in a fairly wide area for both indoor and outdoor use.
Some parameters of the slab are given in the table.
Advantages and disadvantages of DSP
Cement particle board is definitely a high-quality sheet material that is widely used for interior and exterior work. DSP is very often used to organize floor coverings and produce façade cladding.
Like any other material, it has its positive and negative properties. The obvious advantages of DSP include:
- good water-repellent properties;
- ease of installation;
- relatively low cost of material;
- good noise insulation performance (indicators reach 30 dB);
- resistance to sudden changes in temperature;
- the product is not subject to rotting or fungal infections;
- high degree of fire resistance (thanks to special additives in the composition of the DSP);
- long service life;
- environmentally friendly material (no harmful resins);
- perfectly flat surface of the product (ready for installation of tiles or stone).
The disadvantages of products made from cement-bonded particle boards include, first of all, harmful installation (cutting of CBPB) and the weight of the slab. For more information about the types of slabs and the features of their use, watch this video:
Since the dust released when cutting material has harmful elements and can easily clog the respiratory tract. In addition, dust reduces the visibility of the work being done, so you should be extremely careful and careful to avoid injury.
How to prepare glue
To lay tiles on DSP, it is better to use cement adhesive. Pour water into the container and add the dry mixture. The proportions are indicated on the packaging. To improve the adhesion of ceramic tiles to glue, add special plasticizers, their amount in the mixture is approximately 15%. Stir the mixture until smooth. It is better to use a construction mixer for mixing. Apply the prepared mixture to the surface of cement particle boards with a notched trowel.
The size of the teeth depends on the dimensions of the tile, for example: for ceramic tiles 30 by 30 cm, a notched trowel is suitable, with a tooth size from 8 millimeters to 1 centimeter. Since the glue dries in 15 minutes, it must be applied and leveled quickly. It will not be difficult to prepare tile adhesive yourself, because the proportions and components are specified in the instructions on the package with the mixture.
Preparation of tile adhesive
What types of screeds are there?
A screed is the top layer on a wooden or concrete floor, which is subsequently finished with a floor covering.
There are the following types:
- Dry.
- Cement.
In the first case, when using this type of screed, the surface becomes resistant to various loads and becomes highly durable.
It is made from plasterboard, moisture-resistant plywood or PVC sheets by laying on expanded clay or quartz sand. This type of flooring is most suitable for wooden floors.
A cement or concrete screed on a wooden floor is used as a base for a polymer coating or ceramic tiles.
Surface preparation before installation
Any surface needs preparatory work before finishing. A sheet of sawdust and cement is practically the only finishing material used for laying tiles without prior preparation. Thus, there is no need to make a concrete screed to level the floor. It is enough just to cover it with DSP.
Floor priming
The only thing you need to do is cover the top with 2-3 layers of soil. Each layer must be thoroughly dried before applying the next.
The use of a soil emulsion composition is a guarantee of protecting the CBPB from the ingress of too much moisture, which can form during the flooding process.
Protected and located under the ceramic tiles, the material will retain its dimensions and structure in this case.