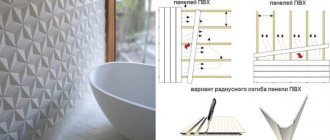
Finishing a bathroom is a particularly difficult undertaking, since this room is used in conditions close to extreme - there is a lot of water and steam in it. So, what are the types and how are mosaic tiles for the bathroom installed? Accordingly, the material used should withstand such exposure without problems. Ceramic tiles, just like mosaics, have become the ideal solution for this. Previously, only wealthy people could afford mosaics, since the installation process was complex and very time-consuming; today, any average craftsman can handle the installation.
Mosaic tiles for the bathroom
Preparation for installation
The installation of mosaics in the video looks clean, so with this photo we decided to remind you that the process is quite easy to stain.
An expensive and attractive coating is mosaic, which must be installed correctly. Before the installation process, you need to select high-quality glue, and also take into account the conditions in which the material will be used (floor, wall, pool thicket). The base for the mosaic, which must be carefully prepared, also plays an important role. Laying mosaics, the video of the master class, which is given here, was not chosen by chance, but was selected according to the criteria that the work was carried out correctly and professionally.
Mosaic in bathroom design
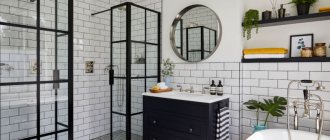
The combination of tiles and mosaics looks impressive when decorating a bathroom with a shower. This stylistic solution of combining all complex components will give the room harmony and comfort. It is worth paying attention to glass mosaics, which in the bathroom will serve as aesthetic and reliable protection for the walls.
Advantages of glass mosaic:
- provides protection of actively used surfaces from mechanical damage;
- excellent coating that protects walls from bacteria;
- has increased strength;
- water and moisture resistant.
Styling tools
The necessary tools will have to be used:
- Bulgarian. It is used to level curved surfaces;
- Level. To eliminate errors in alignment;
- Pencil, cord and tape measure. They are used to make markings;
- Forceps. The sharpening angle should be obtuse;
- A knife, preferably a construction knife. It removes the base;
- Spatula (notched) or comb;
- Spatula (rubber). The seams are rubbed;
- A small plastic container for water, a paint brush, a stiff brush, a sponge.
If the walls are smooth, then laying mosaics is the most enjoyable and entertaining job in renovation.
Types of mosaics for installation
The types of mosaics are simple, but they determine subsequent installation work on the base.
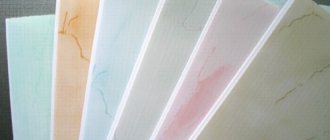
There are 2 types of mosaics based on the type of base:
- Mosaic applied on a mesh or paper base;
- Individual chipped elements from various types of stone, broken tiles or metal.
There are also mosaics based on the type of assembly:
- Matrix (in this case, the mosaic is assembled onto a matrix);
- Artistic (hand-assembled by mosaic artists).
And the type of drawing:
- Background mosaic - monochrome color;
- Stretching (sfumature) – color changes from light to dark and vice versa;
- Multi-tone (a combination of several mosaic colors, with individual sheets creating a single surface when laid).
Tabletop
In the same simple way, you can lay out a mosaic on the tabletop, and when developing a sketch, ready-made templates on self-adhesive paper will help you. Upon completion of the work, you can rub the composition with wax for greater shine. In practice, the uneven, rough surface of the table is not always convenient, so the mosaic is often covered with thick glass . The glass “cap” will also hide any unevenness when using a mosaic of sea pebbles or CDs.
Chic table with handmade mosaic
This wrought iron table is suitable for the home, garden, and balcony
Small garden table with turquoise tiles
Features and types of base for laying mosaics
Most often found in various structures, cement-sand screed, in order for it to have the required strength indicator, it must harden for about a month, after which you can begin laying various decorative coatings. To perform correct installation, the residual moisture content of the base should be taken into account, which should not exceed 3%. To lay mosaics, you need to make sure that the surfaces are smooth, so if there are defects or unevenness, leveling should be done.
Gypsum coatings are also often used as a base, the residual moisture content of which should not be higher than 0.5%.
Each base on which the mosaic is supposed to be laid must be even and durable, dry and clean, otherwise it will not be possible to avoid the appearance of various defects on the new coating or even the material peeling off from the surfaces.
The most difficult surfaces for laying mosaics are wooden or rubber, as well as metal. They are deformable and during installation you need to use special elastic adhesives.
Preparing walls for laying mosaics
Nowadays, there are many options for wall decoration. Nowadays, wall decoration with mosaics is gaining great popularity.
Regardless of the type of mosaic, the preparation of the walls should be as thorough and correct as possible. The surface of the walls should not have any curvatures, potholes, or cracks. For finishing walls with mosaics, plasterboard walls are best suited.
When choosing an adhesive for tiles, it is best to rely on latex adhesive. It is this glue that will allow you to securely fasten various types of mosaics, such as glass, stone, metal or smalt.
A mandatory process for preparing walls is their complete cleaning of dust and dirt. For maximum quality mosaic finishing, the walls are pre-primed. After this, the mosaic can be laid; a video of this process was posted at the beginning of the article.
Laying mosaics on the wall is a more labor-intensive process than on the floor, since the material may slip if the work is carried out without following the installation technology.
Before laying the mosaic, you need to trim all protruding parts and accurately calculate the amount of material by laying out
Choosing adhesive for mosaic tiles
Laying mosaics is easy to do with your own hands. Regardless of the installation location and the chosen technology, high-quality preparation of the base and the correct selection of adhesive composition are necessary. You can lay the mosaic using any adhesive suitable for tiles. But when choosing a certain type of mixture, one must take into account the condition of the surface and its features. The following materials are most often used for gluing mosaic elements:
- Cement glue. It has the lowest price compared to other compounds. Manufacturers produce white or gray mixtures, packaged in 20-30 kg bags. The composition includes cement, sand, gypsum, alabaster, fillers and plasticizers. Cement glue is diluted with water or liquid latex and used for application to brick and concrete masonry.
- Dispersion composition. Sold ready-made in jars. The composition includes water, mineral components, acrylic additives. The pasty mass is more expensive than the cement mass, but the ease of its application compensates for this disadvantage. It takes 30 minutes to harden completely. During this time, you can adjust the position of the mosaic tiles. The remainder of the mixture can be stored for a long time in an airtight container.
- Two-component adhesive. The high-strength mass includes epoxy resin and hardener. The material is suitable for gluing mosaics to smooth surfaces (marble, glass, plastic, metal). Wall cladding with mosaics using two-component mixtures is carried out in the bathroom, swimming pool, kitchen, shower.
Waterproofing
If you plan to install mosaics in a swimming pool or bathroom, then it is necessary to create high-quality and reliable waterproofing, which is most often done using special waterproofing compounds. These compositions are applied to the surface using a spatula, and the layer can be applied twice, and its thickness can be 2 cm.
During the installation process, seams are formed between the individual mosaic elements, which need to be filled with silicone or polyurethane sealant, and colored grout is often used, which is selected depending on the color of the mosaic. The material is pressed against the surface with a rubber spatula for some time, after which the installation is considered completed.
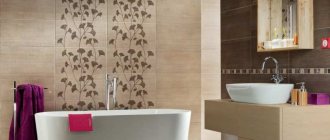
Advantages of mosaic
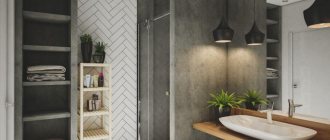
The choice of mosaics is currently very large, so choosing it for the bathroom is not entirely easy. In the case of combining a bathroom with a toilet, it is necessary to improve ergonomics in the equipped areas. In addition to thinking about where and what will be installed - a bathroom, a shower stall, you also need to calculate the points where the lighting will be located, the design of the mirror, hangers, etc.
The entire design should be based on the same color shades or completely contrasting solutions. In terms of texture and color, the selected decor should have something in common with the installed plumbing fixtures (sink, shower stall, bathtub) and ceramic tiles. Most bathrooms have a small area. In such cases, mosaic comes to the rescue, since rooms made with its help are visually enlarged and seem lighter.
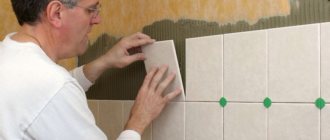
Step-by-step installation algorithm
There are several stages for laying mosaic tiles. First: you need to prepare the wall surface. Sanding and thorough cleaning of dust and construction debris. Second: mark and outline the laying area. At least three sheets are measured, taking into account the space between sheets, all measurements are applied to the surface vertically and simultaneously horizontally. The entire drawn sector should be 9 sheets. Third: the actual styling. The solution is selected depending on the type of mosaic, applied with a spatula within the lined 9 sheets. Use the teeth of a spatula to remove excess and level the solution. A nuance: the gaps between the sheets are checked extremely accurately, with a paper or mesh base on top of the laid tiles. For uniformity, apply with a spatula (rubber only!). Having finished with one sector, proceed to the next, also starting with marking. Having laid the second sector, they return to the first - moisten the paper with a sponge and remove it. You must work with extreme caution, since the glue has not yet dried and the tile may “crawl.” After removing the paper, the gaps are smoothed out and excess glue is removed; the process must be carried out until the glue dries completely. This is how the entire planned surface of the wall is processed. Fourth, no earlier than a day later, the joints are grouted. The area covered with grouting material is no more than 2 square meters. m, it dries in about 20 minutes (depending on the room temperature). The excess is washed off with a wet sponge. If you use a product with acids, wash it off with plenty of water.
Briefly about the main thing
Mosaic tiles allow you to quickly and inexpensively tile the surface of any room. The variety of types makes it possible to choose the best option for different wall surfaces.
The basic requirements for creating a beautiful and durable mosaic are knowledge of what material the tiles are suitable for the room, and what glue to use to glue the mosaic.
Mosaic allows you to implement any design idea at low cost. The cladding looks impressive, and its properties are not inferior to ceramic tiles.
After studying the instructions on how to lay mosaic tiles, you can decorate a bathroom, toilet or other room yourself. It is important to adhere to the rules and recommendations for laying mosaic tiles.
Ratings 0
The process of laying mosaics with a mesh base
This mosaic is considered the easiest to install, and therefore the most common. So, you have a task before you: there is a mosaic on a mesh, laying it on a flat surface. Here's what you need to do. To begin with, latex glue is applied to the surface of the walls with a comb, after which the tiles are applied to the wall. The mosaic should also be pressed down with a wide rubber object, while straightening the mosaic elements to ensure maximum uniformity of the seams. When the glue is completely dry, the seams are cleaned and grouting begins. This type of work, in which the laying of mosaics, videos and photos are quite abundant, is carried out without difficulty, since the laid out pattern is visible and even the pressing force can be calculated in advance. This type of work is similar to how tiles are laid; mosaics only require crosses rather than wedges during installation. Another thing is laying mosaics on a paper base.
It is worth remembering, before laying mosaics on the grid, that the grid faces the wall and the mosaic faces outwards
The process of laying mosaics with a paper base
For this type of mosaic, colorless glue or a white adhesive solution is best suited. When laying tiles, it is important to select the amount of glue. The main thing in this matter is not to overdo it and not to save so much that the material will fall off and all the costs will have to be incurred again. The seams will be uneven and crossed if you apply a large amount of glue, and if there is not enough of it, then voids will form in the seams.
It is very important not to confuse the installation side; there were construction teams with no experience working with the material who managed to lay the paper base inside even the pool bowl. The sheets floating away from the side will make a lasting impression on you; if you haven’t experienced a feeling of horror for a long time, then you can safely try the services of untrained craftsmen.
Step-by-step instructions - laying tiles, mosaics, metal tesserae.
Then the mosaic is pressed to the surface, as a result of which the glue will fill the seams on its own. The paper base prevents the occurrence of excess. After the glue has dried, remove the paper layer, after moistening it with water. Next, grout is carried out using the usual method using a rubber spatula. Laying a mosaic, the video is also published above, is more difficult of this type, since the pattern is not visible until the paper is removed.
This option requires that the work be carried out by a professional mosaic artist.
Mosaic laying - all the important working points
Laying mosaics is a very interesting and creative process. The photographs show examples of the work of professional craftsmen - all of them are worthy of praise and admiration. In this part of the article we will try to learn how something similar can be implemented yourself with minimal time and labor costs. We will also cover all third-party issues regarding materials and tools to make everything as clear as possible.
Mother-of-pearl surface - elements are arranged in a checkerboard pattern
Unique handmade
The sink is lined with white smalt mosaic, the countertop is made of acrylic stone
Selection of adhesive composition
The choice of glue type is influenced by the material used to make the mosaic, as well as the base on which it needs to be placed. You have several options from which we will choose.
Table 2. What type of glue to choose for mosaic
| Photo | Description |
| Dry cement-based adhesive | The most common solution is cement-based adhesive. It is sold in bags of different packaging. It is inexpensive, but has good characteristics and properties. These compositions are made on the basis of white or gray cement. More often, the first option is purchased for mosaics, as it allows the material to become less dirty. When preparing it, it is mixed with liquid latex or water. There are three types of such adhesives - deformable, elastic and rigid. They are selected for the base to be finished. Rigid adhesive is needed to work on stationary dimensional surfaces, which, if they experience deformation, are very insignificant, for example, on a wall made of brick, cinder block, etc. Elastic and deformable adhesives are very effective when the house is constantly subjected to loads that create deformation of the structure and its vibrations. For example, it is framed or there is a metro line nearby. They are also designed for installing tiles on wooden surfaces and other materials with high thermal expansion rates. |
| To work with mosaics, it is very convenient to use diluted glue. It is stored in a hermetically sealed bucket, which significantly increases its production time. Since mosaic processing can take a long time, this property will help avoid wastage of material. The cost of such glue is higher. The composition includes various minerals, acrylic and water. Its consistency is pasty, medium thickness - it is very convenient and pleasant to work with. The color of the material is white. The setting time of this glue is higher than that of cement glue and reaches 40 minutes, which allows you to adjust the position of the glued sheets if necessary. It has excellent adhesion even to complex substrates - mosaics can be glued directly onto old tiles, for example. The use of this solution is 100 percent justified when you are engaged in complex, painstaking work. |
| Two component adhesive | Two-component reactive adhesives are made from epoxy resins and polyurethane. They consist of two substances mixed together - a hardener and a base. In this case, a chemical reaction occurs - the resulting mixture hardens into a very strong and elastic mass. These compounds are completely waterproof, so they are ideal for swimming pools, baths, saunas and bathrooms. The composition does not use water, so this solution is the only correct one when laying mosaics made of sandstone and similar rocks. Mosaics can be mounted on any surface, even glass. The strength of such compounds is very high and they last an incredibly long time. For beginners, it is not recommended to use such glue, as it has a short development time. You need to have experience and accurately calculate the amount of mixture to be prepared. |
Now let's summarize the information a little to understand which composition is better to choose. If you want to finish the job as quickly as possible, then two-component compositions are what you need. We also take them for complex foundations in terms of its material and movements. If the mosaic is transparent, then it would be correct to choose the color of the glue to match it - more often they take white as a neutral base. Opaque elements can be installed with any adhesive.
Expert opinion: Masalsky A.V.
Editor of the “construction” category on the Stroyday.ru portal. Specialist in engineering systems and drainage.
If the tiles are laid in places that are constantly in contact with water, it is necessary that the adhesion of the adhesive is at least 2 MPa, and that it itself is waterproof.
It’s a crime to save money when creating such luxury on glue.
What should be the base for a mosaic?
An ideal mosaic wall will be smooth, durable and clean. If it does not crumble, then applying glue to it is very convenient. Such a surface will be gypsum or cement plaster - we do not write how it is made, since this is the material for a separate article. Just remember what the wall should be and achieve it with all your might. We are now interested in its preparation.
Table 3. Substrate preparation
| Step, photo | Description |
| If the presence of small recesses on the wall when laying large tiles is not of particular importance, then the mosaic cannot be placed on such a base, since individual elements have a small area and can fly off. Therefore, we arm ourselves with medium-grade putty, spatulas and inspect the wall. If we find something, we eliminate it. Large and smooth changes will not affect the strength of the finish, but when they pass through a mosaic on a fiberglass mesh, the size of the seams will change, so it is first necessary to achieve a certain evenness. To work, use a rule and a spatula. |
| After all restoration measures have been carried out, growths and debris may remain on the wall. We clean everything with a spatula and, if necessary, bring the surface to a smooth state with an abrasive mesh. |
| Next, the walls are primed. Deep penetration compounds are usually used, which will make the plaster stronger and bind all the dust on it. The primer is selected according to the glue that will be applied to it. Interesting to know! If your bathroom walls are covered with plasterboard, then you will need to seal the seams between the sheets and cover the screw caps. |
The working process
Along the way you will need the following tools:
- An electric drill with a mixer attachment for mixing glue.
- Buckets for these purposes and cleaning tools - if you bought a ready-made composition, we do not take these points into account.
- A laser or water level for setting rows and a bubble level for checking the position of individual elements.
- A notched grinder for applying glue to the wall (you can also use a spatula).
- Any roller for pressing and rolling mosaics on the wall.
- The right tool for cutting. A stationery knife, a mosaic cutter, an electric machine for part-time work and an emery stone for the same purposes will come in handy here.
- A grater for rubbing seams.
Roller mosaic cutters
Among additional devices and materials, we note grouting paste for seams and spacer crosses.
Mosaic grout
Table 4. Instructions for laying mosaics
| Steps, photo | Description |
| It is very important that the position of the mosaic is level. We mark the wall horizontally at the height of the second row. You need to take into account the height to which the floor will rise when laying it, if the mosaic reaches it. If the floor has already been laid, then laying can begin directly from it. |
| According to the markings, we attach the metal profile PNP 27*28 - it will serve as an excellent, even base while the glue sets. It is difficult to align the mosaic on the canvases, since they are flexible and the mesh can sag. Take the canvas and make a vertical marking, which will serve as an additional guide. |
| So, we can begin. We take the chalk and apply glue from the bucket to its flat side with a spatula. We then spread it on the wall in a layer of several millimeters. We pass in this manner only the area that we are guaranteed to have time to fill. It is important to cover the entire base evenly so that the gray concrete walls do not show through. |
| Then we take a comb and stretch it through the glue applied to the wall. We do this once, in one direction. The size of the mosaic comb is 3*3 mm. |
| We remove the protective film from the back of the mosaic and glue it at the intended level. You can actively use a laser axle builder in your work. |
| Now the canvas needs to be pressed evenly to the base. This can be done using a flat grater or roller like this. In this case, excess glue will be squeezed out a little into the seams, which will strengthen the adhesion of the materials. Then we remove the excess glue and move on. |
The rest of the canvases are placed in exactly the same way. If trimming is required, then send it to the inner corners, but it is better to try to avoid them altogether. Finally, the joints are grouted - for this they use the same grater. The mosaic wall is ready and looks great.
When renovating an apartment, the planned design of a small bathroom often causes difficulties for many. Therefore, a special article will examine the main factors that influence the ease of use and aesthetics of a given room, and will also present several options for designing a bathroom.
Video - Laying mosaics
With your own hands
The most attractive, high-quality and elegant type of finishing remains the manual selection of mosaics, which are independently selected from individual parts.
There are two ways to lay such a mosaic:
- To begin with, a pattern of elements is laid out on the floor, and then each part is transferred one by one to the surface of the walls;
- The mosaic in the form of a pattern is glued with the front side to thick paper, then transferred to the walls. After the glue has dried, the paper is removed.
Artistic mosaic is an entertaining process from the beginning of creation to laying the material with your own hands on the floor or wall in your home
. Important: the size of each mosaic element should not be large. Medium-sized fragments will allow you to create a design with high quality and precision, using different types of material.
Glue
Many people are interested in what to glue the mosaic onto so that it holds firmly. The adhesive composition must be carefully selected to match the properties of the wall surface, material, and operating conditions.
Special tile adhesive
The easiest way is to purchase a special adhesive for tiles at a building materials store, made on the basis of Portland cement with the addition of plasticizers. This is a ready-made composition that only requires dilution with water to the required thickness. The glue ensures reliable adhesion to any surface. This glue is not suitable for glass mosaics due to its light gray tint.
Tile adhesive Source purplemint.ru
Polymer glue
The acrylic-based mixture ensures reliable fixation of mosaics made of any materials on various surfaces. This is the best ready-made adhesive for rooms with humid air. Dyes are added to the composition, which makes it possible to use it to create interesting design solutions. Before use, stir and apply to the surface. The glue dries quickly, forming a glass-like mass.
Main conclusions
Mosaic tiles are sold in various types, but most often they do not absorb moisture, and to install them you need to use reliable and high-quality adhesives. What is the difference between mosaics is now clear and how to lay a mosaic on a grid is now clear. If all these conditions are met, then the end result will be a unique interior design with an artistic component, no worse than the basilicas of Byzantium.
The combination of laying tiles and mosaics creates interesting design interiors
The information is not entirely correct; laying mosaics in the bathroom is the best way to use this material; it is suitable for any room in an apartment or house. And if there is a swimming pool, then this material has a higher priority than, for example, tiles or porcelain stoneware. Mosaic tiles are a natural and environmentally friendly material that does not emit toxins when heated strongly. Maintenance is extremely simple, it is easy to wash, and it retains its original appearance for many years.
Laying mosaics in the bathroom is a proven solution that is both beautiful and practical
It is worth noting that the laying of tiles and mosaics (the video of which was given) are different and the masters who lay tiles may not be masters in laying mosaics. These are quite different types of work, although the materials are very similar, but even the preparation of glue for the work is different. We recommend taking this into account. The technology for laying mosaics is different than when laying tiles and the training of mosaic masters requires more time, as it has many secrets, from preparing the base to facing curved surfaces. Based on the data in this article, you will definitely be able to understand how to properly lay a mosaic and make the right selection of both tools and builders. A large number of video and photo examples allowed us to fully explore the topic of laying various types of mosaics.
Types of mosaics
Today, mosaic is not only small-format tiles, but also a larger material with a corresponding relief. This also includes certain tile layouts and patterns on it. We will talk about all this in this article. Along the way, we will present you with interesting photographs with options for ready-made design solutions, so that you better understand the beauty and elegance of such finishing. We will also list the materials from which mosaics are made today.
Glass mosaic with metallized base
Expert opinion: Masalsky A.V.
Editor of the “construction” category on the Stroyday.ru portal. Specialist in engineering systems and drainage.
In general, the term mosaic refers to a type of applied art in which the resulting image is composed of small multi-colored parts. For these purposes, they use pieces of wood, fragments of ceramics and decorative glass, as well as small pebbles, which, if necessary, can be painted in different shades. Not all masters mastered this art, so handmade work has always been worth its weight in gold.
As we have already written, today manufacturers offer many solutions that help to significantly simplify the task.
Table 1. Varieties of mosaic masonry
| Types of mosaic masonry | Description |
| The classic version is a placer mosaic. They make it from any materials, which we will talk about in the next chapter. To simplify the set, today for such a mosaic you can purchase special stencils that are pre-mounted on the walls. Laying is mainly done using polymer, elastic adhesive compositions. |
| This option consists of small canvases of a certain format (usually 30*30 cm) made of fiberglass mesh, on top of which mosaic tiles are glued. A huge advantage of this arrangement is the high installation speed, comparable to laying conventional tiles. The seams between the elements are perfectly aligned, which allows you to create an even geometric pattern without moving the seams without unnecessary problems. Such a mosaic costs more than a loose mosaic, but the savings on the craftsman’s work more than justifies this difference. The standardized size of such a mosaic can also be considered a disadvantage, since it becomes difficult to join it in the corners of the room - special cutters are required, which we will show you a little later. Advice! If the size of the wall matches the size of the seam of such a canvas, then it can be shortened without any problems with a stationery knife. |
| This mosaic can also be loose or mounted on a fiberglass mesh. In the second case, you will need copious grouting after laying the material, and in the first, it is simply embedded in cement mortar. Such mosaics can be produced in different formats - geometric shapes, abstraction, imitation of leaves and petals, etc. This finish looks very beautiful and rich, but the master must be able to beautifully and accurately fill in the gaps between the elements, which, as you can see, are quite large. |
| A very convenient solution to use would be glazed ceramic or porcelain tiles, the front side of which has the appearance of a mosaic grid with the appropriate colors. Such tiles are laid in exactly the same way as the most ordinary ones. The only peculiarity that can be noted is the precise alignment of the tile joints so that their thickness matches the pattern. This solution also has disadvantages when compared with classic mosaics - it cannot be used for cladding curved planes and it is necessary to accurately select the color of the grout, which is sometimes very difficult to do. |
| The mosaic effect can also be achieved by arranging larger elements. Here is the most ordinary ceramic tile with glaze of different colors. The masonry is ordinary, but the chaotic alternation of colors gives the finished surfaces a special charm and expressiveness. A room with such decoration will not leave anyone indifferent; visitors will always be in a good mood. |
| A mosaic pattern can be made from elements of different shapes. The photo on the left shows a variant of volumetric masonry made of rounded parts on a mesh backing. |
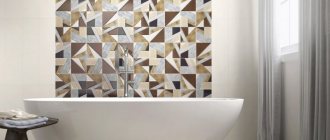
| A tile can become a mosaic if a pattern of the appropriate format is applied to it. Here is a vivid example - the wall on the left looks like it is simply lined with small tiles, and on the right it has already turned out to be a real mosaic composition. |
| The shape of the tile will also influence the appropriate perception of the finish. The photo shows products from Italy - the tiles have the shape of scales, which allows you to create very beautiful and original compositions from them. Working with such material requires a certain amount of experience from the craftsman - it is difficult to cut and align rows. Due to its large size, it is also not suitable for curved planes. The material can have any other shape - we have given this one as an illustrative example. Hexagons, arabesques, triangles, rhombuses and other options look very nice. Sometimes a very interesting effect is achieved when an unusual tile shape is combined with a geometric pattern applied to it. |
| Some semblance of a mosaic effect can be achieved by varying the tile layout. Of course, you need to have at least small multi-colored accent spots on the surface, as shown in the photo on the left. In general, there are a lot of options, you will definitely find one that suits you. |
Mosaic materials
The appearance of the mosaic largely depends on the material from which it is made. This parameter affects both the price of the material and the complexity of its processing.
- The most inexpensive and unpretentious-looking mosaic is the option from the usual ceramics. It is ideal for finishing bathroom walls, as the glazed surface is non-hygroscopic. The surface of the material can have different designs - colors, texture, surface type. This solution is used very often when lining swimming pools, as it is convenient (tanks can have a round shape), safe and reliable. It is perfect for columns and semi-columns.
Ceramic mosaic - Incredibly beautiful glass mosaic. It costs much more than ceramic due to the increased complexity of processing the material. It is beneficial to use such elements as decoration, combining them with large-format tiles. Glass reflects light very beautifully and makes the room visually larger, especially when the panel has mirror inserts. This effect helps to hide surface unevenness, if any. There are a lot of options for making such a mosaic - interesting effects are achieved due to the base on which the glass is poured. The edges of the glass parts are rounded by grinding. The absence of sharp edges means safe operation.
Glass mosaic set - Smalt mosaic is a classic material for the work of professional artists. We can also use it in the interior in the form of small drawings to decorate surfaces. Smalt is also glass, but an unusual one. During the production process, the molten mass is brought to a certain temperature, after which it undergoes special treatment. This gives the structure of the material high strength, immunity to temperature changes and unique beauty - the material has a unique matte gloss while being opaque.
Smalt mosaic - There is another type of glass - Venetian, from which the mosaic is made. They definitely don’t use it for bathrooms because of its high cost - professional artists work with the material, and they make paintings, frescoes, panels, etc. from it.
Venetian mosaic - Materials made from natural stone. You get a unique pattern and unique strength. If installed correctly, such a mosaic will last for many decades. For the production of such mosaics, the following rocks are mainly used: tuff, jasper, marble, sandstone, mica, amber, etc. It is clear that the cost of the material will largely depend on the breed.
Natural stone mosaic - Also popular are options from artificial stone and porcelain stoneware. These materials have a wide range of colors, textures and shapes, which allows you to create unique interiors. They cost much less than their natural counterparts, but they don’t look much worse.
Fake diamond
Even wood can be used as a manufacturing material, but it is more often used for residential premises, for obvious reasons.