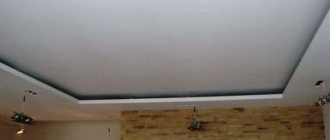
Repair work includes many stages of surface finishing; a special highlight is finishing the ceiling. There are many materials on sale to cover the ceiling. But whitewashing the ceiling with a water-based composition does not lose its position and is chosen by many. This is due to the simplicity of the work and the good results obtained. How to whitewash a ceiling with water-based paint correctly will be discussed below.
Advantages of water-based paint
Among similar products, water emulsion has several positive properties. They are what make it so popular when finishing ceiling surfaces. The following advantages stand out:
- No unpleasant odor;
- Fast drying speed, the process will take only a couple of hours;
- Work safety;
- Pleasant decorative effect;
- Good compatibility with many materials, except metal products;
- Ease of care;
- It is easy to clean tools and skin after using the composition.
Fast drying speed, the process will only take a couple of hours.
Types of material
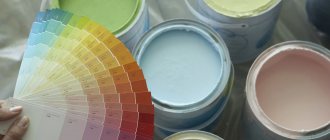
In order for whitewashing with water-based paint to be successful with your own hands, you need to choose the appropriate composition. There are several types of products on the market, they have different characteristics:
- Mineral look. The composition contains cement or lime. It is of low quality, so this coating will not last long. It is used more often for buildings made of brick and concrete that are not residential. Cheap option;
- Silicate, based on liquid glass. Highly resistant, this finish will last 20 years or even more. But does not tolerate exposure to moisture;
- Acrylic, the base consists of acrylic resin mixed with water, they are odorless and give the surface a beautiful decorative appearance. Resistant to mechanical stress, can be cleaned using a soap solution. It is vapor-tight, so the surface must dry before application;
- Silicone, the most expensive and high-quality type. Unlike the previous type, it allows steam to pass through, so it can be applied to a surface that is not completely dry. Can be washed.
The compositions can have a glossy, matte, semi-matte effect. The glossy version is easy to clean, but cannot hide surface imperfections; the matte version is difficult to clean, but at the same time they cover minor imperfections.
In order for whitewashing with water-based paint to be successful with your own hands, you need to choose the appropriate composition.
Some subtleties of choosing an emulsion
The variety of paints is enormous.
When choosing, it is worth considering the condition of the surface - it is better to paint rough ones with matte compounds, but there will be difficulties when washing. The glossy, special white coating reflects light well, so it can be recommended for ceilings in rooms with insufficient lighting.
For the kitchen, bathroom, laundry room, swimming pool, the requirements of low abrasion, the ability to wash with household chemicals, and vapor permeability come to the fore - silicone paints are the best choice.
Whitewashing the ceiling of a non-residential, rarely visited, but dry room can be done with a mineral emulsion; for damp ones that require periodic washing, acrylic and silicone paints are suitable.
How to choose water-based paint
To choose a good and suitable composition, you can follow the tips listed below; they will help you find the best option among the many paints:
- If you decide to paint the ceiling white, then a composition with titanium dioxide will work well, the coating will be perfectly white;
- To produce water-based emulsions, expensive foreign materials are used, so the cost is high. If you come across a cheap type on sale, then low-quality ingredients were probably used for production, or it is an expired product. Such a price should arouse suspicion;
- To make it easier to distinguish the scope of application of products, material marking is used; if there is a number 1, then this type is suitable for exterior finishing; to whitewash the ceiling, choose the VD2 marking.
The average consumption is indicated on the packaging, but if the solution is tinted, you need to take extra paint, the consumption will increase. It is important to buy the correct quantity of the product, because it is difficult to create the same shade of the solution again.
Consumption may increase depending on the surface material. It is imperative to study the consumption data indicated by the manufacturer, because cheaper options often require more consumption, so there may not be any savings.
This product does not tolerate frost and heat well, so buying them on the street is undesirable.
The average consumption is indicated on the packaging, but if the solution is tinted, you need to take extra paint, the consumption will increase.
Preparing the necessary tools for whitewashing
The tools you choose can affect the speed of work and the results obtained. To carry out the painting itself, you will need one of the following tools:
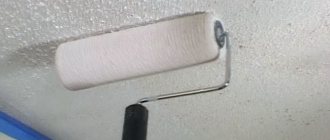
- A roller is a convenient option; you can quickly cover the ceiling and walls with it;
- Brush. When processing is carried out with a brush, streaks may remain on the surface, making it difficult to hide the strokes. It is advisable to paint only corners and hard-to-reach places with it;
- Spray gun. The work will proceed at a fast pace, there will be no streaks, and the coating will be uniform. But it is important to protect nearby surfaces, because splashes can get on them and in your eyes.
For other stages you will need to prepare:
- Sandpaper;
- Masking tape;
- Polyethylene film;
- Putty knife;
- Cuvette;
- Stepladder.
The tools you choose can affect the speed of work and the results obtained.
Painting works
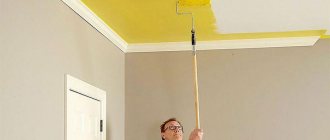
When whitewashing a ceiling with your own hands, it is best to start by painting two layers of hard-to-reach places and corners formed by adjacent walls.
- Apply the first layer with short strokes perpendicular to the walls, and then shade with smooth sweeping movements of the brush.
- To apply the second layer, you must use the same technique, only the direction of movement of the tool must be changed to the opposite.
Having thus outlined the boundaries of hard-to-reach places, you can begin to process the main area of the ceiling using a paint roller.
- Dip the roller into a tray with emulsion, roll it out flat and squeeze it thoroughly.
- Apply paint to the ceiling using transverse movements of the tool, and then, loosening the pressure of the roller, roll it over the entire surface using smooth, sweeping movements.
- Thus, it is necessary to treat the entire surface, covering it with paint in several layers, alternately changing the direction of application and rolling.
- It should be remembered that each layer requires intermediate drying, so between their application it is necessary to maintain a time interval of about 2 hours.
Scheme of applying paint layers.
Which roller to paint with?
To make the job easier, you should choose the right tool. According to experts, a roller is best suited for painting ceilings with water-based paint. At the same time, they note that the pile should be long and natural, the handle should be elongated.
What rollers are used:
- Fur or velor, has good paint retention, but is more expensive than synthetic analogues;
- Painting, impregnates the paint; you need to lower the roller into the ditch less often, but if you press hard, the substance can flow out;
- With long pile, a metal thread is used inside, making the tool more reliable and more expensive;
- With relief, we can use it to create patterns on the surface, if the designer has a similar idea to decorate the ceiling.
For large areas, the best option would be to use wide rollers; they reduce the number of strokes, so it will be easier to avoid streaks. The extended handle allows you to paint the ceiling while standing on the floor.
The pile should be long and natural, the handle should be elongated.
Need to read the label
Make it a habit to read the instructions on the label. After all, it contains all the technical characteristics.
- In the annotation you will find what types of work this emulsion is intended for.
- Also there you will find the emulsion consumption per square meter. This is necessary to calculate the required quantity.
- The degree of coverage will also be indicated there - this is the ability or ability of the water emulsion to cover a darker background.
- And finally, the abrasion resistance of the water-based emulsion should be indicated in the annotation.
Pay special attention to the small font in the annotation, because... the manufacturer often enters the main technical characteristics there.
- It is recommended to use the emulsion in dry rooms. Such an inscription notifies the consumer that this paint is not suitable for painting the ceiling in the kitchen. Since in the first case there will be constant oily evaporation, and in the second case there will be increased humidity.
- Leave-in emulsion or highly durable. This means that the ceiling can be washed without the use of cleaning agents and detergents.
- The paint is abrasion resistant. Dirt-repellent property. This surface can be cleaned with detergents.
Padding
To reduce the consumption of water-based emulsion, you can carry out priming; this process will also allow you to obtain a better-quality coating. There are a number of advantages of applying a primer:
- Improving the strength of the surface, the primer solution penetrates deep into the material, therefore it combines the compositions;
- Ensuring good adhesion of materials;
- Increased resistance to moisture;
- If a composition with protective elements against mold and mildew is selected, it will prevent their occurrence.
To reduce the consumption of water-based emulsion, you can carry out priming; this process will also allow you to obtain a better-quality coating.
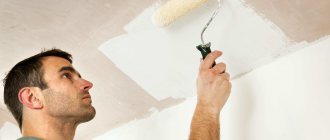
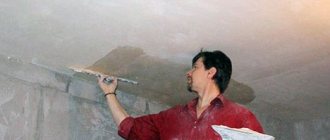
Preparing the ceiling surface
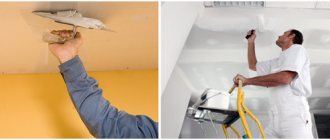
To repair the ceiling, you first need to clean it of all types of dirt, remove the old coating, and the surface must be smooth. The presence of flaws, pieces of old finishing, or various types of stains is checked.
The previous finish must be removed using a spatula. If it was whitewash, then first wet the surface in sections, wait for it to swell, then work with a spatula or a metal brush. You should not wet the entire ceiling at once; it is better to carry out the process in stages.
If wallpaper was used as a ceiling covering, then they are also pre-moistened. Remove the old water emulsion by thoroughly wetting the entire surface. The second time, twenty minutes later, the ceiling is wetted again. Open windows and doors in the room to get a draft. After the coating has swollen, you can try to remove the water-based paint with a spatula.
Even if there are small areas of old coating on the surface, they need to be eliminated. You can only leave freshly applied material when it holds securely.
Reliability is checked by tapping these areas; if the sound is dull, then the clutch is bad, and these defects must be removed.
The previous finish must be removed using a spatula.
Good repairs are easy!
Many things seem incredibly simple until you try to do them yourself. Painting the ceiling is one of them. This page will discuss how to properly paint a ceiling. Painting should begin by preparing the base.
How to prepare a ceiling for painting
If the ceiling is in very poor condition, then it should be leveled and puttied. This has been covered on other pages and there is no need to go into detail about it here. Let's consider a case where the ceiling is in good condition and just needs to be refreshed.
First you need to determine what is on the ceiling now. The most common options: whitewash, oil paint, water-based paint. To understand what's on your ceiling, run your hand over it. If the hand is all chalky - whitewash, if it is slightly dirty - cheap water-based paint, if completely clean - a good water-based emulsion or enamel (oil). You can distinguish a good water-based emulsion from enamel like this: if it’s a kitchen that was renovated twenty years ago, there’s oil paint on the ceiling; if the repair was done recently, it is most likely water-based paint.
If there is whitewash on the ceiling, then there are two options: • whitewash it again; • wash off the whitewash, putty and paint with water-based paint. The first option is simpler (just remember that you cannot whiten with a roller), the second is longer and more difficult, but in the end you will get a normal ceiling. Choose for yourself.
If there is oil paint on the ceiling, and it is in such a condition that it does not require repair and just needs to be refreshed, then consider yourself very lucky (I have never seen anything like this). In this case, you just need to repaint it with enamel. Now water-based enamels have appeared, almost odorless. Just right for the ceiling.
If there is water-based paint on the ceiling, make sure there are no peeling pieces of paint or cracks. If there are such places, you need to prepare the ceiling completely for painting. Do not try to correct it in pieces - these places will be visible later (the surface texture will be different). If there are no such places, prime the ceiling with a good penetrating primer (for example, Dufa or Knauf). The ceiling is ready for painting.
How to paint the ceiling
It is best to use water-based paint. For example, Tikkurila Euro 7. A nine-liter bucket of this paint costs about two thousand rubles. One such can should be enough to paint the ceilings in a small apartment (it’s better to buy paint in large cans - it’s cheaper). This paint is one of the cheapest among washable ones. Other washable paints may be better washable, but more expensive. If prices don’t scare you, pay attention to Duluxe paints.
Cheaper paints, as a rule, are no longer washable. How important this is for the ceiling, decide for yourself. These are already dispersion paints (those that get a little dirty if you run your hand over them). A good representative of this family is Dufa Superweiss. The paint is very white and covers well. It costs, however, no less than Euro 7.
The paint can be glossy, semi-gloss or matte. It's always written on the bucket. It is better not to buy glossy paints - they will reveal everything that will not be visible on matte paints. Matte looks poorer. The best choice is semi-gloss paint.
Tools you will need: • a roller with a pile on a long handle, 25-30 cm wide (not foam rubber, the longer the pile, the more “shagreen” from the roller, hiding minor surface flaws); • roller with pile 7-10cm wide; • brush 5-7cm wide; • trough for rolling out the roller; • stepladder.
How to paint a ceiling
The ceiling is painted in two layers. After the first layer, gaps may remain, which will be covered with the second layer. The layers are applied equally. The only thing is that you need to be more careful with the second layer, because... you can't fix it anymore.
If the paint is thick and the manufacturer allows dilution, dilute with water and mix thoroughly. During the painting process, you often come across pieces of paint that have dried on the lid or edge of the bucket. Here you need to: either pre-filter the paint (if there is a lot of debris); or immediately remove these pieces from the ceiling as soon as you notice them.
The ceiling must first be “retracted”, i.e. paint the perimeter and around the chandelier - where a large roller will not fit. It is best to first apply the paint evenly with a brush to an area about a meter long, then go over it with a small roller to create the same roll from the pile as from a large roller.
Then the ceiling is rolled with a large roller. The most crucial moment. It is better to skate from the window, along the direction of the light, moving from left to right (right to left). The length of the rolling strip is 2-3 meters. That is, first a strip (rectangle) is painted 2-3 meters from the window across the entire width of the room, then the next 2-3 meters, etc. The overlap between rectangles is 10-20 cm.
It is better to ride in one place many, many times. If you wave the roller a couple of times (everything will appear white) and move on, then when the paint dries, there will be a lot of bald spots in this place. Having rolled the strip properly to the width of the roller, step back and look at the gap (at the reflection) to see if there are any gaps. Don’t skimp on paint - there will be bald spots, but don’t apply it too thickly - there will be streaks and sagging.
Removing stains
In addition to the previous layer of finishing, various types of contaminants must be removed. All kinds of stains can be found on the surface. Their types and methods of removal:
- Grease stains are removed using a sponge soaked in an aqueous solution (5%) of soda ash. She presses against the area with the stain until it comes off, then wipe the area with a sponge moistened with plain water;
- Moldy stains, add 5-6 caps of “Whiteness” per liter of water, wipe the area with a rag soaked in this solution, and wait for the surface to dry;
- Rust stains. They are first cleaned with ordinary water, then the area is treated with copper sulfate (100 g per 10 liters of water).
In addition to the previous layer of finishing, various types of contaminants must be removed.
Leveling the base with your own hands
After cleaning the surface, proceed to leveling the ceiling. If repairs are carried out in a new building, then it may not be necessary to repair defects; they act based on the condition of the coating. Stages include:
- Large cracks are expanded with a spatula and sealed with putty mortar; if the depressions are very deep, then polyurethane foam is used.
- After these areas have dried, they are sanded and the resulting dust is removed.
- Using a roller, cover the ceiling with a deep penetration primer, and cover the corners with a brush.
When working with drywall, the steps are different. The gypsum board joints are widened, 3-4 mm are cut off from each edge, the seams and screw heads are puttied, and a primer is applied. When it dries, putty is applied, then sanding is carried out, and priming again.
After cleaning the surface, proceed to leveling the ceiling.
Ceiling painting
First you need to prepare the solution itself. The water emulsion is poured into the prepared container, and water is gradually added to it and mixed. Water should not be more than 10% of the paint itself. Mix the composition thoroughly until a homogeneous mass is obtained.
The first step is to paint the corners with a brush, then the rest of the surface is painted with a roller. Start from the corner farthest from the door. Coloring occurs in parallel with an overlap; you need to go 9-10 centimeters into the previous strip. Act quickly so that the solution does not dry out.
After the first layer has dried, proceed to the 2nd. For the 2nd layer, do not add water to the solution. The 2nd layer is applied perpendicular to the window to avoid streaks.
If a spray gun is used, the technician must be protected by a respirator and special goggles.
Coloring occurs in parallel with an overlap; you need to go 9-10 centimeters into the previous strip.
The article described how to whitewash a ceiling with water-based paint. The process is simple, you can easily handle it yourself, but you need to carefully prepare the surface so that errors do not appear on it later.
Preparation of working solution
The calculation of the required materials is carried out based on the ceiling area in all rooms that need to be whitewashed. They are calculated by multiplying the length and width of each room that needs to be whitewashed and adding the result.
Chalk solution
The chalk solution is prepared from fine powder intended specifically for whitewashing. The table shows the solution recipe and the number of components required for whitewashing 10 m² of ceiling area.
Chalk whitewash solution
Table. Chalk solution for whitewashing.
| №№ | Component | Quantity |
| 1 | Dry chalk | 2.3 kg |
| 2 | Water | 4 l |
| 3 | Wood glue or PVA | 90 g |
| 4 | Laundry soap | 60 g |
| 5 | Blue, powder | 17 g |
Preparation of chalk solution.
- Take the required amount of warm water and pour it into a plastic or enamel container of sufficient volume.
- Glue is dissolved in water.
- Add pre-grated or knife-cut soap.
- Pour in the calculated amount of chalk and mix thoroughly by hand or with a construction mixer.
- Add blue to give whiteness or tint to create the desired shade, mix again.
- Strain through two or three layers of gauze or nylon stocking to remove lumps and foreign particles.
Preparation of chalk solution for whitewashing the ceiling
After filtering, the solution is ready for use. It is better to use it immediately - during storage it settles and will require repeated mixing. The solution can also be prepared from chalk paste, packaged in jars; it is sold in hardware stores. In this case, the solution is prepared following the instructions on the package.
Lime solution
If quicklime is used, it must be slaked first.
- It is better to carry out all work on slaking lime outdoors or indoors, which is not afraid of splashes, steam, or high temperature.
- Be sure to wear safety glasses, gloves, and protective clothing or an apron to protect against hot splashes and steam.
- Lump or powder quicklime is placed in a stainless steel container. Fill it with cold water in an equal amount to obtain fluff; if you need to get lime milk, then take 1.5-2 times more water.
- The quenching reaction is accompanied by the release of a large amount of heat, and the solution begins to steam, boil and heats up to a temperature of 150 degrees. Some of the water may boil away; when a crust forms, add a small amount of water. The lime is mixed during the slaking process using a wooden stick.
- Depending on the type, the lime slaking time can range from 10 to 25 minutes. This information is usually indicated on the packaging. The lime must be completely quenched, otherwise its covering power will be insufficient during whitewashing.
- The lime must be kept for at least a day, or better yet, two or three days. During this time, it will be completely extinguished and will dissolve better when preparing the whitewash.
Ready fluff lime is diluted according to the recipe given in the table. The consumption in the table is indicated for 10 m².
Table. Lime mortar for whitewashing.
| №№ | Component | Quantity |
| 1 | Slaked lime | 2 kg |
| 2 | Water | 4-6 l |
| 3 | Table salt | 50 g (2 tablespoons) |
| 4 | Color or blue | 20-50 g |
Preparation of lime mortar.
- Slaked lime is poured into an enameled or galvanized bucket. It is not recommended to use plastic - if the lime has not been completely slaked, a violent reaction may begin with the release of heat.
- Add table salt or powdered coloring, gradually pour in cold water, stirring gently, and dilute the lime to the consistency of liquid sour cream.
- After a few minutes, a reaction will begin in which the solution can heat up to a high temperature. In this case, the water may boil and release a large amount of steam, so it is better to do this outdoors or on the balcony.
- Bring the solution to the desired consistency by adding water - it should be quite thick. Check the consistency this way: dip a smooth metal object, such as a spatula or knife, into the solution and let the solution drain. The metal should then remain completely painted.
- Cool and filter the solution, after which you can begin whitewashing.
Unlike chalk mortar, lime mortar only benefits from long-term storage, it becomes more uniform and exhibits its covering ability better. Therefore, you can prepare a solution for several stages of whitewashing at once. When using ready-made lime milk, water is added to it until the desired consistency is achieved; no reaction with heating occurs.