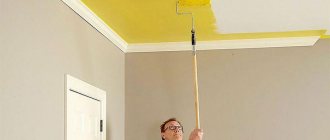
From the author: Hello, dear readers. There was one interesting case in my practice, which would be useful for many of you to know about. One of our customers, having purchased an apartment, immediately planned to renovate it. And in order to somehow save money, he decided to take on painting the ceiling. Once we arrived at the site after most of the work on the walls had been completed, we saw our unfortunate builder with a spatula under the ceiling, and damaged walls around him. And it was like this: not knowing how to paint the ceiling in the apartment over the whitewash, he bought the first paint he came across and applied it without any preliminary preparation of the surface.
Of course, everything went horribly: the lime fell off, the ceiling looked like it had been broken off with an axe, everything rolled down and flowed onto the floor. Well, after he decided to fix everything and clean up the result of his work, he also ruined the walls, throwing pieces of torn paint and lime over them. Of course, by taking everything into our own hands, we achieved purity and beauty, but it cost our craftsman a lot of money.
So, dear readers, so as not to end up in the same sad story, read the article and remember the information well.
How to apply paint on whitewash and is it possible to do it at all?
The first thing we start any renovation with is finishing the ceiling. It is no coincidence that one starts with this area; this allows one to subsequently avoid contamination of the fresh floor covering and calmly carry out painting without fear of staining or ruining something. However, at this stage many people have a choice between lime and staining, since each of these finishing options has its pros and cons.
Finishing the ceiling is one of the first stages of renovation
Many, when carrying out repair work with their own hands, prefer to update the whitewashed ceiling with lime, because they do not know that it can be painted. In fact, decorating with paint is not at all difficult if you have a perfectly flat surface at your disposal, without scratches, depressions or chips.
If you decide to paint over existing whitewash, you need to take into account one important point - when applying paint, the whitewash may fall off and stick to the roller. If this does not happen immediately, then during the drying process the paint begins to “pull off” the whitewashed layer, as a result of which a large piece of paint may fall off along with the whitewash.
If the whitewash layer is thin and holds well, you can update it using water-based paints, which do not require special preparation of the ceiling. However, such “cosmetics” will not hide small cracks or scratches, but, on the contrary, will enhance the effect of unevenness.
How to understand whether whitewash is suitable for wallpapering: 4 tests
It is almost impossible to visually determine the type of whitewash. Therefore, it is necessary to find out whether the existing basis is suitable for our purposes experimentally.
- Just run your hand over the whitewashed wall. A chalk base, unlike lime, will turn your palm white. Wallpapering such walls is a waste of time. Wallpaper sheets will simply fall off from a coated base and even the highest quality primer will not be able to save the situation and provide the necessary adhesion.
- The second test will help determine how firmly the mortar adheres. You should carry out a test pasting on an inconspicuous area. The wallpaper strip must be pasted in compliance with all technologies and manufacturer's recommendations, let it dry, and then try to pull it. If it takes minimal effort to tear off the sheet along with the whitewash, you shouldn’t even think about completely covering the room without cleaning the walls.
- The abundance of whitewash layers applied to the surface guarantees that they will definitely delaminate under the weight of the wallpaper. To check, break off a small piece of whitewash in an inconspicuous place.
- Another obstacle to pasting is frozen whitewash. You can determine this fact by simply swiping your hand. Remains of dust indicate that no matter how you try to erase it, there will be no result.
Keep in mind that even if the finishing in the apartment has passed all the tests, but the walls are uneven, gluing wallpaper will not give good results. Exit: clean off the whitewash, plaster and putty the walls.
What to consider before starting work
When considering whether water-based paint can be applied to whitewash, the condition of the wall is of greatest importance. The list of work that will have to be carried out as part of the preparatory stage depends on it.
Cases when whitewash must be removed
The question is often asked: is it possible to paint over whitewash that has been applied in a thick layer and has peeled off in places? Is it necessary to clean the entire surface or is it enough to remove the unsafe area?
Everything is very simple here, let’s look at cases when you can’t leave the old layer:
- If the composition is applied in a thick layer. Even if it holds up very well, moisture negatively affects such a coating, and it swells and peels off. Therefore, you will have to resort to a long and labor-intensive process of removing the whitewash.
- In cases where there are cracks and swellings on the surface, it will also not be possible to paint it without removing the whitewash layer. This finish will not be durable, and within a few months the paint will begin to crack and peel.
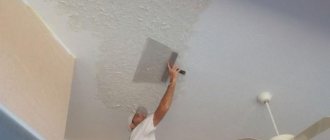
Photo: if entire sections peel off from the surface, then the entire surface needs to be cleaned
Instructions for preparing such surfaces with your own hands are as follows:
- First of all, all unreliable areas are removed. The easiest way to do this is with a spatula or a special scraper for removing paint. Remove only those fragments that can be removed without effort.
- The next stage is soaking the coating. The best option is hot water, moisten the surface with it, and if the layer does not begin to fall off at one time, repeat the treatment again. This is the simplest and most effective way to loosen the whitewash layer.
- Next, the old coating can be easily removed with a spatula.
- The last stage is complete cleaning of the surface. Work should be continued only after the base has completely dried.
As you can see, the process is quite simple, but it will take time. But this must be done, otherwise in a short time you will have to redo the repair again.
Advice! If several layers of whitewash are applied to the wall, you need to remove them all, since when the surface is soaked, moisture penetrates very deeply and weakens the entire finishing layer.
When the coating does not need to be removed
Now let's look at whether it is possible to paint over whitewash with water-based paint if the layer is strong enough. You can check the reliability of the coating by visual inspection: the layer should be thin, without cracks or swollen areas.
It is worth remembering that even a perfectly adhered whitewash does not look very good - the ceiling and walls will not be perfectly smooth
Another typical question: is it possible to paint over whitewash without prior preparation? The answer is clear: under no circumstances. If you do not prepare correctly, the paint will not adhere to the surface.
Priming surfaces before whitewashing
Savig 11934 0 5
Savig June 26, 2017Specialization: master of interior finishing works. I am well versed in power tools for repair and construction. Formerly a teacher at a radio engineering college.
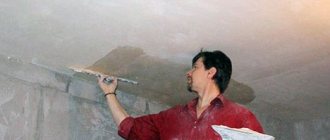
Applying primer to whitewash is a very risky task
Are you planning to paint a whitewashed ceiling and for some reason you don’t want or can’t wash off the whitewash? In some cases, you can get by by applying a special primer to it. What are these cases, and what solutions are suitable for them? I propose to look into all of the above issues together.
We'll tell you about the procedure for priming surfaces before whitewashing them.
Do you feel like a novice when it comes to repairs, but still take on this kind of work? You shouldn’t worry too much that such an attempt will probably fail.
To do this, you need to thoroughly familiarize yourself with all the nuances ahead of time in order to get a good result.
So, you need to go through the preparation stage, know what materials need to be purchased and in what order to do everything. For example, if you whiten the walls, you should first treat them with a primer.
This article is dedicated to this topic.
The primer composition is used in the intervals between stages of repair work and before whitewashing. In turn, it has the following functions:
- It improves the adhesion of the surface and finishing material.
- The service life of the structure increases significantly.
- The surface is protected from corrosive processes and the colonization of harmful bacteria, fungi and mold.
Due to the presence of special additives in the product, there will be fewer pores on the surface. Also, the primer mixture ensures high adhesion and leveled bases of the structure without unnecessary defects.
Do you feel like a novice when it comes to repairs, but still take on this kind of work?
Application technology
To apply primer to previously whitened surfaces, use the following tools:
- wide brush (maclovica);
- paint roller;
- a tray with a ribbed surface for priming;
- putty knife.
After such an operation, the wall or ceiling is given time to dry. Then a primer is applied to the surface.
Applying whitewash to primer
Experts say that primer must be applied before whitewashing. Why? Because it performs many useful functions, namely:
- lime mortar or a mixture with chalk will lie on the primed surface very easily, and will last a long time and reliably;
- if you prime the ceiling or walls, the layer of whitewash will not be absorbed, but will be evenly distributed, so working with the mixture will be much more convenient and easier;
- Before whitewashing, the primer reliably holds together the crumbling building or damaged areas. The primer solution applied before bleaching reliably binds small and large unstable fragments that can fall off and crumble.
When not to paint: how to clean old whitewash from walls or ceilings
Experts still do not recommend painting without first removing the whitewash. And therefore, the ideal solution in this case is to remove the layer of this very whitewash. There is no single master class here, and it all depends on the thickness of this layer and how firmly it holds:
- Thin layer. Despite its insignificant thickness, it is very difficult to remove. Significant impact will be required, and a grinding machine can provide this;
- Medium thickness layer. If this is exactly what you get, then this whitewash will most likely hold up well. However, it’s still easier to pick it up and tear it off the wall. We use a roller with good pile, generously wetting the walls or ceiling with it;
- Thick layer . As a rule, such a layer of whitewash adheres very mediocrely, so in most cases it can be removed with an ordinary spatula, after wetting it first.
Some whitewash removers
- Paste. This method allows you to rid the walls or ceiling not only of whitewash, but also of dust and dirt;
- Soapy water. The solution is prepared as follows: for 10 liters of water, take 2 tablespoons of grated soap and 5 tablespoons of soda. It is necessary to wipe the whitewash layer with this solution until it completely disappears;
- Wallpaper remover. Apply the remover to the whitewash surface and leave for a while. After this, you can work with a spatula and clean the wall.
What to consider before starting work
When considering the question of whether water-based paint can be applied to whitewash, the most important thing is the condition of the wall. Actually, the list of works that will have to be carried out as part of the preparation stage depends on it.
Situations when whitewash needs to be removed
You can often come across the question: is it possible to paint over whitewash, which is applied in a thick layer and has peeled off in places? Is it worth cleaning every centimeter of the surface or is it enough to remove the unreliable area?
Everything is quite simple here, let’s look at situations where you can’t leave an outdated layer:
- If the composition is applied in a thick layer. Even if it holds up well enough, moisture is bad for such a coating, and it swells and peels off. And therefore you will have to resort to the long and complex process of removing the whitewash.
- In cases where there are cracks and swellings on the surface, painting it without removing the whitewash layer will also not work. This type of finish will not last long, and after just a couple of months the paint will begin to peel and crack.
Photo: if entire sections peel off from a plane, then every centimeter of the surface must be cleaned
Instructions for preparing such surfaces with your own hands look like this:
- The first step is to remove all unreliable areas. The easiest way to do this is with a spatula or a specialized scraper for removing paint. Remove only those parts that can be easily removed.
- The next step is soaking the coating. The best option is hot water, wet the surface with it, and if the layer does not begin to fall off in one go, repeat the finishing again. This is a very simple and very productive option for loosening the whitewash layer.
- Then the coating, which is already outdated, can be easily removed with a spatula.
- The final point is to completely clean the plane. Work should be continued only after the base has completely dried.
As you can see, the process is very simple, but it will require some time. But this needs to be done, otherwise in a short time you will need to redo the repair again.
Advice! If a couple of layers of whitewash are applied to the surface of the wall, it is necessary to remove them all, since when the surface is soaked, the moisture gets deep enough and weakens the entire facing layer.
When the coating does not need to be removed
Now let's look at whether it is possible to paint over whitewash with water-based paint if the layer is very strong. The strength of the coating can be verified by visual inspection: the layer must be thin, without cracks or swollen areas.
It must be remembered that even an excellent whitewash does not look good enough - the walls and ceiling will not be very smooth
Another common question: is it possible to paint over whitewash without any preparatory work? The answer is obvious: no way. If you do not prepare correctly, the paint will not adhere to the surface.
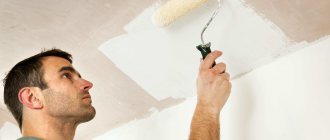
Painting with water-based paint
In order to get a good paint job over lime, it is best to first coat the old layer with an acrylic primer. After this, you need to check the surface for strength by trying to scratch it. If it does not crumble, then you can apply paint.
Painting a wooden ceiling using a sprayer
But when painting over chalk, it is not necessary to do this - water-based paint will bind it well and will stick even without primer.
Before you start work, you need to prepare the room. It is necessary to remove or carefully cover all items with film so that they do not get dirty with paint.
If you are applying paint with a brush, place strokes first perpendicular to the windows, then parallel. If the last layer is laid parallel to the light source, the streaks will not be visible after drying.
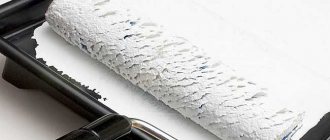
Painting with a roller is a simpler and more convenient process in which you need to perform the following steps:
- pour paint into the paint tray;
- dip the roller into the bath, and then roll it along the slope, evenly distributing the paint over the surface and letting the excess drain off;
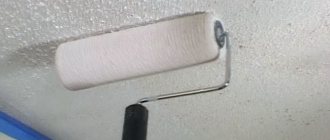
- lay the first layer of paint perpendicular to the windows;
- wait for the composition to dry completely;
- then add a second layer, which should be parallel to the window opening;
- Carefully paint the sections of the ceiling at the junctions with the walls with a brush.
How to whitewash a ceiling correctly
Applying paint from a sprayer is even easier - just apply three even layers, and you don’t need to watch the direction. The main thing is not to miss a single square centimeter of the surface when applying each of them.
Dyeing process
Any surface needs preparation before finishing; in this case, you need to do the following:
- clean the ceiling from accumulated dust; This can be done using a vacuum cleaner or a well-wrung out damp cloth;
- put a layer of primer on a dry surface; it is possible to use a water-based emulsion diluted with water at least five times as a priming composition, but it is better to purchase a special deep penetration composition; let dry;
Now it's time to start painting. Tools to choose from: brushes and paint roller, spray gun.
Masking tape will be required in any case. Paper tape should be used to cover the perimeter of the walls just below the ceiling to protect them from paint.
Attention: before use, the water-based emulsion must be thoroughly mixed using a construction mixer or drill with an appropriate attachment.
If the household does not have a paint sprayer, then use a brush to paint the corners and joints (along the glued tape). Paint is poured into a special tray and the coat of a roller (with short pile or foam rubber) is soaked with it; excess liquid is removed by rolling it along the grooved surface of the tray.
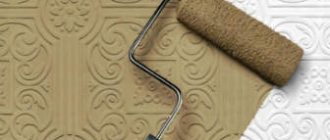
Water-based paint for whitewash
In order to evenly paint surfaces over old whitewash, it is recommended to treat the ceiling and walls with a primer before applying the base layer. This can be ceiling paint diluted in water at least 5 times. If high quality work is required, then it is advisable to purchase a special primer mixture that will ensure normal adhesion of whitewash and water-based paint.
Such primers prevent delamination of whitewash and eliminate its cracking.
After this work, water-based paint will adhere well to the whitewash. Any type of dye of this class that is non-toxic is suitable. To ensure that the new coating does not stand out, it is advisable to consult a specialist when choosing a paint color. Most often they purchase the option with a matte tint. This allows you to better hide minor coating defects.
Revealing the essence of the problem
This unpleasant situation occurred due to the fact that the new coating was applied to the whitewash without any preliminary surface preparation. And, whatever one may say, it is necessary to prepare it, and very thoroughly. Lime is a finishing material, the most popular in the union. And it has achieved such popularity due to the fact that it does not wash, is not afraid of getting wet, is not washed off with water, is durable, has antifungal properties, repels insects and works great in damp, even basement areas.
The properties, as you can see, are impressive, but lime is applied to the surface only with a very thick composition. And this causes an uneven surface, which, among other things, is also heterogeneous; blurs and, in some places, smudges are visible. Therefore, it is not used in modern finishing works.
Also, working with lime is complicated by the fact that when applied, this material penetrates deeply into the surface and after a long time begins to peel off, not in an even layer, but in flakes. This makes its removal so difficult that cleaning the ceilings from lime when hiring workers costs a lot of money, and the apartment is then very dirty.
If you decide to apply a layer of any paint to a ceiling finished with this solution, the end result will be sad in any case. Even after you pass the roller once, about a dozen flakes with a diameter of 5–7 mm will remain on it, and they will create indentations on the ceiling.
If you try to paint them over, the process will repeat again. In general, the more attempts you make to remove these flakes from the roller and begin to paint over the imperfections, the greater the avalanche of events you will cause, because the lime will become soaked and flake off even more.
This option, that is, without pre-treatment, is suitable only in a few cases. The first is if you treat such a ceiling with lime again. It will become white and, at first glance, beautiful, but it will be uneven, and when light hits it, it will be completely scary. This method is only suitable for country rooms, technical premises or industrial facilities, where the aesthetic side of the issue is not important.
Well, the second option is to be content with what you get. If the lime coating is no more than 5 years old and it was installed properly, then if you correctly apply paint over the old whitewash you will get a more or less acceptable result. That is, the flakes will be visible, but not so much as to be obvious. Of course, this method is not suitable if you are undertaking a full-scale renovation, but it is quite suitable for updating the coating.
Finally, I will say that you may still be lucky. The ceiling in some rooms was painted not with lime, but with chalk mortar. It is easily removed from the surface with a spatula, and the residue is easily washed off with water. But such cases are rare. It is very easy to distinguish chalk from lime - just run your hand over the surface. If the palm is completely white, then it is chalk. If there is nothing left on it, or literally a mess, then it is lime.
As I understand, you have already drawn conclusions from what you read above, let’s continue further.
Pros and cons of acrylic paints
Painting the ceiling with acrylic paint provides the following advantages:
- The paint layer polymerizes quickly. The elastic film dries within a couple of hours.
- The coating is resistant to mechanical stress and intense friction. It does not absorb pollution.
- Good hiding power, thanks to which the coating hides minor defects in the base and cracks up to 2 mm wide. However, glossy mixtures only highlight all the imperfections.
- The paint does not support combustion and does not emit harmful substances during application and drying. It does not fade under ultraviolet rays.
- The paint coating is resistant to changes in temperature and humidity, so it can be used in the bathroom and kitchen.
- The surface is easy to maintain. It can be wiped with a damp sponge without using abrasive detergents.
- The water-based acrylic composition can be diluted with water if necessary, is easy to apply and does not smell. For application you can use brushes, a paint roller or a spray gun.
- A large selection of ready-made colors and textures, as well as the ability to tint the white paint at your discretion, allows you to choose a shade to match the color of the interior.
- Acrylic dyes can be used to paint substrates made of wood, concrete, stone, plasterboard and plaster.
Environmental friendliness and the absence of organic components that can contribute to the appearance of mold and rot are considered additional advantages of these paints.
Important! The only disadvantage of acrylic compositions is associated with their price, which is higher than that of conventional water-based emulsions and amounts to $4 per liter. But such a considerable cost pays off with an impressive service life.
In what cases should you not paint the ceiling over whitewash?
Lime, as well as other facing materials such as putty or plaster, can be used as a basis for applying paint. However, in some cases it is not recommended to paint the ceiling with water-based paint without washing off the whitewash:
- There are deep cracks or defects on the ceiling surface. In this case, the paint will not only not hide the flaws, but will also make them even more noticeable. Therefore, before applying paint, all irregularities will have to be repaired, and this cannot be done without removing the whitewash.
- The whitewash is applied too thickly or in several layers. Due to the peculiarities of its composition, lime whitewash absorbs liquids very well. Since the paint also has a liquid consistency, a thick layer of lime will begin to absorb it, which will lead to the formation of cracks and bubbles, and ultimately the destruction of the inner layer of whitewash.
- After the whitewashing, flooding occurred from the neighbors above. As a rule, in such cases, characteristic stains remain on the surface of the ceiling, sometimes with traces of rust. Even if you paint the ceiling in several layers, the shade of paint in these places will still be noticeably different.
- There are traces of mold or mildew on the ceiling. Several layers of water-based paint can hide mold for a while, but will not completely destroy it, so in the future fungus may appear on the painted ceiling. In this case, painting should be carried out only after the old whitewash has been completely removed and the ceiling has been treated with an antifungal compound.
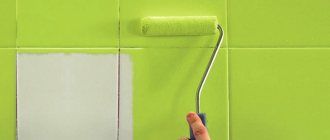
Paint for whitewashing walls. How to paint for whitewash
But since we all want to keep up with the times, and prefer painted surfaces, the question becomes: is it possible to paint over whitewash? How and with what? You can immediately answer that yes, but there are some nuances here. Let's look at them in more detail.
Is it possible to paint over whitewash
Painting, although undesirable, is possible. And only in those cases if:
- There is a very thin layer of whitewash;
- It holds up well, does not crack or crumble.
Otherwise, when painting, it will be removed with a roller. And in the end we will get a poorly painted and unaesthetic surface.
How to paint over whitewash
Before applying paint, the surface is coated with a deep penetration primer. Then, it is given time to dry completely. And then they test the feasibility of painting by scratching the surface. If it is easily damaged and removed, then it is better not to risk it and not paint it. In this case, you cannot do without completely cleansing the surface of chalk. Well, if the primed surface passes the test, then you can safely start painting.
Water-based paint for whitewash
If water-based paint is chosen as the paint for painting the surface, then you can do without a primer. This type of paint itself will act as a primer, binding and securely fixing the chalk particles.
If the layer of chalk or lime is thin, holds tightly and does not have swelling or cracks, then water-based paint applied to it will last for many years.
In what cases is it better not to paint the ceiling and walls over whitewash?
It is strictly not recommended to apply paint to chalk or lime if:
- There is a thick layer of whitewash with cracks and swollen areas;
- If you plan to apply oil paint or enamel.
In order not to take risks and end up with a bad result, it is better not to save time and effort, but to immediately remove the layer of chalk or lime. Then the result will be much better and will last for many years.
Painting over lime. how?
- Guests
- Registration: -
Hello everyone, the problem is this: the walls of a non-residential premises with a constant draft are covered with lime, which has turned gray (dirty). Coating it twice with lime does not remove the grayness; you need to paint it somehow to somehow give it freshness and cleanliness. Is it possible to paint a wall over mortar? what paint? there will be no draft anymore
#2 Guest_acer_*
- Guests
- Registration: -
Water-based emulsion for interior work.
#3 Beginner
acer
Water-based emulsion for interior work
Is it possible to paint a wall over mortar?
#4 Guest_acer_*
- Guests
- Registration: -
Yes, I tried it, only it was in the yard, so the emulsion is for external work.
#5 sleep of the mind
We applied water-based emulsion onto the old lime using a brush. Before this, they didn’t wash it off, didn’t vacuum it, just swept away a little dust with a broom. The fifth year is excellent, but there is a minus - the texture of those coarse limestone stains is visible on the white water-based surface.
#6 Kahuna
- Blocked
- Messages: 4,836
- Registration: 07-10-2005
- Warnings: 3
We applied water-based emulsion onto the old lime using a brush. Before this, they didn’t wash it off, didn’t vacuum it, just swept away a little dust with a broom. The fifth year is excellent, but there is a minus - the texture of those coarse limestone stains is visible on the white water-based surface.
The same story. But when there is no time, desire and money for new plaster... then it’s 4+.
Ceiling preparation
The first thing you need to do when working with paint is to remove all the furniture. Of course, you can cover it with film, but there is no guarantee that there are no holes in it or that it will not tear. It's better to endure everything. When working, use gloves and a mask. Lime is not good for health.
Whitewash is easier to remove when wet. Use warm soapy water. Apply it around the entire perimeter of the ceiling. Change the water when it gets dirty. Treat the entire ceiling thoroughly.
If you have a thin layer of whitewash, then when soaked, you can remove it with a regular roller. Also moisten it periodically with water. Instead of a roller, you can use a brush. For ease of work, you can use a spray bottle and wet the ceiling with it, and remove the coating with a sponge.
If the whitewash is not removed in this way, you will have to work with a spatula. Use it to scrape off the whitewash from the ceiling.
Another way to remove it is with a paste. It simply sticks to the whitewash and, after drying, turns into a film that is easier to peel off. You can make the paste yourself. Add flour or starch to boiled water. Stir gradually to prevent the formation of lumps. Cool the mixture slightly and apply it to the ceiling with a roller or brush, spreading evenly. Then wait until the mixture dries and forms a crust. Remove it with a spatula.
If this does not help, the whitewash can only be removed with a sanding machine. There will be enough drinking, so close the door and put on a protective suit. Then you will need to thoroughly clean the entire room. Preferably several times with special means.
And the most radical way of getting rid of it is removal with acid. You need to work with full protection: glasses, mask, gloves and suit. Add acetic acid in small portions to water. There should be no more than 3% acid per volume of water. The order is exactly this: water, then small portions of acid, otherwise it will react. Apply the solution to the ceiling with a brush and then remove the coating with a spatula or brush. The ceiling surface must be washed with soapy water.
After removing the whitewash, fill all cracks and holes. Prime the surface. Choose a primer specifically for the paint that you will be applying. Preferably from the same manufacturer.
What can replace whitewash?
Lime can be replaced
ground chalk, adding wood glue (50-100 g per 10 l), clay or cow dung to the solution for stickiness.
By the way, a solution with paste can
only be used on old trees.
The bark of young trees is thin and does not breathe well through such whitewash
.
Interesting materials:
What can you snack on in the evening while on a diet? What can you give a guy for his 15th birthday inexpensively? What can you put in Slime? What can you watch on 12 plus? What can you watch for family viewing? What can you watch from the films of 11 years? What movies can you watch at home in the evening? What can you watch from fantasy adventure films? What family films can you watch? What can you watch from comedies 12?