- July 29, 2018
- Nail care
- Lazareva Valeria
A neat manicure gives a girl, or rather her hands, a well-groomed look. However, not every lady has perfect nails. They can flake, break, be uneven, etc. That is why acrylic for manicure is used to give the nails the desired shape. This material is often used for building or strengthening. Having familiarized yourself with the technique of use in detail, you can perform the procedure yourself.
What is acrylic used for?
The effect is noticeable immediately after covering the nails with the material. They become denser and stronger. Thanks to its unique properties, acrylic applied to nails protects them from mechanical stress, ultraviolet radiation, exposure to cold and aggressive household chemicals, as well as from dirt and dust. That is why the plate is strengthened under acrylic, and delamination occurs less often.
You need to understand that this is a synthetic material. Therefore, strengthening of nails does not occur due to the penetration of nutrients. The whole effect is achieved thanks to a kind of acrylic shell. If everything is done correctly, the material does not flow onto the cuticle or side ridges, and detachments do not appear.
Series of professional dyes
Let's meet some of the SalonSecret experts' favorites.
Matrix SoColor Sync Pre-Bonded
Ammonia-free dye with a wide and varied palette, conveniently fragmented on the line:
- acid toner - has a comfortable gel texture, cares for hair, allows you to create unique shades through toning and washes out beautifully into a cool tone;
- alkaline toner - works with gray hair, gives dense coverage. Its wide palette allows you to choose the perfect hair color.
Matrix SoColor Pre-Bonded
Permanent permanent dye. The shades are already mixed with the base, which allows you to immediately neutralize any lightening background and achieve a clear match in tone. The formula is enriched with a protective bonder based on taurine and cationic polymers.
L'Oréal Professionnel Majirel
Majirel palette includes smoky and radiant shades, ultra-dense shades for gray hair, ultra-cool shades for trendy looks, and lightening shades for creating super blondes. We talk more about the dye here .
Redken Shades EQ Bonder Inside
Shades EQ Gloss is known to every colorist. Recently, a collection with a caring bonder appeared in his palette, helping to restore disulfide bonds in the hair shaft. A specific feature of the new product is delicacy. The dye comes to the rescue when you need to dye sensitive hair.
Redken Color Gels Lacquers
Permanent alkaline dye has a gentle effect on strands due to the reduced ammonia content. The liquid texture speeds up the coloring process and guarantees that even on coarse hair, any chosen shade will look perfect, covering 100% of gray hair.
Minuses
There are surprisingly few of them. Like any synthetic material, acrylic can cause allergies. However, according to statistics, this occurs in no more than 5% of clients. However, this does not mean that you can neglect safety rules. Before you are interested in how to use acrylic for nails, you need to make sure that you are not allergic.
In addition, the material has a rather pungent and unpleasant odor, which may be unbearable for some. Not all girls are ready to endure discomfort. Even to get the nails of your dreams. You need to work with acrylic in rooms with good ventilation.
Types of acrylic
To understand how to use acrylic nails, you need to know what types of material are on the market.
- Transparent powder is considered universal. It is used for both building and strengthening. This is also a great option for creating a classic French manicure. Nail artists use transparent powder for decoration, creating beautiful designs and sculpting. To achieve the desired result, transparent acrylic powder is mixed with glitter, dyes and other decorative elements.
- Camouflage powder is useful to disguise defects or hide unevenness. Typically, this acrylic has a beige tint, reminiscent of skin color. This allows you to imitate a natural nail. Camouflage acrylic has a denser structure. It is incredibly convenient to use due to its flexibility and plasticity. This allows you to use it even on thin or damaged nails.
- Finishing acrylic powder is recommended if a glossy top coat is desired. It's quite easy to use. After hardening, the nails acquire a mesmerizing glossy tint.
Rules for dyeing hair at home with professional dye
View this post on Instagram
Posted by L'Oréal Professionnel Paris (@lorealpro)
We asked the hairdressers how to dye our hair with professional dye, and received a lack of understanding. Someone asked why take risks if you can go to a salon . Someone told me what disasters you see after home experiments - green or spotted strands, burnt strands, strands broken off at the roots. The conclusion suggests itself: dyeing your hair at home with professional dye by stylists is equivalent to a beauty crime.
The desire to get a salon effect at home is understandable, but not everything is so simple. In a beauty salon, dye is responsible for approximately 50% of success. Another 50% is the skill of the colorist. And then the color and quality of the hair will be gorgeous. The pros I know prefer to dye their hair not on their own, but from their colleagues. Not out of whim at all. Think about it.
Mikhail Zolotarev
Stylist, creative partner of L'Oréal Professionnel
We’ve already thought about it, but we’ll still tell you about the specifics of the process. The first step is to check on the bend of the elbow or behind the ear how the skin perceives the dye. This should be done a day before the coloring procedure. Everything else depends on whether your hair is dark or blond. In any case, there is such an opinion.
Dark hair
Determine what you are aiming for: going blonde or simply giving your hair a new nuance at the same tone level. Dark hair, let us remind you, goes from level 1 to 5, higher - blonde.
Lightening
You will need a dye that raises the tone level. It will almost certainly contain ammonia. Lightening paints can be raised up to five levels at a time, no more. At home, it’s definitely not worth doing total bleaching with professional powders and trying to get a uniform, cold blonde; colorists learn this all their lives.
If you have previously dyed your hair, these dyes may not be suitable. They are created, as a rule, for natural strands, which certainly will not give strange effects when lightened. Those with dyed dark hair will have to go to a salon to lighten their hair.
So, the skin test has been completed, what next? Read the instructions carefully. It tells you exactly how to apply the composition - on dry or damp hair. Most likely, dry, this is normal for ammonia paints. When you need to cover gray hair at the roots, pay attention to whether your dye covers the gray hair to the required extent - see the instructions.
In a plastic or ceramic bowl, mix the dye with the oxidant in a 1:1 ratio, and do not use a high percentage of the oxidant - a 9-12% negative effect on the hair is guaranteed.
Distribute the mixture over the entire length or apply strand by strand, focusing on the ends if you want highlights. Leave for the time specified by the manufacturer and wash off the dye with warm water and a technical shampoo that stops the oxidation reaction.
Apply a slightly acidic pH conditioner such as Redken Color Extend Magnetics .
Toning or tone-on-tone coloring
tinting process is already much simpler, but don’t skip the instructions too far. You need to know the rules for applying your semi-permanent dye, and only the manufacturer knows the correct information. And colorists, but we decided not to go to them.
Ammonia-free dyes are also mixed with an oxidizing agent, but unstable toners are not always mixed. Take a lower percentage of oxidizer for the sake of hair health. An exception can be made if the shade is a little lighter than yours or is obviously colder. Then a more concentrated oxidant will help the pigments affect the strands so that the result is noticeable. For tinting, as well as for simple tone-on-tone coloring, a 1:2 ratio of dye and oxidant with a concentration of the latter not exceeding 4% is sufficient.
Ammonia-free professional dyes are usually kept for 20–25 minutes, after which they are washed off with shampoo. We recommend using L'Oréal Professionnel Metal Detox - it helps strengthen strands and neutralizes copper particles that tend to change the shade of the hair.
Next, we adhere to the usual scheme, which includes a pigment-fixing conditioner and drying. An interesting point: if you bleached your hair using a complex technique at a colorist, at home you have the opportunity to change the color almost every couple of weeks using toners and dyes with direct pigments.
Important! On porous areas of the hair fiber, the color after any home dyeing is richer. As a rule, the lower part of the length behaves this way. The only way to avoid this is to apply the composition to the ends at the end of the procedure and for a short time.
Blonde hair
How to dye your hair with professional dye if you are blonde?
The essence is the same.
- Permanent dyes are not used on previously colored hair; only natural strands can be lightened.
- Semi-permanent paints are suitable for tone-on-tone coloring, tinting in any shade after bleaching, and for darkening.
- Roots are the start. Any coloring, except highlighting, starts from the roots.
- Testing the dye on the skin is mandatory; no one is immune from allergies even to the most environmentally friendly composition.
- Do not deviate from the manufacturer's instructions; they are definitely trustworthy.
- Don't mix dye with a high (9-12%) concentration of oxidizing agent just because you're curious about what you'll get. Follow the manufacturer's recommendations on this issue too.
- Apply dye to porous areas of hair in a very minimalistic manner.
- After lightening with permanent dye, try a three-step treatment based on the Matrix Unbreak My Blond - it prevents typical blonde problems: brittleness, dryness, dullness.
But blonde hair has its own nuances. So, when painting the regrown root zone in a lighter tone, the dye should be emulsified with your hands with a small amount of water a few minutes before washing off, this way you can avoid uneven staining. Or, for example, it is highly undesirable to try to dye your hair a cold blonde if your current base is warm. And, of course, you shouldn’t dye red blonde yourself - it’s incredibly capricious.
Which acrylic to choose?
Before you learn how to use acrylic nails, you need to decide what type of material to use. The choice should not be random. Start from what result you need to get.
- If you need to straighten your nails, use camouflage powder. It will do the job perfectly and provide your manicure with a natural effect. Those around you are unlikely to realize that the surface is actually artificial.
- If you want to strengthen your nail plates, choose transparent acrylic.
- To create a spectacular design, choose finishing acrylic powder in combination with rhinestones, iridescent sparkles and mirror glitters. The amazing effect will pleasantly surprise you.
Peculiarities
One of the functions of acrylic is nail extension. He copes with it perfectly. No matter how long your nails are, they won’t break under acrylic. It allows you to maintain a flawless manicure for a long time. It is enough just to make the correction in time. Because as nails grow, the coating loses its freshness and attractiveness. That's why you need to make timely corrections.
There are many options for how to use acrylic nails. This is thanks to the amazing variety of shades and textures. Hundreds of design options have been invented: aquarium, artistic, “knitted”, etc. If you have a certain skill, you can create and implement a variety of ideas. Acrylic is quite pliable. This creates limitless scope for imagination and the embodiment of talent.
For those who are interested in how to use acrylic nail powder, the biggest surprise is the fact that the design, extension or strengthening process does not take much time. If you have the skills, everything is done in a matter of minutes. You can speed up the creation of the coating even more if you choose acrylic with the inscription high speed. This means that the material hardens faster than its analogues. However, to use it you will need high speed.
Shade palettes
Palettes are rather shaky ground, since each brand chooses its own shade coding system. You can be sure that the first digit of the code always hides the depth of tone: from black (1) to white (11). The main shades and nuances are traditionally divided into groups with letter or numerical designations, for example:
- N - natural;
- A or 1 - ash;
- P or 2 - pearlescent;
- G or 3 - golden;
- C or 4 - copper;
- R or 5 - red;
- V or 6 - purple;
- M or 8 - Mocha.
For example, 9RV is a very light blonde with red and purple pigments, and 10A is a very, very light ash blonde. Code 8.11 for the gentle dye L'Oréal Professionnel DIA Light stands for “light blond deep ashy.”
Required materials and tools
Whatever nail procedures you perform, you cannot do without auxiliary products. It is advisable to purchase all materials from trusted sellers so as not to waste time and money.
- Acrylic Powder. Can be purchased immediately as a set.
- Liquid. It may also be called liquidity. Needed to dilute dry powder. It does not change the shade of acrylic. The composition contains plasticizers that add stickiness and remove dust.
- Flat brush.
- Degreasing agent. Needed to clean your nails and increase adhesion to the material.
- Buffs and files. Useful for grinding.
It must be said that acrylic powder is not cheap. This can be intimidating for newbies. However, by purchasing just one jar of dry acrylic, you can complete not one, but several coatings. In the end it will be quite economical.
Execution technique
It is very important to know how to use acrylic nail extensions. If you work with the material incorrectly, chips, cracks, and detachments are possible in the future. All these defects spoil the appearance of the acrylic coating. To avoid having to learn from mistakes, you need to immediately find out all the nuances. Knowing how to properly dilute, use, apply and remove acrylic will prevent you from making mistakes.
Is it necessary to use a primer for acrylic nail extensions? One of the popular questions among those who begin to use this material. The primer is applied to the nail plate after degreasing. It forms a thin, rough film that improves the adhesion of the acrylic material to the nail. Professionals consider the use of a primer mandatory. It dries the surface before applying the material and destroys microbes.
Recommendations for Beginners
Painting on nails with acrylic paints is also available for beginners. To do this, you need to follow these tips:
- even simple drawings with acrylic paints on nails are easier to do on a hand that is not tense and is comfortably positioned;
- when applying acrylic, you do not need to press hard on the brush;
- It’s better to start with simple patterns;
- when creating a drawing, you should first draw the contours, and only then fill the space;
- if you want to add more complex elements to the design, it is better to use them only on one finger;
- After drying, the finished drawing must be secured with a finishing coat.
Sample designs on nails with acrylic paints for beginners are presented below.
Acrylic for strengthening
Girls with fragile, peeling nails know how difficult it is to grow their length. Reinforcement with acrylic will make them denser and protect them from mechanical stress.
How to use dry acrylic nails? If your goal is strengthening, you need to follow these steps.
- Get a hygienic manicure.
- Apply primer.
- Cover with gel polish base.
- Using a spatula, sprinkle acrylic powder onto the uncured base. First, place your nail over a jar or other surface where the remaining powder will be poured.
- Dry in a lamp.
- The final stage is surface grinding. Then you need to apply a colored coating and secure it with a top coat.
By following a simple sequence of actions, you will not make mistakes when working with acrylic.
It is important to know that the powder dries out quite quickly, so it is recommended to practice in advance, for example, on tips. It may be necessary to apply acrylic powder in several layers to achieve the desired result.
Priming wooden walls
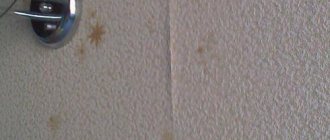
The process of preparing a façade for painting includes the priming stage. In order to avoid making mistakes in this matter, you need to remember one rule: external wooden walls cannot be coated with a water-based primer. Only on oil.
As a rule, all high-quality primers are also antiseptics. Before you start, you need to carefully read the instructions on the package. The conditions under which priming with this product can be performed and the manufacturer's recommendations for application will become known.
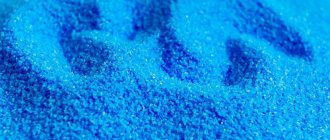
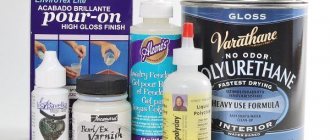
Primer Tikkurila Valtti Akvabase (Valtti Aquabase)
Valtti Akvabase and BIOFA are considered one of the best primers for wood. These oil-based compounds can be used on any wood: freshly planed, pressure treated, heat-treated, old. When working with Valtti Akvabase, personal protective equipment must be used.
Special antiseptic primer for wood
How to Apply Primer to a Wooden Surface
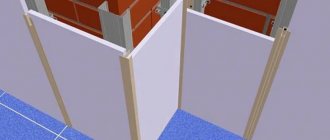
For a small amount of work, you can use a paint brush with natural or artificial bristles to apply the primer. This tool is especially convenient when processing log facades. If the walls are smooth (plank or timber), you can apply the primer with a roller. This is not difficult to do.
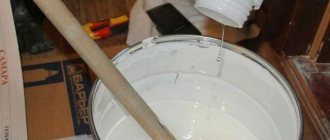
Step 1. Pour enough primer into a paint tray or any other suitable container so that 1/3 of the volume of the roller roller can be immersed in it.
Mix the primer
Pour soil into the tray
Step 2. Dip the roller into the solution and roll it 2-3 times along the relief horizontal part of the paint bath. This removes excess primer, and it will not flow off the wall when applied.
A roller with a foam coat is an excellent tool for applying primer.
Step 3. Moisten a section of the wall by rolling a roller over it. Each subsequent strip should overlap the previous one by 5-7 cm.
Apply primer evenly
Step 4. Dip the roller into the primer again and squeeze it out. Next, work continues according to the given algorithm until the entire area of the facade has been processed.
Applying primer with a brush
Wood with fresh soil
Sand the primed surface after drying
It should be remembered that as little time as possible should pass between the processes of priming and painting. Not all primers are light and UV resistant. Therefore, they need to be covered with a layer of paint in a timely manner.
Building up
Before the procedure, it is recommended to decide in advance what color and texture you will use. You may need to learn how to use liquid acrylic nails in advance.
- You need to perform a hygienic manicure.
- Treat your nails with a degreasing liquid.
- Apply primer.
- Liquid for acrylic is poured into a small container.
- Place the nail extension molds.
- Dip the pre-prepared brush into the liquid and then into the powder.
- Apply the mixture to the nail and shape, forming the desired length. It is very important to perform all actions quickly so that the solution does not have time to dry out.
- After the acrylic mixture has hardened, the molds are removed and the nails are sanded, making the surface perfect.
- Polishing is completed with a fine buff to remove all roughness.
What to choose as a basis: tips or forms
Forms in acrylic extensions refer to special patterns. With their help it is convenient to model the future nail. Disposable paper forms are used. Tips are made of plastic and are special blanks that imitate natural nails. They are thin, strong, and easy to file.
The process of nail extension on forms
- If you are growing almond-shaped or oval-shaped nails, then it is possible to use both bases of your choice.
- If a person regularly bites his nails, it is better to do extensions using tips with a small contact surface.
- When extending trapezoidal nails, you should take forms with a small contact surface.
- For flat nails, you can use both tips and forms. However, if the width of the nail is too large, it is better to take forms, since the tips may not correspond to this width.
- If the nails are curved down, then only forms can be used for extensions.
How to remove acrylic coating?
If the material was used to strengthen nails, it is easy to remove. It is enough to simply dissolve the old coating using a special liquid. Thanks to the small thickness of the acrylic layer, this is easy to do. It is enough to apply a small piece of cotton pad soaked in the product to each nail. Then wrap in foil and leave for ten minutes.
If acrylic was used for extensions, the coating will have to be cut off.
Acrylic for nails performs several different functions - extension, strengthening, decoration.