Cork finishing has been popular for several hundred years. Modern production technologies have made this material practical and durable. After familiarizing yourself with the assortment of the market, you can choose the type of coating that suits you in appearance, characteristics, purpose and cost. This finish has a very good service life and is easy to maintain. That is why it is used not only for walls, ceilings and floors, but also for slopes and loggias.
What is cork covering
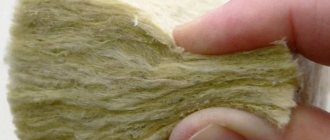
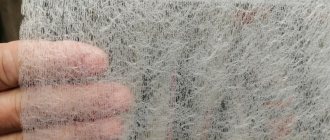
Before decorating walls with cork, you should become more familiar with the main features of the material. It is organic, therefore it is actively chosen by consumers for interior decoration. It is made from crushed bark, which is pre-processed. The technology involves the use of Mediterranean oak. After finishing, the surface acquires a porous structure that breathes well, but the room at the same time acquires the qualities of sound and heat insulation.
How can you connect the transition?
To neatly design the gap between functional areas, four materials are most often used.
Grout
An easy way to seal winding, shallow seams. Such thresholds are difficult to find, and other fillers will not look so organic. Often in modern interiors there is an interesting way of finishing the floor: polygonal ceramic parts “incline” a little into an area with a different coating. This separates the hallway area from the rest of the house and the kitchen area from the living room. In this case, the transition is also carried out using grout. Do it in the following order:
- Carry out preparatory work.
- Treat the edges of the second material with silicone compound.
- Fill the resulting seam halfway with it.
- Wait for it to dry.
- Dilute the grout, spread it on top and level it with a spatula.
- Wipe the finished dried layer with a damp cloth and cover it with clear varnish to extend its service life.
Photo: Instagram @remont100lvl
Photo: Instagram @remont100lvl
Silicone and acrylic sealant
Joining two sections with elastic sealant is even easier than with grout. The advantage of the method is that there is no need to additionally treat the boards to protect them from moisture. But there is one point - you need to take into account that after drying the filler will turn light brown. The acrylic filler can be painted in a suitable shade after it has dried. Both expansion joints are suitable for renovation work in new buildings, as they are able to adapt to the shrinkage of the building.
Sequence of work:
- Place masking tape on both sides of the seam so you don’t have to waste time scrubbing it off later.
- Make a hole in the silicone paste tube so that it can be squeezed out, or insert it into a special gun.
- Fill the gap so that the sealant extends slightly above the floor surface.
- Use a spatula to remove excess mixture. If you don’t have a spatula, you can wait until the mixture dries and cut off the excess.
Keep in mind that it takes one or two days for the sealant to dry completely. Silicone expansion joints are recommended for use in rooms where the flooring is secured with glue or fasteners.
Photo: Instagram @42m2.ofhappiness
Photo: Instagram @42m2.ofhappiness
Photo: Instagram @42m2.ofhappiness
Photo: Instagram @prinesite_pechenki
Liquid plug
Liquid cork for laminate and tile joints is a moisture-resistant mixture of an adhesive base and cork chips. It has an unusual texture and looks good in seams no larger than 7 mm. On wide crossings it will look alien. This is a simple connection method for areas of any shape.
The hole that is filled with the mass is first cleaned of dust and degreased.
Rules for working with the mixture:
- The coating levels must match. If there is a slight difference, the glue is aligned along the higher edge.
- Do not let the cork get on the floor, as it is difficult to wipe off and, once dry, almost impossible. You can pre-coat the floor with oil or apply masking tape to it.
- The material must be sanded a day after pouring, until it hardens.
The layer turns out to be very durable and it is almost impossible to remove it.
Photo: Instagram @centraparketarf
Photo: Instagram @parquet_design
Cork compensator
One of the most popular ways to design boundaries between two floor coverings. The filler is a soft, pressed lath or whole sheets with the same characteristics. The compensator has several advantages:
- Possibility to choose the appropriate color.
- Ability to withstand building shrinkage and dimensional fluctuations of laminated strips.
- Suitable for wide seams.
- Looks beautiful in the interior.
For this material it is also desirable that both areas are at the same level. Otherwise, the result will not look aesthetically pleasing.
Sequence of working with the filler:
- Adjust the rail to the desired size or cut the part from the sheet.
- Apply adhesive to the entire width of the laminate or tile, and a thin layer of sealant to the bottom.
- Glue the compensator and cover it on top with an antiseptic and clear varnish.
- The rail can be tinted, but you need to take into account that it absorbs paint well and the color turns out saturated.
Photo: Instagram @centrpola.ru
Photo: Instagram @centrpola.ru
Advantages and disadvantages of cork in the interior
Before finishing the interior using cork-based materials, you need to familiarize yourself with the main pros and cons of this finish. It is relatively inexpensive, non-toxic and completely safe, and is ready to last for a whole decade. The plug may not require repair or replacement for a period of time that will depend on the type of material.
Applying the cork is very simple; after the repair is completed, all defects are hidden, and the surface also acquires heat-insulating properties. With the help of this finishing you can implement any bold design solutions, creating unique decorative effects. If you use this material in the house, then the fire resistance characteristic will be especially relevant. This list of benefits is not complete. To understand the quality and performance characteristics of the finish, it is necessary to consider all cork covering options. By the way, it consists not only of advantages.
Before decorating your balcony with cork, you should take into account that this material does not cope well with temperature changes. If there is dry air in the room, the material may dry out. It is better to protect the surfaces after finishing from contact with pets, as they can be easily damaged. But this problem can be solved by applying a special varnish to the finish.
Before using the coating to decorate surfaces in your home, you should take into account that the material requires careful handling, which is especially important during operation and cleaning. You should not apply aggressive chemicals, nor should you use hard-bristled brushes when cleaning. That is why many experts recommend abandoning the finishing of arches with cork, since this part of the room usually undergoes high abrasive loads, becoming unusable over time, which will happen faster than in the case of other materials in the premises.
Liquid plug - what is it?
The building material, which is called liquid facade cork, results in a durable coating. Manufacturers claim 10-15 years. They rarely talk about 30 years. In fact, you can say about the cork that it will last much longer. The limitation is that acrylic only lasts 10-15 years.
The product composition includes cork bark with a fraction of 0.5 to 1 mm (more than 90%), acrylic and various polymers. Manufacturers keep the specific recipe secret. This allows you to protect the market from low-quality counterfeits.
The main characteristics of the liquid coating are:
- Decorative character. Externally, the surface looks like a fur coat with a slight grain.
- High adhesion to almost all materials without the need for careful preparation of the base.
- Elasticity. Liquid cork retains its original shape as the structure shrinks. Seasonal changes in temperature and humidity do not have a destructive effect.
- Vapor permeability. This indicator is ensured by the peculiarity of the cork itself. Thanks to this, the base can “breathe” and get rid of the liquid contained inside.
- Moisture resistance. The dried solution can let steam out, but water cannot get inside.
Packaging option
As for equipment, it can be divided into three groups:
- The household kit includes a compressor and a gun for filling deep cracks with putty.
- Professionals prefer to purchase a special universal installation, which is relevant when processing the facades of small buildings.
- The industrial model (MP-120) allows you to cover large areas of walls and roofing parts of buildings.
If self-application is envisaged, then it makes sense to purchase a compressor if the area is relatively large. They often give preference to hiring a construction team, because their work can be cheaper in cost than buying tools.
Main types of cork covering
When considering the types of cork finishes, it should be borne in mind that classification can be carried out according to different criteria. As for floors, the cladding for them can be interlocking or adhesive - this determines the installation method. The first variety has one feature, which is that the cork finish has a locking fastening. Its advantage is the speed and ease of installation, so you can carry out repair work yourself. Castle floors can be used in bedrooms, halls, living rooms and in rooms with low humidity levels.
The floor can be finished with cork, which is installed using the adhesive method. This coating does not provide locks for fixing elements, so they are suitable for rooms with special operating conditions, for example, kitchens and bathrooms.
On sale you can also find technical finishing made from cork, which is used to increase the level of sound and heat insulation of walls, floors and ceilings. This is a natural product based on crushed cara without the addition of synthetic substances. If you want to finish the ceiling with cork, you can do this with different types of coating, which can have the following types of surface:
- glossy;
- brilliant;
- matte.
The manufacturer achieves this result by applying varnish to the cork finish.
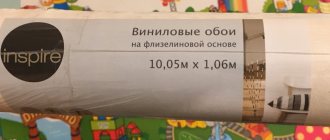
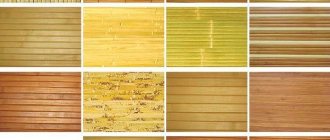
Varieties of cork finishing can also be considered from the point of view of execution. Thus, cladding can be presented in the form of modules or rolls, panels or wallpaper, as well as textiles and even in liquid form.
Roll type of coating
Rolled cork can be used to decorate commercial or domestic premises. Among its advantages, the variety of designs should be highlighted. This coating looks good, but can also be a technical variety that is placed under the decorative layer. Rolls are most popular among consumers today, as they are convenient to use and are an excellent alternative to traditional wallpaper. The rolls are 4 mm thick and can be simply glued to a surface that will not attract dust.
High-quality material recovers on its own after minor scratches, as it has a high degree of elasticity. The cheapest material is the one whose thickness is 2 mm. This type of cork surpasses the characteristics of elite paper wallpaper. The finish is pleasant to the touch and also suits a variety of interior styles.
Modular cork covering
This finish is produced in separate segments that are fixed independently. The main advantage of this material is its ease of installation. It is much easier to work with than a roll, and you will need even fewer tools and skills. This finishing is also good because if a separate module is damaged, it will be possible to replace it without completely removing the cladding. After this, the coating will look like new. Experts advise purchasing this type of finish with a reserve, since defects may appear during the installation process, and sometimes replacement of individual elements is required.
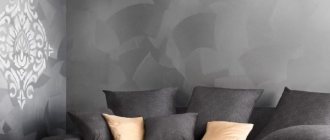
Wallpaper made from cork
If you want to cover your walls, making them environmentally friendly and breathable, as well as sound and heat insulating, you should choose cork wallpaper, which comes in several varieties. They differ from each other in the base material, it can be:
- paper;
- non-woven;
- self-adhesive.
Sometimes cork wallpapers do not have a base, but self-adhesive ones do not require the purchase of additional adhesive materials. Before purchasing such a finish, you need to check whether it is evenly painted, and whether the base is suitable for the rough surface in the room where the renovation will be carried out. It would seem that such a finish is good for everyone, but it is offered for sale in a meager choice of colors, so the shade base for the style needs to be thought out in advance.
Textile
When, during the manufacturing process of finishing, cork veneer is combined with a fabric base, it is possible to obtain cork textiles, which are an easy-to-use and affordable material. The fabric has all the advantages of textile materials and retains the performance properties of cork. The trim can be glued, draped and even stitched. This combination makes the canvas a good solution for cladding not only walls, but also ceilings. Its use is convenient on structures that have complex shapes and smooth transitions.
Designers find unusual uses for textile cork, but women's bags and shoemaking are a completely different story. If you pay attention to the texture of the cork finish, it will remind you of bark, but the color range is not limited to shades of cork. Veneer can have completely unusual colors. The release form is rolls with standard dimensions; such material is easy to cut when finishing premises, and waste will be minimal.
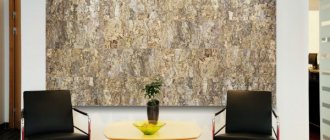
Cork panels
Such panels, like wallpaper, can have different bases. If you are gluing the material to a composition that you select yourself, it is better to choose a baseless coating, but on sale you can find products based on paper or in the form of self-adhesive products. This finish is also good because it can be renewed over time if the varnish layer has worn out or become faded. You can apply a special wax on top of the finish.
Cork panels are also offered for sale in the form of chipboard-based products. Such decorative elements are excellent for cladding dry rooms. If the renovation is to be done in a room with high humidity, the optimal solution would be veneered or laminated panels that are treated with wax.
Liquid plug
The liquid variety is also called universal balsa wood chip material. The size of the elements reaches 1 mm, and modified additives connected with water act as a polymer binder. Don't be put off by the fact that this example is a good use of industrial waste.
Liquid stopper originated in Spain, and domestic production offered an alternative in 2011. The material is offered in the form of a homogeneous mass, which forms a vapor-permeable, moisture-resistant coating with elasticity characteristics. In appearance, this finish resembles pebble plaster.
Coating care
As we all understand, in order for the coating to retain its excellent appearance for a long time, it should be periodically vacuumed and wiped with a barely damp cloth. Cladding panels can only be washed with special detergents for cork.
Sometimes there come times when you need to remove a stubborn stain. To do this, remove the stain with any abrasive material, only after this be sure to treat it with varnish or wax. And to prevent the panels from fading, curtains or blinds should be hung on the windows.
Cork wall decoration
Before finishing with cork with your own hands, you must choose a certain material, or rather, its design. For example, when using rolls, it is possible to create a surface in which seams and joints are invisible, so the finish is more aesthetically pleasing. The technique of applying cork is similar to gluing conventional wallpaper.
When choosing cork panels, you will be installing material in the form of slabs. Each of them consists of two layers. The back surface is made of fine particles, the fraction of which is 2 mm, but the front layer is veneer, for the manufacture of which different types of wood are used. The layers of cork are connected to each other using a composition of natural ingredients. Conveniently, such slabs are offered for sale in different sizes. If necessary, finishing elements can be sawn.
Preparation of material
Before finishing the walls with cork, you need to prepare a certain set of materials and tools. You will need an iron ruler, a spatula and a bucket for diluting glue. In order to install the slabs evenly, you will need a plumb line and a building level. Prepare scissors and knife. It is better to have a velor roller on hand, as well as a seam roller.
To line the rooms of your home with cork, you should choose an adhesive. An acrylic mixture or contact compound is perfect for this. Using the 1st involves one-sided gluing, but it is better to prefer the second option, as it allows you to achieve better results. If you prefer a contact compound for finishing, you should be prepared for the fact that it will be more difficult to work with, because the application will need to be carried out on two surfaces to be joined at once. It should be applied not only to the back of decorative items, but also to the interior wall of the house.
Surface preparation
Before starting work on gluing the plugs, you should inspect the walls, which should not have obvious defects in the form of debris and large chips. All internal and external corners are carefully examined. They may have sagging finishes that need to be removed. It is important to coat the surface with primer and leave it to dry for two hours. You can use a roller or brush to apply this mixture. In the room where repairs to install the plug are being carried out, it is necessary to maintain a temperature mark of + 15 ˚С and above.
Glue selection
Today you can find different types of adhesives for cork on sale, for example, contact compound, which is usually used for installing skirting boards and floor coverings, and rubber glue. You can choose a mixture that is suitable for joining wood elements. Some types of adhesives are intended only for walls or floors, but the composition of Decol is universal. Its consumption will be 0.5 liters per square meter.
Acrylic adhesives, which are offered by domestic and foreign manufacturers, are excellent for finishing work in apartments. The composition “Areal+” is suitable for gluing almost all materials. You can also choose Wakol, the setting time of which does not exceed 1.5 hours.
Surface marking
Before finishing the loggia with cork, you need to make markings, this also applies to the premises of the apartment, as well as its parts, for example, the stairs. This also applies to facing any other surface. To do this, use a plumb line and a building level. If the work is carried out indoors, then the first vertical line is drawn near the window with a retreat of such a distance that will be sufficient for installing a panel or sheet of cork.
Installation
When installing the tiles, you will need to apply a layer of adhesive. And the tile is applied after applying the composition to the wall for approximately one square meter of area. Then the decorative element is pressed against the surface with its lower edge, only after which the rest of the tile is pressed against it. The trim should not be picked up by the corners, as they often break. This is what craftsmen sin when they decorate the space around doors. Having laid the starting product, you can use it as a guide to glue the entire row, while the other can be laid in a staggered manner, which will eliminate the appearance of uneven lines.
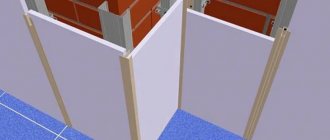
Installation of cork panels
Before you begin the installation process itself, you should prepare the walls.
Surface preparation
So, the wall should be smooth, without chips or cracks. The more ideal the wall, the more beautiful the interior will be and the easier the installation itself will be. You should also take care of adhesion. A well-plastered and smooth surface should be treated with a primer.
The primer must dry completely and only then can you begin gluing the panels. If your wall is painted, then contact plaster should be applied to it to increase adhesion. And remember, a perfectly flat and properly prepared surface is the key to the durability of your finish.
Preparation of materials
Purchased panels also require adaptation.
The material should be unpacked and left for 2 days in the room in which it will be used, this will allow the cork to expand and acclimate.
You should mark the wall; to do this, find the center of the wall and draw vertical and horizontal lines using a construction pencil. A laser level should be used to maintain the correct level.
Preparing the room itself
It should be noted here that the contact adhesive used to glue cork boards sets quickly. Therefore, all holes for sockets, switches, and pipes should be made in advance. Work should begin if the room temperature is above +15 degrees Celsius and the humidity is not higher than 75%.
Pasting with panels
Let's start gluing the panels.
To do this, dilute the mixture, but not in large portions, according to the instructions on the package. The glue should be applied to the wall using a notched trowel, since the adhesive base sets quickly; you should not apply a lot of glue at once, about 1-2 square meters. m. The same glue is applied to the panel itself.
After application, wait a technological pause of 3-5 minutes. We apply the panels according to the markings and press firmly for a couple of minutes, roll them with a roller and remove excess glue with a clean rag. The following panels are attached using the same technology. You can fasten it either in straight rows or in a running pattern. The seams should be well rolled with a roller.
It should be noted that professionals recommend using PVA glue instead of contact glue. Since it is less toxic and does not emit harmful fumes. The glue dries completely after 48 hours.
Tips and tricks for working with cork
When finishing surfaces, a rather important point is the design of the edges, which is especially important for the space near the doors. This can be done by placing one product on top of another. To do this, measure the distance where the material should be laid and mark the places for the edges. Then the tile is simply cut along the line with a mounting knife.
When decorating a doorway with a cork, you need to start moving from it if it is the most visible part of the room. Otherwise, you need to advance from the wall, which is opposite the entrance.
Forms of joints between laminate and tiles
The connection of floor coverings can vary in configuration and length. Depending on its shape, there are three main types of joints.
Straight line
The easiest joint to arrange. It can be issued as a threshold or done without it. If the seam is located in the space under the interior door, a threshold is considered mandatory.
Photo: Instagram remont.detected
Curved joint
Not an easy option to make. The main difficulty lies in precise cutting of the material, which requires a professional tool. The seam can be made without a threshold or with it, but if mistakes were made during the work or defects appeared when cutting materials, only a threshold can disguise them.
broken line
An effective connection that involves laying uncut tiles end-to-end with laminate flooring. The main problem is the exact fit of the parts. The threshold in this case is extremely undesirable, since it greatly spoils the appearance of the floor.
Types of finishes for floor coverings
In the interior, cork is also used for finishing the floor.
Canvas
This is a single canvas measuring up to 6 square meters. The most environmentally friendly because it does not require the parts to adhere to each other. Accordingly, in the photo it looks like a monolithic coating. This is exactly what is most often used in children's rooms.
Boards
Companies also offer a more familiar format - floorboards. Their installation is carried out according to the lock principle, like a laminate; the second option is to attach them with glue. In this form, products with wood and even stone prints are produced. There are also products with patterns intended for a children's room.
Instagram @the_philgrimage
Instagram @fcisoutheastcharlottenc
Instagram @cork_imports_australia_
Instagram @thecalilehotel
Instagram @corkcentre.ru
Tile
This is a neat square tile. The installation principle is the same - it is attached to an adhesive base. After drying, it can form a single monolithic structure. But designers often use the tiled effect in their design.