Preparing to paint our “brick imitation”
After all the seams - both horizontal and the necessary vertical ones - are sealed, we proceed to finishing.
To imitate brickwork, you can use any texture paint. They differ fundamentally in size and number of inclusions, which ultimately give the painted surface the necessary texture. Since we want to give the walls a certain volume, we choose a composition with the maximum number of inclusions. In our case, we imitated aged masonry, so to give it the most weathered look, as well as to enhance the volume, we add ordinary gray cement to the texture paint before application: the gray color mutes the brightness of the honeycomb and emphasizes the rough texture. We add cement at the rate of approximately 4-5 full tablespoons per 5-6 tablespoons of paint (proportions are individual in each case).
Link on topic: Facing brick-masonry, types, sizes and work with it.
How and what to paint
Recently, a white brick wall has become fashionable. If you are going to do just this, there are no problems: apply the seams with a brush, use a roller to apply the surface. If you want something that is not too monochromatic, add a little tint to the base color composition - gray, brown, yellow... or even pink or blue. Paint with this paint. Add more white to the remainder and add highlights with this lighter composition using a semi-dry roller, sponge, or brush. If desired, you can apply the top “shadows” with silver, bronze, adding a little gold. Here's how you like it best.
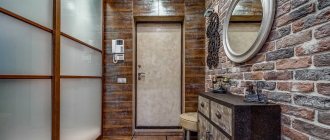
Imitation brick in the bedroom - looks very stylish
If the seams in the imitation brickwork should be darker, go over them first with a brush. Then, using a roller with short or medium pile, we paint the very surface of the bricks. If you take a roller with even shorter pile, dip it in paint of a different shade (lighter or darker - it depends), in bronze, silver, gold, etc. and with this roller, quickly, lightly touching, paint over the most protruding parts, you will get an even more interesting effect. In general, you can experiment. With this approach, imitation brick becomes a design object and the main interior decoration.
LiveInternetLiveInternet
—Categories
- plastic (350)
- embroidery (309)
- baked goods (272)
- beauty (178)
- decoupage.quilling (168)
- sewing (166)
- new year (157)
- drawings (142)
- interior (128)
- handicrafts (124)
- wool felting (120)
- recipes (108)
- flowers (92)
- knitting (80)
- pillow toys (77)
- fur (70)
- essential oils (58)
- health (55)
- curtains (52)
- photo (49)
- English (47)
- spot painting (47)
- let's drink (45)
- candy (44)
- sewing tips (42)
- blanks (41)
- programs (29)
- slippers (29)
- paper weaving (28)
- say the word (27)
- cookies (26)
- decoration of vases, bottles (26)
- cleaning (26)
- soap making (26)
- flowers for curtains (24)
- hairstyles (24)
- painting things (21)
- nails (21)
- cakes (19)
- leather (19)
- bags (18)
- beads (17)
- Building a house (16)
- chebureki samsa (13)
- painting (13)
- games (12)
- coffee (11)
- decorate baked goods (10)
- audio books (10)
- fish (10)
- jeans (8)
- salads (7)
- corset (7)
- online purchasing (6)
- treat colds (6)
- Foamiran (5)
- MaslYan. Paints (5)
- perfume (5)
- Music (4)
- shish kebab (4)
- for Easter (2)
- Satin embroidery (2)
- meat (2)
- omelette (2)
- cheese (2)
- sushi (2)
- bread and rolls (1)
- salt dough (1)
- karaoke (1)
Making a plaster wall
Marking
Before starting the main work, it is necessary to prepare the surface - remove the old finish. If it is not level, level it with plaster and cover it with a primer. Another option is to use drywall, this is a dry leveling method. However, if the area of the room is small, this method is unlikely to be suitable, because the sheets will “eat up” the space.
Please note: if the apartment is in a new building, you can start decorating the room no earlier than 1 year after the completion of the house. Otherwise, the walls may shrink and cracks may form.
Once the surface is prepared for work, you can begin marking. And there are two options here.
First: some construction stores sell a ready-made mesh form; this method is simpler, but also more expensive. Second: independent marking. How to make an imitation brick wall with your own hands?
Marking starts from the left corner. Provide in advance for indentations from the ceiling and floor - at least 5 cm. First, you can mark out the area according to the lattice principle, marking a grid, and then draw half of the brick through the row. Trace the resulting stones and you will have standard brickwork.
It is convenient to use 15 mm thick masking tape. Glue the jumpers overlapping, be sure to leave “tails” at the edges so that the tape can be easily removed later.
If you forgot about the primer during the processing stage, you can apply it directly over the tape now.
Preparation of solution and application
You will need the following tools:
The most reliable solution is gypsum plaster and tile adhesive. You can knead it using a special attachment on a drill (mixer) or manually. What is important to consider? If you have no experience in repair work, do not mix a large amount of mixture at once. Before you have time to apply it, it will dry out.
Source
How to draw brickwork on a wall
If “wet” or “dusty” work is not your thing, but you know how to draw at least a little, you can paint a brick wall. You will need acrylic paints, brushes, a pair of natural sponges, masking tape, and thick paper plates for mixing paints. When thinning paints, remember that acrylic paints darken as they dry. And one more thing: they dry quickly, but freshly applied ones can be removed with a clean cloth soaked in water.
First, we prepare the workplace: cover the baseboard and adjacent floor with polyethylene or old wallpaper (it’s better to fix it with tape). Use masking tape to outline the boundaries - at the top, on the sides. At the bottom there is a limiter - a plinth, although in order not to get dirty, it can be removed.
Drawing bricks on the wall
Below are the step-by-step actions:
- Paint the wall with white semi-matte acrylic paint. Leave to dry.
- Preparing the background paint. In one of the paper plates, mix 1/6 part umber, 1/6 black paint and 4/6 titanium white. Immediately prepare a little paint, apply it to the wall using a sponge, simply applying the surface soaked in paint to the wall. You should not try to make a solid background - it should be torn and textured. In some places we apply the paint more densely, passing twice, in some places we apply a more transparent layer.
- On a dry background, draw several rows of bricks by hand, not using a ruler. We focus on the standard for masonry: 25 * 6.5 cm, seam thickness - 0.8-1.2 cm. When marking, keep in mind that using this technology it is easier to make the seam a little narrower by painting it, than to try to widen it later.
- To paint “bricks” you need to mix ocher and sienna in different proportions, getting different shades of “brick” colors - from yellowish-orange to brownish. We got some shade, painted several “bricks” in random places. We mixed a new batch and painted over the other bricks. We apply the paint with a brush, without trying to get a uniform surface or a dense layer of paint - the background layer is visible. The edges of the “bricks” also should not be smooth.
- For a traditional red-brown color, to sienna and red ocher, add a little light ocher and a little white. You can paint several bricks in a row with this color.
- One more shade - to the above composition we will add brown mars and a little water. Apply with a brush or sponge - as desired.
- If you add white and burnt sienna to ocher and sienna, you get another color.
- We paint all the bricks in random order with these shades.
- We dilute white and a little ocher, add water. Apply the composition with a sponge, acting as a tampon.
- Take an old toothbrush and burnt bone paint. We dip the bristles in paint and spray them on the wall, imitating the heterogeneity and texture of clay bricks.
- We add volume to the bricks: dip a thin brush in a mixture of umber and white. We bring all the bricks from below and to the right or left. Everything is on one side, depending on where the window is located (on the side opposite the window). The thickness of the liner varies, since the masonry and the bricks themselves cannot be ideal.
It takes much longer to describe than to do it all. A beginner can draw about 30 squares of imitation brickwork in a day. For maximum verisimilitude, there are several secrets, which we will discuss below.
Final touches
To ensure that the brickwork painted on the wall is as close to natural as possible, there are several little secrets:
- If the shadows near the bricks turn out to be too harsh, they can be shaded with a toothbrush (another one) dipped in a mixture of white and natural sienna, heavily diluted with water.
- After applying paint to brick, do not wait for it to dry. Take white, add a little umber, dip the sponge and use it to “break” the uniformity of the paint, imitating a rough surface. To do this, lightly touch the “brick” with a sponge.
- On a plate, next to the main batch, squeeze out a little of the other colors. They change color as they paint. The brick will not be monochromatic. It has a smooth and not very gradient color.
- The dimensions of the bricks, their edges, seams - all this does not have to be perfect.
With some skill and effort, you can ensure that the painted brickwork looks like the natural one. The main rule: imperfection and heterogeneity.
Step-by-step algorithm of actions
Drawing the wall
The easiest way is along a long rail. Naturally, with exact observance of the distances between the horizontal lines (the bricks have the same dimensions). You can focus on the standard. The thickness of single – 6.5, one and a half – 8.8, double – 13.8 (cm).
Application of imitation coating
There are many techniques, so we will limit ourselves to only the most common ones, based on the fact that the work is done independently.
Using adhesive tape (masking tape)
Before starting work, the wall must be painted in the color that should be at the seams. Typically gray or white (or something in between). The fact is that depending on the components and their ratio in the mixture, the dried solution takes on a different shade. Next, horizontal seams are marked (using tape). After this, it is easy to highlight individual bricks, simulating masonry with shifting products in adjacent rows (pieces of tape are attached vertically).
Peculiarity
: Since the tape will then have to be removed, there should be free ends left, sufficient to grab them with your fingers. After this, the prepared mixture is applied to the wall.
Important
: the consistency of the solution should be such that it does not flow down the wall. And the layer should be applied minimally, no more than 2 - 3 mm.
Option #1
- based on gypsum. But this material hardens quickly. Therefore, it is necessary to introduce a so-called “moderator” into the mixture. Its use leads to the fact that the layer of gypsum mortar does not harden for 20 to 40 minutes. Otherwise, it will simply not be possible to remove the tape to mark the masonry seams.
Option No. 2
– plaster mixture + tile adhesive (1 to 1). In this case, only the smallest fractions of sand are used in the preparation process. This means that you will have to purchase it specially, since the usual one (from a river or from a quarry), even well sifted, will not work.
Flaws
: If the object is large, covering the wall with tape will take a lot of time and material. If the solution hardens too quickly, it can lead to problems in removing the tape from it in order to preserve the appearance of the design.
Stenciled
The method is more complicated, since you will have to prepare the grate. It is made from a sheet of plastic or rubber, knocking out rectangles in it.
In addition, it is advisable to create a template from thin slats, the undoubted advantages of which are:
- the ability to work with solutions that harden quickly, since they have time to “set” and dry;
- a large selection of materials and flexibility in carrying out any set of works. The shape of the structure fully repeats the elements already discussed;
- the ability to create a template directly on the wall and an image of any shape;
- naturalness and authenticity of the appearance of the resulting brickwork.
Flaws
: a stencil needs to be made or money must be spent on purchasing a finished product.
Equipment for work
Beginners do not need to immediately take on large-scale work. First, they learn to apply paint with a brush and accurately draw lines on a cardboard sheet. And after practice you need to draw a brick wall. What tools will you need:
- plastic bucket; brushes N4 and N20;
- Toothbrush;
- to mix acrylic paints you will need a palette of plastic plates;
- chalk or marker;
- sponges with medium and large pores;
- a piece of pure matter;
- adhesive tape;
- stencil or long metal slats for securing drywall;
- acrylic emulsion (the amount depends on the area of the wall) - carbon black, red and light ocher, white with a hint of titanium, brown mars, burnt and natural sienna, umber.
10 cans of paint are enough to apply an image to an area of 50 square meters. A beginner can paint 30 square meters. walls in 8-10 hours.
Drawing the masonry
To avoid accidentally covering up the primary layer of paint, place an adhesive plaster between the lines where the seam is located. Brushes and sponges are washed in buckets of water. How to draw a brick wall step by step:
The artist stirs sienna and ocher in a plastic bowl. Brings browns, yellows and reds into these paints. They achieve an imitation of brick.
The edges of the stones are drawn smooth, and marker or chalked lines are also painted over.
Work with a wide brush. The base color is applied in the brick marking areas.
Wait for it to partially dry and begin reapplying the layer so that the background in the forms is completely hidden.
Shades are added step by step. Brown mars is diluted with water so that the color is not saturated, and drawn from left to right and from bottom to top. This method of moving the tool carefully hides all the shortcomings.
Stir burnt sienna and whitewash. Similarly, dull shades are applied to the painted stones.
Draw the texture of a brick with a toothbrush. Mix ocher, whitewash and burnt bone. Using the tool, lightly spray the rare liquid over the coating.
Acrylic does not crack, dries in a short time, it is convenient to apply even layers, there is a large selection of colors. This paint may darken after application after a few days. That's why they choose light colors.
Correct markup
Use a stencil or steel profile. In this case, a metal rod, tape measure and marker are used. Drawing a brick wall according to plan:
- Measure 1-2 cm from the bottom of the wall - this is the seam. They retreat from the resulting mark to the height of the brick and mark a line.
- From the auxiliary points, apply a profile horizontally and draw broken lines 25 cm long in increments of 1 cm. Similarly, mark the wall to the ceiling.
- They also make equally intermittent vertical contours - length 6-8 cm with an interval of 1 cm.
- The lines marked with a marker or chalk should not intersect opposite lines. For example, a vertical contour follows the boundaries of horizontal lines. If intersection occurs, then this is asymmetry. We'll have to redraw it.
It is more convenient to draw with a marker than with chalk, but if a beginner makes a mistake, it is difficult to hide the defect. You will need to mix the paint with the correct shade and paint over the lines on the background.
Types of drawings on the facade
Several trends can be distinguished, some of which are more related to classical architecture, and some to modern street design:
Brick drawings
The facades of apartment buildings and private residential buildings are often decorated with brickwork. It is impossible to create a complex thematic image in this way. Brick patterns on the facade of a house are an alternative to the boring, monochrome coloring of houses made of ceramic or sand-lime brick.
The decoration technology is very simple. When laying external walls, at a certain moment the color of the brick changes and a pattern is laid out. Its edges are not smooth, but torn. Therefore, it only looks beautiful from afar.
This method has not been popular lately.
Mosaic
It is laid out from small multi-colored elements. To create a mosaic pattern on the facades of high-rise buildings, ceramic tiles are used, which are laid out on the mortar.
Installing a mosaic façade is a time-consuming and labor-intensive process. With its help, you can transfer to the wall a whole picture associated with a particular era.
To lay the mosaic, a high-quality base of plaster mortar must be prepared. The mosaic facade is characterized by some randomness in the arrangement of decoration elements. It must be viewed from afar.
Drawings with paints
Facades everywhere are decorated with paints. This is the most popular and sought after method.
Drawings are made with facade paints on a prepared and plastered surface. They are not tasked with conveying any specific information. The facade is simply painted in several colors with regular geometric shapes.
This simple method makes it possible to make the internal environment in cities more vibrant and life-affirming.
Drawings on the facade of a private house
They are carried out using all of the above methods, but with some reservations about doing the work yourself. Newly built brick cottages are most often tiled, plastered and painted.
Anyone can draw a picture on the facade of a house. You don't need any special skills to do this. It is enough to plaster the surface, divide it into sections and paint each with its own color.
A simpler and cheaper way to decorate a brick facade is with a brick pattern. As a rule, this is a red image against a background of white silicate stone.
Wooden log houses and clapboard houses are also painted. For these purposes, oil paint is used for external work. The simplest option is to paint the log house “on the log.”
Each log is painted in its own color. The result is a bright and cheerful facade. Don't forget about trim and window frames. A complex, thematic image can be applied to wooden lining. True, this requires artistic skills.
The facades of private houses are decorated with mosaics. There are many techniques for doing it. One of the most original is a mosaic of lids. There is no limit to the flight of fancy. You can create absolutely any image. The main thing is to prepare the required number of bottle caps.
Graffiti
Graffiti on walls is a separate form of art. Graffiti is a drawing on the wall of a building, painted or scratched onto the surface. This is a layer of street art. This includes any image from the author’s signature to a full-fledged painting.
As an art form, graffiti drawings came to us from ancient times. After all, rock paintings that date back tens of thousands of years BC are also primitive graffiti.
Modern art began in the early 20th century in the United States as a way to paint freight train cars. Gradually it spread to large and small cities around the world.
In megacities and advanced cities, local authorities give away entire streets to free artists, thereby trying to protect other infrastructure from encroachment. This doesn’t help, because graffiti is for free people without any boundaries.
To a person ignorant of the topic, it may seem that graffiti is chaotic and lacks style. This is not true, it can be classified:
How to draw graffiti
Modern grafflers create real masterpieces. Crayons are used to outline the drawing. Filling an image or creating a one-color inscription is carried out using aerosol cans of paint.
They can be purchased in specialized departments of street writers or in hardware stores.
Many grafflers use stencils. They are made of thick cardboard. There are artists who use LED lamps or multi-colored fabric in their works.
Street art and traditional forms of decorating facades through drawings do not stand still. People don't want to live in gray, dull boxes. Therefore, drawings on facades will increasingly take over the urban environment.
Another selection of photos with drawings on the facades of houses:
Each building was created by a caring owner. If a person did not have an innate desire for beauty, there would be no facades
at the building. The outer walls would only serve as protection against.
Construction technologies and the production of finishing materials do not stand still. To please consumers, new types of finishing materials for interior and exterior work are appearing on the market.
Many have been convinced from personal experience that façade
Decorative plaster bark beetle is in all respects an excellent and most optimal solution.
Facade
private house. Decorative plaster to imitate brick. Decorating walls in apartments and private houses is aimed at creating an interior in which a person will feel comfortable and comfortable to be. Walls are the face of the house.
At the stage of developing a private house project, the customer must determine what material will be used to decorate the walls outside. The exterior decoration of the house gives the property a presentable appearance.
Source
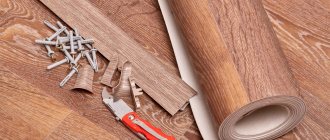
Option 4 – brickwork made of putty.
To recreate it you will need:
- directly putty (any except finishing);
- level;
- pencil;
- putty knife;
- window seal with a thickness equal to the desired joint of the false brick wall.
A furniture stapler may also come in handy (if the glue you choose cannot securely hold the seal), but it is not necessary.
So, the standard brick dimensions are 250x65x120 mm. In accordance with them, basic surface markings should be carried out.
- Step back 65 mm from the floor, use a level and a pencil to mark a straight line and glue the window seal onto it.
- Step back 65 mm from it again and do the same thing again. And so on until the entire surface of the future “brick” wall is filled with these horizontal stripes.
- Make vertical markings. To do this, step back from the lowest point (from which one, it doesn’t matter, unless there is a corner in your false wall, otherwise you need to start from there) 250 mm and draw a vertical line, then another 250 mm... and so on throughout the first row. The second row and each subsequent even row should be done in the same way, only in order to get a checkerboard order, the first “brick” must be halved. Afterwards, glue all the drawn lines with a sealant.
- Dilute the putty, fill the resulting “honeycomb” to the entire thickness of the seal (there is no need to cover it) and leave until completely dry (about 24 hours).
- Peel off the seal (this is not difficult to do, since it does not “resist”), paint the imitation brick wall with your own hands in a more natural color, and after it dries, cover the seams with tile grout or cement.
"Bricks" made of cardboard
Imitating a brick wall with your own hands from cardboard is the most cost-effective and easiest way to do it.
Required set of tools and materials:
- PVA glue;
- liquid Nails;
- thick cardboard;
- sponge fiber;
- paper napkins;
- pencil;
- ruler;
- thin brush;
- stationery knife;
- paints;
- varnish
The wall surface is pre-prepared: wiped off dust and thoroughly degreased. If wallpaper is pasted, it is removed. After this, apply a primer layer or glue diluted with water (in a ratio of 1:2).
Immediately determine the size of the bricks. The appearance of the masonry depends on the side of the brick chosen as the front. There are three types of them:
- spoons (largest in area);
- bed (long side);
- poke (short).
When drawing up a picture, you can imitate any type of masonry: with a spoon, with a bed, or a combination of two methods.
A brick laying with a spoon measuring 228x65 cm is recreated as follows:
- Silhouettes of bricks are drawn on a cardboard sheet - rectangles of the required size.
- Press a ruler to each line and run along it with a stationery cutter.
- You can decorate the wall with solid brickwork or make a decorative window in which to place a fragment of photo wallpaper or a wall calendar. To do this, determine the location and pre-glue the picture onto the prepared surface.
- Several blanks are cut in half so that they can be glued in a checkerboard pattern.
- The cardboard is treated from the inside out with adhesive and fixed to the wall. It is more convenient to apply “liquid nails” on the sides and coat the middle with PVA glue or a special compound for vinyl wallpaper. They retreat from the first fragment by 8–10 mm and fix the next one.
- The second row is laid out with the same gap. They just start with a fragment that is half a brick.
- They proceed in the same way until they have covered the entire space except for the window with the pattern. Then they wait for it to dry - this usually takes a day.
- Next, they recreate the texture, which, in addition to its decorative function, also has a practical one - it hides all sorts of defects. To do this, you will need multi-layer paper napkins. Use a brush or sponge with glue to lubricate the cardboard surface. Napkins, previously crumpled and straightened, are glued on top.
- Apply the adhesive layer again. The seams are pressed and smoothed with a finger.
- After the PVA has dried, begin painting. If they try to imitate natural brickwork as believably as possible, then select the appropriate color – brownish-orange. To do this, mix several colors: red, black, white, orange. The resulting composition is applied to the wall. If it is necessary to recreate a porous surface, then use a sponge.
- Finally, apply white or any other color along the seams using a narrow brush.
The dry surface is sometimes additionally gilded and varnished, which gives it a more pronounced texture. A wall decorated in this way is practically no different from a natural brick one.
In the interior of a living space, walls decorated with brick look both natural and eye-catching. By choosing the color and method of decoration to your liking, you can transform the room beyond recognition. To do this, you don’t have to be a professional and invest heavily in finishing materials.
It is only important to strictly follow the instructions when preparing the walls and base to imitate brickwork
Variety of options
Drawings in the form of masonry are depicted in different ways. You can add your own ideas or use ready-made work options. For example, they create a black background on the wall and paint red bricks with smooth lines without roughness.
You may be interested in:Armstrong suspended ceiling: device, installation
You can paint brickwork on an old wall with microcracks. Paints add a porous texture and outline slightly curved lines. The image looks good in the kitchen or hallway. Roughness is created with a sponge.
Use any color. The masonry can be drawn on a black background with white bricks. Or make golden shades. They take into account the overall interior of the room and make a sketch. For realism, chiaroscuro is added to such a large-scale picture, and the most advanced artists depict hand-drawn 3D masonry.
You may be interested in:Material for soundproofing an apartment: types and features of application
Making a mold for casting brick tiles from plaster
An imitation of brick for interior decoration in an apartment or house can also be cast: you can make gypsum tiles in the form of bricks yourself. To do this, an impression is taken from interesting specimens of bricks (a mold is made to form an artificial finishing stone), and then a gypsum solution is poured into it. The resulting tiles are used for wall decoration. This technology is good because it allows you to prepare several molds in which you can make bricks of different colors for different rooms.
We find bricks of interesting shape and several almost ordinary ones, but with various minor defects. We will use them to cast the mold. It is desirable that there be at least a dozen of them, or better yet, more. “Artificial brickwork” will be more varied.
The result can be very similar to real masonry
On the side that we will “multiply”, apply grease or heated wax mixed with kerosene. This is necessary so that the silicone does not stick to the surface. When everything is dry, apply a layer of silicone sealant to the treated side. The layer thickness is 1-1.5 cm. Leave until the silicone is completely polymerized (the time depends on the type, it is written on the package).
You can also make the following shapes: imitation brick with marine motifs
When the silicone has hardened, take the foam and coat the mold without removing it from the brick. After the foam has hardened, remove the brick and level the bottom of the mold so that it stands level. Can be used by filling with gypsum mortar. It sets quickly; if you have a dozen molds, in 2-3 days you can make tiles for a couple of squares simulating a brick wall. By the way, gypsum mortar can be painted in bulk. Then new cracks and chips are not a problem - just like a brick.
How to imitate brickwork yourself using decorative plaster?
To carry out the work, ready-made dry mixtures are usually used, which are diluted with water at room temperature in accordance with the attached instructions. If necessary, coloring pigments are added. The resulting plaster has a thick consistency. To apply the composition, use a wide spatula. Most often, a perfectly flat surface is not required. The applied layer should dry a little. Seams are formed in one of the following ways:
- Cutting with a scraper. It is convenient to use a long rule for this purpose. It is applied to the wall, the seams are drawn with a sharp plate. The width of the seams is 5-10 mm. The height of a standard brick is 65 mm, length is 250 mm. First, horizontal seams are made. Then - in a checkerboard pattern - vertical. After drawing, you will need a scraper - a narrow carpenter's chisel or a bent steel strip. Using a scraper, seams of the required depth are made, removing the plaster. Another way is to use jointing. This tool is used for finishing masonry. It can be used to form convex or concave seams.
- Pressing in straight thin objects - glazing beads, tubes or thin metal elements.
Video description
Learn how to get rid of efflorescence on brickwork by watching this video:
Joining seams
To create a loft wall, the brick needs to be half cleared. Here they use a special tool for jointing - a chisel. This procedure is best done in pairs: one person will measure the seams with a building level, and the second will make passes.
You can use both electric tools like a grinder and a hammer drill, and mechanical ones like a chisel and a hammer.
Important! In order not to damage the neighboring bricks, they begin to break off pieces from the edge of the shaped product.
During work, the seams are cleared to the required depth - 2-4 mm, so that the bricks are clearly distinguishable.
Sanding and priming masonry
After clear cleaning, use a grinding machine or ordinary sandpaper. This operation allows you to make the masonry wall even.
Important! After sanding, you need to clean the surface with a vacuum cleaner or broom. You can also wash the wall with clean water.
The priming process is also used as an intermediate step on the way to painting or stenciling. The surface treated with this composition does not crumble and absorbs paint or varnish well. This allows you to reduce the consumption of basic materials.
Sanding the wall Source ytimg.com
How to draw a house step by step?
In order to start drawing, you need step-by-step instructions on how to draw a house. But before we move directly to the instructions, you need to prepare a sketchbook, pencils or felt-tip pens, and an eraser.
So here we go:
- Draw a square on a piece of paper.
- Draw a triangle on top of the square with its apex up.
- We have the frame of our house and the roof, depicted in the form of a triangle.
- To make our house look more voluminous, we should finish painting its other walls. To do this, we draw two parallel straight lines from the square to the right, raising them slightly, about 20 degrees.
- We draw exactly the same ray from the vertex of the triangle. Connect all three lines with a straight pencil.
- We got a voluminous house. You should add windows on the facade, a pipe, a door. And our work is ready!
- If desired, the drawing can be decorated.
Drawings and patterns on the facades of houses
Decorating the facade of a house means making it stand out from the surrounding buildings, it means saying something to others through street art. Drawing on the facade of a house is not just a whim of individual property owners, street artists or architects, it is art.
In Soviet times, elements of patterns on the facade were laid out from brick or mosaic tiles. In wooden houses, the platbands or the entire facade were painted. In our time of freedom, this area of art has undergone major changes; there are many more decoration options. Let's look at the main ways to decorate a facade.
Idea 2. Painting checkered walls (+ master class)
As you know, check is the most versatile print that never goes out of style. It fits perfectly into both classic and modern interiors, both into the interior of the kitchen and children's bedroom. You can decorate one or more walls with a cage using wallpaper or painting.
The easiest way is to paint walls in a large Vichy checkered pattern, as in this collection of photos.
Painting walls in Scottish tartan requires a little more effort, but still, it is accessible even to beginners - after all, the accuracy of the markings, rather than painting skills, is what is important here.
And now we suggest you familiarize yourself with the step-by-step instructions for painting walls with your own hands in tartan, as in the photo below.
What you will need: 4 paints of the same color, but in different tones (in this project we used light olive for the background, a slightly more saturated marsh shade for vertical and horizontal stripes, an even darker one for the intersections of stripes, as well as two paints of contrasting colors), brushes , roller, masking tape and laser level, stepladder and other basic painting supplies.
Instructions:
Step 1: Prepare the wall for painting, then paint it with the background color using a roller. In this master class, the background is a light olive tone of paint. Allow the background layer to dry before moving on to the next step.
Step 2: Mark vertical stripes of equal width on the wall using a laser level and masking tape. Then paint them with a paint darker than the background and let dry.
To ensure that the lines are smooth and clear, and the paint does not flow under the masking tape, use a small brush to paint along the tape and a larger brush to paint the main body of the strip.
It is important to ensure that there is no excess paint on the brush. The movement of the brush should not be up and down along the tape, but left and right (across the tape)
Step 3. Now mark the horizontal stripes in the same way, paint over them and leave to dry.
Step 4. Paint the intersections of the stripes in an even more saturated shade to create the effect of layering threads of the same color in the checkered fabric (as if the cells turned out darker than the stripes).
Step 5. Now it's time to draw the contrasting thin stripes that are required for the tartan check.
To do this, again use the laser level and masking tape, mark a line along and in the center of the vertical stripes. Next, paint over them and let dry. Then use the same paint to draw lines along the horizontal thick stripes.
Step 6. Finally, draw the cells of a different contrasting color (in this master class it is blue). The technology is still the same, but the cell becomes larger, since the stripes are drawn along the lines of the first background layer.
Step 7. All that remains is to coat the painted wall(s) with matte varnish to enhance its moisture resistance and strength.
Construction of the stencil
Accessories will speed up the drawing of brickwork. There is a sufficient variety of materials from which a stencil is made. To paint brickwork on a wall with paints like the masters, you need to choose the following options:
- Chipboard sheets. Strips are cut from the slab to the height of the brick, but 1-2 cm more, since there must be a seam between the stones. Pieces of pressed slabs are laid at the joints and the parts are fastened with a stapler and staples. The shapes of red or sand-lime bricks are marked on the stripes. Unnecessary areas are cut out with a stationery knife, applying a ruler or building level to the lines.
- Expanded polystyrene. Similarly, strips of the required size are cut from foam boards. The elements are glued together. Inside, the shapes of stones are cut out with a knife. If the owner wants to paint the wall rough, this option is better.
- Scotch. Adhesive tape is applied to the wall horizontally over the entire area. You can cut long pieces 1-2 cm wide, which will cover the seams. These strips are glued horizontally and vertically to create the shapes of stones. This material is replaced with an adhesive plaster, which is sold in different widths.
It’s easier to use a metal profile and create markings with a marker or chalk. In this work, you cannot cope with drawing without an assistant.
- Added350
- Uploaded2892
0:23
I'M LEARNING TO DRAW. Drawing lessons I'm learning to draw. Drawing lessons
a year ago
5:56
How to make 3 from one picture I'm learning to draw. Drawing lessons
11 months ago
22:38
HOW TO DRAW A COLOR PORTRAIT FROM A BLACK AND WHITE PHOTO I am learning to draw. Drawing lessons
454 views1 year ago
20:32
How to paint a sketch in the open air in the forest I am learning to draw. Drawing lessons
433 views8 months ago
10:32
HOW TO PACK WORK (PAINTINGS) FOR SHIPPING TO ANYWHERE IN THE WORLD I am learning to draw. Drawing lessons
10 months ago
1:59:05
Master class on dry brushing. Falcon I'm learning to draw. Drawing lessons
8 months ago
5:06
HOW TO COVER A PICTURE WITH ACRYLIC VARNISH I'm learning to paint. Drawing lessons
a year ago
10:09
Smoked ink or how to make black ink at home and stay clean. I'm learning to draw. Drawing lessons
four months ago
5:33
The process of drawing a rectangular shaped Acanthus pattern using ink and other materials I am learning to draw. Drawing lessons
581 viewsfour months ago
32:31
How to draw a tree in the snow I'm learning to draw. Drawing lessons
a year ago
1:44:43
Artist Igor Sakharov. Impressionism for Beginners I am learning to draw. Drawing lessons
443 viewsthree months ago
3:29
Stationary mast. How to attach to an easel I'm learning to draw. Drawing lessons
8 months ago
5:17
How to divide objects into a geometer. figures. Learn to draw anything I'm learning to draw. Drawing lessons
a year ago
2:08
How to remove a defect on a canvas I'm learning to draw. Drawing lessons
8 months ago
6:29
HOW TO DRAW FASTER. 6 life hacks I'm learning to draw. Drawing lessons
8 months ago
5:17
Method of painting a decorative Lion I am learning to draw. Drawing lessons
302 views9 months ago
8:14
How to draw from your head. 4 exercises for beginning artists I'm learning to draw. Drawing lessons
a year ago
15:30
How to use a brush to create this or that object. Mountains in the distance I'm learning to draw. Drawing lessons
a year ago
10:02
Mistakes that drive you into art block I'm learning to draw. Drawing lessons
354 views11 months ago
10:01
NEVER DO THIS if you want to save your work. I'm learning to draw. Drawing lessons
11 months ago
59:21
Winter sun. Working with a limited palette. Master class for beginners I'm learning to draw. Drawing lessons
362 views1 year ago
42:41
How to draw a rose flower on glass. Stained glass I'm learning to draw. Drawing lessons
373 views1 year ago
30:21
How to paint trees with a fan brush. I'm learning to draw. Drawing lessons
five months ago
6:10
How to draw grass, fur, foliage, etc. I'm learning to draw. Drawing lessons
272 views9 months ago
42:25
“Tender Summer” (Wonderful summer landscape). Artist-Victor Yushkevich. I'm learning to draw. Drawing lessons
624 views1 year ago
14:15
How to mix paints correctly and get the desired shades I'm learning to draw. Drawing lessons
a year ago
2:42:02
Winter's Tale. Webinar by Tatyana Bukreeva. How to draw a picture. Landscape – I’m just learning to draw. Drawing lessons
a year ago
16:33
6 basic techniques for working with a palette knife I'm learning to draw. Drawing lessons
10 months ago
22:27
Cool technique for portraits! How to draw a woman's portrait using soft materials I'm learning to draw. Drawing lessons
a year ago
12:57
You can't draw the sea. Watch this VIDEO I am learning to draw. Drawing lessons
382 views1 year ago
Show more
22:24
How to draw Big Ben in London with a pencil I'm learning to draw. Drawing lessons
7 days ago
4:20
Alexey Krasilnikov. Cityscape. Perspective with two points I'm learning to draw. Drawing lessons
7 days ago
35:01
Yuri Klapoukh. Learning to convey the transparency of water. How to work on a large painting I'm learning to draw. Drawing lessons
1 view7 days ago
14:11
How to draw a zebra's head with a pencil I'm learning to draw. Drawing lessons
474 views18 days ago
16:31
How to draw an eagle with a pencil. I'm learning to draw. Drawing lessons
24 days ago
14:56
Artist Fania Sakharova. How to paint flowers in oil I'm learning to draw. Drawing lessons
24 days ago
19:22
Artist Fania Sakharova. How to paint tulips in oil I am learning to draw. Drawing lessons
24 days ago
15:45
Artist Fania Sakharova. How to paint lilac in oil I am learning to draw. Drawing lessons
24 days ago
15:14
Artist Fania Sakharova. How to paint roses in oil I'm learning to draw. Drawing lessons
24 days ago
14:56
Artist Fania Sakharova. How to paint poppies in oil I'm learning to draw. Drawing lessons
24 days ago
1:12:31
How to draw a rose with a pencil I'm learning to draw. Drawing lessons
601 views24 days ago
1:01:01
Pencil drawing of hands playing the guitar in 45 minutes. Timed drawing exercise. I'm learning to draw. Drawing lessons
24 days ago
12:46
Panther. Dry brush technique. Demonstration of work I am learning to draw. Drawing lessons
741 views25 days ago
1:52:16
We draw a man with long hair with a pencil and charcoal. I am learning to draw. Drawing lessons
26 days ago
7:02
Painting using Fluid art technique with a silhouette of a rhinoceros. I am learning to draw. Drawing lessons
91 views26 days ago
27:16
How to draw draw lips with a pencil I am learning to draw. Drawing lessons
26 days ago
54:58
Yuri Klapoukh. How to draw glass realistically using a crystal glass as an example. I'm learning to draw. Drawing lessons
1493 views26 days ago
19:07
Landscape in gouache “Fog over the river” I am learning to draw. Drawing lessons
1182 views26 days ago
1:27:17
How to draw curly hair (English) I'm learning to draw. Drawing lessons
26 days ago
11:50
Cloud with acrylic I'm learning to draw. Drawing lessons
753 views26 days ago
20:02
Landscape “Old Town”. Watercolor I'm learning to draw. Drawing lessons
26 days ago
10:33
Drawing a child's portrait with graphite pencils I'm learning to draw. Drawing lessons
26 days ago
9:46
Drawing the head from different angles I'm learning to draw. Drawing lessons
31 views27 days ago
1:02
Review of the DrawShow application I'm learning to draw. Drawing lessons
a month ago
8:43
Painting Still Life with Red Velvet I'm learning to draw. Drawing lessons
32 views1 month ago
10:02
Tulip in watercolor I'm learning to draw. Drawing lessons
123 views1 month ago
0:57
Da Vinci Eye – Anyone Can Draw I'm learning to draw. Drawing lessons
34 views1 month ago
2:13:44
Surfer at sunset with acrylic (English) I'm learning to draw. Drawing lessons
a month ago
14:28
Bullfinches in gouache on a snowy day I'm learning to draw. Drawing lessons
a month ago
17:50
Contrasting still life in gouache I'm learning to draw. Drawing lessons
a month ago
Show more
IMITATION OF BRICK MASONRY WITH YOUR OWN HANDS - METHODS AND TIPS FROM READERS
IMITATION BRICK MASONRY ACCORDING TO MY METHOD
For a long time I wanted not only to master the imitation of brickwork that has become fashionable, but also to reduce the cost of this process as much as possible. Finally I came up with and made a stencil for applying the required texture, with which I finished the walls.
Imitation of brickwork with your own hands
Manufacturing
From a plastic corner under a ruler, I cut strips 150 cm long and 1 cm wide with a sharp knife, as well as figured lintels with a length equal to the height of a standard brick (with an allowance of 5 mm) and a width of 1 cm (photo 1).
From the prepared parts, I used PVA-Moment glue to glue two canvases measuring 150x150 cm (photo 2). I chose the standard size of the “brick” and the “masonry” option. The stencil is ready.
Finishing
I immediately calculated and shaped the edges of the stencils so that when moving from one wall to another it would be very easy to join them. A thin finishing layer of brickwork plaster was applied to the leveled walls with a spatula to make the surface “uniform.” Then, after coloring the acrylic primer with white paint, I covered the entire wall with it under the stencil.
I used a stapler to attach the stencil to the wall in several places and, after stirring the solution according to the instructions, applied the finishing plaster to the stencil with a 100 mm spatula without further adding texture.
Almost immediately after applying the plaster (2-3 minutes later), I removed the stencil (photo 3). The bricks dry quickly, as the walls draw excess moisture from the mortar.
Each time I cleaned the surface of the stencil from plaster, since the adhering solution increases the weight of the template significantly and makes it inconvenient to work.
I secured the template further along the wall, observing the geometry of the “masonry,” and continued finishing throughout the hallway. After finishing applying the pattern to the main area, the stencil was cut in place: in the corners, as well as near the floor and ceiling.
At the final stage, I painted the walls in one layer of white paint with a medium-pile roller, due to this a more relief pattern is created: the bricks remain white, and the seams between them are several tones darker (photo 4). I did not cover the joints of the wall with the ceiling with a plinth, since the latter would hide part of the top row of “bricks” (photo 5).
Preparatory stage
It all starts with things that are banal, boring and even a little tedious. Namely, from preparing the wall planned for finishing. This stage should not cause any particular difficulty, but skipping its individual subparagraphs is strictly not recommended. Otherwise, you will then have to pay for your natural desire to save energy and time with no less natural and logical disappointment from the result obtained.
- remove old finishing material;
- carefully scrape off all the scraps that, one way or another, may interfere with you in the future;
- inspect the wall for cracks and irregularities;
- if you notice cracks, then use a hammer and chisel to make them a little wider and fill the holes with a deep penetration primer - this will help prevent the appearance of always unwanted mold;
- carry out the initial treatment of the wall surface with a primer - it is not necessary to achieve a perfectly smooth surface, since after puttying the priming procedure will have to be repeated;
- if the surface is very uneven and there are noticeable defects, then go over the wall with plaster, and also cover the cracks previously treated with primer;
- to achieve a perfectly smooth wall after plastering, it makes sense to use gypsum-based putty - it is not so rough in consistency and will help make the wall flawless, eliminating those irregularities that plaster, for objective reasons, cannot cope with;
- the final touch is re-priming the surface, this time we are pursuing the goal of achieving excellent adhesion to the decorative material that will be used to imitate brick, the treatment must be carried out carefully, generously lubricating those areas that very quickly absorb the solution.
Creating a background
Tape or newspapers are placed in the corners of the work area to prevent paint from getting onto adjacent walls, floors and ceilings. It is difficult to erase acrylic, so try to paint carefully. How to draw a brick painting on a wall correctly:
- The background color is prepared in plates. Stir umber, titanium white and black paint.
- The prepared components are gradually added to a clean container and the desired shade is achieved.
- To apply paint use a large porous sponge. It is dipped in liquid and the background is painted on top of the wall.
- Rub the resulting gaps with a small sponge until the color is uniform.
Wait until the applied coating dries. They check the work for roughness and gaps; if there are any, they are covered with a new layer of acrylic. Before painting a brick wall, the surface is wiped and treated with a primer.
How to turn drawing into learning
Drawing is a creative process and can be used for learning. To begin with, ask your child what kind of house he likes, check if he remembers its shape and outline, discuss everything that he would like to depict.
We recommend devoting each lesson to studying a new topic or, perhaps, reinforcing previously covered material. In this case, time spent in close communication with your offspring is equivalent to time spent usefully for:
- studying geometric shapes and the most commonly used shapes;
- studying colors and shades, as well as becoming familiar with the color palette;
- reinforcing the concepts of simple shapes and perspective in drawing;
- studying the main elements of a typical building and their names.
Article on the topic: What weight can a balcony in a brick house withstand?
It is worth knowing that in the process of mastering the basics of drawing, the child will learn to correctly hold a pencil, pen or any other writing object, which is useful for the development of fine motor skills and, accordingly, stimulation of mental development.
Such skills will be useful to all preschool children, as well as primary schoolchildren.
Idea 1. Painting walls using a stencil
Stencils come in handy when you need to outline the contours of a complex image, draw letters, numbers or any repeating patterns.
To paint the walls, you can use a ready-made template or one made to order in a printing house. Such stencils can be flexible or rigid, one- or two-layer (to create a multi-color pattern), self-adhesive or glueless. They are generally durable, fit tightly to the wall, and are designed to be reusable.
However, you can make a simple single-layer stencil for painting walls with your own hands, following our step-by-step instructions.
What you will need to make a stencil: office paper, plastic film or thick paper (for example, whatman paper or wallpaper), a pencil, scissors, a stationery knife or a special knife for cutting out stencils, masking and transparent tape, as well as a printer and some kind of graphic editor (vector or raster).
What you will need for stencil painting of walls: paints (preferably water-based acrylic), a synthetic round brush (7 cm in diameter for painting large designs and smaller ones for finer work), a sponge (can be used instead of brushes) and paper napkins to remove excess paints.
Instructions:
Step 1. Find a suitable vector(!) stencil on the Internet, for example, on the website https://www.getpattern.ru/
Please note that it is advisable to select an outline image (or make it as such, following these instructions), because colored areas will only waste ink when printed
Step 2. The selected picture must be scaled to the desired size and printed.
This is very easy to do if the stencil size does not exceed A4 format. However, if you need to print a large template, then you need to break it into several parts, following these instructions. Next, all you have to do is assemble the picture as a mosaic.
Step 3. At this stage, the A4 paper stencil must be covered with transparent tape on both sides and overlapped (!) to protect the paper from getting wet. Finally, use a craft knife to cut out all the segments intended for painting.
If you have printed several A4 sheets for a large stencil, then at this stage you can immediately start cutting, but keep in mind that you will have to paint the stencil with an almost dry brush so that the paper does not get wet. But in order not to take risks, it is advisable to laminate the design or copy it onto a denser base (for example, vinyl wallpaper). To do this you can:
When cutting out the stencil, be sure to protect the table from scratches by placing some kind of backing on it, such as glass.
Step 4: Now it's time to stick the stencil to the wall. To do this, try on your template to the selected location, align it with the building level and glue it with tape. If necessary, for example, if you need to draw repeating elements at equal intervals, you must first make markings using a building level.
Step 5. Hurray, the most labor-intensive work is left behind, it's time to start painting.
Step 6. When the drawing on the wall is completely dry, coat it with matte varnish to protect it from moisture.
What walls are suitable
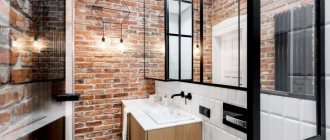
Walls made of white and red brick are suitable for a loft; there is not much difference here. The only thing you need to pay attention to is the condition of the masonry.
Important ! If, when cleaning the surface, shedding and destruction of bricks were revealed, the best option would be to plaster the surface and seal all defects. This work also includes the replacement of individual masonry elements with the help of restorers.
Naturally, in this case we cannot talk about any “natural” loft. Therefore, imitation masonry, decorative stone and other methods of wall decoration are used here.
Imitation of masonry using photo wallpaper Source design-homes.ru
Ways to Draw a Brick Wall
Painting a wall to look like brick is the most cost-effective way to imitate masonry. This option is also practical. For example, wallpaper gets dirty easily and can be torn by children and pets. It is difficult to spoil a painted wall. In addition, such a surface is much easier to change - you can simply repaint it.
There are several ways to paint a wall to match brickwork:
- drawing individual bricks;
- imitation of masonry using a stencil;
- use of foam rubber.
Each method requires different tools:
- wide and narrow brushes;
- roller;
- masking tape;
- foam;
- toothbrush to add texture.
For painting, acrylic interior paint with the addition of brown, pink, and orange pigments is usually used. The paint application technology is as follows:
- First, paint the plastered surface with a roller in one tone.
- Take a different shade and use a sponge, using a semi-dry method, to create a random pattern characteristic of brickwork.
- To imitate horizontal seams, apply lighter paint with a sponge.
- Then the seams are drawn, located vertically.
- To give natural color transitions and imitate irregularities, brush strokes are applied.
The average consumption rates for various types of paint are shown in the table.
| Type of paint | Approximate consumption, in grams per 1m2 |
| Acrylic | 250 |
| Latex | 600 |
| Silicate | 400 |
| Silicone | 300 |
What does it look like
Painting a wall to look like brick is perhaps the cheapest way to imitate it. Plus it's practical. While wallpaper can get dirty or damaged by pets, this will not happen with painting. Unlike wallpaper, you don’t have to rip off the paint if you get tired of it—you can simply repaint the wall.
Painted brickwork, of course, does not look as impressive as the original, but it will also suit any design solution. A clear example of this is in the photo below.
in the living room
in the hall
in the bedroom
on the facade
Wallpapers and photo wallpapers
Wallpapering is the easiest way to create a brick wall. There was a period when the cheapest versions with brick patterns were produced; such examples were glued in the kitchen and hallway. Today, a large selection is offered on a more durable base (vinyl, non-woven fabric) and fiberglass.
Photo wallpapers look impressive and realistic. They can be bought at retail outlets, or you can order them from design studios, bringing your own sketch.
Wallpapers that depict not just a brick wall, but a grafitti composition with crumbling paint or plaster are gaining popularity.
Self-adhesive 3D panels
The main advantage of PVC interior panels is ease of use. You can use them on any surface, be it one of the varieties of wallpaper or just a painted wall, a wooden panel or a plastic insert. The only undesirable surface is walls with a rough texture that will affect the finished appearance of the product.
The main advantage of adhesive panels is that they are very easy to care for. The surface is easy to clean and is not susceptible to moisture.
Textured roller
Textured rollers can create a stunning texture that imitates natural stone, while a cutting edge roller is great for creating neat brick edges. This option is more expensive, as it requires specialized tools, but it also has the right to life.
If these ideas have inspired you to create your own accent wall in the interior, then don’t hesitate, just go ahead and do it! Good luck to you!
Follow us on Pinterest for more interesting articles.
Useful short videos from Make-Self.net
Styrofoam
Make your own version of faced brick using foam board and textured spray paint. This is a cool project that any homeowner can do! I also like the lack of joints that can be visible when paneling. Take a look at the complete and detailed guide.