Using this innovative technology, we produce ready-made elements for interior decoration from standard sheets of plasterboard. You can choose various cornices, multi-level transitions, lighting boxes and much more from the catalog or we can produce them according to your drawing. The product is ready-made, easy to install and ready for painting. Depending on the complexity of the elements being performed, you are guaranteed to receive savings of 10-50% on materials and 50-70% savings in installation and finishing time!!!
Workflow Features
Let's figure out what advantages milling drywall has over the classic version of the work, and also consider all the features of working with cutters.
Pros and cons of this option
Drywall milling has the following advantages:
- Save time. The use of the technology we are considering reduces the time spent on the construction of boxes and corners by 2-3 times. Everything is done much faster and easier, in addition, the likelihood of damage to the material if all recommendations are followed is practically absent;
Making corner joints with a router is very easy
- Possibility of constructing boxes of any size and configuration. There are no restrictions on the complexity of the design, the main thing is to correctly understand the markings and make grooves in the required places;
It is better to train on designs of simple forms, and when you already have experience, you can move on to more complex options.
An experienced craftsman can make structures of very complex configurations without cutting the sheet into pieces
- The number of open ends is reduced. This makes the structure neater and greatly simplifies the work of puttying and finishing. In addition, you do not need to reinforce all bends with corners, which reduces the cost of the project and reduces the time spent on putty with metal elements;
- Possibility of creating structures without a frame. If there is no load on the box or corner protrusion, then you don’t have to reinforce such elements with a profile. They themselves will have good rigidity and will last for many years without deformation.
You can make blanks in advance if you need a lot of identical elements, this is very convenient
The only downside is that you will have to spend money on a cutter and router. But if you are doing renovations in your home, then it is easier to rent a power tool. The price of the service is low, so you will save significant money.
The working process
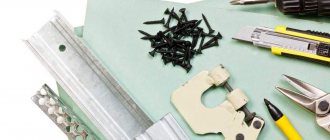
Let's figure out what you need for work:
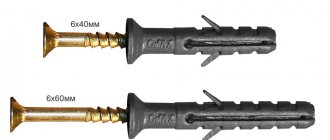
- A 90 degree drywall cutter is a special device that is used to make perfectly straight corner joints. The cost of equipment varies from 1000 to 4000 rubles. For household needs, the cheapest option is also suitable - even it will be enough for ten years of occasional use;
Drywall is a soft material, so the cutters practically do not wear out during use.
- Manual frezer. As I wrote above, if you are not involved in professional installation, then it is easier to rent a power tool. The work usually only takes a few days, so rental costs will be minimal. The main thing is to make sure that the shank of your cutter fits the equipment.
A manual milling cutter is a simple and convenient device for making grooves in plasterboard and gypsum boards
Instructions for doing the work yourself look like this:
| Illustration | Description of the stage |
| The strip is cut out. Its width should correspond to the distance from the edge of the router to the center of the cutter. This element is needed to transfer dimensions and precise location of equipment. You don't have to measure the offset; a ready-made pattern will help you do this quickly. | |
| The rule is set. To determine the exact offset of the stop element, use a previously made rail. This way you can set up the design accurately. | |
| The rule is followed by hand, the router is installed on the edge of the sheet. It is very important to hold the guide so that it does not move and you do not make a crooked cut. The cutter rotates clockwise, so during operation the router always pulls to the left. It is on the left side that the rule needs to be made. | |
| A groove is cut. The milling cutter is started, after which it is carefully guided, resting against the rule or rail. Gyprock is a soft material, so you can move the tool quite quickly. | |
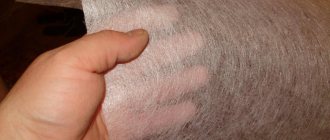
| Immediately the tool is passed along the groove in the opposite direction. When you do this, the slit is cleared and the edge of the paper is straightened. You don't need to sweep up the trash. | |
| The bend is checked. When a cutter is used, the drywall is cut at an ideal angle and when bent it should result in an even angle. If everything is fine, then you can continue working. | |
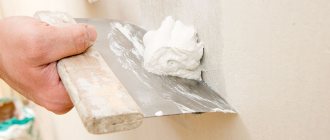
| Foam or glue is applied to the fold. The composition is distributed in a thin continuous strip. Both polyurethane glue and regular foam are suitable for the job. | |
| The corner is bent and straightened. It is important to form the correct angle while the foam is fresh. The easiest way to check the geometry is with a regular construction square. | |
| The element is fixed with masking tape. To secure the correct position when the foam hardens, glue the corner in several places with masking tape as shown in the photo. You can remove the tape after about an hour. If you have a complex box, then it is glued together in the same way, you just need to fasten several sides. | |
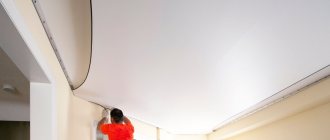
| The assembled box is glued to the wall. The picture shows an option for a built-in toilet. The finished structure with neat corners is simply put in place, after which it can be finished. |
Main types
A disc router with a Strong cutter is needed to form straight grooves and saw the drywall itself. Its advantages are speed and cleanliness. But this tool is not suitable for creating grooves of more complex shapes.
A shaped router performs milling of gypsum boards. It is often used to cut out more complex grooves and create various shapes of holes: round, oval and others. This tool uses a Festool cutter.
Milling sheets of drywall makes it possible to bring to life the most unusual design ideas that could not be realized with a knife. Only milling makes it possible to obtain a flawlessly smooth edging, which is especially important in cases where several elements are joined in one plane.
For any case, specialized cutters are used. The following types are often used:
- straight - makes grooves and holes located at an angle of 90 degrees;
- edge attachment - used only if you need to remove a chamfer;
- T-shaped - allows you to create extremely large holes;
- U-shaped – forms grooves of a semicircular figure;
- V-shaped - used for cutting triangular grooves.
As a rule, any highly professional specialist who often needs to use similar attachments for processing plasterboard sheets should have such a set of cutters. A home craftsman will use a V-shaped cutter as his main tool for processing gypsum boards.
The Festool V-cutter can be used to create a variety of drywall pieces with the sides butting together at right angles.
This feature allows you to create straight corner surfaces with a minimum number of joints
When selecting, you should pay attention to the size: it must fit the router. Often this is a diameter of 32 mm
But in order to mill gypsum board, you need to know how to use it, and also buy a good router.
To use a V-shaped cutter, you need to purchase a milling machine. Such equipment is quite expensive, so not everyone can afford it. To mill drywall yourself, you don’t need expensive equipment; you can do the work with a hand-held device. The prices for hand tools are low, the device performs any cutting of drywall, and most importantly, it is fast.
Before starting work, you need to adjust the cutter so that the nozzle itself does not damage the bottom layer. After this, you can begin to directly work with the tool. If you do not mark the exact point of the cut, you will make a mistake. In this case, you will have to take another sheet of drywall and start this process again. In order to start working, you should attach a cut measure and run the router along the marked lines.
Milling technology allows you to make any shape of the structure, but you must follow the above rules - only then will you get the desired result.
The nuances of milling drywall
Take a look at this little thing that has revolutionized the entire drywall installation process. This is a drywall cutter.
We will try to briefly explain why it is needed and how to use it. Let’s say right away that this cutter from Festool, like all equipment, is not cheap, but it is worth the money. It will be enough for almost the entire duration of your work. We chose this milling cutter from Makita for it.
We found it the most compact and convenient. The only inconvenience when working with drywall milling is the transfer of marks. Since the distance from the center of the cutter to the edge of the router is 5.5 cm, this must be taken into account when marking. One small device will help you with this.
This rack makes it easier for us to transfer marks. Since the distance from the edge of the router to the center of the cutter is 5.5 cm, we made the rack 5.5 cm wide. We apply it to the rule at the marks we need, clamp the rule, then remove the rack and calmly mill.
We only glue seams, drywall joints, internal seams and ceilings, but do not glue external corners. Why? Because we never overlap drywall. Since the milling cutter appeared, we have been milling all external corners. This speeds up the work and the putty crew moves much faster. Imagine a plasterboard column that has only two joints in the middle and four milled corners. There is simply nothing to putty there.
Additional equipment
Additional equipment of a router greatly influences both its functionality and price. Therefore, the closest attention must be paid to the completeness and quality of equipment. Even if a router is purchased for a specific purpose, it would be useful to find out whether there is additional equipment for this model and whether it is possible to attach equipment from other models to it.
The parallel stop is designed to guide the cutter at a constant distance from the edge of the part. With the help of this stop, grooves are milled in furniture facades, interior doors, etc.
The guide rail is also designed for milling along straight lines, but, unlike the rip fence, it is not tied to the edge of the workpiece. The guide rail allows you to mill at any distance from the edge and at any angle to it.
The copying sleeve is used to copy a part according to a template. The bushing is selected according to the diameter of the cutter and is installed in the sole above the cutter. The template is placed on the material being processed, and by pressing the sleeve against the edges of the template, it is copied.
The compass allows you to mill along a radial line.
Production and installation of formwork for pouring cement-sand screed
Take a look at this console:
It is milled completely from one sheet without waste, without overlaps, on foam, very durable. It does not have profiles during assembly. The customer has full access to the console, can look inside and see no profiles, no screws, nothing. Imagine that there is practically no need to putty these niches.
You can apply a thin layer of putty for those who are especially demanding - and that’s it! There is no need to work out any corners or joints. The console is double and therefore very durable. To break it, you need to try very hard, despite the fact that it is ordinary drywall. During installation, everything is very quickly milled stationary on the table. In the normal position, we completely assembled it, twisted it, glued it and went for installation. There is no need to separately screw first one shelf, then the other, and then struggle with putty. Milled parts have a 90° angle, if you require it, of course. It is very convenient to install.
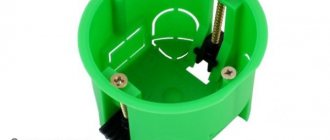
For example, we lay mosaic tiles. It is necessary to sheathe the installation box. The task is to do this clearly according to the size of the installation. We ordered the sizes and had the silhouette milled for us. Here's a smaller version:
They made everything for us exactly according to size, applied polyurethane foam, fixed two corners with masking tape, checked 90°, after 15 minutes they brought a ready-made box in which we drilled the necessary holes for cleaning, for draining, for water supply and took it for installation.
See how the installation was carried out.
The next element is milled and glued without using profiles. What it is needed for, you probably won’t immediately guess.
It could be a half-column, a ceiling beam, or some kind of decorative element. But this is a removable formwork for pouring cement-sand screed for a niche under heating beds. We need to fill the floor; heating beds will run along the windows for more than 30 meters. They need to be made perfectly even in order to place an iron grate on top. How do we do this? We mill these boxes from drywall scraps.
Then we install them together with the beacons for pouring the cement-sand screed, place wooden wedges, setting them to the desired height, and foam the gap with polyurethane foam, after which we fill in the usual cement-sand mortar. After it dries, we break the formwork, take it out and get the result we need.
Here is the temporary formwork that we used while pouring the cement-sand screed to form a niche for the heating beds, as smooth as an arrow.
Subsequently, we will cover the sunbeds with decorative iron bars, and everything will be fine.
V-shaped cutter for drywall - the craftsmen's secret tool for getting perfectly straight corners
A 90 degree cutter for drywall allows you to greatly speed up and simplify the process of creating boxes and corner joints
When installing drywall, do the corner joints turn out crooked and unreliable? I'll tell you how to very quickly make perfectly even and strong corners. You don't have to putty them and reinforce them with corners - everything can be done much easier and faster.
The cutter has a specific profile and is sold in stores that sell accessories for power tools.
Working with a router and gypsum glue
Now we will tell you how, using milling, you can make blanks from plasterboard, which are almost impossible to make in any other way, and even if possible, the strength is incommensurable. Let’s say right away that many Chinese milling cutters have appeared - analogues of “Festool”, very affordable. We still use our router and cutter.
Why do we go through a workpiece with a milling cutter in one direction and then immediately move it back? When we move the router in the opposite direction, it not only trims off the excess paper, but also completely cleans out the groove right down to the plaster support. This improves further gluing of the folded sheet.
One more nuance: due to the fact that the cutter rotates clockwise, the router will pull to the left when moving without a stop.
This means that if you place the rule on the left side, the router itself will press against the rule, and you will only need to push it forward, that is, the work will be done with one hand.
When setting up the router, we set the depth of the cutter so that the cutter barely catches the paper.
There should be a very small coating of plaster left, then when bending we will get a very sharp corner. For those working with different thicknesses of drywall, you may want to consider adjusting the stop bolts to suit the different thicknesses of drywall. Let's say that after adjusting for 9mm drywall, you can easily move to 12.5mm and then back to 9mm.
With just one 90° cutter, you can mount workpieces from 180° to 90°. We work with moisture-resistant drywall, in which the paper does not get wet when primed and does not tear when bent. We select a groove, prime it, then fill this groove with any adhesive gypsum composition: “Fugen”, “Uniflot”, “Perlfix”, “VOLMA-Montazh”, any. We fill the groove with plaster glue, bend it to the desired angle, and remove the excess. Here is the finished dried sample:
You can remove excess glue and take it with fresh glue for installation, carefully mount it, give it the desired shape on the table or directly on the wall. Later, after drying, it simply becomes a monolith - a very strong formed corner where nothing needs to be worked on. In principle, if anyone knows, such unfolded angles are very difficult to form.
Manufacturing and installation of niches for curtains
First, we laid out the metal frame, which was needed to mount further elements.
Here everything, except the reinforcing structures for the hanging shelves, is done extremely simply. We made the structures separately.
Before we start milling a large volume of workpieces, we always make a pattern and try it on in place.
Then you need to form niches for the curtains. Here is all the metal that was required to install the niche.
By milling the internal corners we obtained separate, very strong niches.
Niches can be mounted without the use of additional profiles. We mounted them, but simply placed the profile for reinforcement under the curtain on top and screwed in the screws. In the future, we will mount the curtain on this profile through the drywall.
The niches are very durable, they can withstand almost the weight of a person, that is, for a normal light curtain the strength is more than enough. After installing the niches for the curtains, we prepared L-shaped elements for installing large shelves in the corridor. Since there are a lot of blanks, it makes sense to firmly clamp the rail and cut them in a stream.
We insert the sheet, saw through it, and take it away for curling.
After applying the mounting foam, we immediately twist the workpiece onto the profile with a profile shift of 20 cm to twist the sheets together, and immediately take it to installation, without waiting for the foam to dry.
Next we will tell you how the installation is carried out. The installation of milled elements is somewhat different from conventional installation. Here's one option:
Our workpiece already has an angle, and we substitute it, pressing it against the vertical and horizontal profile. We bring the workpiece together with the already mounted one, and first of all we twist the outer corners of our and the mounted workpieces together.
Having twisted the corner, we control the horizontal plane with a level, pressing the workpiece to the horizontal profile, and screw it on top. Then we control the vertical plane, pressing the level to the upper profile, and screw it from below.
Four self-tapping screws - and the workpiece hangs in place. Our blanks line up automatically, since our ceiling and wall profiles are made clearly in line and level.
Manufacturing joints of complex shapes
There is another interesting way to work with drywall. You can take a stop bar and drive the router not with a straight side, but with a semicircular one, moving the router either towards the operator or away from him. The router can change its position, but the distance from the center to the stop bar does not change.
This is convenient if you just need to do direct milling of all workpieces. We got to turns, overlaps, and joints of complex shapes, and here we need not just continuous milling, but milling to a certain point. Each tool like this has a cutter center mark.
We bring the mark that is on the sole of the router to the line. We need the cutter to stop exactly in the right place.
Milling plasterboard is not completely necessary when making boxes of complex shapes, various joints, overlaps, and through the passage of boxes among themselves.
Markup may seem complicated, but it's actually simpler than it looks.
Elements of this kind, which use both metal and sizing, have very high strength.
GKL milling
Drywall is incredibly popular because it allows you to quickly perform various types of work: erect a partition, level a wall, make a structure of almost any type. But when creating structures from gypsum plasterboard, it is necessary to minimize the number of joints. Each joint requires labor in its careful fitting, priming, reinforcement, and puttying. And this takes a lot of time, especially if there are a lot of joints - then the repair can take a long time.
A very convenient modern way of cutting sheets is to mill plasterboard. It allows you to quickly create not only a variety of holes in gypsum boards, but also make structures of any configuration with the minimum possible number of joints and cuts.
Making a strong shelf
Now we will tell you about such elements where it is extremely difficult to do without milling. More precisely, it is impossible to achieve a certain strength. When we mill any elements, we are left with a piece of paper that takes on part of the load, plus foam, plus the general configuration of the entire workpiece.
Probably many people made such shelves with very little thickness. Our minimum shelf was a 27th profile and two layers of drywall. Here we did not use a profile; each shelf had the back parts of the paper left uncut plus foam gluing. As a result, we get not a decorative, but a completely load-bearing shelf, which can be tiled, seal the inner corners with sealant, paint and put whatever you want on it. Such a shelf gives an idea of all the possibilities of such self-supporting very thin elements, which can be of completely different shapes. These could be consoles, runners, hiding niches for some sliding elements. And this is only a small part of the milling possibilities!
Marking and manufacturing of complex shaped elements
Let's start with what beginners encounter - the difficulties associated with markup. The markup itself is not that complicated, but it has certain nuances. And the biggest one is that if you make a mistake in one size, you will immediately ruin two or three blanks. But in the case of a caterpillar like this, you can ruin 13 sizes at once!
Of course, this is not a mounting element, but simply a visual aid. We make blanks containing up to six elements. Now we will tell you how not to make a mistake in sizes. The thickness of the material makes marking even more difficult. What is this connected with? If we need to make a shelf 10 centimeters high and 20 centimeters wide, and it has only one outer corner and this shape, then our workpiece should have 30 cm, no more, no less.
We go through the back side with a milling cutter, bend it, and get exactly 10 by 20 centimeters. But if our blank has at least one internal corner, then for a shelf 10 by 20 centimeters, the length of the original blank will be 10 plus 20 plus two drywall widths. We must add 2.5 cm to each inner corner of the workpiece. This is the shelf we will have 10 plus 10 plus 10 plus 2.5 centimeters. Cut off 32.5 centimeters.
Now we start marking the places for milling. It can be either from the inside or from the outside. Another difficulty in marking is the fact that the distance from the stop bar to the center of the cutter must be taken into account in any case.
In our case it is 5.5 cm.
You can substitute a special strip 5.5 cm wide, or you can simply transfer the size with a tape measure, moving it to one side or the other by 5.5 cm.
You can use this template:
It is both 5.5 centimeters wide and long, and has a stop bar.
We need a stop bar in order to take the size both from the line to the right, placing it on the right side of the sheet, and from the line to the left, resting the stop bar against the edge of the sheet and measuring from the beginning with a tape measure.
If you have a lot of similar elements of complex shape, you can pre-make a pattern, try it on in place, and make sure it fits. This pattern can also be made if your ceiling height is 2.80 meters, and the sheet is only 2.5 meters. Here you make a pattern from a 30-centimeter scrap, which is then used for work. All marks from the pattern, and they can be either on the front side of the drywall or on the back, are transferred to the tape measure. Transfer to the tape measure exactly the dimensions needed to set the rule. Moreover, on the front side of the roulette we transfer the marks for the front side and put an arrow.
The arrow indicates which side of it the router will go on, for a specific mark, for the front side. Turning the drywall over to the back side, turn the tape measure over and transfer to it the dimensions that are needed for the back side.
Also, let’s not forget about the size needed to trim the length of the workpiece. Why do we need this? This is necessary so as not to keep a whole bunch of sizes in your head. Up to 6–7 workpieces are being processed simultaneously for installation. There is no need to keep these dimensions in your head, you just need to turn the tape measure over, transfer the marks, mill it, turn the sheet over, turn the tape measure over. This way you definitely won't get confused. And there are roulettes with two hooks. We turned the tape measure over, transferred the marks, milled it, got a lot of blanks at once, and the only thing you need to do is remember the size of the last blank and cut it to length.
Conclusion
You learned how to make perfect corners in plasterboard structures yourself and spend a minimum of time on it. The video in this article will clearly show the workflow so that you understand it even better. If something is unclear to you, ask in the comments.
The most popular material for finishing rooms is plasterboard. It is used for the installation of curved structures, arranging gypsum plasterboard ceilings, leveling walls and erecting partitions. This material is so versatile that any structure can be built from it. The only inconvenience is adjusting the joints, which takes a lot of time.
This is what V-shaped cutters for drywall of various sizes look like. But there is a tool that minimizes labor costs for fitting sheets - a drywall cutter. Thanks to this device, you can make even holes in the slab, or cut complex configurations with cuts.
Full contents of the material
Manufacturing and installation of shelves for tiles
Let's see how this installation happens. Here we unraveled the drywall directly onto the floor.
This has its advantages. There was no longer any need to temporarily fix the rule. After going through the router just twice, we made three shelves at once. This must be taken into account when marking drywall.
After milling, we cut the drywall into individual elements. When twisting, we control the angle from the plane on which the workpiece lies.
We mill the left and right pillars and the top.
First we start installing the left rack. It is L-shaped and consists of two elements.
Then we install the right rack.
Milled elements are very stable during installation. When making them, we used exactly the same dimensions that we used when milling the shelves. They were preserved simply on the roulette wheel. The stand is U-shaped and consists of three elements. Next, we mount the profile and stick out the wires, and now you just need to insert the shelves into place.
In order to mount this structure, we needed only six elements. We not only made it easier for ourselves to install drywall. Due to the fact that milling is a very precise technology, and the widths of the shelves are adjusted to the nearest millimeter, this is very useful when laying tiles.
Take a look: five runs with a router, ten runs with a circular saw on drywall - and we get a lot of disposable formwork for forming column tops, which are mounted in a matter of minutes using ordinary masking tape.
Manufacturing and installation of a U-shaped shelf and box
On this wall we conduct experiments with various samples. In this case, it will be the simplest shelf.
Here is a U-shaped shelf that can be installed both on a vertical wall and on a horizontal plane, say, on the ceiling. What don't we like about it? To make it, you need at least four profiles, unless, of course, the shelf fits the format of the 75th or 50th profile. You will need three separate elements. In this case, the shelf does not bear lateral load. If we slightly complicate the design, then the next design will not add rigidity to the previous one. To screw two shelves, we will need at least three profiles, unless the shelf pitch does not allow us to use one large profile at the bottom. In addition, as in the case of the U-shaped shelf, the entire load falls on the corners, which we will place outside.
Look at the following picture. To assemble such a structure, we need 12 different elements. In this case, you can either make 12 approaches to installing this shelf, or, if experience allows, mount two profiles at the same time. The profile can be screwed in advance if overlaps allow. And if all the calculations are correct, you can nail down all three branches at once. Even such a simple element has a significant number of installation approaches, and it is good if the installation is carried out in easy access, with a ceiling height of, for example, 2.80 meters. And if the height is 3.5–4 meters, then installation becomes the most expensive part of the production of such shelves.
This U-shaped shelf is assembled completely without profiles. Here we did not use the gluing technology on polyurethane foam, but gradually switched to using the gluing technology on polymer putty, and we apply the putty both when forming the shelves and during installation.
Such an element behaves very stably even on a vertical plane. The shelf is made in a convenient position on the assembly table. And what is important, the additional element is a reinforcement of the previous one.
The technology of milling lightweight elements from plasterboard without a metal profile allows us to additionally install stiffening ribs.
Stiffening ribs are not that difficult to install, but they do a very serious job. A similar shelf using stiffening ribs is almost absolutely motionless. We use stiffening ribs when we need to make a shelf with a very large overhang, where a more stable structure is needed.
We also glue the stiffening ribs onto polymer putty, which we place in advance in plastic bags. This putty can be used for several days. Here is a mounted sample of a U-shaped element with two stiffeners:
A shelf with a height of 125 mm and a reach of 150 mm, with two stiffening ribs, can support the weight of a person.
This stability of structures glued with polymer putty and glued to the wall partly explains the fact that milled elements behave very well when installed without running apart.
The putty we use to glue the U-shaped shelf to the finished wall is crack-resistant, so there is no need to glue the corner between the wall and the drywall.
Apply a little of this putty to the end joint. In order to position the two halves, we will use a conventional SVP - a system for leveling tiles.
After we have installed the second element, we snap the wedges, thereby positioning all sides of the boxes in the same plane.
We must not forget that one of the big disadvantages of the putty we work with is the fact that it does not sand very well. It is necessary to immediately remove all excess so as not to leave any residue in the corner, otherwise you will have to spend a lot of time removing it later. Our wall is gypsum plaster, plastered with the same putty, so we safely glue it onto it, almost immediately clean.
We glued all the samples using “Weber Vetonit JS” putty. We simply went through the unprimed milled grooves with a milling cutter in one direction and the other, and applied putty there. This is enough; none of the samples burst due to the gluing. Usually it breaks in a different place, but not along the glue.
No priming is required during installation; plasterboard does not need to be primed at all. Why did we choose this particular putty? It is one of the strongest in gluing. This is a putty for problematic substrates. We couldn’t tear off the pieces of paper that we glued to it during tests. Drywall comes off in some samples along with the plaster.
To date, this putty has no analogues. This is still a new product, but we have already started gluing elements onto it without gluing the inner corner with paper. The putty is crack-resistant, with microfiber, there are no problems with the appearance of cracks. The fact that sizing the paper is not required greatly speeds up the work, especially in cases where there are stepped shelves in several steps.
Milling cutter from Fiolent
We purchased a router from Fiolent specifically for milling drywall.
It has a very convenient shape - it is one-handed, and the trigger button is located on the handle.
The milling cutter has speed adjustment, and the adjustment is made not only by the wheel, but also by the degree of pressing the button. For example, if your vacuum cleaner is not powerful enough, you can work with a soft start or at low speeds, or cut into a sheet at low speeds, since when cutting from the edge, dust is generated.
The milling power of 1100 watts is exactly what you need. Typically, routers with a power of about 1 kilowatt are good for milling drywall.
Its price is not the highest. The motor on the router can be moved from the mixer.
It is exactly the same on the mixer as on the router. And if we remove the gearbox, we will get an even more reliable machine. As for woodworking with a router, there are a lot of questions about it, but when it comes to working with drywall, the only question is the issue of dust removal. The more efficient it is, the longer the router will live.
The solution to this problem is quite simple.
We cut out a circle from the plastic from the ventilation duct, which we screw to where the sleeve for copying is screwed. The original dust extractor is located quite conveniently, we did not change it, we simply drilled holes in the plastic using a drywall cutter.
If the router's wire is short, it can be lengthened. That's all the necessary modifications.
Now the router does not generate dust at all. You can see that everything underneath is clogged with dust, but there is practically no dust on the bottom of the engine, so the bearings will work for a long time.
The dust extraction works very well in any direction, and sometimes you also have to mill in any direction. This is the pattern we made, a kind of 3D panel.
Let's just say it's a garage business idea.
Choices.
If you need a tool for a variety of household work that does not require high precision and quality of milling, a basic model priced from 3,500 to 8,000 rubles will suit you.
If you are going to use a router professionally to make furniture or interior doors, pay attention to models from manufacturers specializing in the production of professional tools. Such a router will cost from 8,000 to 20,000 rubles, depending on the characteristics and configuration.
If you are going to use a router for metal work, you should pay attention to models with a high speed. Such a tool can be selected in the price range from 3,800 to 13,000 rubles.
If you are a professional furniture maker and you don’t yet have an edge router, pay attention to this type of tool - it can significantly speed up the processing of edges and provide them with the best appearance. Such a tool will cost you from 7,500 to 15,000 rubles.
Source