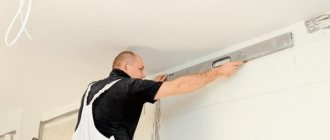
Despite the fact that drywall has been used since Soviet times, it has become widespread only in the last two decades. Working with drywall with your own hands is quite within the capabilities of a common man with a minimum of construction skills, and the scope of application of this material is extremely wide. It is ideal for leveling walls and ceilings in apartments, erecting all kinds of arches, interior partitions and creating other interior details that give the apartment its individuality.
Drywall is valued by finishers for its undeniable advantages.
- The material has excellent value for money.
- In addition to solving aesthetic problems, it can be used to insulate apartments and increase their sound insulation.
- Under its surface it is easy to hide not only the unevenness of the wall, but also protruding pipes and communications.
- Working with drywall is not accompanied by as much dust and dirt as, for example, plastering walls or whitewashing a ceiling.
- This finishing material is environmentally friendly, does not conduct electricity and is easy to use.
All these factors determined the widespread use of drywall in repair work.
What is drywall like?
Before you figure out how to work with drywall, you need to decide on its types. The building material must be selected taking into account the specifics of the room and its microclimate. For convenience, the sheets of material are painted in different colors depending on the type.
- In ordinary rooms with normal humidity, gray plasterboard is used.
- Fire-resistant sheets marked with the abbreviation GKLO are painted pink or light purple. They are used when finishing surfaces near stoves and fireplaces.
- The letters GKLV and the color green indicate moisture-resistant plasterboard for bathrooms and kitchens.
- To decorate the walls and ceilings in the kitchen, you can also use sheets of dark gray or blue color, designated GKLVO. They combine good moisture resistance with increased fire resistance.
- To create curved structures, arched plasterboard GKLA is often used. It has a smaller thickness - 6–7 mm and is very plastic.
The most detailed information about the types of this material and its parameters, as well as its classification according to the new GOST, can be found in the article “Basic characteristics of a plasterboard sheet.”
Types and designs
The assortment of cutters in our stores is not so large, but in large construction stores you can see about a dozen different models. What are they? First, there are models for sheet metal (pictured below). They have a very small gap in the working part, which is also called a “window”. For sheet metal cutters, this window is only about a centimeter wide. Any metal will fit there, but the profile for drywall is only a guide (PN) or rack-mount (PS) with small shelves. And then there may be problems.
A cutter for a metal profile should have a larger “window” in the working part
If we talk about models for connecting drywall, they have a larger “window”. It is made in the form of a square, rectangle or with rounded corners. The larger the window, the easier it will be to fasten rack profiles with any shelf width. But then the size of the “head” increases, which is not always convenient. Professionals simply have several different tools, and for repairs and household use they choose something in between.
This is already a tool for professionals - with holes of different sizes and shapes
There are also different shapes of holes: rectangular, round, square. They come in different sizes. The thicker the metal, the larger the punch (or bit) required. There are models with replaceable punches, and there are rotary ones. For rotary or revolving ones (pictured above), the attachment is changed by turning a wheel with bits of different shapes and sizes. If you plan to work with sheet metal often, this is a good thing. For occasional use, such luxury is unnecessary.
We advise you to study - White color in the interior of various rooms
You can fasten profiles near the ceiling and floor with a regular tool, but it is more convenient to work with a special
There is also a cutter for metal profiles for convenient fastening of profiles under the ceiling or near the floor. Their handles are not a continuation of the working part, but are installed at an angle. Some (Ultra Profil EDMA) are at an angle of 90°, others are at 45°. This tool further speeds up the work when creating frames for suspended ceilings.
One-handed and two-handed and principle of operation
It is also worth remembering that there are one-handed and two-handed models. One-handed ones have a return spring that opens the handles after the tension is removed.
Working one-handed is far from easy. Especially on good profiles made of normal metal. So often one-handed ones are still operated with two hands. In this case, the procedure for working with the cutter for KG profiles is as follows:
How the cutter works: it pierces both profiles, bends the edges inward
- We set profiles by level.
- With your left hand we fix them in the desired position.
- Tool on the right. We bring its working part to the desired point, compress it until the bit hits the metal.
- We remove our left hand (the profiles are “held” by the cutter), and squeeze the handles with both hands.
Two-handed work is different in that the handles are at such a distance that you can’t even grab them with one hand. Well, they are also designed to connect thicker metal.
Profiles for drywall installation
Installation of drywall can be done in two ways: with glue or with a frame. More often they use a frame structure, which has only one drawback: a more significant reduction in the internal space of the room. But with its help it is easier to level the walls or ceiling, provide heat and sound insulation of the room, and hide communications.
Fastening drywall to a frame made of wooden blocks is now rarely seen; it is much more convenient to use special metal profiles. Their length is standard and is 3 m, and the remaining parameters are indicated in the profile marking. The first number is the width of the profile, and the second is its height.
- The basis of the drywall frame is made up of guide profiles designated PN or UW. Ceiling or rack profiles are attached to them.
- For fastening suspended ceilings and for wall cladding, guides are used that are marked PNP or UD.
- PP or CD ceiling profiles are inserted into the guides, which are also used when leveling walls, which are subsequently fixed with crab hangers or anchors. With their help, the frame and lintels are formed.
- To create walls and partitions, rack profiles, designated by the abbreviation PS or CW, are inserted into the guides.
USEFUL INFORMATION: Which paint is better to choose for wallpaper for painting?
For curved structures and arches, a special arched profile is used. There is also a corner profile designed to strengthen external and internal corners.
In addition, a wide variety of fastening elements are produced, thanks to which working with drywall on walls and ceilings with your own hands turns into an exciting construction set.
The profiles are attached to the wall and ceiling using U-shaped brackets, self-tapping screws and “quick installation” dowel nails. To fasten the profiles together, you can use rivets or a cutter (special assembly pliers). There are many parts available for fasteners, but for a single do-it-yourself job, most of them will not be needed.
Key features of working with drywall
It is necessary to cut drywall from the back side, under a ruler and with a very sharp knife. The force should be sufficient, but no more - after all, you only need to cut cardboard. After cutting, the sheet is laid horizontally and broken along the line. Next, you need to cut off the cardboard on the other side of the sheet. To do this, the latter is bent inward, and the cut is made from bottom to top in one smooth and uniform movement. If everything was done correctly, the cut will be neat and precise.
For wall finishing, it is recommended to use 12 mm thick gypsum board, and for a suspended ceiling, a thinner sheet is suitable. In practice, the choice of material is made based on the complexity and volume of the structure, as well as the presence of areas with non-standard shapes and geometry. The reliability and durability of the structure directly depends on how well the loads on the frame and sheet material were calculated . On average, a standard plasterboard wall with the correct placement and fixation of profiles can withstand a weight of about 50 kg. In this case, it is necessary to take into account both vertical and horizontal loads on the drywall - reinforcing profiles are placed in these directions.
When working with drywall, one way or another you will have to use a stepladder and mini-scaffolding, as well as various tools. An entire 1200x2500 m plasterboard sheet weighs about 30 kg, so you shouldn’t lift it, much less carry it, alone. And, it goes without saying, safety must always be kept in mind.
Required Tools
It is better to prepare the tools that will be needed when installing a plasterboard structure in advance.
- When attaching profiles to the wall, you will have to drill a lot of holes for dowels. With a regular impact drill, this process can turn into a real pain. Therefore, it is better to stock up on a good hammer drill.
- A screwdriver with a set of replaceable bits is useful when installing a frame on a wall or ceiling and fastening sheets of drywall.
- You will also need a hammer, metal scissors, a screwdriver, a level, a plumb bob, a utility knife and a spatula.
This is the required minimum; you can expand the list of tools based on your needs and capabilities.
Mistakes when working with drywall
In any type of construction work, strict adherence to technology is important. It is the latter that guarantees the quality and durability of the construction or repair result. Unfortunately, quite often inexperienced craftsmen make serious mistakes when working with drywall, which ultimately lead to the most disastrous consequences. What exactly should be avoided when creating plasterboard structures in the interior?
- Violation of the installation technology of the profile structure
Perhaps the most common mistake when installing a frame under drywall is the discrepancy between the profiles used and their purpose. DC profiles cannot be installed instead of UW type profiles, etc. The same applies to fastenings and any other structural elements. Also, during installation, it is necessary to carefully monitor the quality of fastening of guides, transverse and, in particular, reinforcing profiles.
- Application of unforeseen profile cutting technologies
When installing a frame under drywall, the length of the metal profiles used will have to be adjusted one way or another. Under no circumstances should this be done using a circular saw. At a high rotation speed of the cutting disc, the profile will heat up and the galvanization at the cut site will burn out . In the future, this area will be susceptible to corrosion, which can ultimately lead to weakening and even destruction of the structure.
- Extension of profile walls
When the walls of a metal profile are unbent, its load-bearing capacity decreases, which leads to a violation of the integrity of the structure during cladding or, what is much worse, after finishing work is completed.
- Installation of gypsum boards with the back side facing out
The biggest mistake when creating plasterboard structures is to use the back side of the sheet instead of the front side. If the gypsum board is wall-based, this will lead to unevenness and mismatched edges when adjacent sheets meet. In the case of moisture-resistant drywall, the front part, specially protected from moisture and temperature changes, will not be able to perform its functions, which will lead to swelling of the gypsum and inevitable destruction of the structure in the future.
- Refusal of suspensions and deliberate weakening of the frame
When finishing complex surfaces, difficulties often arise with securing the profile system. It is very important to understand that with the weight of one standard sheet being 30 kg and the installation of the frame being insufficiently reliable, the latter will soon fail. This can happen literally after finishing the drywall, that is, with the addition of additional weight of finishing materials.
- Violation of the frame diagram
If the pitch of the profiles is chaotic, with too wide or, conversely, too narrow indentations from the walls and from each other, this will cause serious problems during installation and further operation of the structure. The latter can simply sag and the drywall can crack, which is unacceptable. In addition, more work will need to be done, of course, with additional material costs.
- Fastening gypsum boards “in a row”
The list of the most popular mistakes when installing drywall is installing sheets in one row. The result of this is unevenness at the joints that cannot be eliminated during finishing and the occurrence of seam cracks. To avoid this, it is strongly recommended to install the gypsum boards in a staggered manner.
Installation work should begin after all necessary calculations have been carried out. In the process of manufacturing the frame and covering it with sheet material, it is necessary to check both the reliability of the entire structure and the correct installation of joints, compliance with angles, levels and linearity.
Cutting sheets
In order to cut a sheet of drywall, you can use a regular stationery knife. With its help, a cut is made along a ruler on one side of the sheet, after which the sheet is easily broken into two parts.
If you need to cut a curved hole, such as an arch, it is better to use a jigsaw. You need to insert a metal file into it and cut at maximum speed.
What brand of drywall do you use?
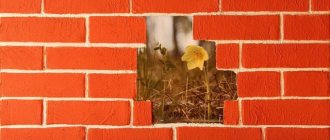
USEFUL INFORMATION: Brick-like wall panels for interior decoration
How to bend a sheet of drywall
In the vast majority of cases, plasterboard structures have flat surfaces. But a gypsum board sheet can be easily bent. This can be done dry or wet.
- With the dry method, suitable for the sharpest bends, transverse cuts are made on the surface of the plasterboard sheet in increments of 1 to 5 mm. Their depth can reach 6 mm. The smaller the radius of curvature, the more often such lines need to be made. After giving the sheet the desired shape, the cuts are filled with gypsum putty.
To obtain a smooth bend, you can do without cuts. The gypsum board sheet is attached with one side to the prepared curved frame, the free side is slowly and carefully bent and rounded to the shape of the frame. This kind of work is best done together.
Check out the video tutorial that will show how the professionals do it:
With the wet method, the side of the gypsum board sheet that will be concave must be moistened. For a better effect, you can go over the surface with a needle roller, or if you don’t have one, use an ordinary fork. Once wet, the sheet can be carefully bent to obtain the desired shape. It is best to carefully place it on the template, wrap it with tape and leave it until completely dry.
How it's done
The technology of “dry” construction is extremely simple and quickly mastered.
It begins with marking according to the drawing and installing a frame to which the drywall is attached with self-tapping screws (without pre-drilling holes).
The seams are puttied, and the necessary communications, electrical wiring and mineral wool for sound insulation can be laid in the interior space. When assembled, the walls have a perfectly flat surface and are ready for painting, wallpapering, and ceramic tiles.
And a significant expansion of architectural possibilities completely elevates plasterboard to the royal throne of the best building materials.
What is drywall used for?
This is where drywall is indispensable. Plasterboard boards will help you in the shortest possible time to build a wall that will be strong enough, reliable and that you can remove at any time.
The convenience of building walls from plasterboard is that this process does not require much physical effort. And you will not need to lay bricks, you will not need to invite specialists for this. Anyone can build their own house.
Surface preparation
Regardless of the purpose and method of attaching drywall, the surface of the wall or ceiling requires preliminary preparation.
- Old coatings are removed. This could be paint, wallpaper or fragile plaster.
- Large cracks are primed and sealed with cement mortar.
- The surface is treated with an antiseptic, otherwise mold or mildew may develop under the drywall.
Installation of drywall on the frame
In most cases, this method is used to level walls. The installation procedure will be as follows:
- A line is drawn on the ceiling of the inner edge of the plasterboard sheet. The distance from the wall cannot be less than the thickness of the profile, that is, 30 mm.
- The UD guide profile is screwed along this line. Its outer border should coincide with our line, and it itself will be between the wall and the mark.
- Using a plumb line, draw the same line on the floor and screw another UD profile. If everything is done carefully, the profiles will end up in a single vertical plane.
USEFUL INFORMATION: Using decorative plaster in the interior
- Vertical racks are being installed. Each sheet of drywall must be screwed to three such racks from the CD profile: one is located in the center of the sheet, and two at the edges. With a standard plasterboard width of 120 mm, vertical posts must be installed every 60 mm. Adjacent sheets will also be attached to the profiles located along the edges. The verticality of the profiles is checked using a level.
- The racks are fixed using a cutter or self-tapping screws. In order for the frame to gain rigidity, each rack must be connected to the wall using brackets. They are attached to the wall with dowels in increments of 500–600 mm. Subsequently, their edges are bent and attached to the profiles using self-tapping screws. In this case, it is necessary to avoid curvature of the racks by controlling their verticality with a level.
- After the frame is ready, insulation is laid into it, if this was provided for by one of the tasks of constructing the structure, and drywall is screwed on.
If the ceiling is leveled using plasterboard, then anchors are used instead of dowels for fastening. Rough plastic dowels and screws can only be used in cases of light load. Also, when installing the ceiling, wire strands and “butterflies” are used, which are necessary if the distance between the ceiling and the gypsum board sheet is significant.
- Drywall sheets are attached to the frame with self-tapping screws 30–35 mm long. The distance between the attachment points should not exceed 20 cm; most often, a step of 10–15 cm is chosen.
The screw caps must be deepened into the sheet by a few millimeters.
Lathing made of wood or profile – which is better?
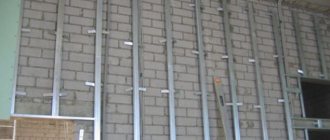
In order for the drywall to fit perfectly on the walls during operation and hide all defects, as shown in our video material, it is necessary to pay attention to another important fact - mounting the frame.
The technology for constructing such a structure comes down to marking the plane of the walls and subsequent installation of wooden or metal products on them.
Previously, wall coverings with plasterboard were carried out on a wooden frame; the affordable cost of wooden beams spoke for itself.
But since wood behaves unpredictably if the humidity in the room changes, over time, preference began to be given to a galvanized profile when installing sheathing under the cladding.
But it makes sense to build a wooden structure with your own hands for installing drywall if you have dry bars in stock.
You should not rely on commercially available wood; by and large, such wood is either freshly sawn or has a high degree of humidity.
A frame mounted from such materials becomes deformed over time due to drying of the wood.
In any case, further information and the proposed video materials will be useful to you.
Here we will consider in detail the methods of installing a frame, both from wooden beams and from a metal profile, followed by laying insulation and installing drywall.
Sealing joints between sheets
When attaching drywall, a gap of 1–2 mm is allowed between adjacent sheets. At the final stage, it is necessary to process these joints so that the plasterboard surface is ready for finishing.
- If the sheets do not have a factory chamfer, then you need to make one with a sharp knife at an angle of 45 degrees.
- This triangular seam is filled with putty, and a sickle mesh is glued on top. It is pressed with a spatula and buried in putty. The corners are puttied using special corners equipped with perforations. You should also remember to fill all the recesses formed at the points where the screws are screwed in with putty, otherwise the rust from them will eventually show through the finish.
- After the putty has dried, the entire surface of the drywall should be primed.
- After the time required for the primer to dry, a finishing layer of putty is applied. The excess can later be removed with fine sandpaper.
The ideal base for finishing is ready.
Installation of plasterboard sheets - subtleties of the procedure
You will most likely have to cut the gypsum board when creating the wall. This is not difficult to do if you use a standard construction knife equipped with several blades that can be changed if necessary. Drywall cutting is carried out as follows:
- place a sheet of material on a hard, flat surface;
- Use a pencil to mark the line along which you want to cut the plasterboard;
- carefully cut the top covering of the product, slide it along the intended line to the edge of the surface;
- very carefully break the gypsum board.
After this, you should return the product to its place (it will stand on its edge and bend), turn it over, carefully cut it, place it again on the edge of the supporting surface and finally separate the “excess part” from it.
The cut end of the plasterboard sheet is usually additionally chamfered, beveled at an angle of about 22.5°. It must be performed on the edge of the gypsum board adjacent to the strip of drywall located either below or above the sheet. Such a bevel is made using a plane, which is intended specifically for working with gypsum boards. The need for this strip arises when the height of the ceilings in the room is greater than the length of the sheet.
Planer for working with plasterboard
It is necessary to remove the side chamfer from the first sheet of drywall mounted flush against the edge of the supporting surface. This is done by cutting a strip about 5 cm wide on one side (along the entire length) of the product.
The connection of the metal frame with the gypsum board is made with 3.5x35 mm plasterboard screws. First, fix the edges of the sheet, then install the fasteners along its middle line. The distance between adjacent hardware is selected from 100 to 250 mm. It is not recommended to take a larger distance, as the strength of the structure will greatly decrease.
The gypsum board should be mounted at a distance of 1–1.5 cm from the floor surface. This way you will ensure the integrity of the constructed wall during its operation. Another important point. When screwed into the sheet, the heads of the screws should not protrude beyond the level of the wall; they should be slightly deepened into the drywall.
Self-tapping screws embedded in drywall
After the installation and fixation of the first sheet is completed, you will need to cut the plasterboard strip to cover the distance from the plasterboard to the ceiling surface. Don’t forget to chamfer the strip (on the sides that will connect to the drywall and directly to the ceiling).
Next, installing drywall on the walls is completely simple. All subsequent products do not need to be trimmed. Mount them in a checkerboard pattern - a whole gypsum board after the first row is placed under the ceiling, and the missing strip is added below. One side of our new wall is covered with plasterboard.
Before you begin covering the other side, you need to lay the electrical cables in the wall (if you decide to “hide the wires”). At the required height, make 3.5 cm holes in the middle of the metal profile. You will then pass the electrical cables through them. Be sure to bend the edges of the holes, otherwise their sharp parts may damage the communications. Note that it is recommended to place the wires in the wall in a corrugated pipe.
I think you can complete the cladding on the other side without much difficulty. After all, now you clearly know how to install drywall. After this, you will need to fill all the gaps of the structure made. The joints between the sheets and the internal corners are first glued with serpyanka (a special mesh used in finishing work), and then leveled with putty for drywall (we recommend using starting compounds).
Finishing putty is used to seal areas where fasteners are located. It must also be used before you wallpaper a wall or paint its surface.
How to treat the surface → Room decoration → How to choose the right paint → Surface treatment technologies → Leveling and finishing the walls → Selecting and applying a primer → Removal from the surface → Stretch ceilings and technologies → Reviews and testimonials