Installing drywall on walls and ceilings is a fairly simple job that you can do yourself. Installation of plasterboard is carried out on the ceiling or walls on the wall using a profile. Drywall is a material that will allow you, quite independently, quickly and easily, with minimal investment of time and money, to level and prepare walls for further finishing in any room of a wooden, brick or panel house. We will tell you in our article how to install drywall on walls and ceilings correctly so that they are not only smooth, but also durable.
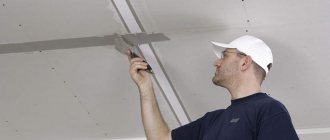
Drywall: scope
Drywall has long gained popularity as a flexible and versatile material for construction and repair. Installing drywall is not as complicated as it may seem at first glance. It is enough to understand some rules and nuances.
Drywall is a sheet made from gypsum. It can be in size 1.2*3 m or 2.5*1.2. The material is covered on both sides with thick cardboard. Because of this composition, it is considered environmentally friendly. But during manufacturing, additives can be used to impart certain qualities to the building material: moisture resistance, heat resistance.
When performing repair work, plasterboard can be used for the following purposes:
- Insulation of premises.
- Construction of partitions, walls, niches, various complex structures.
- Leveling surfaces. It is worth noting that this is a fairly economical and fast method.
Making a wall from plasterboard: sheathing and insulating
An ordinary or decorative wall made of plasterboard involves a staged plaster covering - first one side of it is sheathed (preferably the one on which a large number of sockets and switches will be installed), then the socket boxes are installed and the wires are released out.
Next to the electrician, the wall is insulated and soundproofed with mineral wool, and only after that the second side of the frame is sheathed with sheets of plasterboard. This work is not difficult, and if you wish, you can figure it out yourself - it is for this reason that here we will focus exclusively on the subtleties and nuances of this process. There are not many of them.
The connection of plasterboard sheets should be carried out clearly in the middle of the profile.
If the height of the room is more than 2.5 m, then you will need to add a number of horizontal jumpers. Without them, cracks at the seams of drywall are guaranteed, no matter how or with what you try to repair them.
Attaching drywall to the frame should be done in all possible places, and not just along vertical load-bearing profiles - the installation step of self-tapping screws is 150-200mm.
The cut edges of drywall that meet the joint with other sheets must be equipped with a chamfer. It is necessary for high-quality sealing of seams - this is one of the necessary conditions that is designed to prevent cracking of joints after puttying.
In principle, that’s all, the only thing left to add is the nuance of installing moisture-resistant drywall in wet rooms.
I will not reveal a secret if I say that depending on changes in humidity and temperature, any building material is deformed to a greater or lesser extent and changes its linear dimensions. To prevent the drywall from swelling under the influence of humidity, you need to make a compensation gap above the floor - simply raise the sheet a centimeter above the floor level. This centimeter, as you may have guessed, provides free space for the drywall to deform.
As you can see, making plasterboard walls with your own hands is not as difficult as it might seem at first glance - as they say, the devil is not as scary as he is painted. Despite this, you should not relax, especially if this is your first time taking on this work.
How to make your own plasterboard walls
We often publish articles on how to expand space in an apartment, and the main recommendation, as a rule, is visual zoning: the fewer walls and partitions, the more spacious the room! But what to do if you really need these partitions, but there are none at all?
An excellent solution would be a plasterboard wall: it can be monolithic, with an elegant doorway, and also serve as a partial partition. In our article today we will talk about how to make such a wall yourself - step-by-step instructions will help you avoid possible mistakes.
Drywall installation - what you need to know
Installation of drywall is carried out in several ways:
- Apply strong special glue to leveled surfaces. Next, you will need a finishing finish, for example, dry plaster. It is not recommended to use it to make wood surfaces even.
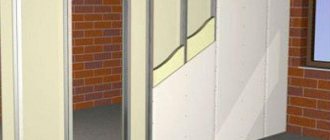
- On a pre-prepared frame. With a similar installation, it can also be used for wooden floors. The frame can be made of either metal or wood.
Wooden bases are cheaper, since only blocks of wood are required for execution. Metal ones are made from galvanized profiles, special hangers, and connecting elements. This is a more reliable and durable option.
Before starting installation, you should familiarize yourself with several rules:
- The joints of the sheets are placed strictly on the frame and fixed with self-tapping screws.
- The seams must be taped with joining tape.
- External corners are closed with special corners.
- Interior partitions are mounted in two parallel layers.
Advantages of using drywall when creating partitions
What are the advantages of using gypsum plasterboard when constructing additional walls indoors?
Drywall itself has good soundproofing properties, so even without additional materials, such a wall will prevent the spread of sound.
GKL is environmentally friendly and fireproof. The resulting plane, after minimal processing, is ready for further finishing.
The sheets form a smooth surface that can be painted, wallpapered, covered with decorative plaster or even ceramic tiles. Easy to assemble. Almost anyone can install a plasterboard partition with their own hands, following simple step-by-step instructions. This will not require specialized skills or expensive professional tools. Drywall allows you to easily realize various design ideas: you can design a partition in the form of an arch, make a niche for a TV or other household appliances, build built-in shelves and much more.
Of course, there are also disadvantages. The main thing is the relative fragility of drywall: such an interior partition is much easier to damage than, for example, a brick one. In addition, even moisture-resistant plasterboard does not tolerate prolonged exposure to conditions of excess humidity.
Before assembling the structure from plasterboard, you will have to decide on the location of all the interior parts on the future wall: their attachment points need to be strengthened at the stage of assembling the frame.
Installation of drywall on walls - technology
It can be noted that the sequence of installation of gypsum boards on surfaces made of various materials is approximately the same:
- the frame must be leveled;
- the guides are attached specifically to the wall surface with the same pitch;
- racks are used as load-bearing components;
- the frame can be supplemented with guide profiles to increase reliability;
- frame elements are placed at a distance of 0.4-0.6 m;
- A gap of 1-1.5 cm should be left from the floor and ceiling.
Video: installing drywall on walls
There are a number of differences in fastening drywall, taking into account the material of the walls:
- The sheets are attached to the concrete wall using a hammer drill and 60 mm dowel nails.
- The correct installation of drywall to a brick wall is carried out in the same way, but the quality and strength of the masonry should be taken into account. For old buildings and those made of hollow bricks, dowel-nails with a length of more than 80 mm are used.
- The frame is mounted on foam blocks using pancake screws without preparing holes.
- If the wall is made of wood, then fastening occurs with nails or self-tapping screws. A frame must be built on curtains with a stroke of up to 6 cm.
Video description
How to make a frame for an arch can be seen in the video
In places where it is planned to build a niche or shelf, the horizontal profiles must be further strengthened, since they will be subject to load.
To make a box that hides the sewer risers, you will need to use a guide profile. It will serve as fastening of the structure to the foundations. To construct the main frame, ordinary profiles will be sufficient. A hatch is left in the area of the unit that needs to be serviced. It will provide easy access to communications.
Important ! When making boxes whose purpose is to hide communications, it is necessary to make doors. This will provide easy access to the nodes in case of emergency. The walls of the box should not touch the communication elements, so the box is made with a small margin, creating a gap.
A blind box can be made if:
- There are no tees and there is no need to clean it.
- The riser is made of plastic, the pipes are fixed with clamps, which prevent subsidence.
- The risers are made of materials that do not require repair or replacement.
Open access should be:
- Up to risers made from pipes whose service life is limited. When a leak occurs, it is necessary to promptly replace certain areas.
Communications can easily be hidden in a plasterboard box Source yavvannoy.ru
- Pipes through which cold water flows should not be closed, since the lack of ventilation provokes the formation of condensation on their surface.
DIY drywall installation: 14 rules for successful installation
Experts identify a number of rules that will help to carry out repair work correctly:
- Accurately determine the position. Be sure to mark with chalk, cord or pigment. How the installation itself will proceed depends on this.
- Install profiles correctly. They must be insulated from the floor with some kind of elastic material. This will provide sound insulation. Foam, felt, rubber, cork are suitable.
- When measuring the length of the posts, subtract the thickness of the soundproofing material. Additionally, a gap of 1.5-2 cm is made.
- When installing wall partitions, the openings should be strengthened. A rigid profile is suitable for this.
- The slabs must be carefully trimmed. A line is drawn on the outside of the sheet - where there is no print, and there are chamfers at the ends for connection.
- Sheets should be attached carefully. Phosphated screws are used for this. They are not prone to corrosion due to contact with gypsum. The cap is hidden in a sheet of 0.5 mm, and then filled with putty. There should not be too much putty between the sheets, as this will lead to cracks.
- Avoid using additional elements. You should immediately take as a basis sheets whose size is slightly larger or corresponds to the required one.
- The need for insulation and sound insulation should be considered in advance.
- When installing plasterboard walls, the layout on the second side must be offset so that the seams do not coincide.
- The seams must be puttied. In this case, the mixture must be pressed as deeply as possible and smoothed out on top.
- It is necessary to select the correct reinforcing tapes taking into account their purpose.
- To avoid deformation, do not make joining seams in the middle of doorways.
- To cut niches and openings, you need to use gypsum board crowns.
- It is recommended to start attaching sheets from the center or corner.
How to make a plasterboard wall: building a frame
The first thing you need to understand in this whole matter is that the final result depends on the frame and the quality of its manufacture - if you don’t want to get a flimsy and crooked wall, everything needs to be done as expected. And it is necessary to install a plasterboard wall as follows.
We make markings.
To begin with, using any of the profiles, using it as a ruler, we designate the installation location of the frame on the floor. You need to take into account the thickness of the future plasterboard covering of the frame (12.5 mm). You also need to take care of the correct geometry of the room that will fence off the partition being built - the distance from the intended line to the opposite wall on both sides should be the same.
Now we mark the position of the frame on the walls - we can’t do without a level here. With its help, again, using it as a ruler, we draw vertical lines on the wall that originate from the line on the floor. On the ceiling, we simply connect two verticals drawn on the walls with one straight line, and we get a clear frame into which the frame is installed. Now we attach the uw guide profiles.
Everything here is quite simple - we orient them clearly along the drawn lines and fix them with dowels or self-tapping screws (depending on the material of the surface to which they are attached).
Guide profiles are installed along the entire outlined perimeter, with the exception of the place where the doorway will be formed. We strengthen the frame with load-bearing profiles cw. There is nothing complicated here either.
The supporting profile is installed vertically so that both ends are inserted into the guide profile - the installation step of this frame element is 600mm according to the standard, but if you want to get a really rigid partition, then it is better to reduce it to 400mm. There is one more nuance here - you need to start installing the load-bearing profiles from the doorway. First, we limit it by installing the supporting profile clearly at the vertical level, and then we move to the sides and install all the other cw profiles.
They are fastened using ties on both sides of the frame - two screws should be installed at the bottom and at the top. We complete the formation of the frame, or rather the doorway in it. At this stage, you need to install the upper horizontal lintel in the doorway. To do this, we first mark the location of its installation from the floor level - usually 2100 mm (taking into account the door frame and the future floor covering).
Further from the ceiling to these marks, on the inner sides of the profiles framing the opening, we attach uw guides (their length will have to be measured locally). After this, we insert a horizontal jumper into the lower edges of these guides, made from the same uw profile.
In principle, that’s all, all that remains is to secure it and strengthen it with an additional vertical jumper mounted between the ceiling and the upper part of the now formed doorway.
The frame is ready, and you can start covering it, but first you should take care of hidden electrical communications, if any, on this wall.
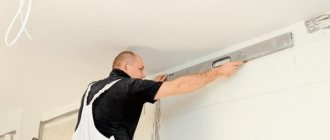
Installation of drywall on walls and ceilings using metal profiles
Marking for the frame
The action is carried out using a painting cord. A straight line is marked on the floor, which is the boundary of the frame. Then it is duplicated on the ceiling using a plumb line, a level and a pencil cord. Strictly vertical lines are drawn on the walls for mounting rack elements. The pitch is measured so that the joints fall in the middle of the rack profiles. Typically it is 600 mm.
Installation of guides
Installation of the frame is the next step. The horizontal profile guides on the side that will be adjacent to the base are covered with a special sealant. Its role is played by the tape. It is this that provides sound insulation. After this, drill holes for the dowels. A profile with insulation is attached to them.
The guides must securely hold the drywall, so between the screws you need to choose a step in the range of 50-100 cm. Each segment is attached in at least three places.
Drywall frame for wall
Defects on the walls are hidden in a similar way, but in this case there are some difficulties that should be taken into account:
- Communications are laid along the wall. A line is drawn on the surface of the ceiling where the guide profile will need to be installed. To draw a similar mark on the floor surface, they resort to a plumb line.
Sheathing for plasterboard covering, hiding communications Source voicednepropetrovsk.ru
- Horizontal elements are inserted into the guide every 60 centimeters. The sheet of drywall will be mounted on three posts at once, standing perpendicular to the floor, with one of them located exactly in the middle of the sheet, while the others serve as support for the joints.
- Having drawn all the marks, you can assemble and install the frame. The racks are inserted into the guides and fixed in a stationary position with self-tapping screws.
- Horizontal cross members are installed as for the ceiling mesh frame. Fastening is done using self-tapping screws. Suspensions are used to level the surface of the frame. The intersections of the profiles are connected by “crabs”.
On a note ! It is very difficult for a beginner to place horizontal posts exactly, so professionals recommend using a guide before making a frame from a plasterboard profile for walls and securely fixing it. Three or four threads stretched between the outermost standing profiles are suitable for this.
How to glue drywall
The sheets are attached to flat surfaces using specialized glue. This is the easiest and fastest installation method. But it is only suitable for leveled surfaces. A difference of no more than 20 mm is allowed. This takes up less room space. There are two ways to fasten sheets:
- On clean and primed walls.
- On strips of Perlfix glue 10 cm wide.
Drywall should be fixed only after the wires have been laid and sound insulation has been thought out. Glue is applied around the perimeter and in the middle of the sheet. To ensure uniform application, use a notched trowel. After the glue has hardened, you can strengthen the structure with dowel nails.
You can also attach drywall to polyurethane foam. In this case, the sheets are attached to long screws, and the gaps are filled with foam.
Types of profiles
The profile forms the basis on which gypsum board sheets are mounted.
Support and guide profiles
Table 2. Types of profiles.
| Type | Characteristic |
| U-shaped in cross-section, the side walls are smooth. Used as a metal support for racks. Mounted along the perimeter of the future partition. | |
| Installed in the guide profile. It is to this that the sheets of drywall are attached. It is characterized by increased rigidity due to heavy load. The U-shaped structure of the profile is supplemented with stiffening ribs. | |
| There are load-bearing and guiding types. The cross-section of metal products is smaller than that of the 2 previous types. Since it does not place a large load on the base of the partition, it is thinner. | |
| The holes in the product make it possible to install them at different angles. |
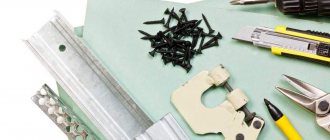
Tools, materials and components for installation
To attach drywall, you may need the following tools and materials:
- For marking surfaces and sheets: level, plumb line, simple pencil, tape measure, painting cord.
- For installation: knife, special scissors for metal, screwdriver, hammer drill, hammer.
- Accessories: guide profiles, racks, hangers, dowels, screws, glue, foam.
The set of tools may vary depending on the situation, the material of the walls or ceilings, and the purpose of using drywall.
Installation secrets: how to cut drywall
It is necessary to cut plasterboard sheets with a special knife. To ensure an even cutting line, it is better to use a long strip. The paper is cut along it and pressed onto one part of the sheet. After these steps, the plaster will break and you will have to cut the remaining paper with a knife.
If you need to cut a large number of sheets, you can use a special cutter. The edges of the sheets are made at an angle in order to increase the area of the seams. They will subsequently be puttied. Therefore, you should leave 5 mm from the edge and cut off excess material along the bias.
Insulation for drywall
There are often cases when premises require insulation. This can be encountered especially often when carrying out repair work on balconies and loggias. The proven insulation is usually glass wool or mineral wool. They are laid after the sheathing has been built and covered with sheets of plasterboard.
Features of drywall
It is often used for finishing and decorative works. Due to the ease of installation, it is popular for DIY repairs. Eco-friendly and does not pose a health hazard.
When creating drywall, gypsum is used as a base.
- Warmth and waterproofing. The structural features of gypsum make it possible to control the microclimate in the room. There are no problems with excessive humidity or dry air.
- Sound absorber. Helps in solving the issue of excessive hearing. The best result is achieved in combination with mineral wool.
- Fire resistance. Not the most fireproof material. Asbestos, for example, is more durable. If drywall is used in facilities with an increased risk of fire, its variety is used - gypsum board.
- Ease. This is one of the most “airy” building materials. The weight of a sheet with an area of 1 m² and a thickness of 6.5 mm is 5 kg. This figure is almost 4 times less than the mass of similar structures.
Working with drywall does not require the purchase of complex tools. Gypsum foam is cut with a simple knife.
GKL - a sandwich panel popular among builders
Table 1. Types of drywall.
| View | Characteristics |
| With insulation | The polystyrene foam coating enhances the heat-saving properties of the material. |
| GKLO | Fire-resistant variety. |
| GVL | It is characterized by increased strength. Due to the fact that it does not have a cardboard covering, it is resistant to fire. |
| GKL with vinyl coating | Used primarily for decorative finishing. It is well fixed and has a long service life. |
| GLKV | Thanks to the presence of additives, it is characterized by increased moisture resistance. The sheet holds its structure well and does not delaminate. Used for furnishing a kitchen or bathroom. An ideal material for country houses, as they have high humidity. Resistant to mold formation. |
Physical and technical characteristics of plasterboard sheets
Finishing work with drywall
After completing the above work, you need to start finishing. Before painting, the sheets are covered with putty and leveled. Afterwards, all surfaces must be primed if painting is required. It is recommended to paint with water-based paint. It is also possible to use a primer. To do this, dilute the paint with water in a ratio of 3:1.
It is possible to finish drywall with the following materials: wallpaper, decorative plaster. Surface preparation is carried out in accordance with the manufacturer's instructions.
Installation cost
Prices for services may vary in different regions. They also depend on the complexity of the work performed. The approximate cost for different types of work is as follows:
- Wall cladding in one layer - from 350 rubles per square meter.
- The construction of partitions in two layers starts from 500 rubles, and in one layer from 400.
- Ceilings on metal lathing – from 550.
In addition, additional services may be offered:
- Sound insulation - from 80 rubles per square.
- Painting work for preparation for wallpapering - from 420 rubles.
- Painting work for painting - from 550 rubles.
Cutting sheets
In order to cut a sheet of drywall, you can use a regular stationery knife. With its help, a cut is made along a ruler on one side of the sheet, after which the sheet is easily broken into two parts.
If you need to cut a curved hole, such as an arch, it is better to use a jigsaw. You need to insert a metal file into it and cut at maximum speed.
What brand of drywall do you use?
USEFUL INFORMATION: Brick-like wall panels for interior decoration
Lathing made of wood or profile, which is better?
There are not many materials available that are suitable for a frame under plasterboard: metal and wood. It is worth understanding the features of each of them:
- Metal sheathing, unlike wood, has moisture-resistant properties. She is also not afraid of temperature changes. But wood, in turn, can become deformed under the influence of cold or heat.
- Fungus, bugs, and mold develop their lives only on wooden beams.
- Metal doesn't burn. Moreover, it does not support fire. For rooms with a high probability of fires, it is better to choose a galvanized profile.
- Wooden beams must be pre-treated with antiseptics and fire retardants. This makes repair work more expensive, and you have to spend a lot of time processing and drying the wood.
- The width and length of the metal profile are the same, it does not require rejection due to non-compliance with the dimensions.
- Wooden beams are several times cheaper than metal.
- The tree is firmly fixed with self-tapping screws. While in metal the self-tapping screw is held on only by one turn.
More often, a metal profile is chosen, since it is easier and more reliable to use.
Making lathing from wooden beams
The work includes several stages:
- Wood preparation. It is better to use coniferous trees. Before installation, the wood must lie in the room where the renovation will be carried out for several days. You should make sure in advance that the raw materials have undergone appropriate treatment with fire retardants and antiseptics.
- Trace. This is marking the lines along which the frame will adjoin the walls, floor and ceiling. It is easier to mark a point on the ceiling and transfer it to the floor near the wall using a plumb line. To do this, a nail is driven into a point and a weight is suspended from the thread. The resulting points are connected by a line along the wall.
After this, a perpendicular to the wall from the bottom point is required. This will be the second line of the partition. From its extreme point a third line is built along the wall. On the ceiling, you then need to connect the existing points and you will get the fourth. This is how the boundaries of the partition become visible
- Frame installation. The frame is built from vertical and horizontal beams. And they start making it only from the frame. First of all, the bars are secured along the constructed lines using self-tapping screws or dowel-nails. It should be taken into account that the beam on the floor should not be solid, but located on both sides
- Doorway. First you need to install two racks along the edges. The width of the opening is usually 3-5 cm wider than the door frame. They are reinforced with additional horizontal bars. Additional rigidity will be provided by vertical bars along the opening.
- Racks. They are placed in increments of 0.6 m. It is recommended to use metal corners for connections. It is better to install the racks so that the wall contains the maximum number of whole sheets of gypsum board.
Installation of a metal profile lathing frame
The creation of a metal sheathing can be divided into 3 stages:
- You should start by developing a sketch or design diagram. At this stage, it is imperative to take into account that the distance between the guides should be in the range of 40-60 cm, and hangers should be placed every 0.5 m.
- To avoid any difficulties during installation, be sure to make preliminary markings on the surfaces.
- The construction of the frame should begin with the installation of guides. Then the racks are attached to them. All connections are fixed with self-tapping screws.
Thermal insulation of walls and installation of plasterboard on the sheathing
Before installing plasterboard sheets, you need to think about thermal insulation and sound insulation. The thickness of the materials primarily depends on the width of the structure. In most cases, mineral wool or polystyrene foam is chosen.
Insulation segments are placed between the sheathing posts, filling all voids. A vapor barrier membrane should be placed on top. The joints must be secured with tape. It is convenient to fasten the film with a construction stapler.
After insulation, you can begin installing the sheets. Initially, you need to calculate how many sheets will be needed for the entire area. It is recommended to leave a reserve of approximately 15-20% of the purchased material. The sheets are adjusted according to pre-drawn lines. The drywall needs to be secured to the sheathing.
How to assemble a ceiling frame
If you need to hide unevenness in a room, all manipulations begin from the ceiling. Since there are no rooms where the corners are even, it is very difficult to level the ceiling when starting repairs from the walls. If you first level the ceiling, then when working on the walls, all the resulting gaps will be closed.
The work is carried out in several stages:
- marking;
- installation;
- connection of profiles.
How the marking is done
Markings must be done at the initial stage of work on the frame made from a profile for plasterboard. At what distance from the ceiling surface the new surface will be depends on how much the owner wants to lower the ceiling. Marks are placed with a construction marker. Draw lines by controlling the ruler and level. It indicates where the guide profiles need to be attached.
A grid is drawn on the ceiling. The sides of the cells should be equal to 60 cm. This will be the plan for the ceiling frame.
Important ! Before constructing a frame for plasterboard from a metal profile, you must first install all the electrical wiring, leaving at least 10 centimeters of spare cable. This will make it easy to connect all nodes. Install sockets, switches and lamps according to plan.
Profile mesh for ceiling cladding with communications Source kitchenremont.ru
See also: Companies specializing in finishing materials, ventilation and air conditioning.
Marks on the walls are drawn after determining the distance between the frame and the main wall. The resulting space should be equal to the dimensions of the profile and communications that will be hidden behind the casing. After these manipulations, a line is drawn on the ceiling, serving as a guide for installing the racks.
Important ! The closer the structure is to the wall, the more free space will remain in the room.
A plumb line is lowered from the top guide, perpendicular to the floor, to determine the boundary of the structure on the floor surface. Marks are drawn on the walls, opposite which the racks will be installed. The distance between them is made no less than 60 centimeters. The places where hangers will need to be installed are also noted. Marks are drawn every 80 centimeters.
Installation of plasterboard, frameless wall covering with plasterboard
Frameless wall finishing with plasterboard is a fairly quick and elementary way to level surfaces. And this way you can really save quite a lot of space.
Special glue is used for fastening. With a difference of up to 0.02 m, a product called “Perflix” is suitable. It is placed on sheets in small mounds, which are leveled when the drywall is pressed against the wall. If the difference reaches 0.05 m, then you first need to fix narrow strips of drywall, and then attach the main sheets to them.
In general, the procedure includes the following steps:
- Cleaning walls of outdated finishes.
- Preparation of necessary materials and tools.
- Treating surfaces with a primer.
- Cut out the sheets.
- Applying glue to one part and attaching it to the wall.
What is drywall like?
Before you figure out how to work with drywall, you need to decide on its types. The building material must be selected taking into account the specifics of the room and its microclimate. For convenience, the sheets of material are painted in different colors depending on the type.
- In ordinary rooms with normal humidity, gray plasterboard is used.
- Fire-resistant sheets marked with the abbreviation GKLO are painted pink or light purple. They are used when finishing surfaces near stoves and fireplaces.
- The letters GKLV and the color green indicate moisture-resistant plasterboard for bathrooms and kitchens.
- To decorate the walls and ceilings in the kitchen, you can also use sheets of dark gray or blue color, designated GKLVO. They combine good moisture resistance with increased fire resistance.
- To create curved structures, arched plasterboard GKLA is often used. It has a smaller thickness - 6–7 mm and is very plastic.
The most detailed information about the types of this material and its parameters, as well as its classification according to the new GOST, can be found in the article “Basic characteristics of a plasterboard sheet.”
Processing drywall seams: working on the nuances
How to chamfer drywall
There are 3 available chamfering methods:
- Place the material on a plane and securely fix it. Next, you need to position the ruler along the edge, draw a line approximately 5-7 mm from the border of the sheet. Then you can cut off the edge with a knife. The chamfer must be removed carefully, without leaving any unevenness. If done correctly, the result will be long, curled shavings.
- The second method is that the sheets are initially attached to the base and chamfered with a stationery knife at an angle of 45 degrees.
- The simplest method of chamfering is carried out using a special tool - a chamfer cutter. It looks like a plane with a beveled blade and allows you to process the material evenly.
Drywall installation - cutout in drywall
During installation, it is often necessary to make holes, for example, for sockets. To cut a rectangular hole you need to do the following:
- Determine the location of the hole. It is better to outline its exact boundaries.
- Use a drill to make holes in the center of each line. You can also place them in the corners. The jigsaw blade should easily fit into the hole.
- Carefully cut out the rectangle exactly along the lines.
- At the last stage, you need to check whether the resulting hole meets the specified parameters. For example, try on a switch or socket in it.
Round holes are a little more difficult to make. To do this, you can use, for example, a crown, a ballerina or a hacksaw. A crown is easier to use and is ideal for cutting small and medium-sized holes.
So, the work includes the following stages:
- First you need to mark the location of the cutouts and accurately determine the center of the circle.
- Select a crown of the required diameter and place the drill in the center. It is recommended to operate at medium speed.
Treatment of joints of plasterboard sheets of internal and external corners
If all sockets and switches are installed, wires are removed, then you can begin processing the joints. A gypsum mixture is suitable for this. It hardens quickly, is very strong and can be easily sanded later.
Beveled edges should be coated with a primer and left to dry completely.
To seal the joints you will definitely need a reinforcing mesh. For example, for a factory border, a width of up to 100 mm is suitable. If the edges are processed at an angle of 45 degrees, then the following sequence of actions will occur:
- Cut a thin strip so that it does not cross the boundaries of the joint. Otherwise, you will have to putty plasterboard over the entire surface to a thickness of 1-2 mm. This will be quite costly in terms of time and materials.
- Apply a little putty to the seam, and then place the mesh on it. After this, you can fill the remaining volume.
Installation of drywall - processing of drywall corners
External corners must be fixed with special corners. They come in several types:
- Aluminum. They are characterized by rigidity and protection against rust. But they can easily break if moved carelessly.
- Plastic. Not so tough, but almost impossible to break.
- Galvanized. They have the only drawback: the possibility of rust, which later comes out through the finishing.
It’s great if the outer corner has a couple of factory edges. Then the corner will not stick out and an extra layer of putty will not be required. Otherwise, the following work is possible:
- A small chamfer is made to secure the corner tightly. After this, the corner is fixed and puttied.
- The corner is glued without a chamfer, but then an additional layer of putty is required for leveling.
- The putty coating procedure is carried out without a corner. And after finishing the plastic corner is glued.
With internal corners everything is much simpler. Simply filling the gap is enough. You can secure them with a special tape.
Necessary materials
First of all, you will need the drywall itself.
The partition, of course, is not a load-bearing wall, but must have a certain strength. Therefore, sheets are taken with a thickness of at least 12.5 mm. Moisture-resistant and fire-resistant varieties of this material are used only when necessary.
A galvanized metal profile is ideal for forming the frame. Most partitions will require two types:
The guides have a standard length of 3 m. The size of the required rack profiles is selected based on the height of the room where the partition is being erected.
Horizontal lintels, which give rigidity to the structure and form doorways, are also made from a rack profile. Therefore, the exact amount of this material is calculated only after drawing up a detailed diagram of the frame, taking into account the required supply.
In addition to the plasterboard and profile, for work you will need:
Dowel-nails for attaching guides to the walls, ceiling and floor of the room.
In a wooden room they are replaced with wood screws. Sealing tape to improve sound insulation. It is glued to the back side of metal profiles, preventing the transmission of sound vibrations from the main walls to the frame. Beam for strengthening the doorway. In size, it should fit tightly inside the rack profile - this will facilitate its installation.
Professionals advise fastening the profiles together using a cutter. But this tool is still not widely used, so small metal screws, popularly called “fleas” or “bugs,” are more often used.
What brand of drywall do you use?
If you plan to fill the voids in the partition with insulation or sound insulation, then these are also purchased.
Installation of drywall - finishing
After the putty has dried well, the entire surface is primed with a regular paint roller. Next, the base layer is applied using a pair of spatulas: small and large. The first mixture is taken from the container and smoothly distributed along the edge of the second. The surface is already treated with a large spatula.
Next, you must sand the drywall. It will become completely smooth. On such surfaces you can easily glue wallpaper or apply paint, but only after another layer of primer.
Frame diagram
It is impossible to correctly build a partition without creating a drawing.
It will be required already at the stage of purchasing material. Yes, and it is impossible to mentally calculate all the subtleties of placing profiles and fastening gypsum boards. The drawing will help you use the material more rationally and avoid unwanted losses.
The dimensions of the future partition are determined as follows:
This algorithm is needed due to the fact that in apartments the floors are rarely even and located at right angles.
The drawing is transferred to paper, the location of the rack profiles and partitions, as well as the doorway, is outlined. The following rules are observed:
To impart rigidity to the structure, the sheets on both sides must be connected on different racks. For example, on the front - on odd profiles, on the back - on even profiles.
The space above the door is further strengthened by at least a pair of guides. At the same stage, the mounting locations for all additional accessories, such as a TV, are determined.
These areas are also reinforced. The number of required horizontal jumpers is calculated. GCRs are joined to them if the partition is longer than their length. But even when the sheet completely covers the opening in height, it is recommended to fasten a couple of horizontal profiles to provide rigidity.
And one more important point. If a sliding door is installed in the partition, the doors of which will drive into the plasterboard wall when opened, the profiles should be arranged in 2 rows
Note! In such a design, there should be no jumpers, wires or any other communications or obstacles along the direction of movement of the door leaves.
A simpler solution. A standard wall with an opening is made, and the sliding door is located outside, on one side.
The frame for the partition with niches shown in the next photo has a more complex design.
Based on the drawing, the required amount of material is calculated. After purchasing it, you can begin installing the frame.
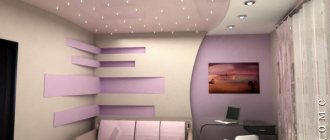
Complex plasterboard structures
Designs with angles other than 90 degrees are considered complex. Design skills, accurate calculations and installation will be useful for design. Complex structures include:
- Two-level ceilings with volumetric figures, such as circles, in the center.
- Multi-level ceilings with radius corners.
- Segmental ceilings.
- Various built-in niches.
- Arches.
- Any non-standard elements or openings.
Thanks to plasterboard, such structures are light, strong and reliable. They allow you to make the interior original. Moreover, material costs will be minimal. During the installation process, you can think through the illumination of a structure of any complexity.
The main advantage of drywall is its ability to be reused. It is enough to carefully dismantle the existing building and redraw the parts.
13 954
Fastening and processing drywall
Fixation of gypsum boards is carried out as standard:
According to the markings, we cut the necessary fragments using a hacksaw or a painting knife. Using a knife, cut the cardboard along the marking line on one side of the sheet. We carefully break the drywall and turn it over to cut through the cardboard from the reverse side. At the joints, the fragments must have chamfers.
It is recommended to shape them before attaching them using an edge plane or a painting knife. We attach the drywall to the frame with metal screws. A special gypsum board bit for a screwdriver will greatly facilitate this process. The pitch between the fastening elements is 10–15 cm.
On the sheets being joined, the fastening points are spaced apart.
At the end of all operations, a strong and even partition is obtained, ready for further finishing.
Well, now it's time to finish the article. All the material I wanted to share has been reviewed. I hope it will be useful to you, and you will use it if you need to make a plasterboard wall with your own hands. Improve your own practical skills and gain new knowledge, as they say: “It’s never too late to learn!” That's all, thank you for your attention, successful and easy repair!
Sheathing with plasterboard sheets
The plating process is fairly standard. Plasterboard sheets are attached to the frame on both sides with self-tapping screws. If this is necessary, then two layers of plasterboard sheathing are installed. In this case, the partition will provide additional benefits in the form of strength, sound insulation and thermal insulation.
Plasterboard sheets will have to be cut, and if you did not make any windows or built-in shelves, then the space will need to be left only for the door. Otherwise, you will need to trim the trim so as not to block the window opening. This is not a complicated procedure, but it has one caveat. A lot of drywall will go to waste, since the remnants of the cut sheets are unlikely to be put to good use.
This completes the installation of an interior partition made of plasterboard sheets. All that remains is to putty the partition and start designing it. Here you can give free rein to your imagination or find the style you like among the examples below.
Some of the above interiors will require not only finishing, but also changes in the structure and design of the partition.
Level tapping
The first stage of installing plasterboard ceilings is to level the surface. Often, due to uneven wall heights or curvature of floors, the ceiling is not parallel to the floor.
Therefore, you first need to beat off the surface of the structure being constructed.
The beating is carried out in several stages:
- Place a marker in one of the corners of the room.
- Marking the remaining corners of the room using a level. Ideally, you should use a laser level, but you can get by with a regular water level. For greater accuracy, marks should be made not only in the corners, but also along the entire perimeter of the walls.
- Measuring the distances between each mark and the rough ceiling.
- Determining the angle with the minimum distance between the mark and the ceiling.
- Applying a mark at a distance of at least 3 cm from the ceiling in the corner with the lowest value. Next, you need to measure the distance between the two marks in one corner.
- Applying marks in the remaining corners in accordance with the resulting difference.
- Applying markings along the entire perimeter of the walls using a tapping cord.
Surface finishing
After installing the gypsum board on the frame, the surface must be brought to its final form so that the installation of facing materials can begin.
The technology involves the following stages:
- Reinforcing joints between sheets using adhesive reinforcing mesh or elastic tape.
- Closing reinforced joints with putty.
- Covering all screws with putty. This must be done, otherwise deformation of the final finish may occur.
- Treatment with a primer mixture.
- Coating the surface with starting putty.
- Rubbing the surface to remove protruding areas.
- Coating with finishing putty followed by grouting.
It is important to allow time for liquid compounds to dry, otherwise the surface may become deformed.
After this, you can begin finishing work - wallpapering, painting, decorative plastering, attaching facing panels, etc. In most cases, the surface must first be coated with a primer mixture to ensure reliable fixation of the facing material.
Installation of ceiling plasterboard
To install a suspended plasterboard ceiling, you need the following tools:
- Hammer or drill;
- Roulette;
- Building level;
- Beating cord;
- Pencil;
- Stationery knife;
- Screwdriver;
- Tool for cutting metal (scissors, angle grinder).
Installation is carried out using the following materials:
- Ceiling gypsum board;
- Metal profile UD and CD;
- Fastening elements: screws, dowels, anchors;
- Connecting parts (crabs, hangers).
Variety of drywall
According to its design features, it can be:
- ordinary;
- moisture resistant;
- fire resistant;
- with increased sound insulation;
- in the form of a gypsum fiber sheet with increased strength.
This significantly expands the range of its application.
Methods for attaching drywall
There are two main options for attaching this finishing material. With help:
- gypsum mastic, which is applied directly to the surface to be coated and the sheet being installed;
- special screws screwed into a previously prepared frame.
Both types have their advantages and disadvantages.
In the first case, the work is done quickly, but the quality of fixation may be questionable. In the second case, more time and material are required, but the structure is sufficiently strong.