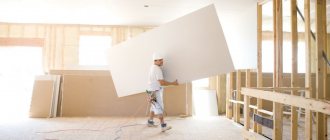
In new apartments with a large area and in old apartments with an outdated layout, there is a desire to remodel the premises for yourself. From one large room you can always make two smaller ones. For these purposes, interior partitions made of plasterboard are used. They are an effective solution in this situation due to their lightness and ease of installation. Also, their construction does not need to be coordinated with anyone.
Such partitions can be used to divide a nursery where children of different sexes live. Or the living room can be turned into two bedrooms. Regardless of the situation, the process of erecting plasterboard partitions in a room will be the same.
The advantages of such partitions
Any design must have a number of positive qualities in order to be used in practice. Let's consider what advantages plasterboard partitions used in an apartment room can provide.
Installing interior plasterboard partitions takes little time and requires little effort compared to other redevelopment options.- The structure is lightweight, which means it does not create unnecessary loads on the floors.
- Installation work is very easy. Even a non-specialist can cope with this task if there is enough information.
- They prevent the fire from moving from one room to another. Although it is not concrete or brick, the fire resistance limit of drywall is high enough to prevent fire from spreading.
- It is possible to create figured, decorative elements. Also, a plasterboard partition with shelves can be designed at the frame assembly level. In this case, it will be possible to immediately carry out the redevelopment and create the required number of shelves on the new walls.
- The finished surface will come out without curvature, since the gypsum board has a flat surface and is mounted to the frame, which is also assembled using a level. Moreover, the resulting surface is almost ready for finishing.
How the corners of plasterboard structures are formed
External corners
Sticker of aluminum outer corner on fugenfüller mixture.
Drywall corners are finished using the following auxiliary corners:
- aluminum, it is quite rigid, not subject to rust, it can be used if you need to seal drywall corners at right angles;
- galvanized, it is more rigid, it is difficult to break, but it can rust over time, also used for right angles;
- made of plastic, this element is less rigid, does not rust and is not brittle, can be used for any angles, for sharp, straight and turned ones.
Processing drywall corners by sticking a plastic corner onto the unfolded corner.
The question arises, how to seal the corners of drywall using corners? You can watch a video about this process on our website.
The principle of working with all types of corners is the same:
- we remove the chamfer from the end edges with a special plane for working with plasterboard so that there are no protrusions;
- We apply a layer of gypsum putty on both planes; the Knauf fugenfüller is best suited for this;
- glue the corners, pressing them with a rule or an even strip so that the excess mixture comes out through the perforation;
- We give the corners a chance to set with a thin layer of fugenfüller.
Important. The price of Knauf fugenfüller often exceeds the prices of leveling putty from other manufacturers. But this is a well-known brand that has proven itself well. If you choose material from another manufacturer, try to read reviews about its quality before making a decision.
Internal corners
Internal corners at the joints of Knauf sheets are sealed using paper reinforcing tape and leveling putty.
Selection of base materials
Having decided on the need to use partitions to divide the space in the room, you should understand the tools and materials that will be required for the work.
Of course, drywall comes in number one. Typical wall plasterboard with a thickness of 12.5 mm is used. The sheets have a standard width of 1.2 meters and lengths of 2.5 and 3 meters. There are other parameters, but these are standard . It is better to take shorter sheets, as they are easier to carry into the house. You can take fire-resistant sheets (they have pink cardboard). In this situation, they will be appropriate if the children's room is divided, and power cables will be laid in the partition itself.
Soundproofing material is fixed thanks to metal profiles
An interior partition made of plasterboard with sound insulation will allow your roommates to comfortably listen to music, watch a movie or have a quiet conversation. Since the room is divided into two parts, the use of soundproofing materials is necessary. They are installed in a metal frame.
Various profiles that can be used to assemble the frame
To assemble the frame you will need metal profiles. The standard length of such profiles ranges from 3-4 meters (shorter ones are more convenient, since it is easier to bring them into the apartment without cutting or bending). What profiles may be needed?
- Guides are classics of the genre. They are attached to the surface and serve as the basis for attaching other profiles. It is convenient to cut jumpers from the guides.
- The rack profile is a thrust element of load-bearing structures. It seems to support the entire frame, because it is used as a vertical support.
- Corner and ceiling profiles are not used when creating interior partitions.
The installation of interior partitions from plasterboard involves the creation of a frame from profiles. But which profiles to take, since they all have different sizes? It is necessary to select the size so that the rack profile fits tightly into the guide. We need to look at this first. Otherwise, if you take 28x27 mm guides and 50x50 mm racks, you won’t be able to assemble anything. If a 50x40 guide profile is used, then 50x50 mm racks will be just right.
Selection of fasteners and tools
To attach all the elements of the interior partition from gypsum plasterboard you will need:
- dowels 6x40 mm for attaching the frame to the floor, wall and ceiling;
- black phosphate self-tapping screws. The length of the self-tapping screw should be 25 mm if the wall plasterboard is attached in one layer. Sometimes, for greater reliability and better sound insulation of the interior partition, sheets of plasterboard are attached in two layers on top of each other. In this case, 3.5x35 mm self-tapping screws will be required for the second layer;
- bugs (small self-tapping screws with a drill and a press washer) are used to fasten profiles to each other. They should be as short as possible (for example, 4.2x19 mm), and the cap should be as flat as possible. The presence of a drill in the “bugs” makes it easier for them to pass through two profiles.
- Sealing tape must be used. It is installed between the surface and the frame, thereby improving the sound insulation characteristics of the assembled structure.
In addition to the fasteners, you will need special tools for the job. Without them, installation of an interior plasterboard partition will not be possible. Such tools include a screwdriver, drill, level, plumb bob, tin snips, construction knife, hammer and tape measure. However, this list is not complete or mandatory. Some tools will not be needed, but others may come in handy instead (hole saw, cutter, hammer cord, hammer drill, edge plane, etc.).
When the partition for dividing the room is assembled, it will need to be prepared for finishing. For these purposes you will need:
- primer;
- roller with a container for it;
- putty;
- serpyanka;
- set of spatulas;
- reinforcing corners;
- sandpaper.
Building a niche
Let's assume that we need to build a false wall with decorative niches according to the project with our own hands. Let's look at the sequence of actions. We will have approximate instructions for the procedure.
Advice. If you want to make decorative electric lighting, then you need to remember the rules of the PUE, which state that wiring behind plasterboard walls can only be laid in a corrugated pipe that does not support combustion. This is a metal hose or a special plastic one with the NG marking.
List of tools
To work we will need the following tools:
- level;
- plumb line;
- roulette;
- carpenter's pencil;
- perforator;
- hammer;
- screwdriver;
- Bulgarian;
- metal scissors;
- drywall knife;
- planer for gypsum boards;
- spatulas;
- graters with mesh or sandpaper;
- brushes, rollers for priming.
Three-dimensional image of a false wall made of plasterboard with three decorative niches.
Step-by-step work order
Let's get started with the work and do it in the following order:
- we mark the future structure in accordance with the drawing;
The photo shows a drawing for constructing a false wall.
- we build a base for drywall from a metal profile and guides;
Lathing installation - foundations for drywall.
- we fix the side crossbars from the profile;
Installation of horizontal guides.
- The frame is ready, let's move on to its covering;
The finished structure before the sheathing process.
- we attach the gypsum board strips to the inner side surfaces of the niches so that its ends are at the level of the front side of the guides;
Fastening gypsum board strips to the side surface of the niche.
- we sew up the entire front part of the wall with plaster sheets, covering the lining of the side surfaces of the niches;
- prime the surface of the plasterboard;
- we use drywall corners to process all rectangular joints followed by putty;
The process of finishing the finished structure.
- we process the seams by gluing them with serpyanka and putty with a leveling mixture twice;
- completely putty all the drywall with the finishing mixture;
- Our design is ready for final finishing.
Room layout
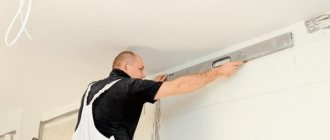
The quality of the partition depends on the correct layout of the room.
It is necessary to decide on the place where the partition will go. Using a laser level, lines are drawn on the ceiling, walls and floor. If it is not there, then you will need to draw the first line on the ceiling. To do this, you will need a water level and a long ruler (guide profile).
Using a plumb line, the extreme points of the line on the ceiling are transferred to the floor. Now there are two points on the floor, between which another line is drawn. You can use upholstery cord. Next, the only thing left to do is to draw lines on the walls in a similar way, focusing on the mark that is already on the floor and ceiling.
When you assemble interior partitions from plasterboard with your own hands, they usually have a doorway, although not always. The space under the doorway also needs to be marked in order to know where to place the profile on the floor and where to insert additional racks with mortgages.
Zoning of living space, or how to make a partition if there is a suspended ceiling
Residents are not always satisfied with the visual separation of a separate area in a large room. Often, to create a comfortable environment, you need to build a wall that will divide one room into two. This option will be the most time-consuming and difficult, but it is possible. In this case, the coating should be film, and the installation method should be harpoon. The method is not acceptable for fabric ceilings. After heating the tension fabric with a heat gun, the tension material is carefully inserted into the profile using a special spatula. Folds and irregularities are heated until they are completely eliminated. It is recommended to leave about 25cm between the partition and the suspended ceiling.
A larger distance will not look aesthetically pleasing, while a smaller distance will create additional difficulties during installation. The next stage is plasterboard covering . If lighting is planned, then it is necessary to install the electrical wiring.
If necessary, sound and heat insulating materials are laid between the drywall inside the frame.
General rules for assembling a frame for a partition
The interior partition should not rest against the window.
The base of the frame is assembled from guide profiles that are attached along the perimeter of the future partition. It is most convenient to start from the ceiling. The guide is pressed against the ceiling and a hole is drilled using a drill. Then a dowel is hammered in, which presses the guide to the surface. The fastening pitch is 0.5-1 meter, depending on the upcoming operational loads. Perhaps only a couple of hangers will be hung on the partition, or maybe it will be tiled and several massive shelves for books will be attached to it.
Don't forget to use sealing tape wherever the profiles come into contact with any surface. Thanks to this, the soundproofing characteristics of the partition are improved.
The rest of the profiles are attached to the ceiling in the same way as the guide. It is not necessary to join them together in the corners. Still, the drywall in the corners cannot be secured with self-tapping screws. Now the perimeter of the future partition made of metal profiles and drywall is ready.
Location of profiles in the frame
It is necessary to insert racks to strengthen the structure. They are inserted in increments of 40 to 60, depending on how the drywall sheets will be attached later. The fact is that the joints of the sheets must fall on the profile. Typically, racks are installed in increments of 60 cm with the expectation that the entire structure will be additionally reinforced with jumpers.
The studs should be installed sideways so that drywall can be attached to them on both sides. In other words, the ribs of the rack profile must run parallel to the plane of the frame.
When assembling an interior partition from plasterboard with your own hands, it is important that the gypsum board lies flat on the frame. Therefore, the racks are attached to the guides using a special cutting tool. If it is not there, then use small metal screws. Screw in two screws in each place where the rack profile enters the guide (a total of 8 screws for each rack). However, the caps stick out a little, which is why the drywall also does not lie perfectly flat.
Jumpers make the entire frame more durable
If the vertical posts were installed in 40 cm increments, then you can do without jumpers. If the pitch is 60 cm, then you need to install several horizontal jumpers for greater structural stability. Simply cut a profile from guides that are mounted horizontally between the vertical posts. The fastening step is 50-60 cm. The jumpers are also fastened with “bugs” or using a cutter.
Jumpers can be specially installed in places where future shelves are attached to make their installation even more reliable. You can insert a wooden beam into such a jumper if you plan to hang something massive on the wall.
Summary
The use of protective corners when finishing the corner joints of gypsum board surfaces allows you to simplify the process of removing the outer corners of walls, niches and window openings. In addition, the corners protect the surface from chipping during the operation of the room.
Once again we repeat that you can only use a profile with a metal thickness of 0.55-0.6 mm, for example, Knauf. They are good not only because of their rigidity, but also because their design allows them to be inserted into each other, thereby lengthening and strengthening them on the sides of the doorway. Profiles from other manufacturers may not have this option.
The walls of the PN already have ready-made holes with a diameter of 8 mm for dowels. One of the rack profiles is turned with its wall outward, and the second one faces us with a shelf. Between them there is a distance equal to the thickness of the plasterboard; we laid it at the stage of attaching the PN.
Thus, the sheet of civil code from the inside of the partition will be inserted, as it were, into its depths. At the end of the article, the outer corner of the fully finished partition will be shown in section. Building a partition from plasterboard with your own hands will be much cheaper than resorting to the services of installers.
In the article we will give valuable advice on the work and tell you how to carry out the work quickly and with a minimum of effort.
- The joints between the sheets are puttied.
- A fastening tape is laid, onto which another layer of putty solution is applied.
- After drying, the surfaces of the partition are leveled with a thin layer of putty. It is recommended to treat the surfaces of the structure with a primer before puttying .
- Sanding and finishing (painting, wallpapering, etc.).
- Door installation.
When working with profiles to create plasterboard structures, it is necessary to take into account the height at which the upper part of the partition will be located. It is with profiles that it is necessary to install the upper level so that it does not reach the ceiling and is located at a certain distance from it. It involves the installation of glass blocks that do not reach the ceiling, using a special sand-cement or polymer type solution. In addition to such a substance, you will need a reinforcing rod with a diameter of 4-6 mm. It is also necessary to prepare the linings and brackets for fastening.
It is necessary to install the frame of the second wall only after drywall has been attached to the first wall. This is necessary in order to increase the rigidity of the structure being built and reduce the likelihood of cracks. To get around this problem, the easiest way is to make a lining from MDF (hardboard), plywood or some other fairly dense material. Moreover, you need to understand that its thickness will not be constant and will depend on the angle of the walls.
You can calculate the thickness of the lining by simply measuring the distance between the guide and the rack profile.
How to fill the void of a partition: sound insulation
Depending on the thickness of the interior plasterboard partition, you can choose how to fill the resulting void. The thickness is the sum of the width of the guide and two thicknesses of the gypsum board. The width of the guide is the same as the height of the rack profile (not to be confused with the length) and is selected individually by each person. This width gives a certain emptiness inside the partition.
You can assemble two frames for partitions at a distance of 10-20 cm from each other. They are then covered with plasterboard, and a thick partition is obtained. This step is taken when they are going to place a lot of things inside such a structure.
There is enough space inside the structure to run a power cable to connect an outlet or wall lamp. Such cables must be corrugated for fire safety purposes.
Soundproofing material must not be subject to combustion
In most cases, the cavity is filled with soundproofing material. Therefore, vertical racks are often installed in increments equal to the width of the soundproofing material. Then it fits without the need for additional trimming and does not tilt to the side. Soundproofing of interior plasterboard partitions should be carried out after one side of the structure is sheathed with plasterboard.
Soundproofing material fits comfortably into the grooves of the upper and lower profile. It will rest against the back of one post profile, but will fit well into the intercostal space of the second post. For this reason, the racks are placed so that they all face the same direction. Some people prefer to install two posts back to back so that the soundproofing fits into them and does not rest against anything.
Horizontal jumpers also serve as additional fixation for sound insulation. Although this is not all that critical, because everything will ultimately be pressed down with sheets of drywall.
Installing a doorway
It is worthwhile to dwell separately on those cases when it is necessary to install a door in interior partitions. We will not consider the process of installing the door itself, but we will focus on how to correctly make an opening for this very door.
The interior door is not so heavy as to damage the partition structure
Before you make an interior partition from plasterboard, you need to decide where the door will be located. After calculating the doorway, the points where it will be located are marked on the floor. It is necessary to take into account not only the width of the door leaf, but also the door frame itself, so calculations are carried out carefully .
The floor profile is laid on both sides up to the doorway. A rack profile is inserted into each end of the guide, which goes all the way to the ceiling. Between these two profiles there will be a doorway. To indicate the height of the opening, a horizontal jumper is installed between the two profiles. All actions are carried out using a level, because errors here are especially dangerous.
It is necessary to use wooden blocks that are inserted into the racks and lintel. They must fit tightly into the profile, after which they are fixed with self-tapping screws. The upper jumper is additionally fixed with nails, two of which are driven into its end. The resulting doorway, although it came out of a metal profile, was reinforced with wooden blocks.
Drywall training
This drawing diagram shows the correct installation of tying plasterboard corners at an angle of 90 degrees. Pay attention to the connecting connection of all the end lines of the gypsum board sheets, as well as the twisting of the CW profiles among themselves, the quality and insulating properties of the entire partition directly depend on this. The next no less common angle for connecting a plasterboard partition is obtuse, in this case it is 135 degrees. Sewing On one side, we place mineral insulating material inside the partition.
It should touch the corner profile tightly around the entire perimeter. This shows how a sheet of drywall should be installed correctly between two connecting profiles, its end being in the same plane with them. No less, but exactly flush, some people think it’s missing a couple of centimeters and it’s no big deal, just twist it enough and it will work.
A centimeter gap between the profiles can worsen sound insulation several times. When screwing sheets of drywall to a metal frame, do not forget to leave a centimeter gap along the floor; to do this, simply place a piece of drywall on the floor, then install the sheet on it; after screwing, remove the stand.
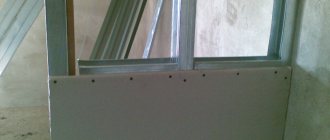
Step-by-step plasterboard covering
When the frame of the interior partition is ready, then it’s just a matter of small things, because there is nothing complicated about covering with plasterboard.
- Drywall sheets are cut with a special knife to the desired size.
- First, the installation of whole sheets is carried out, and only then the cut pieces.
- The sheets need to be installed in a checkerboard pattern. If the first sheet in a plasterboard interior partition is installed from the floor, then the second one must be installed from the ceiling. In other words, there should be as few cross joints as possible. They have a bad effect on the strength of the structure.
- The edges of the sheets that will be joined together must be chamfered at an angle of 450.
- There should be small gaps between all joints to relieve tension between the gypsum boards. A small gap of a couple of millimeters is sufficient between the sheets themselves, but the gap with the floor and ceiling should be 5-10 mm.
- The first layer of plasterboard is fastened with self-tapping screws 25 mm long, and the second layer, if used, with self-tapping screws 35 mm long. The second layer of gypsum plasterboard should be laid so as to completely cover all joints. That is, the joints between the sheets of the first layer should not coincide with the joints between the sheets of the second layer. In any case, the screws need to be slightly recessed into the gypsum board so that the heads do not protrude above the plane of the sheet.
- Self-tapping screws are screwed in increments of 20-30 cm. If two rows are made, then in the second layer the increment is 50-60 cm. The sheets are attached in places where they come into contact with the guides, rack profile and jumpers.
- You cannot screw screws into the very edge of the sheet; you need to step back 15-20 mm from it. Also, the screws cannot be screwed into the corners; you need to step back 50 mm from them.
- Similarly, the second side of the interior partition is covered with plasterboard. But before this, power cables are laid out and soundproofing material is laid. The sound insulation should lie flat and not slide anywhere. If there are problems with this, then it needs to be recorded.
Preparation for finishing
The resulting interior partition cannot remain in this form. It should be prepared for finishing.
Self-tapping screw caps do not require preliminary priming
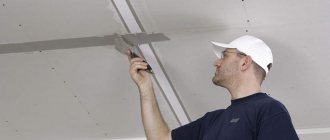
All self-tapping screw heads must be puttied. The joints between sheets of drywall are first primed and then puttied. At the same time, priming makes sense only if the edges of the sheets have been chamfered. Using a primer will improve the adhesion of the starting putty to the gypsum board surface. After applying the putty to the joints, you need to use a serpyanka, which will prevent the putty from cracking in these places in the future. The corner parts of the interior partition must be puttied and reinforced with a special reinforcing corner.
When the putty dries, you will need to treat it with sandpaper to remove any bumps and sagging that could have formed during the work. After this, the entire plasterboard interior partition is primed and puttied. If necessary, the second layer of finishing putty can also be treated with sandpaper.
Now the interior partition can be painted or covered with wallpaper of your choice.
Mounting options
The method of fastening sheets when covering with plasterboard follows from the type of angle (external, internal, straight, acute or obtuse).
For example, if you sew the frame into one sheet, then adjacent elements at the outer corner will overlap one on one - in this case, the end of the sheet must be cleared of the cardboard layer all the way to the gypsum surface.
If the plasterboard corner is internal, it is also advisable to remove the cardboard layer. And when making a T-shaped joint, it is advisable to cut the ends at an angle of 45 degrees, which will make puttying easier in the future.
You should be especially careful when sheathing in two sheets - here the displacement of parts is almost inevitable.