As a rule, in new apartments that are rented without finishing, any finished floor covering is placed on top of the leveling mat. The cement-sand structure, in turn, is mounted on the floor slab. If finishing work is carried out in private residential buildings or in old apartments, a new floor can be laid on top of a previously installed structure. In such situations, it is necessary to study in detail the instructions on how to lay laminate flooring on a wooden floor so that the coating can be used for many years, without the need for replacement or repair.
What types of wooden base can laminate be installed on?
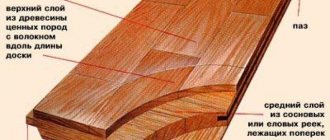
Laminate is such a universal type of flooring that can be easily installed not only on a pre-leveled concrete base, but also on the following types of old flooring:
- Hardboard - often serves as a backing for block parquet in old houses.
- Plywood - used for parquet boards in Khrushchev-era buildings, as well as for linoleum in old private houses.
- Piece parquet - provided that the coating has been preserved in its original form, it can be used as a reliable base.
- Wooden flooring with joists was used in almost every house of the Stalin era.
- Parquet boards were often used as part of municipal finishing in Khrushchev-era apartment buildings.
In most cases, all of the listed types of floors require minimal mechanical modification and leveling, since the laminate lamellas fit perfectly tightly together and are also laid on a pre-prepared base - a cork or penofol backing, which evens out most minor irregularities.
Pros and cons of leveling the floor with plywood
Smoothing out differences in height of a wooden floor by laying plywood is a fairly universal way to repair the subfloor before laying the flooring. After all, this method has a number of advantages:
- the strength and moisture resistance of plywood increase the service life of the laminate;
- sound and heat insulation properties of the material;
- resulting in a high-quality, even and stable foundation;
- low price of the material and minimal installation costs;
- ease of installation allows you to quickly carry out work on leveling the floor.
There is, of course, one significant drawback to using this material. When leveling with plywood, the height of the flooring increases, which may be unacceptable for certain rooms.
Disadvantages of laying laminate flooring on a wooden base
Before installing laminate flooring over an old wooden floor, the owner of the premises should take into account the risk of a number of negative consequences for the following objective reasons:
- Wood is susceptible to rotting, mold and bacterial growth when exposed to moisture and an aggressive environment. If condensation forms under the floor, water vapor will immediately begin to affect the structure of the subfloor, causing its destruction and the appearance of unpleasant odors. A large number of bacteria also contributes to the development of infectious diseases.
- As a rule, without treatment, the service life of natural material is much shorter than that of synthetic laminate slats, which will lead to premature destruction of the base due to its physical wear and tear if the owner does not take measures to assemble and strengthen it.
- Wood flooring can become susceptible to cracking, shrinkage and cracking over time, often resulting in loss of structural stability of the entire subfloor and resulting in uneven surface finishes.
At the same time, provided that the old floor is pre-treated with protective paints and impregnations, the finished structure will last at least 15-20 years, and this is exactly the guarantee that most manufacturers of laminate flooring with wear resistance class 33 or 34 give.
Strengthening boards with screws
So, all the materials have been purchased, let's start strengthening the floor with screws. There is an article on the site about what to do with a creaking floor in an apartment; it partially talks about this work.
Since the screws were difficult to insert into the wood, we first drilled holes about 70% of the length of the screw, and then used screws to tighten the boards to the joists.
We strengthen the floor in rows along the joists
Of course, if you have a powerful screwdriver, you will be able to do this much faster without additional drilling. In our case, the cheapest Chinese screwdriver, which quickly sat down, so the whole job lasted for several days. The main thing is to screw the boards tightly to the joists so that they do not dangle when walking. Since the doors will soon be replaced, we cut down the slopes to install the plinth.
We file the door slopes
During work, it turned out that there was too much blowing from under the floor on the street side, so we had to seal the gap with foam. In this case, you need to moisten the surface before treating with water, and also spray the foam after application, since the polymerization process of the polyurethane foam requires moisture.
There was a strong blow from the street from this gap
It got so much better
Requirements for a wooden base under laminate
A wooden base, which can be used as a subfloor for laminate flooring, is subject to a number of design, technological and functional requirements:
- Wooden structures must withstand the operational load that is applied to the surface of the finished floor, in accordance with the functional purpose of the object.
- The base must be of high quality, uniform, without visible or hidden defects, cracks, chips or signs of rotting.
- The maximum moisture content of wood under standard operating conditions should not exceed 12%.
- A ventilation gap must be installed under the wooden base to allow effective ventilation of the natural material, which prevents premature decomposition of the fibers.
- All boards must be treated with a special high-tech impregnation, which, during polymerization, ensures the strength of the material up to 150 MPa. The need to use a strengthening compound is determined after a thorough inspection of the subfloor.
- In addition to these special requirements, the base for the laminate must be absolutely flat, with a maximum height difference of no more than 1 - 2 mm over the entire area of the room.
- Before installing a clean floor, the surface must be cleaned of all visible dirt.
If a water or electric heated floor is installed under the laminate, then more stringent requirements for the absence of moisture are imposed on the base - the maximum percentage of water vapor cannot exceed 5%.
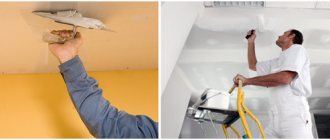
Plywood laying technology
- The plywood is fastened to the wooden floor according to a pre-planned layout of the sheets. Self-tapping screws or screws with plastic dowels are used for fastening. Holes for self-tapping screws are pre-drilled and countersunk with a large-diameter drill in order to “hide” the screw head.
- The mounted plywood base for laying the laminate is sanded and then coated with protective compounds that increase moisture resistance and wear resistance.
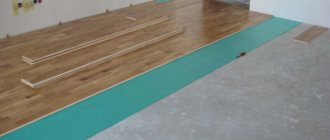
- A special laminate underlay is laid on top, which has noise-absorbing and heat-insulating properties.
The technology of leveling the floor with plywood allows you to prepare a wooden base of any quality for laying the finishing coating. If the installation of rough plywood flooring is carried out in compliance with the necessary requirements, then the laminate will last a long time. Environmental safety, unpretentiousness, and durability of the material make it possible to use it in residential premises to create a smooth and stable floor.
How to properly prepare a wooden base
Before installing the laminate, the old wood flooring is subject to thorough inspection to identify the following types of defects:
- Any traces of grease or oil stains.
- Old paint stains.
- All cracks that have arisen from shrinkage or mechanical damage must be sealed.
- Traces of mold, fungal infections, areas with rotten boards.
- All wooden parts that are subject to deformation or protrude beyond the plane of the floor.
- If poor fixation of any elements is detected, they must be secured with self-tapping screws or in other ways.
- Any irregularities that arise due to swelling of wood under the influence of external factors.
All unevenness and defects must be eliminated until a uniform, even, clean coating is achieved.
Floor preparation
A wooden floor is a capricious base. Its geometry is constantly changing due to changes in humidity and temperature in the room. And all this directly affects the integrity of the laminate laid on top. Some manufacturers of this floor finish generally prohibit placing it on such subflooring, threatening to void the warranty.
However, if the floorboards or parquet do not have deep cracks and do not “play” on the joists, then they are quite suitable for laying laminated flooring. It is only necessary to inspect such a base for the presence of rotten areas, swollen with water and worn out by insects. These damaged areas will have to be replaced. But otherwise, wood flooring is quite suitable for laminate. In most cases, it is not necessary to dismantle it.
Preparing for work
Preparing a wooden base involves three steps.
- Identification of defective areas.
- Replacement of damaged boards, wood boards and joists.
- Leveling the entire surface.
Most of the floor areas unsuitable for further use are identified visually. But it won’t hurt to walk along the flooring with your foot pressing on each floorboard. If any of them sags under a person, then the board itself has rotted or the joists under it have rotted. In both cases, it will be necessary to carefully examine such a place to determine the need for repairs.
Floor preparation
But first, you need to completely remove all the furniture from the room and tear off the old baseboards from the walls. There should be no obstacles left on the floor in the room for further repairs. It is best to complete the installation of interior doors, installation of radiators and finishing of ceilings before this point. Then damage to the already laid laminate may occur.
How to repair and level a rough wood base
After identifying the above defects, it is necessary to take the following steps to restore the structure of the subfloor:
- First of all, all elements of the old coating that cannot be restored must be dismantled and replaced with new ones.
- Large gaps between the boards are filled with a mixture of PVA glue and sawdust, or wedge-shaped sections of new wood are inserted into them. Wooden patches and wedges should be made from the same type of natural materials.
- The old floor must be planed in places where there are differences in elevations.
- Upon completion of the restoration work, the old coating must be scraped over the entire area.
- After sanding, it is necessary to collect all sawdust and shavings with a vacuum cleaner.
- When the old wooden floor is completely cleaned, it is thoroughly treated with antibacterial compounds, as well as water repellents and impregnations that increase strength.
- If the floor initially had large unevenness, it is recommended to use special polymer self-leveling mastics, which form a single continuous surface convenient for installing laminate slats.
- The installation of the self-leveling mixture must be carried out using a polymer film with a thickness of more than 80 microns previously laid on an old wooden base.
- If installing a liquid composition is not possible, experts also recommend using an additional underlying layer of thin plywood, hardboard or OSB boards.
- When constructing plywood, it should be remembered that this material also consists of natural fibers, which leads to its swelling from contact with a humid environment. Thus, to reduce the risk of laminate swelling, it is recommended to lay plywood with a technological gap.
At the final stage, it is necessary to place the laser roofing in the center of the room and check the horizontal plane of the base under the laminate. If differences exceeding 2 mm are detected, it is recommended to carry out the preparatory work again.
Installation of skirting boards
The plastic plinth with cable duct consists of two parts. The first is a wall mount, and the second is a decorative attachment that snaps on top. There is another type of fastening - first, metal brackets are attached, and then a plinth is put on them.
We drill holes for dowels approximately every 30 cm and fasten one part of the plinth. We fasten the main part, hide the wires, then put on the decorative attachment. For a beautiful connection, we use special components for the plinth: adapters, external and internal corners, plugs.
We put a special lining around the pipe to hide the gap (it costs about 50 rubles). In our case, the pipe was very close to the wall, so we had to trim the baseboard and saw off the lining, and then glue it with liquid nails.
Buy the plinth and all components together with the laminate. Otherwise, if there is a shortage of material, you will have to visit many stores before you can find the right color.
And the final touch is to attach the threshold to the door. It is needed to hide the height difference between rooms. The rules for laying laminate flooring require separating different rooms with a gap so that the coverings are independent. However, in practice, if the same covering is chosen for adjacent rooms, you can not use the threshold, but do everything without seams: it will be prettier and easier to clean. If some kind of defect later appears, it is more convenient to actually saw off the coverings in the doorway.
What is underlayment for laminate flooring?
When the subfloor is completely prepared and leveled, it can be used as a base for laminate flooring. The lamellas are pricked on top of an elastic layer of substrate, which can be made of the following materials:
- Foamed roll membrane - penofol, with a thickness of 5 to 10 mm. Under the weight of the laminate, the material is compressed to 2 - 3 mm.
- Piece sheets of extruded polystyrene foam with a thickness of 5 mm.
- Natural cork materials, manufactured in the form of pressed and processed sheets with dimensions of 1 x 0.5 m.
All piece elements are laid on the subfloor, after which they are taped with construction tape to avoid movement during operation. Penofol can also be glued with self-adhesive tapes, or overlapped up to 50 mm along the entire length.
Regardless of the material and installation technology, the substrate under the laminate performs several important functions at once:
- The elastic material effectively levels out small unevenness of the rough coating, within 1 - 2 mm, which eliminates the risk of wave formation on the laminate.
- Considering that laminate is usually a floating floor, any substrate serves as a damper layer.
- This material greatly increases sound insulation properties and eliminates the transmission of structural noise to adjacent structures and adjacent rooms.
- Slightly increases the heat transfer resistance of the enclosing structure, increasing the energy efficiency of the space being used.
- It has moisture-repellent properties and plays the role of additional waterproofing of the floor pie.
It is recommended to combine the cork backing with an additional polymer membrane, which prevents the material from absorbing moisture. As a rule, the underlay is laid loosely on an old wooden floor, but to increase the adhesion of the materials, it is recommended to first apply an adhesive composition such as “liquid nails” to the sheets.
How to perform alignment
A nice thing is that laminate can be laid on plywood and almost all other materials. Some people lay it on concrete floors, and others on wooden floors. Experts say that you can even leave the old linoleum if your floors are perfectly flat, and then it will serve as insulation, which is a plus.
If floor defects are obvious, everything should be corrected immediately. This includes defects such as depressions and cracks. If there is a slope, it also needs to be removed and leveled. When starting renovation work, people are often interested in what to lay plywood on so that they can then lay laminate on it. You can leave concrete or any other covering.
Most often, leveling work will take much more time than laying flooring material. To make the process quick, professionals recommend laying laminate flooring on top of plywood. To do this, the sheet should be fixed on wooden boards. If there was parquet in the room before, we install it directly on it. To obtain a warm floor, it is not necessary to use a heating system, and plywood under the laminate will also provide additional sound insulation.
Selection of material
Before you start work, you should carefully consider the choice of materials, in particular plywood and its special components in the composition. It must be safe for human health, and it must not contain toxic substances. The material will serve as a base for the coating, and therefore it should not be expensive.
Plywood for laying laminate can be divided into three types:
- FOF, which is a specialized material that is used in industry. It has certain features in application.
- Moisture-resistant plywood (FFP), which contains substances in the adhesive solution that are hazardous to human health. It cannot be used for finishing in the kitchen and bathroom.
- Special plywood for residential buildings (FC).
The wood for making plywood is taken from coniferous or birch species. The material obtained from the use of coniferous species will not rot after a while, but substances harmful to health will still remain in the glue, and this type is only suitable for roofing work.
Birch plywood (Bp) is used for finishing and interior work, as well as for creating furniture. When selecting a base material for a laminate, you should choose this type. This plywood has a certain quality classification, which is divided into four classes. The first one includes that material. Which is perfectly smooth and has no knots. But plywood of the fourth class is considered the most fragile, but the second class of material is perfect for the floor.
Tools and accessories
How to lay laminate on plywood with your own hands if you have not yet selected the tools for the work?
You will need to purchase or borrow from friends:
- Square for marking, so as soon as after marking you can start cutting the panels.
- A jigsaw, because with it you will cut laminate.
- A 5 m construction tape, which will be needed to measure the panels.
- A tapping block that will be needed to tap the panels at the optimal distance. Experts advise taking plastic bars, which are more convenient for work than wooden ones. Such tools will not leave chips on the laminate.
- Stopper wedges for creating gaps between the wall and the floor.
- A hammer drill, which will be required to install the skirting boards, and the fastening will be done using dowels.
Alignment Methods
There are several ways to level the floor:
- Using plywood.
- If there are uneven surfaces, scrape the floor. But in this case, the unevenness should not be more than 0.6 cm and they should be processed one by one with an electric machine. If there are few irregularities, you can use sandpaper.
- It is possible to lay laminate flooring on plywood and joists, and this method is relevant when the floors creak or are slanted. To do this, slats are attached to the base of the concrete, which will be the lags.
DIY plywood flooring
Before laying the laminate on plywood, you should deal with the first layer and lay the plywood.
This is a painstaking process and therefore there are several stages:
- First, divide a sheet of plywood into squares. Usually they are sawed, and then laid out and adjusted to size. Take into account the characteristics of the room where you will lay the floors, since after laying the sheets should not be placed close to the walls. There must be a small gap, but its size should not exceed 2 cm. You will need a pencil to number the sheets so as not to accidentally mix up the stacking order. Do not make long seams, and then it will be convenient to offset each sheet when laying.
- After this comes the turn of the floor screed. It is made using concrete. It is better not to skip this stage, especially if the base for the laminate will be wooden floors. To move on to the next step, you should let the floors dry. This can last up to 30 days. The screed should also be covered with polyethylene and covered with bars along the perimeter, and after three days you can remove the film. If there is no excess moisture, you can start laying the laminate. If there was moisture on the film, wait a little longer so that the screed is completely dry.
- Now coat the plywood with a special solution, i.e. primer. You need to apply a layer of glue to the screed, lay a sheet on top and secure it with self-tapping screws. After this, the plywood should be sanded. Most people who made plywood flooring finished the surface with drying oil. It will help ensure that the material does not become moldy in the future. Also, do not forget that you need to waterproof the floor.
Advantages of plywood
Among other options for substrates, plywood has certain advantages: it provides good sound insulation as well as thermal insulation. The biggest advantage is that plywood provides a heat-saving effect. It is pleasant to walk on such a warm floor. Plywood makes it possible to hide all the irregularities and small defects that were not eliminated at the preparation stage. Installation will not cause any problems, and you can handle it yourself.
Styling tips
The technology of laying laminate on plywood has a number of nuances. You should start working from the far corner, preferably away from the door. The first row of panels is laid horizontally. Watch the joints and how the boards will lie in relation to the wall. To avoid moving the gap between the floor and the wall, install stops that can be purchased at a hardware store. They come in wood and metal. After finishing laying the first row, one board should rest against the wall. Cut off the excess using a jigsaw. And now a trick that you can use when laying the second row - the joints at the ends should not coincide with the first row. Take the new panel and cut a small part from it (about 1/3). This will be the beginning of a new series.
On the second row we begin to fasten the boards, and then fasten them to the first row. When laying laminate, try to do everything carefully so as not to damage the panel. To do this, you will need a block that is placed against the panel and hit on it. All that remains is to complete the rows, while leaving gaps between the laminate and the wall.
Laying options
You can lay laminate on plywood in several ways, one of which is herringbone. This is the most complex technique, and if you cover an apartment with one canvas without thresholds, this is a master of his craft. The connection of the panels can be different, it all depends on the type of lock. It will be ideal if you have a minimum of waste.
Process Features
It should be taken into account that laminate is a “floating covering”, which is based on fastening. Laminate cannot be glued to the floor, and it is held together by the adhesion of the elements to each other. Fastening and laying of plywood should take place in a well-heated room in which the humidity level does not exceed the norm. Otherwise, the coating will begin to rot and will need to be redone in the near future.
When laying flooring in the kitchen, professionals recommend sealing the seams. This is explained by the fact that the kitchen is the place where something is most often spilled, and laminate flooring is known to be afraid of water. At high humidity levels it may swell. If the installation was carried out as a monolith, to replace one component you will have to disassemble the entire structure. For this reason, a sealant will be the best option and should definitely be used. Also, be careful when using the floor in the future. Do not overuse water, and carry out wet cleaning with all care, so that there is no water on the floor.
Deadlines
Typically, laying laminate flooring takes approximately 5-6 days. Most of the time will be spent on preparation before installation; a day will be spent on creating and drying the screed. So, in a week you can definitely lay laminate flooring.
Actions at the end
Once everything is ready, remember the wedges and remove them. After this, all that remains is to install the baseboards. Places of cuts can be made invisible if you use plugs. And yes, think about carrying out all communications in advance, and if necessary, cut special holes.
How to calculate laminate before purchasing
Before laying laminate slats on a pre-prepared wooden flooring base, you need to purchase the material. In order not to make a mistake in quantity, the material is subject to precise preliminary calculation. This operation is performed in several ways:
- Exact calculation, provided that the room has the shape of a regular rectangle, and the laminate is laid in the longitudinal or transverse direction.
In such situations, the length of the room is determined, which is divided by the longitudinal dimension of each lamella, after which the fractional remainder is calculated.
This operation is repeated for the transverse direction of the room, the dimensions of which are divided by the width of the product to find out the number of rows.
- The above algorithm is quite complex, and each consumer can easily make a mistake in the calculations. Experts recommend using a simpler empirical relationship - provided the laminate is laid out straight, the area of the room is calculated, after which 10% is added to this value for scraps. The risk of making a mistake in such situations is minimal.
- In cases where the laminate is laid out diagonally, at an angle to the orthogonal projection of 30, 45 or 60 degrees, in such situations the margin should be greater - up to 20%.
- If the slats are installed on the floor, according to a previously developed project, with an exclusive pattern, then the amount of laminate should be within 30%, which indicates a large number of trims.
It should be noted that the above dependencies are relevant for residential and public premises with a standard area of up to 30 - 40 m2. In the case of laying laminate flooring in extended spaces - halls, corridors of hospitals or schools, the area of which can exceed 100 m2, it is recommended to take a smaller margin - from 5% to 15%.
Stage 2. Calculation of the amount of materials
The amount of materials needed will depend on the condition of the subfloor and the layout of the flooring.
To prepare the base you may need:
- logs and boards. They will come in handy if the subfloor has to be made from scratch. Typically, beams of 100x100 mm or 50x100 mm are used for logs. Depending on this, the frequency of laying the lags is selected. The distance can vary from 30 to 70 cm (it is usually tied to the length of the floorboard). When counting the number of boards, you need to proceed from their width, length and shape of the room. Also, do not forget about the margin for trimming (about 5%) and fastening materials (screws, etc.);
- leveling materials. This could be plywood, chipboard, OSB, self-leveling mixtures, etc. The amount of materials will depend not only on the area and shape of the room, but also on the degree of curvature of the base and its condition;
- putty. For sealing cracks and small floor defects;
- primer and protective compounds (antifungal, water-repellent, etc.). Consumption per square meter may vary from manufacturer to manufacturer; it is usually indicated on the packaging.
Additional tools may also be required when working:
- plane or scraper;
- Bulgarian;
- sander;
- hacksaw;
- screwdriver;
- hammer;
- drill;
- measuring tape and pencil;
- level;
- brushes and brushes for applying mixtures;
- spatulas.
The list of tools may vary depending on the type of work required.
In order to calculate the required number of dies, you need to calculate the area of the room and add a percentage for trimming.
When directly laid, 5–10% of the total area will be waste (depending on the shape of the room). When installing diagonally, you need to add 10–20%.
As for the substrate, such a large supply is not needed. Usually no more than 3–5% goes to waste.
Methods for laying laminate
There are several ways to lay laminate flooring, each of which depends on the content of the design project:
- Direct scheme. The simplest way to arrange lamellas is that each subsequent rad is arranged strictly coaxially with the previous one, with a shift of ½ the length of the lamellas. Thus, it looks like a chain ligation of the joints between the elements.
- Diagonal scheme. The laminate is laid out from one corner of the room, diagonally, towards the opposite corner. The chain pattern for ligating joints, in this case, completely repeats the standard row layout with the difference that the entire mounting plane is rotated at a certain angle (most often, 30, 45 or 60 degrees) in relation to the orthogonal layout of the room.
- Arbitrary patterns. This layout scheme is determined by the planning design of the room. The most popular layout patterns are “herringbone”, “basket”, “checkerboard” and other, more complex patterns. It should be noted that such methods require a large amount of trimming of almost every third or fourth lamella.
When laying the floor, according to individual drawings, it is recommended to draw out the desired shape on the substrate in advance and start work from the central part of the complex structure in order to achieve symmetry.
Step-by-step instructions for laying laminate flooring
After preparing the base and installing the substrate for the laminate, the master begins laying out the lamellas themselves. This work does not require special training and can be easily done with your own hands, provided you follow a certain technological map:
- Damper tape is glued around the perimeter of the room.
- The first row is laid out in such a way that a constant gap of 10 - 15 mm is maintained from the entire plane of the wall.
- Each subsequent lamella is joined to the previous one using the tongue-and-groove method.
- To fix the laminate elements into a lock, a plastic template and a wooden hammer are used.
- When installing the second, third and subsequent rows, the “lock” pairing is carried out immediately along 2 contact planes - longitudinal and end.
- The outer lamellas in each row must be cut in place, according to the previously taken dimensions and markings applied to each plank.
- The last row, with a high degree of probability, will also have to be cut along the length of each lamella, for which it is recommended to use a workbench with a bench and a powerful circular saw.
- To install the last row, use a second template, which is sold in every hardware store. This metal element looks like a bracket with several bends. When fixing the elements, the floor, the part is applied to the edge of the lamella, after which the master carefully hits the protrusion with hammers, and the lamella goes into the groove.
Immediately after installing the laminate, it is recommended to check the position of the horizontal plane with a level and, if unevenness or loose joints are detected, immediately eliminate these defects.
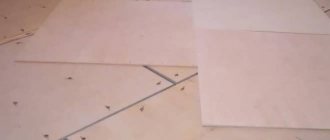
Cutting and fitting plywood
Plywood is cut according to the floor area. It is necessary to take into account that when laying from the wall, an indent of 10 mm and the gap between the seams is 2-3 mm. Having cut the sheets into squares of the required size, you need to check their edges for delamination at the ends and the presence of other defects. If the edge is damaged, the workpiece should be replaced.
The plywood is laid in a checkerboard pattern. The sheets are drilled to the base with self-tapping screws along the perimeter and additionally along the surface in increments of about 20 cm. For quick and convenient installation , it is recommended to number the sheets and also mark the fastening points with self-tapping screws.
After fitting, the blanks are removed, the base is cleaned of dirt and dust. Before laying, the prepared sheets should be impregnated with an antiseptic in order to increase their service life. Then you can begin installation.
Possible errors and ways to eliminate them
When installing a laminate floor on a wooden base with your own hands, beginners can easily make many gross mistakes that lead to increased costs and other negative consequences. To avoid this, experts and professionals often share useful recommendations with Internet users:
- Installation of laminate flooring on a damp base. The development of mold and rotting of wooden materials is possible. To avoid this, before starting installation, it is recommended to dry the base for several days using heat guns in a ventilated area. The moisture content of the material should not exceed 12%.
- Poor preparation of wood flooring. Any defects, unevenness, large gaps, as well as physical wear and tear of the old floor will undoubtedly affect the quality of the new laminate and the comfort of its use. Before laying, it is necessary to carefully inspect the old floor over the entire area, and then eliminate any identified defect.
- Poor quality substrate. Polymer or cork elastic material greatly increases comfort when using a new laminate floor. If you choose low-quality materials, over time, sagging and depressions will appear on the floor surface, the lamellas will begin to delaminate, and a characteristic creaking will be created when walking.
- Lay out the laminate before installation. It should be taken into account that preliminary marking and cutting of lamellas can lead to significant inconsistencies between elements during installation. Each plank should be tried on in place, when, after laying out all the previous slats in a row, the master will be able to accurately determine the distance from the penultimate element to the wall.
- Unreliable joining of lamellas. Each lamella should fit into the groove of the previous one with a characteristic click. Modern materials are distinguished by high-precision edges, which eliminates the formation of even a millimeter gap after joining. Thus, during the layout, the master can easily control the quality of the mating of the boards with each other.
- Lack of control over the result as you lay it. In the process of laying out and fixing the lamellas, the master may make minor mistakes. If defects are eliminated promptly, at each stage of installation, the owner of the premises is guaranteed a high-quality result. If minor defects are not paid attention to, the error can accumulate, which, when laying out the last row, will lead to significant inconsistencies that will be noticeable to the naked eye.
The expected result is achieved only in cases where the home craftsman strictly follows the technological maps, uses high-quality materials, and also takes into account all the recommendations of specialists.
In general, if laid out correctly, the finished floor covering should be used for at least the period stated by the manufacturer. Thus, these durability requirements are always projected onto a wooden base.
TOP 3 laminate manufacturers
| Photo | Name | Rating | Price | |
| #1 | Kronotex | ⭐ 99 / 100 | More details | |
| #2 | Pergo | ⭐ 98 / 100 | More details | |
| #3 | Tarkett | ⭐ 97 / 100 | More details |
Tarkett
The Tarkett company produces various floor coverings: laminate, parquet boards and linoleum. During the existence of the company, it has taken a leading position and entered the top five world leaders in the production of floor coverings.
Tarkett
pros
- A wide range of.
- High strength and reliability of layer connections.
- Long service life.
- Reliable and simple lock.
- Easy to install and operate.
- Affordable price.
Minuses
- Should not be used in places with high humidity.
- Low sound and heat insulation.
Tarkett laminate
Pergo
Today, the products of the Swedish company are in demand in different countries of the world, and the technological chain at Pergo factories is so improved that the laminate is of the highest quality.
Pergo
pros
- High quality.
- Excellent strength indicators.
- Long service life.
- Stylish design.
- Easy to use and maintain.
- Environmentally friendly.
Minuses
Not detected.
laminate Pergo
Kronotex
The German company Kronotex has been producing floor coverings for more than 20 years. The products are of excellent quality, as they are produced using special technology. In the panel production process, exclusively natural raw materials are used, including all impregnations.
Kronotex
pros
- easy installation;
- simple and reliable locks;
- high quality;
- wide range of shades;
- affordable price.
Minuses
- not detected.
Kronotex laminate