In an apartment or private house/cottage, parquet boards are often used as flooring. The aesthetic characteristics and service life of such a coating directly depend on compliance with the installation technology and the correct choice of materials. The parquet board is laid on plywood, which serves as a rough substrate. A multi-layer wooden base is used to level the working surface, reduce the level of noise created when walking, and serve as protection against moisture.
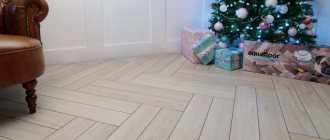
Laying parquet on joists and plywood
So, the first method is laying on logs. To begin with, if necessary, insulate the floor and carry out all the necessary communications, and then get to work on the logs. Before work, do not forget to thoroughly treat the joist boards with an antiseptic composition and dry them. Immediately prepare the following tools and materials:
- self-tapping screws;
- dowels;
- screws;
- special glue;
- plywood sheets;
- building level;
- hammer;
- wedges and plane.
Article on the topic: Eurofence - production and installation features, sizes and prices
Now, starting from the edge of the wall, install the joists on the self-tapping screws. Do not forget to periodically check the evenness using a level, and every half a meter additionally fix the coating with screws and dowels. If unevenness is found, it is recommended to level them using a plane and blades.
The structure of the parquet board.
Once the floor is covered with wooden joists, you can begin attaching the plywood. It will be laid in two layers. The first layer is attached to the joists with screws, and the second is placed on top of the first using glue. This two-layer option will ensure the durability of the floor.
After about two days, when the glue has set well, you can lay the parquet board on top in the usual way - first on the glue, and then on the screws. After this, use a sanding machine to sand the board, then remove debris and dust with a rag.
The final step in laying parquet boards on plywood is its varnishing. You can apply one or several layers of wood varnish, depending on the quality of the surface.
How is surface puttying performed?
The wooden surface is leveled in the same way as other materials, the technology is no different.
At the first stage, the following are aligned:
- seams;
- cracks;
- unevenness.
The work is carried out with a rubber spatula. After applying the composition, you need to wait and let it dry. Then the treated areas are cleaned with sandpaper and dust is removed from the surface.
Only moisture-resistant plywood sheets can be puttied.
Parquet restoration (repair and restoration)
In principle, at this point, installing parquet on your own can be considered complete. But I would like to shed some light on such a property of parquet as its high maintainability. It lies in the fact that parquet, after a certain service life, can be restored, i.e. restore its original appearance. Parquet restoration can also be done independently, without the involvement of specialists.
Parquet repair - sequence:
removing the top layer of varnish;
assessment of the condition of the parquet floor. To do this, each die or board is inspected for the appearance of serious defects and damage (potholes or rot, gaps, creaks, etc.). If the floor is in perfect condition, then its repair will not take much time, because you only need to update the varnish coating.
eliminating defects. If there are potholes, they can be removed by applying putty; the dies with dust must be replaced. And to eliminate the creaking of parquet, it is enough to nail the die to the base, and recess the head of the nail into the wood. Often parquet becomes unusable in certain places. Where it bears the greatest variable load, then you need to partially dismantle the planks in this place and replace them with new ones;
polishing the parquet surface;
applying varnish.
After this, the restored parquet will delight you with its fresh appearance for a long time.
Parquet care
You can extend the life of a parquet floor if you provide it with proper care. To do this you need:
carry out wet cleaning instead of traditional floor washing. This will prevent water from flowing into the cracks and drying them out;
Do not scrub the surface with abrasive compounds. This will cause whitish spots to appear on the varnish;
do not use aggressive detergents that can damage the varnish coating on the parquet;
maintain a normal constant temperature in the room;
protect parquet from mechanical damage that can be caused by moving furniture, falling objects, or stiletto heels;
apply an additional protective coating to the varnish (various types of polishes containing wax).
Conclusion
As you can see, laying parquet with your own hands is not such a difficult task. Using these instructions and fulfilling all the necessary installation requirements will allow you to obtain high-quality and beautiful parquet flooring.
Laying features
To prevent illiterate installation from leading to damage to building materials, it is recommended to carefully understand the nuances of installation technology and only then begin work. Parquet board is a complex coating consisting of at least 4 layers. Therefore, it is not afraid of dampness and tolerates wet cleaning well.
Board structure
The top layer of such a coating is made of natural veneer, and it is the value of the wood from which it is made that affects the cost of the parquet board. This layer is coated with special oils or varnish to increase service life and improve performance characteristics. The bottom layer is also made from wood treated with moisture-repellent agents, but less valuable coniferous species are used for this.
What is the difference between the technology of laying parquet boards and installing parquet?
Parquet board is a multi-layer coating of several types of wood, coated with a protective composition (varnish, oil or wax). And parquet is a solid mass, actually a semi-finished product, which needs to be mounted, leveled using scraping and grinding machines, and protected with a layer of varnish or oil-wax compositions.
The design of flooring materials imposes certain rules during installation. Parquet flooring is most often installed using adhesive compounds, and the technology of laying parquet boards with glue is rarely used. This is due to the fact that most manufacturers have already switched to producing planks with Click or Click2Click type locking connections. This significantly speeds up the installation process and facilitates dismantling.
The technology for laying parquet boards on plywood is identical to installing flooring on a screed. The base is covered with a substrate, then the lamellas are assembled, taking into account compensation gaps.
When installing parquet boards using the adhesive method, the adhesive composition differs: for concrete - on a water-dispersion or synthetic base, for wooden surfaces - on a solvent base or reactive polyurethane with a hardener.
Parquet, unlike boards, is glued only to plywood or other sheet material made from wood waste (chipboard, OSB, DSP). All three types of adhesives are used.
In conclusion, I would like to note that any technology for laying flooring will pay off if you follow all the recommendations in the work, carefully double-check for possible errors or shortcomings and, of course, use only high-quality and safe building materials.
Video - stages of work on laying parquet:
Laying waterproofing
A waterproofing layer should be laid on top of the prepared concrete base under the plywood. PVC film used for greenhouses is optimal for these purposes.
The layers are laid with an overlap of 10 cm, after which they are secured with wide tape. This stage of work will not pose any problems even for a person not versed in the details of construction.
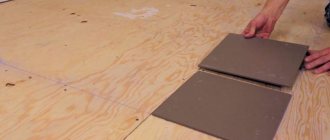
Cutting and fitting plywood for the base
Before final laying of plywood on a concrete base, it must be marked, cut and placed over the entire area of the room. To make it more convenient to handle the plywood sheet, it should be cut into small squares measuring approximately from 100x100 to 120x120 cm.
The fabric is laid with the seams offset by approximately half their size
It is important to always remember about the technological gaps between the sheets (2-3 mm) and the distances from the wall (10-12 mm)
Such gaps are needed so that when expanding under the influence of changes in temperature or humidity levels, the plywood has room to expand. If the indentations are neglected, the rough coating will begin to swell, thereby spoiling the appearance of the parquet. You can safely leave larger gaps near the walls - they will still be hidden under the baseboards.
Preliminary preparation of the base
At the first stage, you need to check the quality of the concrete screed. If it is covered with cracks, chips or nicks, or has deviations in levels, then these defects must be eliminated.
The most convenient way to level the screed is to fill it with liquid floors - they dry quickly and fill the cracks well. In addition, such materials do not require special skills to work - even a beginner can handle it.
If, after leveling the floor, the level difference in different places in the room does not exceed 3 mm, it means that the screed preparation was carried out correctly.
Which material to choose
Due to its advantages, plywood has become a very popular material, both in construction and in the industrial sector. The base is made of natural veneer and a number of binding components give it reliability, strength, and resistance to high humidity.
When choosing plywood for parquet, you should pay attention to the following indicators:
Thickness of the canvas. The minimum thickness of plywood for parquet is 10 mm.
Plywood size. Manufacturers produce several standard sheet sizes. However, to make it more convenient to work with the material, it is recommended to cut it into small squares
When laying, it is important to maintain 2-3 mm gaps between seams and a 10 mm distance from the wall.
Moisture resistance of the material. You can find several brands of plywood on sale: FK, FBV, FBS, FOF, FSF.
FC is a type of plywood that has a high level of moisture resistance and is environmentally friendly. To join veneer, glue based on urea resins is used.
FSF is a moisture-resistant plywood based on veneer and binding elements containing formaldehyde. It is quite toxic to humans, so it is used mainly for outdoor use.
FBV, FBS are varieties of plywood in which the veneer is joined using bakelite glue. Such materials have a higher cost because they are more durable compared to FSF. Therefore, they are most often used in the machine and shipbuilding industries.
FOF is laminated plywood containing, in addition to veneer, layers of cardboard. It is impregnated with a special compound that protects against moisture and is insulated with a layer of film soldered into the base of the plywood.
In our opinion, FK plywood is optimal for installation in residential premises. It does not emit toxic fumes and is safe for both adults and children. In addition, such plywood is not afraid of moisture.
Classification and selection of plywood substrate
To create a base for parquet, plywood of different brands is used. The material is selected depending on the type of room and the degree of humidity, so the features and characteristics of each brand are taken into account:
- FC - moisture resistant sheets. The connecting composition is urea glue made on the basis of urea-formaldehyde and melamine-formaldehyde resins. The FC brand is the most environmentally friendly and safe, due to which it is used in residential premises: living room, bedroom, children's room.
- FSF - analogues of increased moisture resistance. A phenol-formaldehyde adhesive composition is used to glue several layers of veneer.
- FBA is a non-waterproof plywood. The veneer layers are joined using albumin casein glue.
- FBS, FBV are moisture-resistant bakelite analogues; their adhesive composition is similar to FSF, but the cost is much more expensive than other brands. Due to their low environmental friendliness, these brands are not used for subfloors and are only suitable for outdoor use.
To create a substrate in residential premises, moisture-resistant brands FK and FSF are used. Plywood is also classified according to other parameters:
- Sheet thickness. The rough base is created from plywood boards with a thickness of at least 10 mm. When installing on joists, it is preferable to use a multi-layer board from 20 mm.
- The number of veneer layers (the more there are, the stronger the sheet). The optimal amount is from 7 to 13 layers.
- Varieties - only 4 varieties differ. Grades III and IV are suitable for creating an invisible substrate. If daily use is envisaged, as a result of which the load on the floor increases, then it is better to use plywood of higher quality, but not lower than grade III.
- Wood species: spruce, pine, birch are used. Coniferous species are less susceptible to rot and disease, and are cheaper in cost. Birch analogues are heavier, but the top layer lends itself well to mechanical processing (grinding).
Types of plywood
Only the correct choice of material guarantees sufficient strength of the subfloor and eliminates deformation (bending) of the parquet board. Strict requirements are not imposed on the size of multilayer slabs; the main thing is that they correspond to the area of a particular room and are convenient to work with. The usual square format is available in several sizes - 1220x1220, 1270x1270, 1475x1475 and 1525x1525 mm, rectangular - 1525x1475 (1350/1270/1220) mm. The largest sizes reach 3050 mm in length and 1525 mm in width. It is advisable to cut this format into squares of 750x750, 1000x1000 mm, which are convenient to work with.
Subfloor laying technology
There are several ways to lay plywood under a parquet board - on joists, concrete screed or underfloor heating. Technologies have their own characteristics, so it is worth considering each separately. A video is provided to help beginners, be sure to watch:
Installation on joists
This method of laying parquet on plywood is suitable for wooden or concrete floors. To prevent moisture from entering the substrate, it is necessary to use a vapor barrier, which is spread on the prepared base. At the next stage, the logs are installed, which are set using a building level. This technology requires the use of a durable and reliable substrate.
Installation of plywood backing on beams
The thickness of plywood boards depends on the distance between the logs. The higher this indicator, the greater the thickness of the plywood for parquet should be (the minimum parameters are 20 mm). Thick slabs will not bend under the weight of people, squeaking and deformation are eliminated. If you plan to use sound and heat insulation, then the thickness of the thermal insulation layer depends on the height of the wooden frame
It is very important to correctly measure the dimensions of plywood boards, since their edges must be attached directly to the wooden frame. Square or rectangular slabs are laid in two layers with an offset - in a “checkerboard” order
On a concrete screed
Installation of plywood boards on a concrete screed is carried out in strict compliance with certain conditions:
- The working surface must be perfectly flat and dry.
- The further appearance of moisture is completely eliminated. You can check for dryness using PVC film, which is spread on the base and left for 1-2 days. If after this time there are no traces of evaporation on the film, then you can safely begin installation work.
Installation of plywood on a concrete screed
The plywood is laid under the parquet board using an adhesive composition, followed by fastening with self-tapping screws, screws and dowels, while the glue must still be wet. The adhesive substance is applied using a spatula, brush or roller. Double fastening technology guarantees the reliability and strength of the rough base.
Installation of plywood underlay on a heated floor
If there is high humidity in the room, then you can get rid of this problem with the help of a heated floor, on top of which you can also lay plywood boards. This installation option eliminates deformation of the parquet board and creates comfort in the room. The method of fastening a plywood substrate is the same as for concrete: two types of fastening are used - an adhesive substance, self-tapping screws, screws and dowel-nails.
Preparatory work: tools and building materials
Before laying plywood under the parquet, you must first prepare the base:
- The working surface is cleaned from dust and dirt.
- Shortcomings and defects are eliminated - cracks and chips are repaired.
- Large differences are removed, the subfloor is brought to the same level (the difference should not exceed 3 mm).
In order for the plywood under the parquet to be laid correctly, you will need to stock up on the following building materials:
- Water-dispersed or acrylic adhesive compositions, with the help of which the plywood backing will be attached to the base.
- PVC film (for greenhouses), acting as a waterproofing layer.
- Thermal insulation, if there is a need to insulate the floor.
You will also need a specialized tool that is used at different stages of work:
- Medium power electric sander for sanding the surface of plywood substrate.
- Drill and attachment for preparing concrete and adhesive mixtures.
- Screwdriver for screwing in self-tapping screws.
- Hammer.
- Jigsaw for cutting plywood sheets.
- Construction or household vacuum cleaner.
- Building level.
- Tape measure up to 10 m, ruler and square.
- Mounting wedges.
- A scraper used to remove dirt.
- Hammer and spatula, including a serrated one.
- Roller or brushes of different diameters.
Concrete screed
If you decide to create a concrete screed, then after pouring you need to wait a few days. During this time, the base should dry out. The resulting base is primed and covered with an adhesive solution. Then plywood sheets are laid out on it.
To reduce stress, plywood is cut into squares (50-75 cm). They are laid out so that each row does not meet the previous one in the corners. A gap of 1 cm is left between the wall and the plywood. Between the squares - 3-4 mm.
Fix the plywood sheets with self-tapping screws. They are screwed in following special rules. The screw head is recessed into the plywood by 3 mm. After fixing all the squares, you need to wait a few days. The plywood will cure and return to its normal position. After this, you can install the parquet board.
Laying plywood on a screed
Features of plywood fastening
An important point is the correct fastening of the substrate to the screws. Fasteners must be recessed so that the caps do not protrude above the surface. To do this, the holes are pre-drilled, using a countersink in the upper part, the diameter is expanded (made larger), due to which the screw head is recessed by 1-2 mm. After the adhesive layer and the parquet board have dried (approximately 48 hours or more), the coating is sanded and a primer is applied.
To fix a sheet measuring 750x750 mm, you will need 10-12 pieces of fasteners. There must be a temperature gap - the slabs should not be closely connected to the wall or to each other, since expansion or contraction occurs as a result of temperature changes. Expansion joints should be in the range from 0.3 to 0.6 mm, the distance from the baseboard varies from 10 to 15 mm.
How to lay parquet on plywood - step-by-step diagram
Step 1: Marking the ground
It will look smooth on paper, but it makes more sense to lay the plywood directly on the floor in the form of ready-made square sheets - initially without fasteners. The size of the squares should be such that there are no interparquet seams on the lines of their joints. For example, if the tiles have a size of 15x15 cm, plywood sheets should be cut with a side of 70 cm. Sizes larger than 80 cm are not recommended to be used due to the possible “windage” of the sheets during fastening. The placement of plywood squares on the floor should imitate brickwork. The displacement can be either half the sheet or only 20-30% of its size. The main thing is to ensure that the seams from the longitudinal and transverse sheets do not converge at one point. Along the perimeter of the room, cut sheets are installed last.
Step 2: We can easily handle it with a jigsaw and deftly cut it with a hacksaw
Standard plywood sheets have sizes of 125x125 and 125x250 cm. Naturally, you want to cut them with minimal waste and maximum accuracy. To do this, it is best to use an electric jigsaw and a wide workbench - cutting 12 mm thick plywood into squares of 60 by 60 or 75 by 75 cm will take no more than half an hour. Sawing with ordinary hacksaws and saws will require a lot of effort and is unlikely to be done alone. Wide sheets will have to be held so that the hacksaw blade does not get pinched - for this you need to hire an assistant or special devices (spacers, wedges, clamps, etc.). Depending on the size of the room(s), one or more whole sheets are reserved for installation of cut plywood inserts around the perimeter.
Step 3: Preparation again
The leveled and dried cement-concrete base should be inspected again - after preliminary laying out the plywood, cracks, peeling of the mortar, potholes, etc. could have formed on it. They should be removed with a quick-drying sealant. The entire surface must be cleaned of debris and dust. It is best to perform final pre-laying treatment with a vacuum cleaner; it will be quick and effective.
An ordinary broom will also work, but you will have to wave it carefully (dust is unacceptable!). Under no circumstances should the broom be wetted when cleaning; installation of plywood sheets should be done on a dry surface. The final preparatory stage is priming
In fact, this is an analogue of priming ceilings, only it is done on the floor. Glue for plywood - it is often identical to the adhesive composition for parquet - is diluted several times and the entire surface is coated with a wide brush. Thanks to priming, dust and small debris are once again removed from the floor, and the adhesive mass penetrates into the cement base for reliable installation of plywood sheets
The final preparatory stage is priming. In fact, this is an analogue of priming ceilings, only it is done on the floor. Glue for plywood - it is often identical to the adhesive composition for parquet - is diluted several times and the entire surface is coated with a wide brush. Thanks to priming, dust and small debris are once again removed from the floor, and the adhesive mass penetrates into the cement base for reliable installation of plywood sheets.
Step 4: Attaching the Plywood to the Floors
Pre-cut sheets are mounted on adhesive mastic. It is convenient to apply the glue to the floor, and not to the underside of the plywood, using a notched trowel. The fasteners are supplemented with self-tapping screws, screwed in in increments of 15-20 cm. For plywood squares with a side of 60-75 cm, 4 screws along each side and 4-5 in the central area are sufficient
It is very important to achieve complete “recession” of the screw heads; even a minimal protrusion will interfere with the installation of the parquet itself. And the metal notch will obviously not help with subsequent grinding. Therefore, it is necessary not only to drill out the plywood sheet for the self-tapping screw, but also to accurately countersink the hole with a larger drill bit
Each screw is checked for sufficient depth (at least 2 mm from the base)
Therefore, it is necessary not only to drill out the plywood sheet for the self-tapping screw, but also to accurately countersink the hole with a larger drill bit. Each screw that is screwed in is checked for sufficient depth (at least 2 mm from the base).
Laying plywood under parquet in the corners of the room is done by cutting the sheets in place, leaving a gap of 10-15 mm between the wall and the floor. For processing use a grinder and sandpaper with a grain size of 1-2 mm.
When sanding, pay special attention to the joints of the sheets. After cleaning the sanding results, you can begin installing the parquet on a new base - dry, strong and reliable.
- 5
- 4
- 3
- 2
- 1
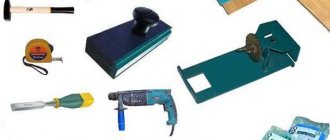
Tools for work
Let's touch on the topic of the instrument. To carry out the work properly, you will need various types of tools.
Here are examples of some basic tools:
- medium power electric sander for sanding plywood;
- drill with a nozzle for mixing mixtures;
- screwdriver;
- hammer drill with drills of suitable diameter;
- jigsaw for cutting;
- vacuum cleaner;
- hand hammer, spatula, several brushes, roller, beating cord;
- square, ruler up to 1m, tape measure up to 10m;
- scraper for removing dirt, mounting wedges.
The glue can be applied with a brush, spatula or, if the base is uneven, with a notched trowel with a minimum comb
Parquet laying
After laying the plywood under the parquet board is completed, you can proceed to the installation of the parquet itself. Flooring can be laid in two ways:
- adhesive;
- floating.
The first technology for laying parquet boards on plywood involves the use of a special adhesive that holds the individual parquet strips together. Floating installation follows the principle of laminate flooring with interlocking joints.
Floating installation
There are several methods for laying parquet. We will look at laying parquet boards using the deck method. When using a floating option, you must ensure that the parquet has Lock or 5G locks. It's best to start in the far left corner. If the room needs to be expanded, then laying is done across, but also from the left corner. All planks have special grooves into which the lock fits. But the first row does not require them, so they need to be cut off. It is necessary to measure the distance. If at the end you get more than half of the plank, then it makes sense to trim the first one so that they lie evenly. A gap of 5 mm should be made from the wall. To do this, you will need special wedges that will prevent the parquet board from moving. The locks listed above can be joined both lengthwise and crosswise. If you use a Click lock, then you will need to assemble the whole strip and then join it along the long edge.
Note! The rows must be laid with offset seams. This will make it possible to avoid swelling of the flooring, as well as its pressing at certain points
The last row of hardwood flooring may require trimming. To do this, measurements are made of how necessary it is to do this. The last row is assembled along its entire length. After this, it is inserted into the gap between the common flooring and the wall. At the same time, do not forget about the 5 mm thermal seam. For better fixation, the last row must be pressed with a special metal plate. If a pipe is encountered during installation, then it is necessary to make a cut in the strip or cut it completely to go around the obstacle. The smaller part must be placed on glue so that it does not fly off over time.
Note! When laying floating parquet boards, it is necessary to use a polyethylene or cork backing
Adhesive
Adhesive laying of parquet boards is more reliable, but requires special attention and caution. This is due to the fact that after gluing the parquet board it will not be possible to correct defects in its position
The principle of laying parquet boards remains the same as in the previous case, but there are some nuances. The first row of parquet boards is laid out with the same pattern as planned. After this, the glue is applied to the plywood and spread with a notched trowel. It must be applied as much as needed for one parquet board. The element is placed in its place in the corner, observing all the gaps. The glue is applied under the second plank of the parquet board, and it is tapped into the end of the first. This is how the first row is assembled. It is worth remembering that the glue has a certain drying time, so you can’t hesitate.
After the first row of parquet boards has been assembled, it must be secured to the floor. This can be done using nails or screws that are driven into the bottom of the lock at an angle of 45 degrees. Instead of nails for parquet flooring, you can use a weight that will fix the planks in place until they set. The last row of parquet boards is assembled in the same way as in the previous case. A video about laying parquet boards with glue is given below.
Advantages and disadvantages of a log foundation
Concrete screed as a base for flooring began to be used not so long ago, but before - several decades ago - this method was not even seriously discussed. At the same time, plywood was also not used under parquet boards; however, there was no such material as parquet boards.
The basis of any floor in those days was heavy structures made of logs, but one should not assume that now such a foundation has completely lost its relevance.
Let's look at some of the differences between a concrete screed and a frame made of logs as a base for the floor:
- Leveling the concrete base . If a frame of joists is laid on top of concrete, then there is no need to level such a base. But if plywood is laid on a screed under parquet, it is imperative to level the surface (for more details: “How to make a screed under parquet or parquet boards: a step-by-step guide”).
- Application of wooden beams . Previously, the floor was laid only on a wooden frame made of timber. Nowadays, the technology of laying parquet boards on plywood does not require the installation of such a frame.
- Waterproofing layer . Such a layer is always made on top of the concrete screed, but is not necessary for laying on logs. The exception is those cases when insulation, say, mineral wool, is placed in the cells between the joists. At the same time, plywood under parquet boards also needs to be protected with a layer of waterproofing.
- Insulation . A layer of insulation is laid in cases where an additional layer is required in apartments with cold floors or a damp basement below. In addition, insulation will be necessary if the floor is plywood - parquet on such a basis can deteriorate due to its deformation due to excess moisture. However, in the latter case, a thin roll of insulation is sufficient, which is quite inexpensive.
It is worth noting that the timber structure raises the floor height by 11 centimeters or more. However, if previously an expensive floor board was used to cover the frame, now it is successfully replaced by such a budget material as plywood.
It is also good as a rough base for linoleum or laminate. It is also possible to lay parquet on plywood - the technology of which will be described in additional materials.
Thus, we can conclude that a concrete screed, preserved in good condition, allows you to get rid of the joist frame and lay the floor directly on top of it on a layer of waterproofing.
If the concrete is already fairly worn out, but the joists remain strong and even, then it is quite possible to lay plywood on them under the parquet board, not forgetting about the insulation.
Laying parquet board technology
When you decide to install a parquet floor yourself, having the time and desire to do so, and also trying to save half the money that would be spent purchasing materials plus the cost of a construction team, you can safely draw up a consistent plan for what you will need to do in this direction.
Here he is:
- Think: are you ready to learn and take responsibility for your actions?
- Decide how you will lay the parquet board.
- Calculate your strength and time.
- Calculate and purchase materials.
- Proceed with installation, having previously studied the technology of work
So, there are works that are carried out before installation: leveling the floor and so on, but you can read about their features in other articles on our portal - for example, here we describe in detail exactly the leveling of the base.
We will consider the details of the types of installation that interest us.
Technology for laying parquet boards on a screed: subtleties and nuances
First, watch the video.
Here is a brief retelling of it and additional tips:
- After purchasing a parquet board, read the instructions - this will further structure the knowledge you have acquired.
- Make a one-level smooth screed. Dry or wet - your choice.
- Place the insulation layer on the cleaned screed. More often they use a film made of polyethylene with a thickness of 200 microns, or special water vapor barrier films.
- Distribute it so that the overlaps are approximately 20 cm from one strip to another. Wrap them onto the walls by 5-10 cm.
- Lay a thermal insulation layer. There is a wide choice of materials, it’s up to you to decide. Modern materials often have heat and sound insulation functions at the same time.
- Next is the actual installation of the board. They begin to lay along a longer wall that does not have doorways.
- Be mindful of wedges between the walls and the decking.
- Lay subsequent boards to the previous ones with the lock side and an angle of 20 degrees, pressing forward and down. Help yourself in this process with a rubber mallet.
- If there are protrusions, stationary elements of the heating system, cut out the corresponding gaps in the boards with a jigsaw, a wood saw, or a hacksaw with fine teeth, but add the necessary indentation, like from a wall.
- After installation is complete, assemble the wedges and cut off the protruding strip of the waterproofing layer.
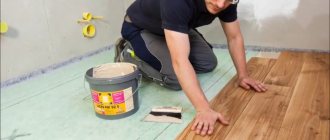
A man puts a parquet board on a screed
The technology of laying parquet boards on a screed is special in that:
- This is a quick installation method, the main thing is to understand how it is done;
- For proper installation, a springboard is required: a dried and cleaned base;
- provided that dampness may occur, the floor is covered with a moisture-proof material that performs hydro and thermal insulation functions, up to 5 mm thick, there can be one or two of them, depending on the functionality;
- with the locking version of the floating installation, the end lock is attached first, then in the same way;
- In order to avoid even the slightest cracks, each plank is tapped and a load is placed at the joints.
Laying parquet boards with glue: technology
We study the instructions:
- Prepare a working arsenal.
- This type of installation is used for large areas. We fix the floor moisture-resistant plywood, creating 5 mm gaps between them.
- Sand and prime it.
- Next, everything follows the principle of the previous method, only here parquet glue is applied to the plywood (read: which one to choose?).
- When installing the board, be careful not to contrast the color and tone of the individual joists.
Laying parquet boards with glue includes installation features:
- the tongues being connected are directed towards the previous board;
- A small area of the base should be covered with glue;
- glue is applied exclusively to the ends, excess is removed with old fabrics quickly and carefully;
- gluing will not happen in a second, it is better to fix the glued materials, for example, with additional strips;
- not only the ends are glued, but also the length;
- the last row is not laid until you calculate the proportionality of the length of the planks and the distance to the walls (the material of the last row is finished off and trimmed);
- acclimatization of the boards should occur over several days before gluing, so that their shape does not deteriorate;
- parts of the covering are tapped with a special hammer, which prevents damage or deformation of the surface of the material; a weight is also used for the floor covering.
Installation with glue shown
In order for the beauty of your flooring to last, you need the goal and desire to do so, as well as the knowledge in the field of installing hardwood flooring, which we shared with you in this article. Create!
a brief description of
Solid wood consists of long planks made of solid wood of valuable species: oak, beech, larch, cherry, walnut. Large manufacturers use especially hard and exotic types - teak, bamboo, jatoba, zebrawood, merbau, etc. Sizes vary:
- Thickness of solid board (depending on the scope of application) – 9-26 mm;
- Product width – from 100 to 220 mm;
- Length – from 300 to 1500 mm.
Along the perimeter of the planks there is a tongue-and-groove lock (“tenon and groove”), which allows you to assemble the array into a single, monolithic covering. Special “grooves” are cut along the reverse side to compensate for internal stresses and prevent deformation.
The surface can be clean or factory-treated with oil, varnish or oil-wax. In the first case, after installation, a little additional sanding and a protective coating will be required (preferably based on fat-containing mixtures, since the varnish film can crack due to changes in temperature and humidity). In some collections, a chamfer is cut around the perimeter, and its depth for unprotected paint strips should be at least 2 mm.
If previously the shade of the floor covering depended on the type of wood, today this is not so important. Modern paints and varnishes make it possible to obtain more than 5,000 shades, from snow-white to deep black. Therefore, when choosing, it is better to pay attention to the hardness of the solid board, its resistance to atmospheric changes, etc.
When sorting solid floorboards, there are several categories:
- Radial and Select - the surface is uniform and monochromatic. There is a small amount of live (the color of the tree or a little darker) knots without cracks and dents, sapwood. There are no various defects. In accordance with GOST 2695-83, GOST 8486-86 and some others, this type of product belongs to grade 1.
- Natural or Classic - the wood has a characteristic pattern with transitions from one shade to another, there are knots, small resin pockets and sapwood. The surface turns out to be quite picturesque, which is greatly appreciated by many designers.
- Rustic or Markant, or Antique - this is exactly the type of solid floor board that is ideal for creating a country, loft and even ethnic style. It is characterized by variegation, a large number of knots (including black and cracked ones), sapwood, cracks, foreign inclusions, etc. The magnificent natural grain of the wood is virtually invisible, giving the finished floor a unique, charismatic look.
The name of each manufacturer may change, but the essence is the same - 1st, 2nd or 3rd grade, and, accordingly, the presence or absence of various defects. Of course, the price also depends on this parameter. Select array is a premium coating, so it will cost several times more than products from the Rustic series.
How to prepare a surface for installing parquet: screed
Preparing the base is an important stage in installing parquet. The surface under wooden boards must be perfectly clean, level with minimal humidity. If plywood under parquet is laid on a concrete base, the height differences of which do not significantly exceed the norm, it is worth considering the installation of a screed. To do this, it is enough to use a self-leveling solution.
An excellent solution in such cases is dry pouring using voidless systems.
When dealing with foundations with serious differences in height, a high-quality cement screed is used. To do this, before pouring the solution, beacons are installed along the entire length of the base, using a level for measurements. Based on the level of the beacons, the required height for cement pouring is determined.
Ready-made cement or concrete screeds require additional processing - using a grinding tool and a vacuum cleaner. The prepared surface is primed, treated with mastic most suitable for the type of screed, protecting it from moisture.
The correct technology for laying parquet on a screed involves the use of calibrated, moisture-resistant material with a thickness of 10 to 12 cm. For convenience, a sheet with parameters 150x150 cm is cut into squares. The material is laid at a temperature not lower than +10 degrees with ventilation gaps from 5 to 15 mm. Joints and irregularities are carefully sanded.
Features of working with parquet
- When purchasing this type of coating, you should give preference to a material with high quality and good characteristics, despite the fact that the material will be more expensive, during operation it pays off its cost by 100%.
- The entire technological process of coating such bases will take place in several stages.
- Before starting the installation process, there is a need to decide on the type of coating.
- Any type of installation involves various kinds of preparatory work. And they require skills with such decorative elements as rosettes and borders.
- An important factor is the thermal regime during laying, at least 18 ° C.
- You should know that in dry rooms it is advisable to use air humidifiers to prevent the board from drying out.
There are several types of laying parquet and parquet boards: herringbone, straight laying, double, single, diagonal, scattered.
Also read materials:
Features of parquet boards
Before laying a parquet board, you need to familiarize yourself with the features of this material and its main varieties.
Block parquet is the most popular among owners because it comes in a wide variety of planks made from strong wood. Such boards are connected using locking joints: a tenon in a groove or a ridge system.
The length of such boards usually does not exceed 50 centimeters, and the width varies from 1.5 to 2.2 centimeters. This type of material can be laid in various ways. There are options for laying out boards in the form of squares, herringbones, etc.
One of the parquet options is solid planks. In essence, this is the same piece parquet, but with larger dimensions and special installation methods. The cost of such boards is much higher, since more wood is used for production than for standard products.
Types of installation
There are several types of laying parquet and parquet boards:
- "herringbone"
- straight laying,
- double,
- single,
- diagonal,
- “in a running start” (the most common),
- square.
The amount of material purchased depends on the choice of coating. In this matter, it would be better to consult with the manufacturer of the work or the seller of the product.
A plywood sheet is cut into several pieces of equal size
Mounting to subfloor and plywood
The third method of laying parquet on plywood is on the subfloor. The method is not bad, but not the highest quality either. Its use is advisable when time and materials are limited. Its essence is that the floor is not prepared in any way for plywood. To work, you only need to purchase glue and screws.
First, a thick layer of glue is applied to the floor, where sheets of plywood are then laid. Every 50 cm they are fixed with self-tapping screws, and their caps are recessed deeper using a light hammer. Upon completion, the parquet board is laid in the manner described above.
So, the main methods of laying parquet on plywood are discussed in as much detail as possible. Now it is much easier to figure out which method to choose. Don't forget to calculate materials to avoid surprises.
The best posts
- Children's fur slippers made of sheepskin: pattern and master class on sewing from old jeans
- Stylish DIY flower beds from scrap materials
- How to choose tulle with lambrequin for windows
- Handicraft box made from a salad bowl
- mustard color in interior design - how to use it correctly?
- What wallpaper to choose for a white kitchen
- Crochet neck clamp pattern: children's version with photos and videos
- Vintage in the interior - a legacy of bygone eras
Related article: How to choose curtains for a dining room in an apartment
Do-it-yourself technology for installing parquet boards on plywood
Laying parquet on a subfloor made of plywood sheets
Installation of the parquet board on the plywood base begins from the far left corner of the room. The slats are first laid out on the floor, a pattern is selected, and markings are applied. One of the important conditions is the preparation of the parquet. To avoid the formation of cracks, the flooring material must be kept in the room where it will be installed for at least 24 hours. The slats are easy to install according to the markings. Anyone can handle this kind of work: instructions are included, and the packaging indicates the type of connecting locks and dimensions.
Briefly about the main thing
Laying plywood over an old wood floor is a great way to quickly and inexpensively prepare the flooring for laying linoleum, laminate or parquet. The plywood floor creates a flat surface for laying the final floor covering. There are 2 main ways of how and what kind of plywood to lay on the floor: laying directly on the old covering and laying on joists. The choice of method primarily depends on the condition of the old floor covering. Regardless of the chosen method, when laying it is necessary to comply with technological requirements: leave damping gaps, arrange the sheets in a checkerboard pattern, use high-quality materials. If all requirements are met, flooring laid on a plywood subfloor will last for many years.
Types of plywood for parquet
When choosing suitable sheets from the product list, it is important to pay attention to the letters in the markings:
- FC – products of medium moisture resistance. The veneer layers are glued with compounds containing urea resins. This plywood is not recommended for rooms with medium and high humidity.
- FSF – sheets with increased moisture resistance, the veneer is glued with phenol-formaldehyde adhesives. Such products are indicated for arranging floors in external areas: terraces, verandas, that is, they are compatible with outdoor use and are allowed for installation in indoor areas with high humidity.
- FB is an expensive, but extremely moisture-resistant product. The letter “B” is a designation for impregnation with bakelite varnishes; all layers are impregnated, which guarantees durability and practicality for a very long time. FB plywood is superior in moisture resistance to any type of parquet and can be used as a base on a residual basis.
- FLC (analogues of FOF, FLB) - sheets with synthetic impregnation and additional protective film. Attractive appearance is combined with high quality indicators. This plywood sheet can be used both as a backing and as a separate original decor.
FSF and FK grades are suitable as a base for solid wood - this plywood for parquet has a reasonable cost, is repairable and can withstand changes in humidity and temperature well. When choosing between sheets made of coniferous and birch, it should be taken into account that coniferous products are lighter in weight and easier to install, but the birch analogue is more practical in scraping and sanding. All other things being equal, birch plywood is much better.
What should be the thickness of plywood under parquet boards? A 12 mm sheet is sufficient, and when leveling with a fresh screed, it is permissible to use sheets with a thickness of 8-10 mm. If scraping or polishing of products is necessary, it is wiser to use plywood sheets of grade III-IV. The products are cheaper than more expensive high-grade analogues, but by grinding and scraping the sheets are easy to bring to the marketable appearance of a high-quality base.
Technology of laying parquet on plywood
According to the nature of fixation, the technology for laying parquet on plywood differs by type:
- on glue;
- for nails, staples, screws;
- combined version using glue and self-tapping screws;
- floating method, used more often for parquet boards.
As for the floating method, it is indicated for boards with 5 G or Lock locks. In this case, the planks are equipped with grooves for the lock and laying out does not cause problems: a gap from the wall, then joining, fastening and finishing. Rows of deck floating masonry should be placed with staggered seams to prevent the deck from swelling.
Fastening with self-tapping screws
As a rule, hardware is used when laying plywood on joists. The logs can be bars 40 mm thick and 80-100 mm wide. The technology of laying parquet on plywood using self-tapping screws involves preliminary arrangement of the substrate to improve the soundproofing qualities of the coating.
- The “snake” figure is laid out so that the gaps between the base boards do not coincide with the end joints of the parquet rows. The screws are recessed into the end grooves, and if the seam coincides, the leg of the hardware will fall into the gap, reducing the strength of the parquet fastening.
- Parquet planks must be secured with hardware up to 40 mm long and 1.6-1.8 mm thick. Each strip up to 30 cm in length is equipped with 3 self-tapping screws: two in the side groove, one in the end groove. If the lamella is more than 30 cm in length, then 4 hardware are required: three in the side groove, one in the end groove.
The edges of the planks are trimmed with a hammer with a rubber head; it is better to install two people: one lays the parquet, the second picks up the dies, laying them out as you move. You can lay the covering in a similar way with regular and piece parquet up to the outer rows adjacent to the walls and friezes. The last row is attached with 1-2 self-tapping screws, depending on the line of the frieze.
It is permissible to use a combined method, which consists of pre-gluing the dies and then fixing them to hardware. The option is characterized by increased strength, but it will be impossible to locally repair or renew the coating - the entire base will have to be removed.
Glue mount
The common technology of adhesive installation of parquet is reliable, but requires increased caution. The glue dries quickly, it is not possible to change the position of the lamella or correct defects, so you should first check the layout, pattern and pattern, and only then lay the wooden floor
Now the first row of the array is laid out, then glue is applied to the plywood base (a notched trowel is required). You need enough glue for one lamella to stick properly. Lay the die, observing the gaps, then apply glue to the second lamella, mount and tuck the fragment under the end of the first die. If additional fastening with self-tapping screws is not intended, then a load must be placed on the glued dies.
Layout is carried out according to the same principle right up to the last row, which sometimes requires trimming. The procedure will be simplified by preliminary measuring the amount of trimming, and then you can assemble the last row, lubricate the slats with glue and install. Lay with a gap of 5 mm, press the dies.
How to lay parquet on a wooden base?
To lay parquet on a wooden floor, it is necessary to observe the temperature and humidity conditions in the room. The optimal temperature for laying natural wood is from +18 to +25 degrees with air humidity up to 60%.
An important point is the preparation of the rough foundation. The old wooden floor must be securely fastened to the base - this will relieve it from squeaking and prevent the appearance of gaps and differences. Dies requiring replacement or repair are removed from the coating sheet, installing new ones or correcting defects.
To achieve a perfectly smooth surface, rough grinding of the base surface using special parquet sanding equipment will help. Puttying and removing remaining gaps and joints will also allow you to achieve the required level of preparation of the base. The final part of the preparation is re-grinding the surface using special equipment.
Small set of electrical grinding equipment
If the rough wooden floor is so uneven that sanding and puttying cannot completely solve the problem, it makes sense to additionally use plywood sheets up to 12 mm thick for leveling. They are fastened with oxidized or galvanized self-tapping screws, recessing the caps by at least 3 mm before the grinding stage. A compensation gap of 5 mm must be left between the layers.
The finished plywood layer is also sanded using a special technique, leveling the joints. After treatment, the intermediate floor is cleaned and treated with soil mixtures to improve adhesive properties and protect against pests.
Laying plywood on a wooden floor
An old wooden floor is a big problem because it has a lot of unevenness. Laying plywood on a wooden floor under laminate is an easy way to smooth out all its small unevenness, however, if the variation in the height of the floorboards is large, then it is worth leveling it by trimming off the excess with an ax or removing it with an electric plane (more details: “How to level a wooden floor - methods and options” ).
Laying plywood under laminate on a wooden floor is quite simple:
- Additionally, secure the old boards with self-tapping screws.
- Nail the plywood sheets with nails or screw them with self-tapping screws.
If you have correctly secured the plywood sheets, then the old boards should not creak anywhere, and the plywood should not come off. At this point, leveling the wooden floor under the laminate is completed, and you can proceed to the next stage of work.
Putty and parquet
Is it necessary to specially putty plywood under parquet? The answer is always controversial. Some believe that wood does not like the moisture contained in such compositions. Putrefactive processes begin on its surface.
According to others, the use of a special putty, which is specifically designed for working with plywood, will not affect the properties of the material. The condition of the plywood will not deteriorate, and fungi and mold will not appear.
To prevent humidity from having a negative impact on wood veneer, it can be additionally treated with special moisture-proof solutions.
Base made of fixed plywood without putty
How to lay plywood
Plywood usually has a format of 1500 * 1500 mm, its thickness for the parquet substrate should not be less than 2/3 of the thickness of the die, it is recommended to use sheets of at least 12 mm thick.
How to put
The plywood base under the parquet is laid according to the bricklaying method, the seams of the previous row must be covered by a whole part of the plywood of the next row. There must be a technical gap of at least 5 mm between the sheets, which are filled with sealant. Along the perimeter it is also necessary to leave a distance from the walls to the substrate, a gap of 10-20 mm wide.
Wood is a living material, so it is necessary to leave a gap around the perimeter
There is a constant debate between professionals and craftsmen regarding the question: to saw or not to saw plywood for a substrate? Reviews from home craftsmen read: “Don’t cut! Talk about some kind of internal tension is empty, the sheet is already small, and even more so as a single piece, the shortcomings of the screed are better smoothed out, fewer seams – fewer problems!”
Experts fundamentally disagree with such arguments; firstly, no one has repealed the laws of physics, and secondly, it’s all about changing the humidity of the room. If there is suddenly dampness, and such a development of events cannot be ruled out, then smaller pieces of plywood will warp less, which means that deformation of the parquet can be avoided. Large sheets can curl up like a helicopter, and consider that all the work is in vain; you will have to re-lay the parquet.
Thus, whether or not to saw the plywood is up to you to decide, but to make the underlay for the parquet more reliable, cut the sheets into 4 parts.
What to attach to
Plywood is usually laid with a one-component adhesive, and also with dowel-nails for adhesive strength. The adhesive is applied with a notched trowel, the plywood is pressed tightly to the base, then drilled into dowels; if the fragments are cut, then 4 pieces are enough. in the corners, and 4 pcs. between them.
Advice: It is better to take screws No. 8, galvanized, immediately complete with a dowel. Hats should be recessed by 2-3 mm.
The rules for laying plywood are the same as for brickwork.
An important touch
No matter how smoothly and neatly the substrate is laid out, there will still be height differences at the joints. Be sure to go over the seams with a sander to get as even a surface as possible.
What to glue
Now there is a huge selection of adhesives on the market. The most inexpensive is dispersion glue, it hardens quite quickly, but it is better not to use it for exotic wood species, but it is ideal for solid oak.
Solvent-based adhesives are good for installing parquet yourself. It is also recommended to lay artistic parquet using this glue. The setting time is quite long, so all installation defects can be corrected within half an hour.
The new generation adhesive is a two-component polyurethane composition and a reactive setting one-component adhesive. Very strong and reliable adhesives, good for expensive parquet, especially for exotic ones
The glue should be used with caution, strictly according to the instructions. It greatly speeds up the process of installing floors; sanding can be done within 24 hours
At one time, parquet flooring was actively glued using PVA glue, but over time it became obvious that this composition was not suitable, it could not withstand the constant work of wood through compression and expansion.
TOP 3 largest plywood producers in Russia
| Photo | Name | Rating | Price | |
| #1 | SVEZA | ⭐ 98 / 100 | More details | |
| #2 | Syktyvkar Plywood Plant (SFZ) | ⭐ 94 / 100 | More details | |
| #3 | Arkhangelsk Plywood Plant | ⭐ 91 / 100 | More details |
Plywood production in Russia according to Rosstat
In the Russian Federation, more than 30 enterprises are engaged in the production of plywood.
Production capacities of the largest European plywood companies
Important! Russia occupies a leading position in the birch plywood production segment (except for the Russian Federation, it is produced only in Finland and some other neighboring countries).
The main volume of plywood is produced in the Northwestern District. This is due to the location of forest resources.
Arkhangelsk Plywood Plant
The production capacity of the plant is 125 thousand m³/year. Plywood is produced in four grades, thickness from 3 to 36 mm, main formats: 1830x1525 and 1525x1525 mm (sheets of other sizes can be produced upon request). The main line of plywood is general-purpose material of the FK and FSF brands. Low-flammability plywood boards, which have slow flame propagation, moderate smoke-generating ability and explosion safety, have also become very popular. 80% of all products are exported to other countries.
Arkhangelsk Plywood Plant
Syktyvkar Plywood Plant (SFZ)
The plant's productivity is 180 thousand m³ of plywood per year. Products are exported to many CIS and European countries, as well as to the USA, South Korea and Saudi Arabia. Sheets are produced from birch veneer, as well as with alternating layers of birch and aspen.
Syktyvkar plywood plant
Sheet characteristics:
- thickness 4…40 mm (3…29 layers);
- toxic substance emission class - E1;
- typical dimensions: 2500 x 1250, 2440 x 1220 mm.
The product line includes: standard and increased water resistance plywood, laminated material, coating prepared for painting.
Plywood production at SFZ
SVEZA
This holding includes six plywood factories.
SVEZA
The consumer is offered a wide range of sheet materials:
- laminated;
- with an outer layer of valuable wood veneer;
- with ultraviolet coating;
- intended for painting;
- lined with anti-slip coating;
- with a wear-resistant outer layer;
- polished and untreated;
- standard FC (for interior work) and FSF (for exterior and interior finishing).
Birch plywood SVEZA
Products are produced in all five grades, with a thickness of 4...40 mm and a density of 640...700 kg/m³. Formaldehyde emission class is E1. Plywood is supplied to 80 countries. The factories have installed modern equipment from the largest foreign manufacturers (RAUTE, Hashimoto, Holzmann, etc.).
Products of SVEZA Holding
Prices for SVEZA plywood
SVEZA plywood
Laying the base
Plywood has a large number of advantages, thanks to which it does not lose its relevance in the construction industry. It is made from natural wood using stabilizing components. Not any plywood for parquet boards will be a good option. It is necessary to take into account:
- thickness;
- sheet size;
- moisture resistance.
Under the parquet you should use sheets of plywood, the thickness of which will not be less than 10 mm. Only in this case will it be possible to talk about the required strength of the substrate, which will prevent the parquet board from sagging. Regarding the size of the plywood sheet under the parquet flooring, you can choose it individually. Everything will depend on what will be convenient for a particular room, so that you have to cut less material. Regarding resistance to moisture, there are recommendations to choose the FC brand. It combines the environmental friendliness of natural wood, as well as glue that does not contain formaldehyde. You don’t have to worry that over time, the plywood under the parquet flooring will emit harmful fumes, which can have a detrimental effect not only on the health of a child, but also an adult.
Advice! When purchasing plywood for parquet boards, opt for the one made from softwood. Due to the partial content of essential oils, it is less susceptible to various parasites.
Plywood on joists
Installation of logs under parquet boards is possible in almost any room. If it is an old wooden floor, then you will need to remove the old covering and evaluate the condition of the installed joists. Some of them may be able to be retained, but others will need to be replaced. Everything will depend on what kind of wood they are made of. If it is necessary to leave old logs under the parquet, it is necessary to clean them and treat them with an antiseptic composition, which will eliminate the processes of rotting and prevent the appearance of parasites. When it comes to a concrete field, then after a thorough inspection it is necessary to repair all the cracks that may be present in it. This can be easily done using tile adhesive. The next step is to apply the primer. If it absorbs quickly, you will need to cover the floor plane in several layers, maintaining the required interval for it to dry.
Next, you will need to determine the level of floor difference. This is important to do in order to know exactly how to lay the logs under the parquet. An excellent tool for this purpose would be a laser level. They can project a line onto all the walls and use a tape measure to take measurements in different parts of the room. In this case, it is worth recording the obtained figures. This approach will allow you to accurately determine the level of difference. After the primer has dried well, you can lay the waterproofing. It can be a film with a thickness of 200 microns or a membrane. The latter must be positioned on the correct side so that condensation does not accumulate under the plywood. When everything is ready, you can begin installing the joists on the floor.
To ensure that the logs are held as firmly as possible, they should be secured to the concrete base using a hammer drill and anchor bolts. In this case, it is important to recess the anchor caps so that they do not protrude at the top of the joists. The most difficult part will be laying the first two elements. In this case, the same laser level or bubble level will help. After laying the logs, you can take care of additional sound insulation. To do this, you can lay stone wool in the resulting niches. It can also be covered with waterproofing on top. Next, a square template is made according to which the plywood will be cut. It can be made from cardboard. It is necessary to determine the most suitable size of plywood sheet that can cover the entire area with minimal trimming.
Note! The distance between the logs should be 30 cm. The plywood should be laid so that its edge lies in the middle of the log. New logs must be treated with an antiseptic composition.
Once the sample has arrived, you can begin cutting the plywood. This can be done using a jigsaw or a hand-held circular saw. Before you screw the plywood down, you can lay it out to double-check that it will cover the area as intended. It is advisable to number it, which will help with installation. If necessary, some sheets can be swapped. It is necessary to screw the plywood so that the heads of the screws are slightly recessed into the plywood. It is important to lay it offset to create a checkerboard pattern. Only in this case can we talk about the required rigidity. If you want to make a larger step between the logs, you will have to take care of a larger thickness of plywood. For example, with a distance of 50 cm, plywood 18 mm thick will be required.
Note! The first lag is laid with a small gap from the wall. You need to do the same with plywood. It is worth making a gap of 5 mm, which will then be closed with a plinth. Such a thermal seam will prevent the floor from rising.
Plywood on screed
The process of laying plywood on a screed requires a careful assessment of the room's humidity. We discussed above how this can be done. The surface of the concrete floor must be perfectly flat. The difference in plane is determined as in the case of laying lags. If its indicators do not exceed 3 cm, then you can use self-leveling mixtures. Next, a full inspection of the plane is carried out and all defects are eliminated. Several layers of primer are applied to strengthen the surface and improve adhesion. If the room area is large, it must be divided into several separate circuits. To do this, you can use the most common polyurethane foam. It is necessary to apply it from a balloon, creating partitions. The self-leveling mixture is diluted with water in accordance with the manufacturer’s recommendations. If you do not follow them, the solution may turn out to be too liquid and will not be able to fulfill the tasks assigned to it.
During mixing and pouring, a large number of air bubbles are formed in the composition. They can be removed using a special needle roller. After pouring, it is necessary to wait for the screed to fully gain strength, as well as for the evaporation of excess moisture. After this, the surface must be treated with a primer and allowed to dry. Next you can move on to laying the plywood. As waterproofing, you can use a film for it, as in the previous case. Then the plywood must be secured with dowels and screws, which means drilling the required number of holes in the floor. You can go the other way and lay the plywood on a special mastic. In this case, there is no need to drill, and the mastic itself will act as waterproofing. Do not forget about interlacing seams like brickwork.