Finishing the attic can be done using many materials, but finishing the attic with clapboard remains a classic, which will be the topic of this article.
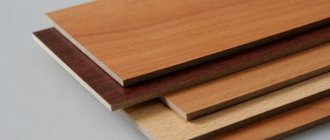
Lining for the attic, which one to choose?
How to choose lining for the attic when the material has a wide range of applications and many varieties? Let's look into this difficult issue together.
Before purchasing the required volume of lining, you need to know one important point. Will the room in which the paneling will be done be heated or not?
- If the attic has a stable heating system, then in this case slats of any type of wood are suitable as finishing materials. The only thing you need to do is unpack the material and leave it open for a week in the room where the finishing will be done. These steps will help avoid shrinkage or swelling of the lining after installation.
- If the room is not heated, then it is worth considering types of wood that do not change their geometry due to changes in temperature and humidity. In this case, lining made of cedar, oak or Angara pine is perfect for finishing the attic. This material is highly resistant to negative factors and, accordingly, you will not have any problems during operation.
Which lining is better (video)
Design work
At the preparatory stage, the owner draws up a design for the premises, selects building materials and calculates their quantities. The design is influenced by the shape of the roof, the location of the beams and the dimensions of the future room.
Options for arranging an attic with a gable roof.
If the roof slope is small, the attic is sheathed according to option No. 1. If the ceiling height is sufficient, the room can be given the correct shape, and the side compartments can be used as storage rooms (option No. 2). Cross beams can be hidden behind the cladding, or act as decorative elements of the room.
Cross beams act as decorative elements.
The project also takes into account the location of the windows and the method of laying the slats. There are many techniques for covering walls with clapboard: from classic horizontal to decorative diamond and herringbone.
After drawing up the attic plan, materials are calculated. To arrange the attic you will need:
- insulation;
- waterproofing;
- wooden or plastic lining;
- wooden boards or metal profiles for sheathing;
- nails/claypers.
To install the slats, the following tools are required:
- roulette;
- pencil;
- building level;
- twine;
- hammer/electric stapler;
- saw;
- brush for applying refractory composition.
Let's look at how to cover an attic with clapboard in more detail.
Do-it-yourself attic finishing with clapboard
Almost anyone with minimal knowledge in the field of repair and construction can complete the attic section with their own hands. To do this, it will be sufficient to follow the following procedure:
1. Waterproofing the walls and ceiling of the attic. First of all, it is necessary to cover the inner surface of the roof with waterproofing. The membrane will create a ventilated layer between the ceiling and the finishing, and will prevent condensation from penetrating into the finishing material.
2. Installation of the frame. You can use both wooden blocks and metal profiles. When creating cells in the frame, you should rely on the size of the insulation sheets; it should fit tightly to the bars. Therefore, the cells should be made 5-8mm smaller than the thermal insulation material. Also, if you use wooden blocks, it is recommended to treat them with an antiseptic.
3. Fill the frame with insulation. The most popular insulation is mineral wool and polystyrene foam. But I recommend using the first option, since this heat insulator has good noise insulation and high fire resistance. Mineral wool is easy to work with; it bends, compresses and unclenches easily. This is a good advantage when installing in hard-to-reach places.
4. Waterproofing of insulation. It is necessary to prevent moisture from entering the insulation through the finishing coating. Most thermal insulators require this protection, since when interacting with a humid environment they become useless.
5. Finishing the attic with clapboard. Installation of the lining should begin from the ceiling to the floor in a vertical position. Either from corners or doorways when the material is in a horizontal position.
Important!!! The question of which side the waterproofing is laid to the insulation remains unresolved for many. This material has one water-repellent side. Therefore, it should be laid so that the protective side is located on the side of the moisture flow.
Important nuances
Arranging an attic with a sloping roof is noticeably more difficult than a conventional building. If builders are not properly trained, they will not be able to do the job properly. In terms of external design, the roofing structures are more reminiscent of hipped roofs; the effect is formed due to a number of kinks and the arrangement of rafters in a couple of tiers. The lower rafter group is installed at an angle of at least 60 degrees, while the upper one is mounted at angles less than 30 degrees.
Equipping a wooden house with a gable roof is attractive because such a solution is practical during operation and subsequent use to the same extent. To create an additional room, you need to think about the internal arrangement and the rational angle of the slope. The minimum necessary conditions are preparation for working with wood and a basic understanding of the engineering aspects of construction.
The second type of attic, made from SIP panels, is built very quickly and easily, and the created room will be quite warm even in the Russian climate. The advantages of their use are as follows:
- excellent level of thermal insulation;
- minimal risk of destruction by pathological fungi and other microorganisms;
- immunity to fire;
- the ease of the created structure - there is almost never a need to further strengthen the foundation.
Since any attic cannot be located in an unheated part of the building, you will have to take care of insulation to a much greater extent compared to a conventional attic. A vapor barrier must be installed, a ventilation gap must be left, and a waterproofing layer must be prepared. You cannot refuse to use any of the layers, because the functions of each of them have a strictly defined function. On a properly insulated roof, snow will not melt and turn into ice.
Attics in small garden houses are mostly built on top of existing buildings. As a result of the alteration, the total height of the structure turns out to be much greater than it was originally designed. If during calculations it turns out that the load-bearing base is not capable of transferring the created load, additional columns must be placed. If the initial supports are weak, it is advisable not to save time and money, but to dismantle the entire structure and replace the problematic elements with new ones, further strengthening the foundation.
The frame is made of reinforced concrete or expanded clay concrete; its design is similar to a crossbar, complemented by a console. Polystyrene foam formwork must be installed under monolithic reinforced concrete. The use of high-tech ready-made components helps to simplify the work and speed up its implementation.
How best to fasten the lining
Fastening the lining can be done in several ways, each of which has its own advantages and features. Therefore, the answer to the question posed: “What is the best way to fasten the lining?” will depend on several factors. These are installation speed, technology and appearance.
Fastening the lining with self-tapping screws
Fastening the lining with self-tapping screws is the easiest and fastest way to install the lining. It is enough to have a good screwdriver and self-tapping screws, preferably made of galvanized steel. They are least susceptible to corrosion. However, the disadvantage of this option is the aesthetic appearance of the lining, because the fastener heads remain on the surface of the material.
Fastening the lining with finishing nails
Fastening the lining with finishing nails is considered a traditional method and has been used for several decades. The main fastening material is special thin nails, from 5 to 7 cm with a small head. The technological process looks like this:
- Fastening in a groove. In this case, a finishing nail is driven into the inner side of the lining groove at an angle of 45 degrees. The nail head should be recessed into the wood so as not to interfere with the connection of the next lamella.
- Tenon fastening. Similar to the previous method and more convenient. The only drawback of this option is that it is not recommended for use on products with narrow spikes.
Fastening the lining to clamps
Fastening the lining to clamps is considered a painstaking job that requires a lot of patience. But in return, you get reliable fixation and integrity of the lining, even if you want to dismantle it in the future.
Clasps are special fasteners in the form of brackets, where the side with holes is attached to the frame, and the other tightly clamps the groove of the lining and presses it down. When purchasing these fasteners, you need to take into account one nuance - the width of the bracket, it must correspond to the thickness of the groove wall of the lining. Therefore, before purchasing clamps, study the parameters of the lining you purchased.
Types of roof structures
Individual construction is characterized by the use of various roofing system options.
Particular attention is paid to the construction of the attic roof, which differs in the main types of structures:
- single or gable (broken, gable);
- hip and half-hip.
The characteristic features for each type determine the possibility of arranging an attic.
Today, in addition to traditional ones, more modern forms are used:
- single-pitched mansard roof with a sloping area (mounted on load-bearing walls);
- a rigid gable mansard roof with a slope on opposite sides;
- sloping roof (installation of a gable roof option);
- a hip or half-hip roof with four slopes (the end slopes of a hip roof are shaped like beveled triangles (for a half-hip roof the gable area is protected);
- pyramidal (also called hipped) types of roofing, which are not widespread, are distinguished by their polygonal shapes.
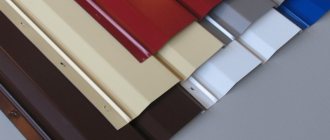
The shape of the roof is not the only distinguishing feature of a modern mansard roof. What matters is the height of the building and the nature of the coating (corrugated sheeting, metal, you can make plastic tiles).
It is worth highlighting the universal distinctive features of the attic roof:
- this is not only the roof, but also the walls of the house;
- the maximum height of the building does not exceed 2.5 m;
- possibility of installing metal-plastic windows with tempered glass;
- multilayer structure;
- The cost of an attic roof is ultimately higher than that of a conventional one.
The best way to paint the lining inside the house
Having finished the room with wood, many people ask the question: “What is the best way to paint the lining inside the house?” For this, there are various compositions that differ in their characteristics, but mainly oil or varnish is used for interior work. These substances form high-quality protection for the wooden surface from mechanical damage, moisture, sunlight or pollution. The main thing is that before purchasing, read the instructions and make sure that this material is intended for interior use and is absolutely safe for human health.
To make it more clear how wood oil differs from varnish, I bring to your attention the following video review.
Oil or varnish for wood, which is better (video)
Bottom line
Now you know how to clap an attic with clapboard quickly and without additional costs, and you can try to do it in practice. After all the finishing work is completed, you will be able to evaluate the scope of your work and the comfort of the atmosphere in the room.
Do not forget to treat the surface of the panels with protective agents so that the structure you create, even after years, is strong, undamaged and has its original appearance.
To avoid mistakes during the finishing process and to avoid making mistakes, follow the recommendations. The instructions provided by us will help you create a unique and cozy interior in your attic.
Cost per square meter of lining
The cost per square meter of lining depends on many factors, ranging from the type of wood to the region. So we'll take the average:
- Lining made of oak and beech. It is the most expensive material due to its strength, resistance to wet environments and attractive appearance. The average price of this material ranges from 1,500 to 3,500 rubles per square meter.
- Lining made of linden and alder. It is mainly used for steam rooms and bathrooms, as it is highly resistant to moisture. For one square meter of this type of lining, you will have to pay from 300 to 1000 rubles per square meter.
- Lining made of larch. Its properties are practically not inferior to oak material. Therefore, anyone who wants to evaluate its strength and durability must pay from 300 to 1200 rubles per square meter.
- Coniferous lining. It is a budget option due to soft wood and possible release of resin. But despite these qualities, softwood lining is actively used in finishing work. This is due to the low cost of the material, about 300-500 rubles per square meter.
How much does lining cost (video)
Attic space projects
To begin with, I would like to note that your attic can be made in different variations. We are talking about internal space. Most developers, when planning an attic project, tend to maximize free space. Sometimes owners do not even hide the rafter system, leaving them as an additional decorative element.
Basically, the layout of the attic depends on the type of roof of the house. What matters is whether the roof is low or high. The space under it can be wide or limited. Nevertheless, two types of arrangement inside the attic are often distinguished.
The first method is used when the roof has a small slope but a high height. The finished room will have a non-standard shape: not rectangular or square, but trapezoidal. The space inside can be made in the form of one room, or you can divide it into two. If you have a narrow and long room, then it is easy to equip two rooms there.
The second method is more traditional. The room turns out to be rectangular or square. Due to the height and width of the roof, you can add additional partitions to create the perfect shape, as seen in the diagram above. The cut-off space is suitable for storage space. Such extra space will never get in the way and will find its use.
Note! The places where you will install partitions are selected depending on the desired ceiling height. Partitions can be made of brick, wood or plasterboard.
Ideas for decorating a house with clapboard
Wooden lining goes well with many finishing materials and is therefore actively used for cladding walls, ceilings and furniture. In conclusion, I want to demonstrate modern ideas for decorating a house with clapboards, so that you can understand how, with the help of finishing boards, you can create a unique and unique design in your home.
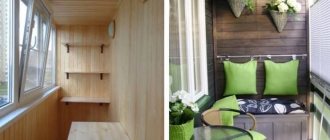
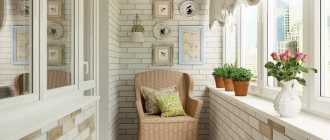
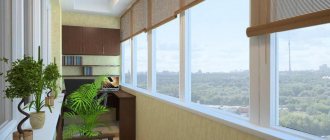
Balcony finishing with clapboard (photo)
a comfortable living space from a nondescript room
Final stage of repair
After installing the lining, it is necessary to coat it with varnish. Aerosol varnishes (cylinders, compressor attachment) are best suited. When covering a tree, you need to wear protective equipment - eye and respiratory protection is mandatory. Residual drying of the varnish will occur after 24 hours, so it is better to postpone moving in furniture and arranging the living space until the next day.
The installed lining will have minimal play. This will allow the wood to expand and contract without the risk of cracking from excess stress. Wooden lining is strong enough for attaching small shelves, pictures, etc. Further design and arrangement of the area depends on the taste of the owner of the house.
What is the frame for?
The question may arise: why do you need lathing at all? If it’s so difficult and time-consuming to make, then maybe we should abandon the frame altogether and attach the boards directly to the wall? There is also such a finishing method, but the wall must be perfectly flat and not require insulation or air exchange. And such situations practically never happen in construction.
Lathing is needed for several reasons:
- Firstly, it hides all surface irregularities; it can be mounted on uneven brick or cinder block surfaces without plastering them first.
- Secondly, a heat-insulating material - basalt wool or foil - is usually placed between the sheathing and the boards. This creates thermal insulation, which is important if work is carried out in residential areas.
- Thirdly, we must not forget that boards are subject to rotting at high humidity. In order for the wood to have the opportunity to dry out, for example, in a bathhouse or sauna, it is necessary to leave an air gap between the wall and the boards for air circulation.
- Fourthly, it is easier and faster to attach wooden panels to a frame than to a bare concrete or brick wall.
Ceiling lining
The most popular way to decorate the ceiling in an attic interior is to decorate it with clapboard. If the design project involves the use of wood in the attic, it is recommended to first cover the ceiling surface with sheets of plasterboard, and then proceed with the finishing cladding. Wooden furniture allows the use of various types of cladding. To add aesthetics, the boards can be painted in light or dark shades.
To prevent the interior decoration of the attic from becoming boring, a combined finish consisting of wooden inserts and hanging structures that need to be framed with stucco is suitable for the ceiling.
A decorative stone would be an interesting solution for the ceiling - it will help to enliven the overall atmosphere of the room and make the room unusual.
Furniture
The attic suggests minimalism of things. Don't block the room with too many objects. But a sloping ceiling will not provide such an opportunity.
Low-compact used furniture, shelves, walls. If you need to place tall items, place them on vertical walls.
Color spectrum
Most often, calm natural tones are used when decorating the attic.
But if you want to give the room a unique feel, you can use contrasting colors on a medium or high wall. This will also help make the ceilings in the room higher.
Window
Most often, windows become the main design element and the main source of light. It is not customary to close them, and if necessary, you can use translucent curtains or blinds.
They try to install the bed or chairs near the window.
The attic can become your favorite place in the whole house, and a photo of the attic floor will help you choose the desired style and finish.
Recommendations for choosing a design
Before finishing the attic space, it is worth deciding on its functionality, as well as its design:
- the bedroom can be made in subdued colors with the addition of a rustic style, which will add romance and tenderness;
- the personal office should have a strict and restrained appearance, and in the attic it will be quite secluded and calm;
- the nursery will allow you to make even the most unusual design decisions that will help your child create his own little refuge, located far from the gaze of his parents;
- a living room in the attic will allow you to enjoy privacy or, conversely, receive guests for quiet and relaxing evenings.
The attic is one of the most comfortable rooms in any private home, which has a unique charm and also allows you to apply even the most creative design solutions. You can easily do the finishing yourself without any special skills or knowledge. The correct choice of attic floor design plays an important role, so this work should be approached very responsibly.