Antique interior: distinctive features, retro design ideas
The interior trend - antique style - involves an original tandem of modern solutions and design elements of a past era. Retro improvisations demonstrate an unexpected compromise of nostalgic mood and life-affirming accents. Filigree combinations of colors and textures come in handy here. Rare objects and antique furniture made of wood with your own hands . Despite the nostalgic notes of retro, the atmosphere is lively, dynamic, and sometimes even playful.
Materials and tools for installation
To cover the facade, you will need not only panels, but also additional elements. Among them:
- internal and external corners;
- base strip;
- starting profile;
- finishing profile;
- design elements for window and door openings.
There are different types of basement siding. For example, UMB brand siding has a lower “backing” that protrudes beyond the boundaries of the main decorative fabric. This is the so-called “additional panel”, which is needed to mask the joints of different finishing elements.
Basement siding UMB (YUMB)
But Fineber, Döcke-R, and Alta Profile sidings do not have such a “backing.” Therefore, panels of these brands have reinforced stiffeners.
Docke-R siding is very popular in Russia due to its high quality, attractive appearance and affordable prices.
The connection of basement siding panels of different brands has significant differences. But despite this, there are only two options for joining cladding elements: tongue-and-groove and dovetail. There are slight differences in installation technology. Therefore, having chosen the brand of facing material, you need to obtain instructions for its installation at the retail outlet.
DÖCKE-R façade panel collections
| Collection/Models | average price |
| FELS (ROCK) | From 544 rub. |
| BERG (MOUNT) | From 475 rub. |
| BURG (CASTLE) | From 544 rub. |
Prices for Docke-R facade panels
Facade panel Docke-R
Required Tools
| For surface marking | For sawing finishing and building materials | For installation work |
Bubble level | Metal hacksaw (can be replaced with a saw with a fine-toothed blade) | Screwdriver |
Water level | Jigsaw | Screwdriver |
| Roulette | Bulgarian | |
Plumb | Knife cutter | |
Chalk lace | Metal scissors | |
Square | ||
Pencil or marker |
Prices for popular models of jigsaws
Jigsaw
Characteristics
Antique design is created on the basis of fashion trends of the early second half of the 20th century and has the following characteristic features:
- synthetic materials are used (a tribute to the achievements of post-war industrial progress), there is an abundance of artificial bases in decoration, furniture, and textile decor;
- antique photographs , portraits, yellowed black-and-white photographs in frames with scuffs, posters of the post-war era, large-format theater posters are in order ;
- solutions in bright design and surfaces with history (artificially aged) are effectively combined;
- Vintage household items are in favor, including old-fashioned lamps, samovars, telephones, beaded curtains, gramophones and vinyl records, and decanters.
It is worth considering that antique interiors tend to be stylized; abstraction and bizarre shapes are in trend. Unusual furniture designs are used, including curly sofas, beanbag chairs and other frameless furniture.
The photo shows antique wooden furniture with open shelves.
Instructions for covering the walls of a house with Döcke-R panels
Step 1. Preparing surfaces for cladding.
First of all, carefully inspect the walls. If the walls are wooden (including OSB), they are treated with an antiseptic. To do this, you will need a sprayer or a roller with a long handle.
Antiseptic treatment
Step 2. Installation of wind protection.
Windproof film sheets are cut. Using staples and a construction stapler, attach them to the wall of the house. Maintain an overlap of 7-10 cm wide.
Installation of wind vapor barrier
Step 3. Construct the first level sheathing, consisting of metal profiles or wooden blocks. The tree is covered with 1-2 layers of antiseptic.
Wooden sheathing diagram
The step between the vertical lathing strips should not exceed 40 cm.
Fastening wooden sheathing
Attach vertical posts. Use a screwdriver and self-tapping screws.
Installing profiles
Fixing hangers for metal sheathing
Installation of guides
Step 4. Installation of insulation.
The insulation sheets are cut and installed between the frame slats.
Insulation
Step 5 . Installation of vapor barrier.
By analogy with laying a windproof film, a vapor barrier is attached.
Installation of a diffuse membrane
Step 6. Installation of hangers.
Galvanized hangers are attached to the racks of the first level of the sheathing in increments of 50-60 cm.
Step 7. Installation of the second level sheathing.
- Using a plumb line, find the vertical.
- A metal profile or wooden blocks are installed between the hangers.
- The vertical posts are attached to the hangers with self-tapping screws.
Installation of second level sheathing
Step 8 . Marking.
Using a water level, find the lowest point located above the base (if the cladding will start from the base) or the wall (if the cladding will start from the blind area). Make a mark with a marker. Using the same level, points are found in other corners of the house located on the same horizontal line with this mark. The marks are connected either with a straight line drawn with a marker, or the line is marked with a chalk cord.
Marking scheme
Level tapping
Step 9 . Installation of lower horizontal strips.
Between the vertical posts of the second level of the battens, horizontally laid inserts of the same material as the main posts are attached. These strips are needed to strengthen the frame.
Horizontal sheathing inserts
Step 10. Installation of the remaining horizontal strips of the second level of the sheathing.
The spacing between the planks should correspond to the height of the siding panels.
Installing jumpers
Step 11. Installation of starting strips.
Starting siding strips are attached to the lower horizontal strips. Special corner starting strips are attached to the corners of the house.
Starting strips, installation
Step 12. Installation of the J-profile.
The J-profile strips are attached using a screwdriver and self-tapping screws to the vertical and horizontal strips of the second-level sheathing. In this way, wall elements, window and door openings are highlighted. Between the J-profile strips, panels of a contrasting color with the main color are installed.
J-profile installation
Step 13. Installation of panels.
The panels are installed starting from the lower left point of the wall. In order for the cladding layer to be durable, the length of the first and last panels along the horizontal line must be at least 200 mm. Siding is trimmed using a grinder.
Trimming the panel
The first panel is installed on the starting profile like this. so that the lower notch (groove) of the siding fits into the tenon of the starting strip. Next, the panel is attached to the sheathing posts using self-tapping screws through the holes in the nail strip. It is necessary to leave a gap of 1 mm between the siding and the head of the fastener.
Panel fastening
Self-tapping screw diagram
The next panel is placed on the starting bar in the same way and moved close to the first panel. Fasten the second panel with self-tapping screws and continue installing the siding.
Panel installation
Installation of corner profile
Window openings are finished in the same way as when finishing with siding.
Installing the last row of panels
Having reached the top of the wall, they cut the last panels to fit the width of the gap and install the finishing strip. Cornices and front overhangs are sheathed with special additional elements: façade J-profile.
Eaves filing
Interesting decor details in the spirit of the 50s, 60s and 70s
Antique interior is characterized by versatility; the design varies depending on the specific period of the era in question.
Retro 50s
Fashion trends of the 50s were dominated by strict shapes, relatively restrained color schemes, and monochromatic finishes without prints. Patent leather and polished surfaces are also in demand in the decoration; there is a sense of challenge to everything ordinary and boring. In the post-war decade, furniture with chrome legs came into fashion.
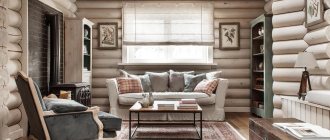
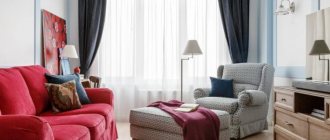
The photo antique furniture in the living room interior.
60s style
By this period, the hippie movement was gaining popularity. The subculture promotes peace and freedom, liberation from stereotypes, and opposes the Cold War. In interior fashion, floral graphics, original furniture, and a combination of rainbow shades are on display. The contrasts are impressive, for example, in the form of original accessories in a catchy design and a primitive set.
70s design
When planning to recreate a design imitation of the 70s, they rely on expressive solutions. In the era of disco, there is a sparkle, a cheerful mood, the palette is dominated by golden shades, bright blue colors, and catchy green touches. Bar stools and counters, polished surfaces, upholstered furniture, and decoration in acid colors are in fashion, as a tribute to the general “disco” mood.
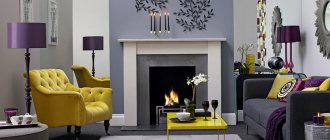
The photo shows an antique style in the interior of a room with a fireplace.
Wall decoration
When covering wall surfaces, water-based paint is preferred. Light shades are most often used; in exclusive interiors, walls are painted in a contrasting palette. If it is brickwork, you can leave it as is; textured planes make the situation dynamic. In imitation of the design of past years, an aged brick wall with a movie poster or poster with images of celebrities of the era looks organic.
On a note! In luxury decor, the trend is fabric wallpaper from retro collections, against which antique pictures with images of historical landmarks look impressive.
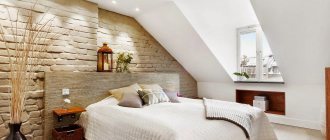
In the photo you can see interesting options for decorating walls in a retro living room
Antique wood finishing
Plastering antique walls is the most common way to decorate walls, but it is not the only one. There are cases when craftsmen and designers line the walls with wooden paneling. How to achieve the effect of an antique interior here?
Antique processing of wooden walls allows you to create an internal classic atmosphere, with which you can plunge into the times of our grandparents and great-grandfathers.
Carrying out the work of aging a wooden element is not as difficult as it might seem at first glance.
To give wood an antique effect, you will need the following tools and materials:
- axe;
- metal brush;
- hair brush;
- brush;
- sandpaper;
- drill;
- stain, acrylic paint, wax and clear varnish.
With these tools you can achieve the desired result very quickly and you don’t have to wait for the wood to age naturally. The aging effect is achieved by simulating abrasions, cracks and artificial depressions.
Wood aging technology
Using an ax, you should make potholes of different sizes on the surface of the lining in any order along the entire wall. In some places we cut off the corners, not paying attention to the accuracy of the work.
After this, the finished areas must be thoroughly sanded using a wire brush. Since the volume of the walls is considerable, a lot of effort is required, you can resort to using a drill with special attachments. Watch a master class on aging wood in this video:
An example of an aged wooden board During sanding, it is necessary to smooth out all sharp nicks made with an ax until the effect of natural damage to the wood. Movements must be performed along the wood fibers. Next, using sandpaper, we remove all protruding chips, while small depressions may form, which will also give our walls the effect of natural aging. Cover the wood with a dark stain
At the next stage of working with antique wood, you should give the light surface a resemblance to a board that has darkened over time. To do this, we treat the lining using a special stain or dark acrylic paint. After waiting for it to dry completely, sand the surface again with medium-hard sandpaper. You don't have to put in any special effort.
At the final stage, the walls should be waxed or coated with clear varnish and the surface should be allowed to dry.
Antique wall decoration can be done in different ways. We looked at such a common option as antique plaster, and a less common option – antique wooden wall finishing. For an example of antique wall decoration, see this video:
Ceiling design
In interior design that imitates fashion trends of the last century, the ceiling is traditionally painted. Before applying paint, the base is carefully leveled, creating an even monolithic plane. antique attic is decorated with clapboard and wooden beams.
The photo shows an antique room in a country house with high ceilings
Facing the house with facade panels
To stylize the facade as antique, they use the following technique: they line the corners, door and window openings of the house with panels that imitate natural stone. The most impressive is the “wild stone” series.
Docke-R facade panels
Such panels, as a rule, have several types of colors:
- sand;
- grey-green;
- coated;
- pearl;
- dark brown.
In order for the decoration to emphasize the style of the house, panels are chosen in such a color that it either contrasts or harmoniously combines with the main color of the walls. A special effect is given to the finishing by the “curly” edges of the panels, consisting of individual “bricks” protruding from the canvas.
Basement siding
Basement siding "Rubble stone"
This is basement siding, the range of which includes not only flat, but also corner elements. These panels imitate surfaces made of natural materials with high precision. The base siding is made of PVC, the front covering is made of high-strength acrylic-based compounds. It protects the base material from moisture and ultraviolet radiation, so the color of the siding remains unchanged even under harsh operating conditions.
Facing the house with facade panels
Due to their light weight, such panels do not place significant load on the load-bearing walls and base of the building. Therefore, siding is ideal for finishing houses that were built many years ago.
Example of using façade panels
To emphasize the architectural features and corners of the building, panels of two colors are used. For example, the main area of the facade is covered with light-colored siding, and those elements that they want to highlight are dark. Thanks to the protruding “bricks”, the joint of different colors will turn out to be “jagged”.
Combination of two shades
Flooring
When planning the arrangement of a room in the format of a bygone era, it is worth considering the following recommendations:
- the retro design effectively combines fabric wallpaper on the walls with tiled floors;
- shades of coffee and mustard palettes are in demand for floor finishing; the floor covering looks interesting in a color scheme that matches the wall decoration;
- shabby antique laminate flooring will help to recreate atmospheric interiors in the style of the 70s ;
- a gradient porcelain stoneware floor will fit well into the “historical picture”;
- Carpet looks good in floor decor; you can lay down a rug with an unobtrusive pattern.
If the horizontal surfaces have a monochromatic decor, the floor can be decorated like a chessboard. To do this, use, for example, black and white tiles or linoleum with a corresponding pattern. Antique laminate flooring with imitation parquet looks no less impressive
Tools and surface preparation
The following tools and devices will be useful:
- spatula (stainless steel, plastic),
- trowel (for applying the composition and structuring the surface),
- roller for priming and painting,
- brush,
- sponge,
- rags.
For a coating that has an antique effect, the base for decorative plaster is prepared according to the technique by which this effect will be achieved. If the mixture is applied in a layer of 3 mm and structured using the touch-touch method, then minor cracks or unevenness in the base of the finishing painting will not spoil it. And if the antiquity is imitated by the Venetian, then the base must be leveled and prepared especially carefully. In any case, the base must be degreased, clean, level and dry. It is coated with a deeply penetrating primer, and then with a primer composition, the components of which include quartz sand or fine-grained marble chips. The ground covering must be dried.
The more professional the tool you use, the easier it will be for you to work, and the result will be noticeably better.
If a solution with an antici effect is used, then two layers of primer paint are applied with a roller, and it is better to take the color two shades lighter than the future finishing coat.
Living room design in retro style
Soft furniture compositions in plain upholstery are designed to give the atmosphere a nostalgic mood. The priority is the design of strict shapes; in the decor you can use capes in a checkered pattern or with a geometric pattern. The sofa area will be complemented by a squat coffee table with a wooden or glass top.
On a note! Self-made antique furniture will fit well into the interior concept .
Fashionable attributes of the era will help you recreate the design of a living room in a retro style, including:
- sewing machine with pedal (foot mechanism);
- trellis, which is a cabinet with a triple mirror sheet of folding design;
- lava lamps, lampshade chandeliers, floor lamps and string lamps.
Here, furniture with a glass facade, cabinets with open shelves, and antique fireplaces with stucco are in favor.
Effects, advantages and disadvantages
The effect of time can be expressed through the texture of the surface or using special painting techniques. Antique decorative plaster combines both of these techniques, because it contains artificial latexes, which give the surface a special roughness when drying and tend to become lighter in places of greater friction. The microporous film formed during drying also protects the coating surface from high temperatures and mechanical damage.
The advantages noted by everyone include:
- versatility of application (facades and interiors),
- possibility of use in places where humidity does not allow the use of other types of plasters,
- high strength,
- fire resistance,
- excellent environmentally friendly qualities,
- easy to care for – can be washed with detergents, excluding those containing organic solvents,
- durability.
As for the disadvantages, these include, first of all, the difficulty of working with some textures, for example, antique Venetian.
Kitchen
Choose a monochromatic set of muted shades with a strict design. Interesting options for fittings are welcome, for example, in the form of a handle on a car door. For mint-colored kitchen furniture, you can choose a dining table in a red palette with chrome legs, which is equipped with matching chairs in leather upholstery. This contrast gives the atmosphere the dynamism characteristic of the interiors of a bygone era.
, an antique bar counter with high chairs, like in a 70s diner, looks interesting A refrigerator with rounded edges is in place, an antique radio or transistor, or a wall clock will complement the composition.
On a note! The kitchen apron can be made in the form of a patterned panel or laid out in a colorful mosaic.
Design tips
To create an atmospheric mood in a retro style, designers recommend using colors that were popular at that time. For example, avocado green is considered one of the fashionable shades of the hippie era. The current palette includes mustard, ocher, orange-wheat, and sea green. Use them to make the interior of an antique home look as realistic as possible.
In fact, it is a kind of mixture of fashion trends. The key advantage of retro imitations is the creative combination of elements from different styles. However, due to the abundance of colors and textures, the decor sometimes turns out to be intrusive. To avoid bad taste, you should use bright accents in doses, rely on muted colors and laconic forms.