A floor screed is a layer of cement-sand mixture that is laid on the floor slab and serves to level or strengthen the surface. During construction work, it is the screed that becomes the rough base on which the finishing coating is laid: tiles, parquet or laminate.
Without a screed, the listed materials will not look as impressive, and the service life of the finished floor will be noticeably lower.
Leveling the base is done in several ways, one of which is a semi-dry floor screed. The pouring technology does not look complicated, so semi-dry screed can be done by home craftsmen who do not have experience in similar work. The main thing is to observe the proportions of the materials used and the sequence of actions.
Features of semi-dry screed
In general, the technology for leveling floors with semi-dry mixtures resembles the traditional method of pouring screed. Here they also use cement-sand mortar, which is poured onto the prepared base and leveled to the height of the placed beacons.
However, the technology also has some peculiarities. In particular, such compositions are characterized by a minimal liquid content.
Water is added in the amount required to hydrate the cement. Thanks to this solution, stable crystalline bonds are formed during the hardening process, which has a positive effect on the strength of the coating.
Caring for freshly laid screed
Immediately after laying the semi-dry screed, it is necessary to provide it with comfortable conditions for rapid strength gain, for which you need to follow simple rules:
- Considering that cement is a hydraulic binder, it hardens in high humidity, or in water. In this regard, you should provide a thermos effect in the room. This is achieved with the doors and windows closed and the heating on.
Hardening the screed
- At temperatures above +25 °C, and the relative humidity in the room is 85% and above, the strength required for further work is achieved within 24 hours.
- Under worst case (standard) conditions, wait 36 to 48 hours.
- You can walk on a freshly laid screed across the entire floor of the room almost immediately, but this is not recommended. It is better to move on polystyrene foam plates that distribute the load.
Moving on polystyrene foam
If these conditions are met, the screed will gain its design strength quickly enough, and, after installing the finished floor, it can be used unhindered for decades. If the technology is violated, delamination is possible in the structure of the substance, which will certainly cause crunching and sagging of the material when walking.
Semi-dry screed in the interior of a residential building
Advantages and disadvantages
Any method of floor leveling has its positive and negative sides.
Knowing these features, you can easily choose the optimal method of pouring screed for yourself, taking into account the specifics of the floor and your personal capabilities.
pros
- Low water content. This nuance shortens the hardening process and eliminates the long process of moisture evaporation. As a result, the risks of pores and cavities appearing are noticeably reduced, so after pouring a semi-dry screed, the rough base is more durable.
- Light weight . This effect is also achieved due to the minimum water content in the prepared solution. Therefore, semi-dry screeds can be poured even in old houses, without fear of excessive load on the supporting structures.
- Minor shrinkage. Considering that the hardening process time is reduced, the screed configuration remains virtually unchanged after drying.
- Cleanliness of work . If necessary, you can fill in a semi-dry screed after finishing the walls. By choosing this method of leveling the floor, you don’t have to worry about splashes and sticky dirt.
- Frost resistance . The minimum liquid content makes the screed more resistant to sub-zero temperatures. The effect is enhanced if specialized chemical additives and plasticizers are included in the composition.
In addition, pouring a semi-dry screed significantly reduces the time required for finishing work. In particular, within a day after installation, you can begin finishing the wall structures.
Minuses
- Difficulty in alignment. Traditional screed spreads well, independently filling the space of the room. With semi-dry mixtures the situation is more complicated. They have to be leveled over the pouring area; difficulties arise with the formation of corners, especially if the correct geometry is crucial.
- Problems with filling large areas. In particular, if the pouring area exceeds 50 square meters, the process will be very labor-intensive, and it will be very difficult to complete the work alone. Mechanized semi-dry floor screed will help solve the problem: the technology requires special equipment, so pouring is carried out by teams of finishers. This significantly increases the cost of performing the work.
- Thickness. This screed is filled with a layer exceeding 30 millimeters. Taking into account the finishing coating, the ceiling height in the room is noticeably reduced.
Plasticizers help correct the shortcomings of semi-dry screed. These are chemical compounds that improve the workability and plasticity of the mixture without adding water.
To ensure that the corners acquire a clear geometry, they are compacted. Of course, such tricks somewhat increase the cost of performing the work, but they help achieve the desired result.
Preparatory stage
An important stage, the quality of which determines the durability and reliability of the semi-dry screed.
Technology for the production and installation of semi-dry screeds
Surface cleaning
Particular attention should be paid to the following nuances:
- when performing repairs or replacing an old screed, all layers must be dismantled down to the base;
- the surface must be thoroughly cleaned of debris and dust, and then covered with high-quality primer;
- all detected irregularities must be cleaned with fine sandpaper, and significant areas of defects are leveled using non-shrink cement mortar.
Taking measurements
Performing markup
Simple manipulations allow you to calculate the amount of solution required for the work. The horizontal line is drawn along the wall surfaces. The work can be done using a standard level, but it is much more effective to use a laser level, which allows you to project a straight line onto all the walls. Particular attention should be paid to the presence of differences in height from the base, which helps to make timely adjustments to the calculation of the amount of solution.
The laser level is installed on a base in the center of the room and marks are made on the walls at the desired height
Marking
The laser level is installed in the central part of the room. In any arbitrary area of the floor near the wall, you should screw in a self-tapping screw with a minimum length of ten centimeters. A rule is installed on the screwed screw and a mark is made at the intersection of the laser beam with the rule. It is convenient to mark using a marker directly on the rule.
Similar to the first self-tapping screw, a second fastening element is screwed into the opposite wall and a rule is installed with the mark made. The beam from the level must intersect the mark on the rule. If the mark does not match, then the height and direction of the rule can be adjusted by screwing in and unscrewing the screw located below.
By analogy, the marking of the entire room is carried out. You should install at least fifteen screws near all walls and mark the center of the room with one of them.
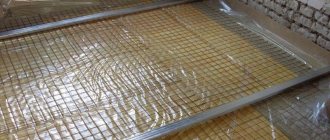
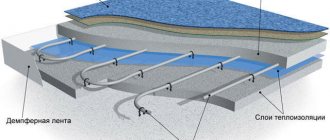
Laying waterproofing and thermal insulation
The film spread on the floor acts as waterproofing
Waterproofing is formed from high-quality polyethylene film with optimal performance of at least one hundred microns. Film strips should be laid with an overlap of fifteen centimeters between each other and the lower section of the walls. Next, a thermal insulation layer is made of sheet insulation.
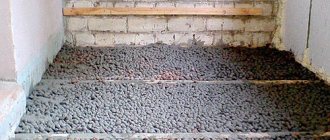
For thermal insulation, it is necessary to use exclusively reliable and high-quality material. The best option is to lay slabs based on extruded polystyrene foam. If it is necessary to obtain a slight thermal insulation effect or if it is intended to form a high semi-dry screed, it is allowed to use expanded clay with a fraction of no more than six millimeters.
Polystyrene foam and polystyrene foam are modern materials that are excellent for floor insulation
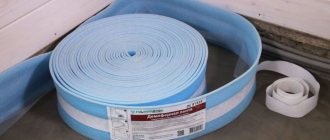
Walls, columns and other architectural elements should be insulated around the perimeter with damping tape with an adhesive backing. The upper edge of the tape should rise slightly above the future screed. Such a tape will not allow the screed to crack during the drying process, and the protruding parts can be cut off before finishing using a regular construction knife.
Installation of beacons
Installation of beacons
One of the most difficult and critical stages, responsible for high-quality leveling of the surface when screeding using the semi-dry method. The device of special guides allows you to follow the rule and evenly distribute the working solution over the floor surface.
It should be taken into account that the use of semi-dry screed places quite stringent requirements on the arrangement of beacons and the best option is to use special factory-made T-profiles, which are called “beacon”
Installed beacons under the floor screed
Factory-made profiles are distributed parallel to the surface of one of the walls. To install the starting beacon, a distance of twenty centimeters from the wall is taken into account. All the following beacons are placed at an optimally convenient distance from each other. This gap should be fifteen centimeters less than the length of the rule prepared for work.
The use of beacons made of cement mortar is allowed. For this purpose, a small amount of the solution is placed on a raised surface between a pair of screws and covered with a piece of wide tape. Using the rule, it is necessary to press the mixture covered with tape to the level of the screws. After thorough drying, the cattle are removed, and the resulting elevation is an alternative to beacons made of T-shaped profiles.
Recommended screed thickness
An accurately calculated screed thickness is one of the key conditions for high-quality pouring of a semi-dry mixture.
As noted above, the solution contains virtually no free water, so drying and hardening occur at an accelerated pace.
Given this feature, you should not skimp on the thickness of the subfloor. If the subfloor is too thin, the compound will harden before the mortar sets to the subfloor. As a result, the screed will be brittle and will likely crack under any load on the surface.
On the other hand, excessive thickness will create additional load on the supporting structures. On average, every centimeter in excess of the recommended norm will create a pressure on the base of 100 kg/m2. Therefore, the recommended thickness of the screed should not exceed 4-5 centimeters.
To avoid possible problems, installation of semi-dry screed is carried out using the “floating floor” technology. A special feature of this system is the absence of fixation of the screed to the base and wall structures. To achieve this effect, a semi-dry screed is usually laid on a thin layer of expanded clay or waterproofing; There is sound insulation between the wall and the subfloor.
The floating floor eliminates the stress that arises during the setting of cement-sand mortars.
Advantages and disadvantages
Like most building materials, standard compositions for screeding using the semi-dry method have some advantages and disadvantages due to the composition of the material and the technology of execution.
Mixture for semi-dry screed
The undeniable advantages include:
- quite affordable cost compared to “wet” analogues;
- no need to additionally level the floors;
- no water is used during the work and the possibility of even minor leaks is eliminated;
- the presence of a porous structure of the finished screed can significantly improve sound and heat insulation characteristics;
- the possibility of defect formation or cracking of the surface layer is minimized.
The period for complete drying of the floor is only 4-5 days
There are no disadvantages when screeding using the semi-dry method yourself, which allows us to recommend it as the most practical and high-quality method for leveling the floor surface. However, it should be taken into account that mechanized leveling of large areas is very expensive, this is due to the high cost of delivering the mixture to the work site and supplying it to the laying site with special flexible pipes.
Reinforcement
Let us immediately note that the technology of pouring semi-dry screed does not require the installation of reinforcing mesh, so this stage of the work can be eliminated. However, experienced builders and finishers do not recommend neglecting this nuance.
Reinforcement of a semi-dry screed significantly increases the physical and mechanical properties of the subfloor, and therefore the finishing coating.
It should be clarified that the optimal reinforcement option is fiberglass.
In comparison with the usual reinforcing mesh made of plastic or metal, fiber fiber has the following advantages:
- the material can be added directly to the batch, which simplifies the pouring process and reduces the cost of the work;
- due to the chaotic arrangement of threads in the solution, the strength of the screed increases many times;
- fiberglass prevents cracks from appearing, and the mesh prevents the resulting damage from spreading further.
If for some reason it is decided to reinforce the screed with mesh, it is laid during the pouring process. In particular, first the area is covered with 2-3 centimeters of solution, and a reinforcing mesh is laid on it. It is covered with a leveling layer, which brings the thickness of the screed to the specified parameters.
Main types of installation
Depending on the technology used, several options for making semi-dry screed can be used:
- installation without the use of a substrate with direct laying on a concrete base;
- floating type of screed with laying on a polyethylene backing without adhesion to the base of the floor and the surface of the walls;
- laying screed with surface installation of a soundproofing membrane;
- screed using heat-insulating materials as a substrate.
The most functional and in demand option is a semi-dry floating screed using fiberglass, which allows you to obtain the highest quality and reliable screed without the use of reinforcing components.
The simplest device for a semi-dry screed (without thermal insulation and/or expanded clay)
Preparing the base for pouring semi-dry screed
Despite the fact that the screed is a subfloor, you should not lay the mortar on an unprepared base; this will negatively affect the strength of the structure, even if the other conditions of the pouring technology are met impeccably.
In particular, the base is cleared of areas of exfoliated cement, the resulting voids and cracks are filled with cement mortar.
Places where the floor meets the walls must be covered, even if there are no voids or cracks. Protruding areas are knocked down using a hammer drill.
Application area
As mentioned earlier, semi-dry screed technology finds its application in the case of shortened repair times. There is a great desire here to quickly move into the purchased apartment, when all types of work are especially carried out on their own. This also includes very thin floor slabs. In this case, there is a high probability that the prepared “wet” solution will fall on the lower floors.
The basis for a semi-dry screed can be:
- Wood floors, which are often found in old buildings.
- Concrete floor slabs used in modern construction.
- Soil bases (gravel, sand, compacted material). This can be encountered in private households, when constructing basements, or when organizing semi-dry screed on the first floors of buildings.
Tools and materials
It is impossible to stir the solution with bare hands, so at a minimum you will need a container for preparing the mixture and a shovel for mixing the components.
Ideally, a compact concrete mixer is used to prepare the cement-sand mixture, but not every household has this equipment.
In addition, you will need tools to level the screed and compaction. A metal profile of a given height is usually used as beacons.
Pay special attention to the components for preparing the solution.
In particular, when choosing materials you should be guided by the following criteria:
- Sand . The recommended particle size fraction should not exceed 2.5, the permissible content of silt-clay inclusions is up to 3%.
- Cement . It is allowed to use material of grades M400 and M500. When Portland cement M500 is included in the solution, the screed can be poured in rooms with high humidity levels. It is important to understand that cement is purchased only with an unexpired shelf life, in its original packaging.
- Water . You should not collect water from natural reservoirs: it may contain not only dirt, but also foreign impurities that can deteriorate the quality of the solution. Regular tap water is suitable for preparing the mixture.
Procedure for installing a leveling screed
The technology for forming the desired layer is simple, but requires attention and diligence.
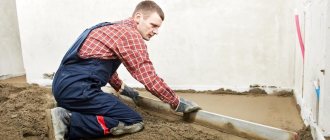
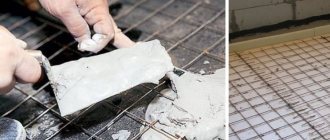
For this work you will need at least 2 performers. One of them prepares a solution of sand concrete and delivers it to the work site. The second one carries out laying, compacting in the required places and smoothing the mass according to the level of the beacons. The volume of a single portion of the solution must be laid within one hour.
For small rooms, the solution is often prepared directly on the floor, laying out the components in the required ratio. They are stirred with a shovel until the mixture is homogeneous and formed into a slide with a small crater on top, where water is added. Stirring is done with a shovel and a portion of water added. The consistency is controlled as indicated above; if necessary, components can be added during cooking.
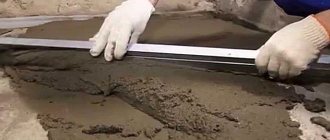
The solution is supplied to the floor using a shovel and leveled with a trowel. Along the wall and beacons, you need to tamp the mixture with the end end of a wooden block. Then, if necessary, the solution is added and leveled with a trowel. The formed surface is leveled by pulling the correct board along the beacons, and all irregularities are removed. Work continues until the next batch is ready.
About an hour after the start of work, another operation begins - grouting. A wooden grater is used for this. The task is to finally level out all, even the smallest, irregularities in the screed. High-quality implementation of this technological operation can subsequently eliminate the need to perform a leveling screed.
Drying of such screed is carried out for at least five days. It is very important to protect the surface from drying out with plastic film, and in hot weather to re-moisten it with periodic irrigation with water.
It should be noted that this type of screed is quite suitable for heated floors, especially for water or cable ones. Its thickness allows you to freely place the heater circuit from pipes, most often used in size 20 mm. And the reinforcement used to fix the wiring only helps to increase its strength characteristics.
Recipe for preparing the solution
In order for the screed to harden evenly and gain the required strength, components are added in strictly defined proportions.
The recommended ratio of sand and cement is 3:1, respectively.
An important factor is the addition of water to the solution. The finished composition should have the consistency of sandy loam: it will gather well into a dense lump, but not release moisture when squeezed.
It is very difficult to achieve this by pouring water “by eye”, because here you have to take into account the moisture content of the sand, so in each specific case the percentage of liquid and dry components will change.
To prepare a high-quality solution that meets all technological standards and requirements, you can listen to the following advice:
- If the prepared portion of the solution oozes moisture, dry components are added to the composition, while strictly maintaining the ratio of sand and cement.
- Fiber fiber is added with each addition of water, which will allow the polypropylene threads to be evenly distributed over the entire pouring area. The recommended amount of reinforcing fiber is about 80 grams per bucket of water.
- The solution is prepared based on the pouring speed: 60 minutes after installation, it will no longer be possible to level the screed.
If pouring a semi-dry screed is done manually, installation is carried out layer by layer with simultaneous compaction. In particular, first a bottom layer equal to half the specified thickness is laid, and the solution is carefully compacted. After this, the remaining part is poured, which is compacted and sanded.
Leveling and grouting
At this stage it is necessary to carry out final alignment. To do this, the rule is pressed against the beacons and passed along them, making zigzag movements. The solution from the blade can be put into a bucket; it will be useful for filling small depressions. After this, go through the vibrating plate again. Finally, you need to sand the surface with a machine or sandpaper.
Arranging semi-dry screeds is a process that requires special equipment. Even if you rent it, the amount can turn out to be quite large, so home craftsmen should calculate the budget and weigh the pros and cons.
How to calculate material consumption?
In this case, experts recommend starting from the amount of cement required to prepare the solution.
By the way, this is the most expensive component in pouring semi-dry screed, therefore, knowing its consumption, you can plan the construction budget in advance.
The calculation is based on a square meter of pouring area, which on average requires 30 kilograms of cement. Please note that the figure is approximate; exact information is indicated by the manufacturer on the packaging and will depend on the thickness of the screed and the moisture content of the sand.
Let’s assume that the screed is poured in a room with an area of 50 square meters, which means that it will take 1,500 kilograms of cement, or 30 fifty-kilogram bags, to prepare the solution. Keeping the proportion 1:3, we multiply the total amount of cement by three, and we get 4.5 tons of sand.
If a plasticizer is added to the mixture, the amount of chemical additive is determined at the rate of 1 liter per 100 kilograms of the finished mixture.
Features of the technological process
Its fundamental difference is the most accurate dosage of water in the concrete solution, ensuring hydration of the cement in the mixture and not remaining free in the concrete stone.
The purpose of installing a leveling screed in this form is to reduce construction or repair time by minimizing the drying time of the laid layer.
Great option for home and apartment
This type of screed has many advantages, but the main one is that you don’t have to wait long for the solution to dry completely. Unlike “wet” screed, semi-dry screed is ready for use almost immediately.
The peculiarity of installation is the need to control the density of installation in places where the screed adjoins walls and lighthouses, where the mixture is prone to the formation of voids due to reduced ductility. An additional technological technique to avoid this effect is the introduction of a special composition into the mixture - a plasticizer, which increases the fluidity of the solution. An indication of this on the packaging of the dry mixture or in the recipe for preparing the composition yourself will help you choose the right additive.
Semi-dry screed laying technology
As mentioned at the beginning, this is a simple job that absolutely anyone can handle. Filling is performed in a certain sequence.
The workflow includes the following steps:
- the prepared and cleaned base is covered with a layer of waterproofing so that the material extends 10-15 centimeters onto the wall structures;
- Guides of a given height are placed on top of the waterproofing. To simplify the task, you can first apply markings to the walls using a laser level;
- the distance between the beacons is calculated in such a way that the alignment rule is based on 2 adjacent profiles;
- the solution is mixed in compliance with the specified proportions and brought to the desired consistency;
- the first layer of the mixture is thrown between the beacons, which is immediately compacted;
- after laying the second layer, the solution should hide the tops of the beacons; the mixture is immediately compacted and leveled;
- When the screed is laid, it is immediately sanded.
If the pouring area exceeds 15 m2, the next day after laying the screed, expansion joints are cut along the wall structures.
How to make a dry screed?
To make a dry floor, you will need any backfill material, which can be used, for example, expanded clay or special dry mixtures. The latter, although more expensive, are justified in their use, since they do not shrink, unlike expanded clay, which can cake over time, leading to noticeable deformation.
More details about the technology can be seen in the video:
On even floors, you can even do without backfill, which primarily serves to level the floor level and thermal insulation. But you can’t do without a separating layer, for which a waterproofing film or vapor barrier membrane is most often used.
The installation of such a screed begins with the installation of a hydro/vapor barrier over the entire area of the floors.
How long does it take for a semi-dry floor screed to dry?
For wooden floors, it is better to use special membranes or parchment rather than film materials. The waterproofing is laid with the sheets overlapping each other by 15-20 cm and extending onto the walls to the height of the screed.
The next step is installing beacons and backfilling. But before this, a compression tape made of foam materials or, for example, mineral wool is installed around the perimeter of the room. This edge strip also serves as effective sound insulation for the room.
Then the screed is backfilled and leveled along the beacons. The final stage is laying sheet material: plasterboard, plywood, OSB, asbestos-cement boards, etc., for installation of which self-tapping screws are used.
If the surface of the floors does not have differences, then you can do without a backfill layer; in this case, sheets of plasterboard, plywood, etc. are laid directly on the waterproofing material. Sometimes, for better heat/sound insulation, instead of backfill, you can use foam boards, after laying which sheet material is also laid.
Drying time for semi-dry screed
High hardening speed is one of the key advantages of this technology. In most cases, already 12 hours after completion of the work, a semi-dry screed will easily support the weight of an adult.
After a day, you can begin further finishing the room without fear of damaging the subfloor.
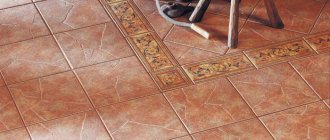
The interval between pouring the screed and laying the finishing floor covering directly depends on the chosen finishing material. For example, installation of tiles or porcelain stoneware is possible after 2 days, linoleum can be laid in a week, and parquet or laminate flooring can be laid only after a month.
Necessary equipment and solution composition
Levels, rules, trowels, and other construction tools are an integral attribute of the work of pouring mortars. The specific equipment is represented by a small set, without which the installation of a high-quality semi-dry screed is unlikely. It includes a pneumatic mixer (concrete pump) and a trowel. This is expensive equipment that not every construction team has, and its presence indicates the specialization of the company.
Note: both machines can be rented, but this is unprofitable for a professional, and also impractical for an amateur home craftsman due to lack of skills.
Proper care and operation
Despite the fact that a semi-dry screed hardens within 24 hours, the cement-sand mortar gains the specified strength in almost a month.
To avoid drying out too quickly, it is recommended to moisten the subfloor with water for 3-5 days.
As a result, the screed will harden and gain strength, and not dry out, losing moisture. If the rooms are too hot, the subfloor can be covered with burlap or plastic film.
In order not to damage the screed, it is strictly forbidden to install stepladders or scaffolding on the surface within 10 days from the moment of pouring.
If a “warm floor” system is to be installed under the final coating, installation work begins after 20 days.
In addition, it is recommended to prevent heavy or sharp objects from falling onto the screed.
Laying waterproofing and insulating the base
Waterproofing of the rough base performs the protective role of the rough base and screed. It also creates an obstacle for water to escape from the leveler, which contributes to the correct development of technical strength. Moisture is not only present in the solution. It can come through the flooring, from an adjacent room or through the facade. That is, the event is preventive in nature.
In wet rooms, coating-type materials are used. In others, it is more convenient to work with canvases that are sold in rolls. These include:
- technical polyethylene;
- PVC film;
- rubber-bitumen based isol;
- hydroisol (fiberglass impregnated with bitumen resin);
- elastic polyisobutylene.
The choice is based on the financial capabilities of the homeowner and operating conditions. So, in an apartment they often lay the film overlapping (25-40 cm) with sealing the seams. You can use waterproof tape or double-sided tape. The roof requires enhanced waterproofing.
In any case, the protection is installed monolithically and extends onto adjacent walls. The height should correspond to the thickness of the screed plus 5 cm.
Additionally, damper tape is laid along the walls. It compensates for the pressure on the structure during expansion of the leveler. The material also helps reduce impact noise levels.
Insulation is often done on the first or basement floors. As a rule, rigid slabs are used that do not shrink under the weight of the screed.
Extruded polystyrene foam is in great demand. In this case, waterproofing may not be necessary, since foam plastic practically does not absorb moisture.
Fixing beacons
An important and crucial stage is the placement of beacons around the perimeter of the room. The leveling of the semi-dry screed will depend on it. They are necessary not only to ensure compliance with the rule, but also to ensure uniform distribution of the finished solution throughout the room.
The requirements here are very high. For this reason, it is best to choose a T-shaped profile, which also has a corresponding name - “beacon” profiles. Having chosen one of the walls as a reference, the profiles are positioned parallel to it. It is best to fix the initial beacon at a distance of approximately 20-25 cm from the wall. Their further location depends on the convenience of performing all subsequent work. The most important thing is that the rule is longer than the beacon pitch.
There is also an option for cement beacons, which are made by screwing self-tapping screws into the base and filling them with cement mortar. But this is a less common method that is not highly effective.