assets/from_origin/upload/resize_cache/iblock/7fd/600_450_2/7fde0d5f477d6cdbf545353578a5479f.jpg From this article you will learn:
- Why does a semi-dry screed for a water floor accumulate heat better?
- What types of flooring can be laid on a semi-dry screed under a water floor?
- What are the pros and cons of semi-dry screed under a water floor?
- What type of underlying insulation is best to use for a semi-dry screed under a water floor?
- How to install a semi-dry screed under a water floor
The design of the screed, its layers, as well as the composition of the mixtures used are largely determined by which floor heating system you have chosen. In order for heat to emanate evenly from the source (namely the floor heating circuit), a substance is required that will act as a conductor. When transferring, distributing and storing heat, heat loss must be kept to a minimum, which directly depends on the material used. From this point of view, a semi-dry screed under a water floor would be the best solution.
Preparatory work before pouring
Before pouring a heated floor, you need to perform a number of preparatory measures, including:
- arrangement of the base for the solution;
- installation of all heating circuits.
When a warm floor is created, the screed is poured after laying the so-called “pie”.
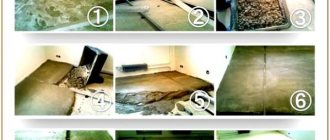
It is done in a certain sequence:
- To ensure waterproofing, a polyethylene film with a thickness of 200-250 microns is laid on the rough base.
- Then, to create thermal insulation, a thin layer of polyethylene foam is used, one side of which is covered with heat-reflecting foil. You can use extruded polystyrene foam with a thickness of 5-10 millimeters.
- At this stage, a base for fixing the pipes and metal mesh with cells of 10.15 centimeters are installed to perform reinforcement.
- After this, they begin to fix the heating circuits. for which they use metal-plastic or polypropylene pipes with a cross-section of 20 millimeters (for more details: “How to make a warm floor from polypropylene pipes with your own hands”).
- In order to increase the strength of the screed, additional reinforcement is sometimes added. To do this, another row of mesh is laid on top of the pipes.
- To obtain a level base, beacon profiles should be secured - this is one of the requirements for how to properly fill a heated floor. It is necessary that the gap between the guidelines be less than the length of the rule. Mount the beacons using mortar or self-tapping screws and focusing on the level. They begin to be installed from the zero (also the highest) point of the floor.
- The final layer
is laying the mortar under the heated floor structure. Before this, you need to determine what to fill the warm water floor with. The screed should rise 3-7 centimeters above the level of the heating circuit. This thickness allows the thermal energy to be distributed evenly and ensure the same surface temperature.
Mistakes you shouldn't make
When building with your own hands, a number of mistakes are made, which ultimately lead to problems:
- Savings on specialists to install water circuits (not everyone will be able to do this at the same level).
- Work before installation of the system is a mandatory process.
- Poor quality installation of damper tape.
- The rough screed is poured unevenly.
- Sloppy installation of the system, poor-quality fastening.
Many small mistakes occur when you fail to properly fill a heated floor. A plan for performing preparatory and installation work and studying professional tips will help you avoid mistakes. An estimate of waste is drawn up, which must be followed and not skimp on materials.
Concrete pouring serves as protection against damage to the water circuit. In order for it to serve for a long time, you need to follow all the rules. Precise laying of the heating circuit and high-quality screed determine the level of reliability and operation of the system.
Preparatory work
Preparatory work is important in any type of repair, since the final result depends on it. When screeding with a semi-dry mixture, the entire preparation process can be divided into the following stages:
- thorough cleaning of the base;
- laying a layer of vapor/waterproofing;
Rice. 5 Laying waterproofing
- wall surface preparation;
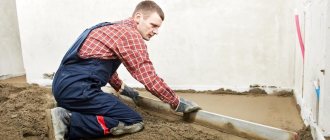
- installation of slats - beacons.
Rice. 6 Laying beacons to level the floor
Pay special attention to cleaning. Use a high-powered vacuum cleaner to completely remove dust and any other contaminants that could degrade the final result.
Waterproofing is also an important point. It should be carefully laid as a continuous sheet on the floor. Along the entire perimeter of the room, it is necessary to insulate the walls with a special damper tape. But you can use slats as a beacon, placing them on a cement mortar base.
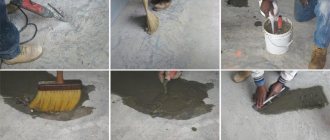
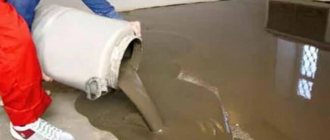
Making the solution
At this stage, you should think carefully about whether you can independently mix a solution of the desired consistency and composition. If you are not confident in yourself, then it is better to purchase a ready-made mixture, which is kneaded according to the instructions on the package. In order to check the correctness of the solution, you can stick your hand into it and clench your fingers into a fist. If water comes out, it means you made the solution too liquid. If there is no such reaction, then you did everything right.
After all the previous steps are completed, you can safely begin the filling itself. To do this, the entire floor covering is divided into several zones and filled with the mixture. Make sure that the thickness of the coating does not exceed 40mm. And constantly level the filled surface with movements to the right and left and towards you - this method will lead to the best results.
Laying the mixture necessarily entails a grouting process. But you should start this type of work twenty minutes after pouring.
Please note that you should not delay this process for long, since after six hours such work will not make sense
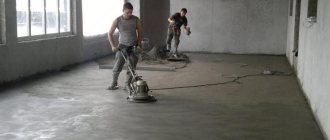
In order to properly sand the surface, you need to use a special trowel, which is sold in every decent hardware store. Using this machine allows you to compact and perfectly level the surface. It is worth noting that this work only seems difficult. In fact, one person can easily handle it in a couple of hours.
Rice. 7 Mixing the solution
Please note that after completion of all work, the water floor heating system can be started in about a month, depending on the materials used. It takes several days for the system to enter full operating mode.
During this time, excess air will escape from the pipes.
Having familiarized ourselves with the main stages of the work of pouring a warm water floor, we can conclude that this is not an easy task - it also requires time, effort, and financial costs. But if you follow everything according to professional instructions, the result will exceed all expectations.
Filling by beacons
Before starting work, you should learn how to correctly pour screed onto heated floors using the beacons. Adhering to the technology, they perform the screed after completing all the plastering work, installing windows and door frames in the room. This must be done in order to create the current temperature conditions for installing a heated floor.
The preparatory stage involves careful removal of build-up, dust, and construction debris. Next, you need to carefully, without haste, place the beacons under the rough screed. The role of the base can be performed by floor slabs, but they will need to be made level if there are deviations from the level. The surface of the wall below should be puttied to a level of 15 cm, so that a damper tape can then be installed into the layer.
Installation of beacons - the main thing is to maintain horizontality
Now they move on to arranging the rough screed. Upon completion of the floor pouring, differences in the area are allowed. occupied by the water circuit. according to GOST. no more than 5 mm. That is why the installation of the subfloor must be carried out according to beacons. To ensure the highest level of insulation in the room. Experienced experts recommend using expanded clay concrete screed. Further. gradually lay the insulation material under the screed using a special adhesive composition. and the seams are sealed using polyurethane foam.
After installing the insulation, you will need to reinforce the surface using a special mesh. The material should be laid on nickels so that it departs from the thermal insulation by 4 cm. After that, expansion joints must be made, pipes/mats/electrical wires must be laid (depending on the type of heated floor that is being installed).
Fill the finished floor with a solution containing plasticizers and screenings (fractions of crushed stone that are small in diameter). You can also use ready-made leveling mixtures that are intended for underfloor heating systems. At the end of the work, you should give 25-28 days for the floor to dry and harden, and then start heating. The self-leveling mixture will dry much earlier - in 1-2 weeks. The floor covering is laid over the dried screed, after which the heating system is turned on.
Beacons are fixed with mortar
Basic technological steps during installation
As mentioned above, working with this building material requires some experience. The master must be able to knead the mixture exactly in those proportions that will reveal all the advantages of such technology.
Preliminary work before installation
The preparatory stage of work begins with preparing the foundation. The main operations are:
- cleaning the base from dust;
- removal of chips;
- removal of delaminations;
- jointing and sealing cracks.
This will prepare the base for the load that the screed will put on it.
After this, the surface is checked for the level of differences in area and the highest point is found. The required thickness of the screed is added to it and a zero level is obtained. Metal beacons are not used in semi-dry screeds, but are made directly from the solution.
The process of installing a semi-dry screed, namely installing a beacon Source prestigehouse.ru
Preparing the mixture
Despite certain difficulties in preparing semi-dry screed, this does not stop craftsmen from actively using it. When preparing the solution, the following materials are used:
- polypropylene fiber;
- coarse washed sand;
- plasticizer;
- Portland cement grade M500.
Mandatory equipment when installing a semi-dry screed is a pneumatic blower/mortar pump. All materials for the screed are mixed in it (cement, sand, fiberglass and water) and the finished solution is supplied through special hoses (up to the 30th floor).
The result should be a composition that, when compressed, slightly releases moisture and retains the shape of a ball. Reaching this consistency signals that the mixture is ready for use.
Preparation of the mixture Source prestigehouse.ru
Making semi-dry screed
Laying a semi-dry screed is also carried out after the installation of the water floor is completed. Damper tape should be glued around the perimeter, and the pipes should be securely fastened.
To work you will need:
- kneading container;
- T-shaped beacons;
- level gauge;
- rule;
- trowel;
- cement and sand;
- fiber fiber.
The workflow is almost the same as described above. On the surface of the water floor, beacons are placed on the solution and leveled horizontally. Next, mix the solution to the desired consistency, raise the pressure in the pipes to 0.3 MPa, and distribute the mixture between the guides. During work, you constantly need to monitor the thickness of the layer above the pipes - it should not be less than 3 cm. The solution must be very carefully leveled and laid as densely as possible. If grooves form under the rule, add more mortar and level it again.
When the screed is completely laid, you need to wait 20-30 minutes and start grouting. The trowel not only perfectly levels the surface, but also compacts the screed at the same time. Please note. That the more time passes after pouring, the weaker the effect of grinding. After 6 hours it is too late to grout, since the mixture will have time to set.
Grouting semi-dry screed
Until the screed is completely dry, you cannot turn on the heating. This applies to both filling methods. On the first day of starting the system, the water temperature in the pipes should not exceed 25 degrees. The next day it is increased by another 5 degrees, and so on for several days in a row until the system enters operating mode.
Self-leveling screed
For the manufacture of this screed, no guides are installed. Before pouring, it is necessary to carefully secure all elements of the water floor, remove all excess from the surface, and increase the pressure in the pipes to 0.3 MPa. Then the dry components are poured into water, mixed with a drill with a nozzle, and distributed over the surface using a filling hose. The mixture should cover the pipes in an even layer with a thickness of 30 mm. For better distribution of the composition, use a wide spatula.
Next, you need to roll the filled layer with a special roller to remove any voids. If rolled out poorly, air may remain under the pipes, which will reduce the strength of the screed. Having leveled the surface, the floor is covered with film until dry. At this time, it is necessary to exclude any air flows and direct sunlight, otherwise the screed will dry unevenly and become deformed.
Comparative table of properties of various screeds
New or popular
- Floor pie in a wooden house - installation instructions
- Hardener for concrete floors - types and instructions for applying the material
- How to make a heated floor correctly: features of choosing components, step-by-step installation instructions
- Subfloor in a wooden house: 5 best options, diagrams and step-by-step construction guide
- Floor installation in a private house
- Sealing cracks in wood floors
- How to lay laminate flooring
- How to make a floor in a country house
Recommendations for screeding
The area of each zone should be no more than 30 square meters, and the length of the sides should not exceed 8 meters. The ratio of length and width should be no more than 1:2; this must be known even before pouring the screed onto the heated floor. If the room has a complex shape, it is divided into square or rectangular sections.
During work you will need the following tools and materials:
- damper tape;
- insulation;
- polyethylene film having a thickness of 200-250 microns;
- sand, cement, fiber, plasticizer for concrete;
- mounting grid;
- rubber boots;
- knee pads;
- broom, industrial vacuum cleaner;
- beacon profiles;
- laser level;
- screwdriver and hammer drill for installing beacons;
- long rod and rule;
- a special attachment for a hammer drill or construction mixer;
- container for solution, designed for 80-100 liters;
- polyethylene or metal-plastic pipes with a diameter of 20 millimeters;
- nylon ties for attaching to the mesh.
To prepare a mixture for pouring a heated floor, use a solution of a grade not lower than M400 and add a plasticizer. The minimum thickness of pouring a water-heated floor above the level of the pipes is 3 centimeters.
The heated floor is poured after hydraulic tests. The pressure inside the pipes during filling should be 0.3 MPa. Thermal testing is carried out no earlier than a month after the completion of concrete pouring. At first, the temperature of the conductor cannot be higher than 25 degrees, then every day it is allowed to increase by 5 degrees until the desired value is reached.
Recommendations for laying pipes are as follows:
- for the contour it is worth using solid products;
- in those places where they cross the expansion joint, they must be protected with a corrugated shell at least one meter long;
- the pipes are secured to the floor using padded wire or V-shaped clamps.
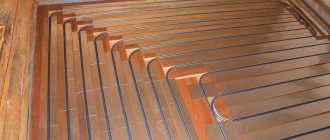
Pipe laying
A mounting grid is usually used to secure the pipes in place. This mesh is made of metal or plastic, has 100 mm cells and is laid out on top of the heat-insulating layer. Pipes are laid on this grid in accordance with the finished diagram, which later need to be secured with wire or special plastic clamps. The use of mesh increases the strength of the screed due to reinforcement, but at the same time increases the amount of labor costs.
Another option for attaching pipes involves the use of special polystyrene mats designed specifically for heated floors. Such material can simultaneously perform the function of thermal insulation and fixative. The outer side of the mats has projections into which pipes can be laid and fixed. Polystyrene mats are quite expensive, but they are also very easy to work with.
In any case, no matter what technology for laying heated floors under the screed is chosen, there are still a number of rules that must be followed when working. So, despite their flexibility, it is better not to bend the pipes too much. It is also not a good idea to step on pipes or drop heavy objects on them - if a pipe is damaged in at least one small area, it will have to be completely replaced.
Pipes for heated floors cannot be cut in advance. First you need to connect it to the supply manifold, then bring it to the return, and only then can it be cut off. It is not worth stretching pipes in order to save money, nor is it worth making one circuit out of several separate pipes - such operations will negatively affect the reliability of the assembled structure.
If a “snake” pattern is used for installation, then it is advisable to start laying pipes from an external wall or window - this will compensate for the decrease in temperature due to heat losses.
Spiral laying does not impose such a requirement, so the pipes can be placed in any convenient way. Date: September 25, 2022
How to pour a concrete screed
Choosing the type of screed to fill is not enough; you also need to know how to fill it correctly. Any mistake in the manufacture of such a coating reduces the effectiveness of heated floors and leads to the destruction of the screed. Before the pouring stage, work must be done to prepare the base, lay waterproofing and reinforcing layer, and install the heating system. The damper tape is also attached around the perimeter of the room before laying the heated floor. And only after this you can start making the screed.
How to make a heated floor screed. Scheme
Schematic diagram of the screed
To work you will need:
- metal profile for guides;
- dry gypsum;
- container for mixing the solution;
- level;
- trowel;
- rule.
Heated floor screed options
Step 1. Using a level gauge, mark the line for pouring the screed on the wall. Please note that the thickness of the mortar above the pipes should not be less than 3 cm.
Step 2. Mix the plaster mortar and use a trowel to spread it in small piles along one of the walls at a distance of 20 cm. Place guides on the mortar and level them. A distance of 1.5-1.8 m is left between the beacons. Since gypsum dries very quickly, you should not spread the beacon solution over the entire area at once, do it in 2-3 steps.
Step 3. Prepare a concrete solution: mix the dry components in the required proportions, pour in water, add a plasticizer.
The solution is poured between the guides and, using the rule, distributed over the surface
Step 4. When pouring the floor, the pressure in the pipes must be 0.3 MPa, otherwise the screed cannot be laid. The solution is poured between the guides and distributed over the surface using a rule. You need to work very carefully so as not to step on the pipes. Filling is done in portions, dividing the room into several sections. If the floor area is more than 40 m2. A damper tape 5-10 mm thick is laid between the sections. It is best to use a special intercontour tape that has a T-shaped profile. It has standard parameters: width 10 cm, height 10 cm and thickness 1 cm. The tape is produced in lengths of 2 m and is very inexpensive. It is much more convenient to install than regular tape. Expansion joints prevent the screed from cracking during thermal expansion. The pipes passing through the seams must additionally be covered with corrugation.
The photo shows an expansion joint and a pipe joint covered with corrugation
When the entire floor is filled, the screed is covered with polyethylene and left to dry. After a day, the beacons are removed and the recesses are sealed with mortar. Cover it again with film, and then periodically moisten the floor with water to prevent cracks from appearing. As soon as the screed has gained the necessary strength and the humidity level drops to 5-7%, the finishing coating can be laid.
The best manufacturers of plasticizers
When choosing a brand of plasticizer, you should pay attention to whether it is suitable for installing heated floors.
Information about this is indicated on the product packaging. An important parameter is the cost of the additives. There are many manufacturers that produce plasticizer for underfloor heating. Let's look at some of them that are considered the most popular.
Sanpol
This is a liquid mixture that meets all user requirements for product quality. Increases the strength of the finished screed and increases its thermal insulation qualities.
When using it, water consumption is reduced by 10-15%.
Pouring screed is a rather complex and time-consuming process that requires some construction skills. However, the addition of this brand leads to a longer setting of the mixture, which makes it possible to correct some errors in the screed.
ArmMix
This is an aqueous plasticizer composition. Used for pouring floors and making dense, waterproof concrete. Produced by the leading Russian company.
Might be interesting
The advantages of this mixture include:
- reduces cement consumption;
- provides high density of concrete mixture;
- possibility of use at sub-zero temperatures;
- reduces screed deformation during concrete shrinkage;
- increases the plasticity of the solution.
The composition is poured into water and mixed in a separate container or added from the packaging directly to the finished sand-cement mortar.
Warm floor HLV-75
The main purpose of this plasticizer is the installation of heated floors.
The main advantages of its use:
- an increase in the mobility and thermal conductivity of the concrete mixture by 50 and 30 percent, respectively.
- protection against cracks;
- reduction in cement consumption by approximately 20%
- corrosion protection of fittings.
The plasticizer for underfloor heating screed of this brand is suitable for its common types: electric and water.
It is added directly to the concrete mixture while mixing or to water before preparing the composition.
The solution should be thoroughly mixed so that the modifier is evenly dissolved in the concrete.
Rehau
Materials of this brand are added to the solution when installing especially thin screeds for heated floors. This additive is a premium product.
The addition of the Rehau plasticizer significantly improves the physical properties of the concrete screed, and increases its thermal conductivity and strength.
The use of this additive reduces the likelihood of possible cracks. This occurs due to the optimal proportions of cement and water when making the concrete mixture.
The product is sold in containers of 10 kg.
Superplasticizer S-3
Modifier C-3 in its finished form has the form of a viscous cream-colored liquid. It is packaged in metal cans and plastic containers with a volume of 0.5 to 10 liters.
They are used in the production of concrete mortar together with cement, water and solid aggregates.
Advantages of using this additive:
- increases the mobility of the concrete solution, which reduces the possibility of cracks appearing when it hardens;
- increases the strength of the composition by approximately 25%;
- allows you to save 20-22% of cement and reduce the specific gravity of water in the mixture;
- improves the adhesion of the solution to the surface and metal structures.
When using the additive in the form of a dry powder, it should first be diluted in warm water and left for several hours to obtain a homogeneous mixture. When diluting, use the following proportion: one part powder to two parts water.
How to fill a warm water floor, we will understand the methods and tools
You can find out how to fill a warm water floor and how to do it correctly by reading the article. The main condition for success is careful attention to the implementation of all stages of the work.
How to fill a warm water floor
In order to create coziness and a comfortable environment in an apartment or any other room, it is not enough just to hang beautiful wallpaper and install high-quality furniture. The condition of the floor covering is of great importance. It should be even, smooth and warm. Recently, warm water floors have become especially popular. They allow owners to independently regulate the air temperature in the house, increasing it in the winter and completely turning off the heating in the hot summer.
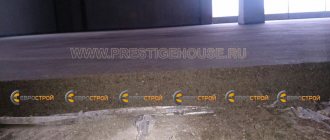
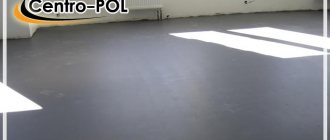
Rice. 2 Concrete screed is one of the most practical options for pouring a warm water floor
Water heated floors are especially popular in families with small children. After all, the baby loves to play right on the floor
Therefore, it is very important for the health of the younger generation that this floor is warm and comfortable
If you have no inclination for construction and repair work, then, of course, it is better to turn to professionals. But, if you decide to do all the work on insulating the floor yourself, then you will find the advice given in this article useful.
Choosing a floor covering
When screeding a warm water floor with your own hands, you should glean information about what kind of floor covering you can choose in the future. The main thing is that it has excellent thermal conductivity characteristics. The most ideal option in this case is ceramic tiles or porcelain stoneware. This material can last for a long time and maintain all its performance characteristics. Heat transfer is good, and, therefore, all the energy from below will flow out very well. True, such a choice will be comfortable for the feet only during the heating season. A semi-dry screed for a warm water floor will be cold in the summer.
Many people make the mistake of laying plastic tiles. At elevated temperatures and heating, it will crack and become unusable over time. So it’s better to avoid it when choosing.
Another best option is laminate. Moreover, you can buy special material in the store designed for heated floors. Tarkett, Parador and others are popular among manufacturers. A semi-dry cement screed can also withstand linoleum. There is one feature here, which is that the raw materials must be natural. Otherwise, various chemicals and carcinogens will be released into the room when heated. This applies to non-woven linoleum.
For warm water floors, natural materials such as parquet and cork are also used as flooring. The main thing is that the product is certified and can be laid on a heated floor. It is very important to read the manufacturer's recommendations.
Screed thickness
The layer of mortar to be poured for a heated floor must certainly be the same over the entire area of the room. In this way, you can achieve efficient operation of the heating system, because the floor covering will warm up evenly. That is why it is necessary to begin work only if the base surface is as flat as possible. In situations where subfloors are not level and have large differences in level, they must first be leveled.
The thickness of the underfloor heating screed is affected by the composition of the solution.
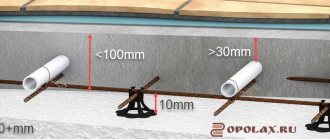
Sometimes a thin layer of screed (about 5 mm in thickness) is sufficient. Then experts recommend placing some of the layers of the structure under the rough screed. That is, lay polyethylene (performing the function of a water barrier) and heat-insulating material, and then fill them with a layer of mortar with a thickness of 2 cm. Next, the base is allowed to dry thoroughly for 28 days, the heat-reflecting material is rolled out on it and the installation of the heating element begins. This technology takes a little longer to implement, however, it is more correct. Under other conditions, you will need to make a screed of more impressive thickness. If heated floors are created in an apartment in a high-rise building on the second floor or higher, then the thickness of the system will be 8.5 cm, and its structure will be as follows.
Above 1cm below the pipe or electric heating element, 2cm above the pipe or 0.5mm electric heating element and 3cm above it or the electric heating element.
In total, the screed layer for a water-heated floor will be 11.5 cm thick, and for electric floors – 9 cm. We also note that the thickness of the mortar layer will be largely determined by its type. So for a water floor the indicators will be as follows:
- if you use ordinary cement-sand mortar, remember that the minimum layer above the pipe or electric heating element should be 5 cm thick;
- if a solution based on plasticizers is used, then its thickness above the pipe or electric heating element will be less than 5 cm;
- if you are installing a warm water floor yourself, then above the pipes or electric heating element of the structure the layer of solution should be no less than 2-2.5 cm thick if reinforcement is used, and at least 3 cm of solution if the reinforcing mesh is not involved in the process work. Then the total thickness of the concrete layer for a water floor will be about 6 cm.
Preparation of semi-dry mixture
First you need to calculate the semi-dry screed, and then purchase the following in the required quantities:
- Portland cement (preferably grade 400 D20);
- washed quarry or river sand;
- additives that improve the fluidity of the mixture.
It is recommended to rent a concrete mixer, otherwise you will have to do it the old fashioned way, using a trough, a shovel and a lot of physical labor.
The components for preparing the solution have their own requirements:
- Sand will be required with a fineness modulus of up to 2.5. The sand should contain no more than 3% of fine clay inclusions, and should be completely free of any random plant remains and peat veins. Natural humidity is allowed, which in practice can fluctuate over a wide range, so the amount of water added to the mixture may be different.
- You need to buy cement with an unexpired shelf life and in undamaged original packaging. If Portland cement 400 D20 is used, the result will be a solution corresponding to the M200 cement brand, and in the case of the original Portland cement 500 D20, the cement mixture will be M350, which can be used in places with difficult operating conditions.
- You cannot take water from untested reservoirs, as it may be contaminated with biological or technical waste. But tap water is fine.
Proportions of the dry mixture: 3 parts sand x 1 part cement x part water in the amount required for the given case.
- In the middle of the container for preparing the mixture, you need to build a slide, pouring in portions of 3 shovels of sand and 1 shovel of cement in the required quantity.
- Then mix all the components dry, and then begin to slowly pour in water with the fiber fiber added there.
- A semi-dry cement-sand screed should be diluted with water to the consistency of sandy loam - like clay sand that sticks together into a lump, but when compressed, no moisture is released, and the lump itself retains its given shape.
- Since the moisture content of the original sand can be different, water has to be added “by eye”, which often ends in overflow. If moisture begins to ooze from a lump of semi-dry solution, then you need to add the dry components to the mixture in the same proportions.
- Polypropylene fiber should be added to each bucket of water so that it disperses more easily through the mixture. Approximately 80 g of fiber is added to each bucket, but the manufacturer’s labeling indicates how much fiber fiber should be added per cubic meter of mixture.
- If a pneumatic machine is used for semi-dry screed, then with its help you should simultaneously prepare such an amount of semi-dry mixture that would be enough for the entire thickness of the screed. If the mixture is prepared manually, then it must be laid out in layers: first the lower part, followed by tamping, then the upper part, which is leveled by the rule and at the same time sanded.
The solution begins to lose the properties necessary for the leveling mass in an hour or even earlier, so you need to plan all operations in advance and work on the screed at an accelerated pace.
- Some craftsmen recommend starting to lay the mortar from the periphery, but this option is possible if the general leveling layer can then be applied in no longer than an hour. If this takes more time, the laid mixture will be covered with a hardened crust, resulting in an extra seam that will open the way for the penetration of cold.
Filling the screed taking into account the type of heated floor
Many people who decide to install electric floors in their home themselves ask a reasonable question about how to install a screed for a heated floor. In fact, this process is not overly complicated and does not require a long time.
But it must be carried out taking into account the most important factor - the type of floor heating that is planned to be installed
If you decide to organize heated water floors yourself, you will need to understand the basic rules for pouring screed for such a system. A screed under a warm floor will raise the entire heating system up to a certain level, but if you compare this option with other alternatives, it becomes clear that this is a rather economical option. The design is layered. It is made of the following materials:
- waterproofing;
- insulation material;
- layer of foil;
- heating system pipes;
- reinforced screed;
- finishing floor
Water heated floor
To prevent the pipes from floating up, they should be fixed by attaching them to reinforcement mesh or insulation. Pipe installation schemes may be different. Pipes can be laid in the following ways:
Pour the prepared concrete solution through the pipes, starting from the far wall and towards the door. The room should be divided into zones with a guide to the beacons. Concrete poured onto pipes should be carefully leveled to avoid distortion in the thickness of the base. When using semi-dry mixtures, already 6-7 hours after organizing the screed, it should be sanded.
Pipe laying methods
Electric
The above describes how to fill a heated water floor yourself, without paying for the services of a hired team of builders. Now let's look at the details of how to fill an electric heated floor. In this case it is poured a little differently.
Firstly, we note that heated electric floors are varied in their structure, which determines the specifics of installation work:
- cable;
- film;
- using heating mats.
Film floors can be laid on top of a layer of concrete, while the other two options are poured into a screed.
Types of electric heated floors
In general, such floors are organized in the same way as water floors, but taking into account the fact that electrical cables or mats are mounted directly on the reinforcing mesh, which is suspended between the joists. The cables should not touch the thermal insulation material, and a plasticizer must be added to the solution for screeding electric floors. After fixing the cables or mats on the reinforcing mesh, pour the solution onto the structure and wait 4 weeks for it to completely harden. The dried floor will need to be sanded and then covered with finishing material.
Mixtures for self-leveling floors
Let's look at what you can use to fill the heating elements and the floor underneath them.
Cement-sand mortar. Due to the presence of sand, the mixture has good plasticity and is easy to work with. The most suitable brand is M200. For heavy loads, stronger solutions are used: M250, M300. If the room is damp, then M400 cement is suitable. To strengthen the cement mixture, fiber can be added to the composition.
Proportions of mortar for screed (by weight):
- M200 - water/cement/sand - 0.48/1/2.8;
- M300 - water/cement/sand - 0.4/1/2.4.
Concrete from ASG. Cement mortar on a sand-gravel mixture is classic concrete. When installing heated floors, it can be used to fill the rough screed. The result is a strong and inexpensive base.
The consumption of materials for concrete grade M300 will be: 1/5.6 - for one kg of M400 cement take 5.6 kg of ASG (group 4 with a gravel content of 60-65%).
Concrete from screenings. Screening is fine-grained crushed stone that has been passed through a sieve (particle size up to 10 mm). It is added to the mixture instead of sand. Irregularities characteristic of screening particles help strengthen the screed. However, this also makes placing and grouting the concrete more difficult.
Foam concrete. A distinctive feature of foam concrete is the presence of a foaming agent in its composition. This makes the material cellular (it has a large number of closed pores). It has increased sound and heat insulation properties, weighs less than conventional concrete and demonstrates greater strength. If necessary, it can be easily drilled.
Expanded clay concrete. Expanded clay concrete is similar to a regular cement mixture, but instead of heavy crushed stone, expanded clay granules are added to it. Thanks to this, the material is warmer and lighter. But expanded clay concrete is fragile, and it cannot be used for pouring surfaces that will be actively used. Those. Expanded clay concrete is used for screeding under heated floors.
More details about the construction of a subfloor made of mortar with expanded clay are shown in the video tutorial.
Self-leveling mixtures (self-levelers). Self-leveling allows you to get a flat surface with less labor. Can be used both for pouring the base under heated floors and for the top screed on which the flooring will lie. This material costs a little more than others. You can use, for example, Ceresit CN 176, cement leveler Unis Horizon.
Gypsum solution. Not suitable for pouring floors!
Tools and materials
Before you start pouring a heated floor screed, you will need to ensure that you have all the tools and materials relevant for this type of work. The materials you will need are the following:
- damper tape for creating thermal seams;
- insulation material (in the form of a roll, mats);
- polyethylene in the form of a film with a thickness of 200 to 250 microns;
- materials for preparing concrete mortar (carefully sifted sand, cement, fiber, plasticizers for concrete);
- mounting grid;
- beacon profiles;
- nylon ties for fixing to the mesh;
- pipes made of polyethylene or metal-plastic, the diameter of which is 20 mm when organizing water-type heated floors.
Damper tape
Beacon profiles
Among the tools relevant for pouring screed on electric floors, you will need the following:
- laser level to check the base for evenness;
- screwdriver (the tool is necessary for installing beacons);
- a hammer drill with a special attachment for mixing concrete mortar. Can be replaced with a construction mixer;
- container for preparing the solution, volume from 80 to 100 l (tank or basin);
- a lath and a rule of significant length for leveling the concrete mortar on the floor surface.
Tools
Do not forget about your own safety when performing work. Rubber boots will help protect your feet from cement, dust, and dirt. Special knee pads will help prevent you from damaging your knees during the screeding process.
To ensure that cleaning up trash after finishing work doesn’t take up a lot of effort, you should get a good broom, or even better, an industrial vacuum cleaner for cleaning.