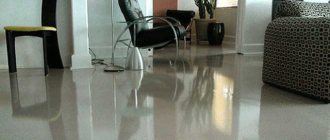
Smooth, beautiful and durable floors are not only functional and aesthetic. They are the first to catch your eye and can decorate an apartment or house. A self-leveling floor screed allows you to get a smooth, defect-free surface. It is made using special mixtures that are diluted almost to a liquid state. The screed can perform several tasks.
Self-leveling screed – minimum effort
Categories of liquid screeds
All compounds used to level the floor or create an impressive smooth finish are divided into several groups. The main functional characteristic in this case is the ability to create a layer of varying thickness. There is the following division:
- low-fill mixtures designed to create thin finishing coatings. They are offered on polymer, epoxy, methyl methacrylate, and cement bases. Capable of creating coatings with a thickness of 2-20 mm;
- Medium-filled mixtures can be useful when rough leveling the floor. They create a floor screed from 5 to 35 mm without reinforcement. This coating is ideal if you are making a warm floor or if you have plans to decorate the surface with ceramic tiles;
- when the height difference on the base for pouring is very large or a very strong self-leveling floor screed is required, highly filled building mixtures are used. They allow you to create a layer of up to 150 mm without reinforcement.
Compositions for screeds are also divided according to the main binder. There are two of them: cement and gypsum. A leveling screed made from a cement-based mixture is highly durable. The compositions allow you to work in a fairly small layer, from 5 mm (from 2 mm when adding plasticizers to solutions containing cement and polymers).
The advantages of gypsum mixtures are a short drying period of the screed (initial setting), strength acceptable for the conditions of an apartment or private house. Floor screed made from gypsum-based mortar is quite lightweight, has a rough surface to which adhesives for tiles or linoleum adhere well. In this case, a thick layer can be laid without reinforcement.
In a garage, bathhouse, or room with high traffic volumes, it is not recommended to create a floor with a gypsum-based leveling mixture. It will not meet the requirements of strength and long-term operation. In addition, a self-leveling screed made from a cement-based composition in a garage or bathhouse can solve a number of important problems.
Types of self-levelers
Self-leveling floors differ in the method of application and their composition. According to the first criterion, self-leveling solutions are divided into three main categories:
- Chernova. “Rough” self-levelers are used for preparatory work in cases where there are significant defects on the base and height differences of more than 3 mm per 1 m2 of plane. A distinctive feature of such mixtures is the large layer thickness, which can be 4-10 mm;
- Finishing. The liquid composition is applied in a small layer to a previously prepared surface. The thickness of the layer can vary from 2 to 4 mm depending on the nature and severity of damage to the surface. After the rough base has hardened, you can immediately install the finishing coating;
- Local. If the concrete floors are in good condition, but there are minor defects here and there, “local” self-leveling solutions are used for preparatory work. They are not applied to the entire surface of the rough base, but only to its individual sections.
Leveling floors with tile adhesive
Despite the fact that the technology for carrying out preparatory work using self-levelers seems simple, failure to comply with technological conditions significantly reduces the service life of the coating. And in order to ensure a truly long service life for your floor, it is better to seek help from a professional rather than take risks and do the preparation yourself.
You can learn about the nuances of preparatory work for pouring liquid self-leveling mortar in the video.
How mixtures are used depending on the situation
During construction or repair work, the contractor may be faced with different tasks. When considering flooring or creating a finish, there are a few basic options to consider.
- The difference in levels on the existing floor covering is quite small and is in the range of 5-10 mm. At the same time, the base is strong and requires only minor cosmetic repairs.
- On the existing surface there is a large deviation in heights within 50 mm. In this case, we can talk not only about large potholes or destroyed areas, but also about a slope of the surface, a notch or a bulge in the center or a large area of the cultivated area.
- The available surface is strong enough for a self-leveling floor screed to be poured onto it. At the same time, the runout of heights over the area is quite large - more than 80 mm.
Advantages of floors made from self-leveling mixture
The most important advantage of such floors is the ability to lay the self-leveling mixture with your own hands. Even without any qualifications, almost anyone can prepare the mixture as written in the instructions on the bag and use it.
The second important advantage is the strength of the surface layer. Some mixtures even allow you to use them as a finish that you can walk on in shoes.
The high strength of the surface layer allows the use of mixtures with minimal gaskets under laminate and linoleum, giving high durability. Some mixtures have increased resistance to impact loads.
Work on a slight runout of heights
If the deviation of heights on the base for pouring does not exceed 10-15 mm, you can work with one layer of self-leveling mortar. When choosing the appropriate mixture, such a step seems rational and will not lead to significant expenditure of funds.
Covering the floor with a self-leveling mixture based on cement with special additives will allow you to create a screed up to 20 mm thick, without the use of reinforcement or other hardening measures. The work is carried out manually; there are no special requirements for the application technique, so all operations can be done with your own hands.
Leveling a concrete floor with liquid flooring
Liquid flooring or self-leveling mixtures are popular today among similar materials for uneven surfaces. This is due to the strength characteristics. Dry compounds, diluted in exact proportions with water, are capable of creating a horizontal level, which is why they are called floor levels.
According to its structure, liquid flooring is manufactured and sold in retail chains in the form of a dry mixture, which is stirred to the consistency specified by the manufacturer and specified in the instructions. There is a self-leveling agent and a self-leveling compound on sale. The first is used to level the rough base and cannot spontaneously spread over the plane, therefore it requires the installation of beacons. And the second composition, after dissolution, becomes fluid and self-levels on the prepared base.
There are differences between both mixtures in terms of pouring levels: the self-leveling leveler is capable of producing thicknesses from 1 to 30 cm, and the maximum level for the self-leveling mixture does not exceed 2.5 cm.
Features and benefits of the technology
Leveling self-leveling flooring is an innovative technique that allows the owner to effortlessly create a flat surface. The chemical and ingredient composition of the mixture is selected in such a way that, under the influence of gravity, the solution spreads evenly over the floor plane.
The advantages of leveling mixtures include:
- Low labor intensity compared to concrete screed.
- Polymers and hardeners added to the dry composition reduce the process of completely setting the floor to 10 days.
- The use of environmentally friendly building materials: Portland cement, piezoquartz sand and polymer additives.
- Small thickness of the filling level.
- Availability of assortment in the distribution network of both Russian and Western production.
Unfortunately, users also note the disadvantages of mixtures for leveling concrete floors: a high price compared to traditional concrete solutions and strength characteristics that are inferior to concrete.
Work on the average runout of heights
If the level difference in the room is 50-100 mm, the use of high-fill class liquid mixtures will be required. They will allow you to create a screed of the required height without much effort. At the same time, workers with little qualifications can use the technique of filling with stripes along beacons.
The installed strips and profiles do not so much serve as a guide for drawing the horizon, but rather allow you to work relatively leisurely. The filled, stretched, needle-rolled strip practically does not spread thanks to the installed beacon. This gives time to mix a new portion of the solution with hand tools.
If you need to create an underfloor heating system in a room, you need to use anhydride self-leveling flooring compounds. These are gypsum-based mixtures that allow you to make screeds from 20 to 60 mm without reinforcement and have good strength properties. This approach to work is rational in rooms with small and medium variations in the heights of the base surface. In the latter case, good results are shown by the use of reinforcing mesh, which serves as a support for placing underfloor heating pipes.
Types of self-levelers by composition
What mixtures can be used to treat concrete floors? To level the rough base, various self-leveling mixtures can be used, which differ in their chemical composition. The most popular self-levelers include:
- Cement-acrylic. Self-leveling coatings of this type are the most inexpensive and perform two tasks at once: they level the surface and serve as a primer. However, the material consumption is quite large, since the minimum thickness of the resulting layer should be 5 mm. They are suitable exclusively for preparatory work and cannot play the role of a finishing coating;
- Plaster. Anhydride solutions with minimal shrinkage have good heat-insulating qualities. They are often used when installing heated floors due to the slight thermal expansion of the material when heated. If concrete screeds cannot be laid with a layer thickness of more than 5 mm, then in the case of pouring gypsum solutions it can be doubled;
- With epoxy resins. The price of self-levelers with epoxy resins is quite high ($5-10 per 1 kg), which is due to the good technical qualities of the coating. Unlike cement-acrylic mortars, the service life of the rough base is not 3, but at least 6 years;
- With polymer additives. Low material consumption and high homogeneity of the mass make polymer self-levelers especially popular. Even when pouring the solution with your own hands, the coating turns out to be very durable and wear-resistant. The mixture may include methyl methacrylate, polyurethane and plasticizers as fillers. The price of such self-leveling coatings is the highest of all existing types ($10-15).
Working in rooms with a very uneven pouring base
If the run-out of the heights of the base for the screed exceeds 100 mm, special measures cannot be avoided. The choice of composition for the job is clear: these are cement and gypsum mixtures of the thick floor class, into which fiber can be added or reinforced with steel wire to increase strength.
The peculiarity of working with a thick screed made from a leveling mixture is the speed of operations. You need to fill the floors in one go. It is recommended that when using a hand-held kneading tool, make the mixture of a thicker consistency than recommended by the manufacturer.
The mixture pours out in streaks. Do not allow the edge to spread too much or dry out. Therefore, you need to work quickly, preferably in pairs (one performer pours and levels the mixture, the other mixes a new portion of the solution). Professionals use special machines that allow the screed compound to be supplied continuously.
Ready-made dry mixes
Since progress does not stand still, manufacturers of building materials have switched to the production of ready-made mixtures for leveling floors. In this composition, all proportions are obviously observed, which will create a surface of higher quality than with manual mixing. It is also worth noting that additives are added to the dry mixture, which provide improved characteristics for the screed.
The similarity with preparing the solution yourself is that you need to add the optimal amount of water to the mixture. The powder packaging always contains instructions indicating the volume of water required to achieve a high-quality base.
An important condition, as in the case of ordinary cement mortar, is that water is added to the mixture, and not vice versa. The liquid is added gradually, and stirring is done manually or with a drill with a construction mixer attachment.
A dry mixture screed takes approximately 72 hours to dry. This period directly depends on the thickness of the screed being poured, but in any case, such a layer must dry for at least a day. The likelihood of subsidence of such a screed is minimal.
Performing special tasks
In garages, bathhouses, and saunas, it is often necessary to solve special problems when creating screeds from self-leveling mixtures. In addition to the installation of in-floor heating and drainage systems (which is partially described above), one of the main operations is the formation of a floor slope. This is to ensure that water flows to collection points or gates.
Self-leveling mixtures can solve the problem without effort. Compositions of the thick floor class have the ability not to form waves when hardening, when the surface is tilted when smoothing. To ensure a smooth floor at an angle, it is recommended to dilute the solution to a thicker consistency than recommended by the mixture manufacturer.
The process of filling the floor with a self-leveler
Considering that the finished mixture quickly begins to thicken, and pouring work must be done continuously , take care in advance of all the little things that can distract you. Place the required amount of mixture in the immediate vicinity of the workplace. Prepare containers with water required for the entire volume of the self-leveling mixture.
The liquid mixture must be prepared according to the instructions on the self-leveling packaging. Maintaining the correct proportions will allow you to obtain the optimal consistency of the liquid and save you from possible defects.
During the continuous preparation of the mixture and its uniform distribution, move around the room only in spiked soles. Since you will need to constantly roll out the surface with a needle roller (or squeegee) and move both on the floor that is not filled with the self-leveling mixture, and directly on the filled area. In ordinary shoes, you will disrupt the integrity of the homogeneous layer.
Try to pour the self-leveling agent onto the floor carefully so that it does not get on the walls. Even if the walls are only plastered, without wallpaper, you will still have to clean off the mixture from them. And it's better to do it right away. Dried self-leveler is very difficult to remove. When rolling out the liquid mixture with a needle roller, with excessively sudden movements, severe splashing of the self-leveling occurs. Take this into account and try to work more smoothly with the roller. This will save you the extra work of cleaning splash-stained walls.
After pouring the self-leveler onto the floor, constantly roll the liquid with a needle roller until you obtain a smooth surface without noticeable sagging. By moving the roller in different directions, you release air bubbles from the mixture and distribute it over the surface. Try to do this work efficiently, visually identifying and eliminating sagging and unevenness.
After a day, the finished surface dries and hardens. Complete acquisition of strength and resistance to deformation occurs in a month. However, within a day, you can safely move on the finished floor. It is only recommended to cover it with film, plywood or cardboard to protect the surface while it dries completely. You don't have to wait a month to install flooring. The optimal period is a week. During this time, the self-leveler will have time to dry and get rid of excess moisture.
General rules for working with bulk mixtures
Regardless of the class of the mixture, when working with self-leveling floors you should follow simple rules and techniques:
- holes are filled, protrusions are cut off or knocked down, cracks are repaired;
- the base is thoroughly cleaned of debris and greasy stains;
- there should be no cracks on the surface to be filled;
- the base is primed with deep impregnation compounds. Non-absorbent surfaces are treated with concrete contact. Wooden bases - with special mastics.
After this, self-leveling mixtures can be applied. After the liquid solution is poured and stretched with a squeegee, it is carefully passed with a needle roller to remove the smallest air bubbles. The curing time is indicated by the manufacturer on the packaging of the specific composition.
To perform certain tasks, plasticizers are added to the self-leveling screed compositions. Some of them increase turnover. Others collapse air bubbles. Still others increase strength and frost resistance. To reduce the mass of the screed, gas-forming plasticizers are useful - they form many air bubbles, almost without affecting the strength of the layer, but significantly reducing its mass.
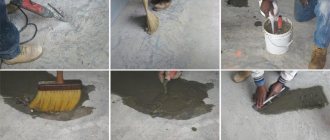
Homemade screed solution
The traditional means for leveling the floor, which was used everywhere a few years ago, was and is a cement-sand mortar. It is prepared by hand. The bottom line is that two main components are mixed in water: cement and sand. In fact, the prepared floor leveling solution differs from the ready-made store-bought solution by about 10 percent.
The mixing process requires the worker to comply with all proportions and purchase components of certain brands. Failure to comply with the technology for preparing the solution or poor quality of the components can lead to rapid deformation of the screed, which is unacceptable in a residential area, where such a process is fraught with consequences for the main floor covering.
To make a high-quality solution, the owner must carefully consider the main points:
- It is recommended to use cement grade M500;
- sand must be first class, and the grain size must not exceed 5 millimeters;
- proportions when mixing the mixture must be observed with maximum accuracy. The optimal consistency is 1 part cement to 3 parts sand;
- The kneading technology itself is also very important. It is correct to first combine dry sand and cement, and then add water to the mixture. The finished solution should be viscous and thick.
The process of manufacturing and pouring the composition has other nuances:
- the sand should not only be clean, but it should be carefully sifted;
- the water content in the mixture should be optimal, since if there is not enough liquid, the solution will be very thick, and if there is too much, it will float;
- The screed is dried within a month. The screed is regularly moistened with water;
- Even after this, dents and depressions will form on the surface, which can be eliminated by re-filling the mixture.
Among modern building materials, traditional floor leveling mixture has a significant advantage in the form of low cost. The disadvantage is that it is quite difficult to obtain high-quality coverage.
Features of the use of various screeds in practice
The advisability of using one or another type of screed or a combination of them depends on several factors.
An indicator for the use of cement-sand screed is the complex terrain of the floor, namely:
- large differences in height between floor slabs;
- significant unevenness, potholes;
- large angle of inclination of the plates.
These defects require the installation of a thick layer of screed, therefore, the advantage of using cement-sand mortars in this case is undeniable.
If it is necessary to achieve significant heat-saving characteristics of floors, for example, interfloor, perilite, expanded clay or polystyrene foam balls are added to the cement-sand screed. Heat-saving functions are not characteristic of self-leveling floors and heat-saving indicators cannot be achieved by adding any additives. Advice: It is believed that you can make a self-leveling floor yourself, without resorting to the services of specialists. The stages of surface preparation for all types of screed can be characterized as follows:
- cleaning floor slabs or existing rough fill;
- surface dust removal;
- treatment with primer compounds to ensure better adhesion.
Ready-made concrete floor screed
What is a self-leveling mortar?
General principles for creating self-leveling floors
To present the picture more clearly, let’s first remember how the floor is leveled with an ordinary cement-sand screed. To do this, the base is prepared, the necessary measurements and calculations are made, and then a system of beacons - guides is created that set the required horizontal plane of the floor.
When leveling the floor with a conventional concrete screed, the creation of a beacon system is required. Any error when setting the guides will affect the quality of the surface.
Then, between the beacons, a plastic concrete solution is laid out with a slight excess, which is leveled by moving the rule along the guides. The result is a surface that repeats the plane defined by the beacons.
It seems that everything is simple, and there is no need to “fence the garden.” Indeed, this scheme has been tested by time, and still remains the most popular in construction. What is attractive about it is its clarity, accessibility, and low costs of raw materials. But it also has certain disadvantages:
- Firstly, it is very difficult to achieve optimal smoothness of the concrete surface with this action. For laying ceramic tiles - just right, but for many other floor coverings the resulting quality is not enough. And we have to, one way or another, modify the surface.
- Secondly, a screed with a thickness of less than 20 mm (and even 30 mm is considered optimal) will not have the necessary strength. And in many cases, such a thick layer for leveling becomes absolutely unnecessary, that is, leading to unnecessary weighting of the structure and unjustified costs.
- Thirdly, when laying a plastic, but still quite dense mortar, if special tools (vibrator or vibrating screed) are not used, small air cavities may remain in the thickness of the screed. And this is a decrease in the strength qualities of the base.
- And fourthly, installing a beacon system correctly can also be a difficult task. And any error in setting the guides or their insufficient fixation will certainly affect the quality of the resulting base.
How to install beacons for pouring concrete screed?
There are many different methods for performing such an operation - you can choose the most convenient for a particular case. Some of the methods are described in detail in the article on our portal “Do-it-yourself concrete floor screed” .
Prices for self-leveling floors
self-leveling floor
Now let's remember the properties of an ordinary liquid. Poured into any vessel, regardless of the complexity of its shape (as an option - poured over the surface of the floor), water under the influence of gravitational forces always “calms down” in such a position that its surface becomes perfectly horizontal. And at the same time it fills the entire volume, that is, it leaves no voids.
It is on this ability of the liquid that the technology of using self-leveling compounds is based.
Self-leveling floor coverings - the ideal horizontality of the resulting surface is achieved due to the action of normal gravitational forces.
Technologists have developed special compositions that are given a liquid consistency when preparing for work. After they are poured onto the base of the floor and distributed over the entire area, the surface of this solution takes on a horizontal plane. Optimally selected components of the mixture ensure its rapid hardening. And the result is a hard layer with a perfectly flat surface, which very often does not require even minimal “finishing”. Moreover, some types of self-leveling floors themselves become the finishing coating.
Advantages and disadvantages of self-leveling floors
Obviously, this technology for creating a smooth and durable floor surface has a number of advantages :
- Self-leveling self-leveling floors allow you to level the base with a thin layer, literally a few millimeters. There is no need for reinforcement, the floor structure is not overweight. Some compositions even make it possible to perform leveling almost “to tear off”, that is, less than a millimeter thick.
However, mixtures are produced that can be applied to very curved substrates, in layers up to 50 and even 100 mm.
The surface can be leveled in a very thin layer, literally a few millimeters. And the strength of the coating does not suffer from this.
- The surface, subject to the technology of preparation and distribution of the composition, acquires a perfectly horizontal plane, and with the filling of all possible irregularities and voids.
- Unlike concrete screed, the completion time for the coating is significantly reduced - on some surfaces you can move on after just a few hours, and after a day or two, you can move on to further finishing operations.
After just a few hours, you can safely move on many self-leveling floors.
- Many self-leveling floors make an excellent waterproofing barrier.
- As a rule, the optimally selected composition of such mixtures is characterized by very slight shrinkage upon drying.
- There is a wide variety of compositions on sale, suitable for different starting substrates and for all possible operating conditions.
- The process of pouring such a floor is not particularly labor-intensive if the operation of preparing the composition is streamlined.
Self-leveling floors may not only not require finishing, but even become the main decorative element of the interior.
- Some self-leveling self-leveling compounds themselves are the final floor covering, that is, they do not require any subsequent lining. Moreover, special technologies make it possible to turn the floor into a completely exclusive interior decoration.
However, self-leveling floors also have their disadvantages :
- It is clear that the smaller the layer, the lower its strength. That is, it is still necessary to observe a certain “line”, in any case - not to make the floors thinner than specified by the manufacturer of the composition.
- If in the future it is necessary to dismantle the self-leveling floor, this will be accompanied by certain difficulties.
- Self-leveling mixtures are of little use if a floor with a certain slope is required.
- Finally, self-leveling floors are always more expensive than regular screed, some even significantly more expensive. That is, using them for the initial leveling of large differences in heights is extremely unprofitable. In this case, it is better to eliminate significant unevenness with a screed, and only then use the leveling qualities of the self-leveling mixture.