Installation of slabs
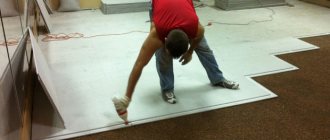
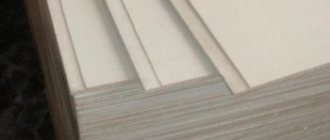
Sheets should be cut on a flat surface
Sheets should be cut on a flat surface
Laying the first floor fragment
Having compacted the expanded clay, you can begin installing gypsum fiber board sheets. Prefabricated floor elements from the Knauf company are easy to install, you just need to take your time and carefully follow all installation technology. It is better to start laying sheets from the door; on the first sheets, you should remove the folds on one side (from the walls) so that they lie flat and do not sink into the expanded clay. The installation scheme is “bricked”, with the joints offset by half of the next sheet. The first sheets must be carefully leveled; the level of the assembled floor will depend on how level they lie. The folds are glued together and scrolled with self-tapping screws every 10-15 cm.
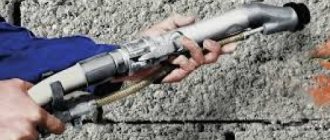
The folds are glued together
Fastening sheets with self-tapping screws
You can cut GVL sheets with a hacksaw or a regular hacksaw with a fine tooth. It is necessary to ensure that expanded clay or other bulk material does not get into the joints. Knauf floors can be assembled throughout the entire apartment at once, while maintaining one level. Installation should be done with a partner; in one working day you can lay the floor on an area of more than 100 square meters. m.
Installation of slabs
Knauf floors have stood the test of time, the manufacturer guarantees truly high quality, but superfloors also have their drawbacks:
- You almost always have to cut off the fold of the sheets adjacent to the wall. This ultimately leads to a slight subsidence of the floor during operation;
- By removing the beacons and adding a small amount of expanded clay, it is quite difficult to maintain a completely flat surface, which is necessary for installation. But beacons left under the floor can also lead to deformation of the coating.
During the installation process, you need to ensure that the bulk material is completely dry, otherwise the floor may “lead.” Knauf floors are not recommended for installation in basements and ground floors. When laying such a floor in bathrooms and kitchens, it is necessary to carry out high-quality waterproofing and install a finishing coating that does not allow moisture to pass through. Such a floor should not be installed in rooms with heavy loads - in office and municipal buildings, in production workshops. Knauf floors are an excellent option for an apartment or private house with a good ventilation system. If the installation was carried out efficiently, this floor will serve you for a very long time.
Puttying sheet joints
Priming the laid Knauf floor
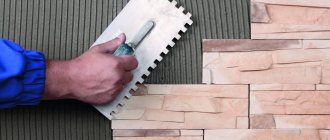
An example of laying tiles on a KNAUF floor
Scope of application
Installation of the product is carried out during the construction of prefabricated floor foundations in public, industrial or residential buildings and premises. Standard gypsum fiber sheets are used in buildings with normal or dry humidity characteristics. GVLV can be used in normal, dry or wet buildings. KNAUF sheets are also actively used as a superfloor element.
Knauf floors can be used in rooms with high levels of humidity: bathrooms, kitchens. In addition, they are perfect for both reinforced concrete and wooden floors
What is KNAUF Superfloor dry screed?
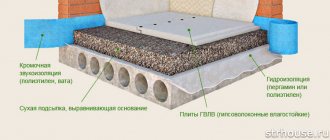
KNAUF superfloors mean products for the manufacture of which moisture-resistant gypsum fiber sheets are used. Using these materials, it is possible to assemble the floor screed on your own, resulting in a prefabricated base. This method itself is considered extremely “clean”, since it involves the use of expanded clay granules as insulation. In turn, they allow you to increase the thermal insulation of the entire structure.
Due to the fact that expanded clay has a fine fraction, it is possible to not only increase the thermal insulation capabilities of the surface, but also make it as smooth as possible. KNAUF elements are placed on top of the formed layer, for fastening of which screws and glue are used.
To complete the planned work, you will not need complex tools or expensive materials. In addition to KNAUF-superfloor elements and expanded clay, you need to stock up on damper tape, polyethylene film for waterproofing, PVA glue and self-tapping screws for gypsum fiber sheets. The tools you will need are a screwdriver, an electric jigsaw, a level, a tape measure and a pencil. When all this is in hand, you can begin the main work.
Do-it-yourself KNAUF superfloor installation
The installation procedure for screeds using KNAUF elements can be divided into a number of stages. The most important of them are those presented below.
1. The working base is covered with film
You can achieve high-quality vapor barrier if you use the simplest film, but it must be more than 50 microns thick. When laying the material, in any case, overlap the individual sheets by 15 cm and overlap the wall by at least 20 cm. After spreading the film, an edge damper tape is installed. Its height should be equal to the thickness of the future layer of expanded clay.
2. Installation of beacons in the room
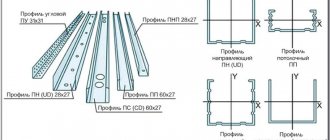
According to the instructions, Knauf superfloors can be installed without the use of beacons. But this is not so easy for inexperienced workers. Therefore, it is better to place the beacons using an inverted profile. Expanded clay is placed in the spaces between the edges of the profile. Since KNAUF elements will hardly come into contact with metal profiles, the thermal insulation of the floor will be high.
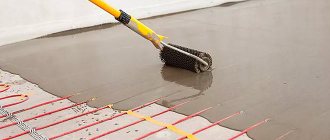
3. Filling the floor with expanded clay and leveling
It is not necessary to cover the entire working surface area at once. To begin with, you can fill in expanded clay only in a small area, and then lay KNAUF superfloor in this place. Then you will be able to move comfortably around the room.
4. Laying KNAUF-superfloor
The most important requirement that must be observed when laying Knauf sheets is not to move the product in such a way that it slides on the floor. And due to the fact that the weight of each element is about 17 kg, it is best to work together
For those elements that are placed near the walls, the folds should be removed.
5. Fastening sheets with screws and glue
It is necessary to lay Knauf sheets on the floor so that a bandage is formed, as when working with brick. Self-tapping screws are attached in those places where a field is formed due to the displacement of gypsum fiber sheets. Fasteners should be placed in increments of 10-15 cm. The seams are additionally glued with PVA. At least that's what the material manufacturer advises.
Features of KNAUF-super technology
When using KNAUF superfloor, you can notice many advantages. The prefabricated floor screed is light in weight, quick to implement, and does not require the use of mortars. The design allows for higher floor insulation, which is also a serious advantage.
But you shouldn’t think that arranging a KNAUF superfloor does not require any skills at all. Still, such work is associated with some subtleties, without which it will not be possible to achieve high-quality installation of the screed. Therefore, the owner must be well prepared before starting the procedure.
Features of preparatory work
Do-it-yourself installation technology for the presented type of floor must follow certain rules.
- Prepare the rooms - inspect the floor, corners of the room for cracks, clear the space of anything unnecessary.
- If defects are found on the floor surface, you should get rid of them.
- If the installation is carried out in a greenhouse, kitchen or shower room, lay a polyethylene film around the perimeter of the floor. Near the walls, its edges should be higher than the height of the floor structure. When working with sand, leveling rulers are used.
- Installation of the covering begins from the wall where the door is installed. If you have to work from the other side, you need to install special islands. At the wall, the finished lamellas are cut off at the junction. The next row starts from the same place.
After laying the mixture, look at how smooth the surface is on which the floor will be installed. Mark the level; it is recommended to use a laser level or water level
Important! To minimize waste, the next row should be installed from the cut piece.
Installation technology requires care. The displacement of the end joints should not exceed 250 millimeters. If everything is done correctly, the floor will serve reliably for several decades.
Knauf-superpol - what is it?
Knauf-superfloor is a prefabricated structure or system that allows you to avoid “wet work” on a concrete screed and, accordingly, reduce technological interruptions associated with its drying.
The elements of this system are glued gypsum fiber sheets, offset by 50 mm relative to each other, due to which folds are formed along the perimeter. The Knauf-superfloor element has a total thickness of 20 mm and overall dimensions of 1.2 × 0.6 m. With this thickness, the floor element weighs little, but the load resistance of its surface reaches 20 MPa.
The leveling base for the elements of this system is a dry expanded clay backfill (with a fraction size of 0−5 mm), which ideally fills the space and has excellent thermal and sound insulation, as well as fire-fighting characteristics. If the expanded clay granules are larger, a slight characteristic crunching sound can be heard when walking in silence.
The Knauf floating floor system, as it is also called, has a number of advantages compared to traditional floor leveling with a concrete screed:
- reduction of installation time. The Knauf-superfloor system allows you to complete all the work in just a few days and not have to take a technological break for the screed to dry - you can start laying the finished floor covering immediately. However, according to the recommendations of experts, you should not touch the dry screed for several weeks if the thickness of the backfill layer is more than 5 cm, since with such a thickness the backfill material will shrink by approximately 15 mm;
- The main advantage of this system is the absence of wet work. Laying dry screed can be carried out without fear in a room where the renovation has already been completed;
- sound and heat insulation. Expanded clay backfill prevents noise penetration and heat loss;
- floating floor technology creates a base that is ready for further covering and does not require additional leveling of small differences and unevenness inherent in a sand-cement screed. This means it saves both time and money. Since the base, assembled from Knauf-superfloor elements, is smooth and even, any type of flooring can be laid on it, be it linoleum, laminate, tiles, and so on;
- unlike cement-sand screed, dry screed is lightweight and does not load the floors;
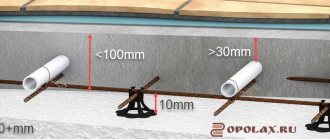
- It is possible to lay pipes or wiring directly in the dry screed.
Knauf-superfloor is laid on wooden and concrete floors in rooms with a non-aggressive environment. When laying a waterproofing layer, this system can also be used in showers and bathrooms. This system is especially relevant in conditions of reduced loads on floors or when “wet” work is excluded.
Advantages
- Knauf Superfloor presents a reliable, easy-to-install and modern floor covering. It solves many problems.
- Excellent sound insulation is achieved.
- The desired level can be made without the use of complex mechanisms.
- You can easily change the appearance of the floor without changing the design.
- The element is installed one by one, the entire floor can be laid in 8 hours.
- Each element weighs a little.
- The surface after installation is smooth.
Knauf floors will allow the owner of the premises to avoid many problems. You will not have any dirt and water, you will not have to look for containers for diluting the cement-sand mixture, you will not need to hire more workers to somehow speed up the pouring process
Laying method
In the simplest method of constructive dry screed technology discussed here, which has the designation “Alpha” in Knauf company terminology, a single-layer installation of gypsum fiber board is used, but there are other options that involve a more complex “pie” using additional layers of polystyrene foam or porous fiber sound and heat insulating materials this company.
Required materials:
- Knauf superfloor panels of the required total area with a small margin. One sheet of material covers ¾ m²;
- expanded clay backfill "Knauf Compavit" at a rate of approximately 20 l/m². It can also be replaced with domestic expanded clay of good quality with a fraction size of no more than 5 mm;
- Knauf self-tapping screws - approximately 12 pcs/m²;
- edge tape with a length equal to the perimeter of the room;
- Knauf adhesive mastic - 50 g/m². You can also use PVA glue;
- Knauf putty - 150~200 g/m²;
putty Knauf
- Knauf deep penetration primer;
- vapor barrier polyethylene film with a total area 20% larger than the size of the room.
Required tools:
- drill, screwdriver;
- jigsaw;
- drywall knife;
- measuring instruments: tape measure, meter, square, level;
- metal profile for installing “beacons”;
- rule for leveling the backfill layer along the beacons.
Tools and material required for installation
- Construction vacuum cleaner.
- Paint brush.
- Construction gypsum.
- Level (regular building or water level).
- Deep penetration soil.
- Pencil or marker.
- Hacksaw for metal.
- Self-tapping screws of the required size (from 2 cm).
- Metal guides (rack profile, 60 mm wide or metal beacons).
- Waterproofing.
- The rule is metal.
- Glue (PVA or liquid nails).
- Screwdriver.
- Putty knife.
Gypsum fiber moisture resistant Knauf supersheet (GVLV)
| Application area: | Walls, Ceilings | Edge type: | PC, FC |
| Length: | 2500 mm | Amount in a package: | 50 pcs, 40 pcs |
| Vapor permeability: | 0.12 mg/(m•h•Pa) | Tensile strength: | >5.3 kPa |
| Thermal conductivity: | 0.22-0.36 W/(m*K) | Thickness: | 12.5 mm, 10 mm |
| Width: | 1200 mm | Gross weight: | 36.1 kg, 45.12 kg |
Knauf supersheet moisture-resistant (GVLV) High-quality, environmentally friendly moisture-resistant plasterboard for dry construction in rooms with high humidity with high requirements for fire safety, heat and sound insulation.
Moisture-resistant gypsum fiber Knauf supersheet (GVLV) is a sheet finishing building material of rectangular shape. It is manufactured in accordance with GOST R 51829-2001 by pressing a mixture of gypsum binder and fluffed waste paper fibers, evenly distributed throughout the entire volume of the sheet.
The front and back sides of the Knauf gypsum fiber supersheet are treated with an effective water repellent, sanded and treated with anti-chalking impregnation.
Based on the shape of the longitudinal edges, Knauf gypsum fiber sheets are divided into sheets with a straight edge (SK) and sheets with a folded edge (FK). The end edges of the sheets have rectangular edges.
The moisture-resistant design of the gypsum-fiber Knauf supersheet, in contrast to the usual one, gives it the properties of both fire-retardant and moisture-resistant material.
Sheet markings are applied in blue on the back side of each product with indelible paint and contain designations: type of sheets; type of longitudinal edges; nominal length, width and thickness of sheets (mm); standard
An example of marking of moisture-resistant gypsum fiber sheets with seam longitudinal edges 2500 mm long, 1200 mm wide and 10 mm thick: GVLV-FK-2500x1200x10 GOST R 51829-2001.
During the entire technological process and at its completion, gypsum fiber moisture-resistant Knauf supersheets undergo strict technical control, guaranteeing high product quality indicators. Product quality is confirmed by: GOST, certificate of conformity, fire safety certificate and hygienic certificate for use in housing and civil construction.
Scope of application of Knauf GVLV supersheet
GVLV Supersheets from Knauf are intended for use in residential, administrative, public and industrial buildings:
- all degrees of fire resistance, including I degree;
- all classes of structural fire hazard, including class CO;
- all classes of functional fire hazard, including class F1;
- any structural systems and types;
- any level of responsibility, including increased;
- different number of storeys;
- regardless of climatic and engineering-geological conditions of construction.
Recommendations for installing Knauf supersheets GVLV
- It is recommended to carry out multi-layer cladding within one day.
- Before puttying, the joints of the sheets are treated with KNAUF-Tiefengrund primer.
- Puttying of edges and places where screws are installed is carried out with KNAUF-Fugenfüller GV or KNAUF-Uniflot putty under conditions corresponding to the operating conditions.
- In rooms where there is a possibility of direct water contact with the surface of structures (bathrooms, showers), the junction points are protected with waterproofing tape of the KNAUF-Flechendicht type, and the surface of the sheets and the junction points are treated with waterproofing mastic of the KNAUF-Flechendicht type.
Advantages of Knauf supersheets GVLV
- Increased moisture resistance.
- Increased fire resistance.
- When using KNAUF gypsum-fiber supersheets during finishing work, inconvenient “wet” processes are eliminated.
- Labor productivity increases significantly.
- Overall savings in construction costs are achieved by lightening the building structure.
- It is possible to implement unlimited in design, multi-variant architectural solutions, including the arrangement of curved surfaces.
- Not only environmental cleanliness is ensured, but also a microclimate in the room that is favorable for humans.
- It has the ability to breathe, that is, to absorb excess moisture and release it into the environment when there is a deficiency.
- The material does not contain toxic components and has an acidity similar to that of human skin.
- Meets strict global standards.
Some nuances
Using the presented design you can get a very durable floor. However, operation must be carried out in compliance with the following rules:
- elements must “get used” to the room before installation;
- sheets are stored only horizontally;
- the best option is a horizontal layer of expanded clay;
- In wet rooms there must be a layer of waterproofing.
We also invite you to learn about the features of installing self-leveling floors yourself by reading the corresponding article on our website.
Do not forget that throughout the installation process, you need to regularly check the plane of the surface using a level.
Installing the system is easy. At the same time, the installation process will cost you much less than the equipment of other systems. The presented design is characterized by a high level of heat and noise protection and allows you to level any surface. The only drawback is the fear of moisture. However, you definitely won’t hear your neighbors below. The system is installed in various industrial, residential and civil buildings, as well as in the presence of waterproofing, in rooms with high humidity.
Installation of Knauf floors
You need to start with measurements of the room, based on which you can purchase all the necessary materials and suitable tools:
- Polyethylene film for waterproofing with a thickness of 200 microns or more;
- Construction vacuum cleaner;
- Paint brushes;
- Deep penetration primer composition;
- Hacksaw or metal scissors;
- Leveling metal beacons;
- Rules;
- Spatulas;
- Alabaster (construction plaster);
- Self-tapping screws 3.5 mm;
- Screwdriver;
- You may need PVA glue.
Before installation begins, all old structures must be dismantled to the supporting base.
There is no need to level the load-bearing base, but it must be taken into account that the height of the bulk layer of the Knauf floor should not exceed 12 cm. The base must be cleared of debris, and large potholes and defects must be filled with plaster. The next stage includes treating the surface with a deep penetration primer, after which you can proceed to vapor barrier using polyethylene film.
Vapor barrier is an important stage in the installation of Knauf flooring. High-quality insulation will increase the service life of the floor several times, which will avoid unnecessary expenses and problems in the future. The film should be overlapped (about 15 - 20 centimeters), and the joints should be secured with tape. In the case of a wooden base, glassine or bitumen paper can be used instead of polyethylene.
After vapor barrier work is completed, leveling beacons are installed, the purpose of which is to achieve ideal distribution of the bulk mixture.
Beacons are placed at a distance of 60 to 150 centimeters and the main limiter in the distance between beacons will be the length of the rule. If there are wires, they must be placed in a corrugation and pressed to the floor.
The base for Knauf gypsum fiber boards is made from bulk mixtures such as expanded clay and silica sand, fine-grained screenings or slag.
The mixture is leveled by the rule to the level of the beacons, after which the beacons are removed, after which the finishing stage can begin.
Knauf Superfloor sheets are laid from the door, where the Knauf gypsum board joins the wall, the folds are cut off, otherwise the installation is simple - the sheets are laid groove to groove with an offset of half a sheet for each subsequent row. Before laying the sheet, the folds are coated with thick PVA glue or liquid nails and screwed at the joints with self-tapping screws at a distance of approximately 15 centimeters
When assembling the structure, special attention should be paid to the first row; all subsequent installation will depend on how straight it is laid out.
What is included
Knauf floors are made by gluing two moisture-resistant gypsum fiber sheets (gypsum fiber). The thickness of the resulting sheet is 2 cm, linear dimensions are 1200x600 mm, folds of 5 cm are arranged around the perimeter.
Also an integral part of Knauf floors is fine-grained expanded clay, the amount depends on the thickness of the layer that is required at a given construction site. If the layer exceeds 6 cm, laying a second layer of gypsum fiber boards is required. The kit usually includes plastic film and screws. After proper installation of Knauf floors, a flat, durable surface is formed that can withstand significant loads - up to 500 kg per sq. m.
How to choose?
Currently, the building materials market offers a wide range of products. When choosing a Knauf dry screed, give preference to trusted suppliers who can provide a quality certificate and are responsible for the quality of their product. To avoid running into fakes, purchase building materials only from specialized stores that have the necessary license. The experience of professional builders and finishers shows that gypsum plasterboard is the most affordable way to level floors and walls. In addition, you will incur much lower financial costs than when using a liquid screed.
When is the Knauf system relevant?
Such floors have a wide range of possibilities and, in some cases, can be done at low cost. to use a dry screed:
- to eliminate differences in the floor base over 40 mm. This applies to apartments of old buildings, where a serious difference in elevation is the norm;
- when installing electrical wiring and water supply systems after completion of repairs;
- with limited time frames for repair work;
- the ability to install a floating floor at low air temperatures;
- when the logs become dilapidated.
Laying the material
Preparing for work
Experts advise laying gypsum fiber board on the floor in two layers when the thickness of the products is 10 millimeters, and in one layer if we are talking about slabs of the “floor element” type. This method has significant differences from conventional concrete screed:
- does not require additional materials;
- generates significantly less debris and dust;
- does not require waiting for the solution to set.
Before installation, it is necessary to mark the contour of the future floor on the walls using levels and plumb lines. These actions must be performed with maximum precision. Otherwise, the floor may swell or “float”. The floor surface must also be cleaned of dust. You can use a construction vacuum cleaner for this. During this process, noticeable cracks and irregularities may be discovered. They need to be covered up. The prepared surface must be primed using a deep penetration solution.
The next step is waterproofing. Plastic film, roofing felt or parchment are suitable for this. The edges of the waterproofing must be secured along the upper edge of the marking contour. This is necessary to improve the result. After waterproofing there is a layer of insulation. You can use polystyrene foam, polystyrene foam, mineral wool or expanded clay. In the first three cases, in addition to marking the contour, you need to mount guides from a metal profile or wooden beam.
If you decide to use expanded clay for thermal insulation, then you need to follow a number of rules. The granules should be small (no more than five centimeters in diameter). After backfilling, the surface must be leveled relative to the level, focusing on the contour and guides
Slab installation technology
After all preparatory measures have been completed, you can proceed directly to the installation of gypsum fiber boards. There is nothing difficult about this, although it may not work out the first time. The installation of gypsum fiber sheets is also called dry screed. This is a rather labor-intensive and responsible process. It can be divided into three stages. The first stage is installation of the sealing tape. It is carried out around the perimeter of the room at the supposed junction of the gypsum fiber board and the walls. The tape itself looks like a finely porous material made of polyethylene foam, usually with an adhesive backing. Its use has a number of advantages:
- sound and noise insulation;
- vibration damping;
- moisture repellent;
- vapor barrier;
- resistance to aggressive external environment;
- smoothing out uneven walls.
When installing the tape, a number of rules should be followed:
- the width of the tape must correspond to the width of the slab or profile;
- it is necessary to unwind the tape and remove the protective film;
- Before gluing, the surface must be degreased;
- The tape should be applied with the adhesive side to the surface, without stretching too much;
- After pasting, the tape must be pressed to the surface using force.
The second stage is the installation of gypsum fiber boards. You should start from the corner closest to the front door.
The third stage is applying an adhesive solution to the edge and installing the second row of slabs. It is better to do this in a checkerboard pattern. Upon completion of installation, it is necessary to process and putty the seams, as well as the screw heads. Otherwise, water will leak through them. Professionals advise taking into account several nuances:
- the width of the seam should not exceed two millimeters;
- excess adhesive solution must be removed in a timely manner;
- upon completion of installation, it is advisable to apply a layer of primer;
- FC should be cut if they are adjacent to the walls;
- Warm floors can only be installed on top of gypsum fiber boards, but not under them.
Preparing the base
Leveling the floor with a Knauf screed
In the case when the floor is laid during renovation work, it is necessary to completely dismantle the old covering down to the concrete (or wooden) base. For the installation of Knauf floors, the base may not be completely flat, but it must be taken into account that the backfill layer should not be more than 10-12 cm.
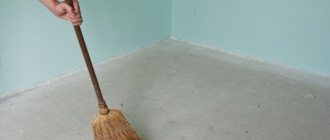
Cleaning is a mandatory process before installing Knauf flooring
It is very important in the process of preparing for installation to thoroughly clean the entire area from dirt and construction debris and seal large potholes/cracks with concrete or gypsum mixture. It is advisable to vacuum the surface with a professional construction vacuum cleaner and treat it with deep penetration primer. After the soil has dried, you can begin installing insulation.
Markings to determine the level of the future floor
A laser level will speed up the process of marking a room
How to make underfloor heating
To install underfloor heating, it is necessary to clear the base of the floor from debris; it is recommended to make a concrete screed so that the surface is level
This is important for normal fluid circulation in the system: the water pressure in all sections of the pipeline must be the same
On an uneven surface, the load on the pipes will be uneven. In areas that experience greater coolant pressure, rupture may occur. This will lead to serious complications. You will have to open the floor covering and completely change the water circuit in the room.
- Thermal insulation “Knauf Therm FLOOR PRO” is laid on the base. Mats do not strengthen. They are installed end to end. The sheets should fit tightly to each other.
- I remove debris and dust from the insulating surface.
- A damping tape is reinforced around the perimeter of the room. It should fit snugly against the polystyrene insulating material.
- Knauf Therm Warm Floor mats are laid. No gaps are left between the sheets. There is no need to glue them to the base of the floor. The mats are laid in such a way that the upper surface of the bosses throughout the entire area has the original tablet shape. Sheets with incorrectly formed bosses remain are installed on the wall side.
- Along the perimeter of the room, a water supply is laid in a “snail”. It is recommended to use Knauf Therm PERT EVOH pipes. They are specially adapted for the heating system and are made of metal-plastic. The outer and inner surfaces are protected with a special anti-diffusion coating that creates an oxygen barrier. Metal parts of the water supply system are not subject to oxidation. On the surface of the plastic there is a meter marking. There is no need to use a tape measure.
- The water circuit is fixed between the bosses. During installation, a certain step of 40 cm is observed; Each turn of the pipe is fixed through 4 bosses.
- The “snail” is brought to the center of the room. The pipe is turned and directed along the return circuit. The same snail technique is used.
- Now the water supply is laid every 2 bosses. The distance between the turns should be 20 cm. The circuit is taken out of the room and connected to the outlet pipe on the boiler or stove.
- The installation of the underfloor heating system is completed by installing the screed. To do this, you can use the Knauf building mixture and make a bulk screed using a dry method. The advantage of a dry screed is that in an emergency, you can easily remove the filler and fix problems in the heating system. When installing a concrete screed, it is difficult to repair the water supply system.
Knauf thermal insulation has poor sound conductivity. This property of the material makes it possible to reduce the penetration of noise into the room. Expanded polystyrene is recommended to be laid on the floor in apartment buildings. The material is used if there are small children in the apartment who like to move actively.
Superfloor in 3 hours (installation of dry screed)
Title Superfloor in 3 hours (installation of dry screed) Title Installation of dry screed for the base of the floor KNAUF-superfloor Title Water-heated floor without screed. Lightweight foil system.
Bulk materials base
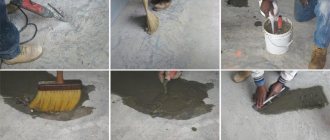
Backfilling bulk insulation
Leveling the filled expanded clay
The base for GVL slabs can be made not only from expanded clay and silica sand, but also from other types of sand. You can also use screenings or slag (small fraction). These materials are characterized by flowability, almost no precipitation, and have high porosity. They have a low hygroscopicity rate, so they are optimally suited for Knauf flooring.
The volume required for backfilling depends on the size of the room and the size of the layer, which, in turn, is determined by the presence of communications and the existing slope of the surface. Before you start backfilling, you need to install beacons - guides, with the help of which the dry screed will be leveled. The two extreme profiles (or beacons) are placed at opposite walls strictly horizontally. They must be placed parallel to each other, the distance from the wall is about 15 cm.
You can place wooden blocks or small pieces of ceramic tiles under the beacons, but it is better to make support poles from plaster. Then the cord is stretched and intermediate profiles are installed, parallel to the others, at a distance of 1.5 meters from each other. After installing the beacons, expanded clay is poured in and carefully leveled using a metal rule.
Leveling the backfill using a special rule
After leveling, the beacons must be very carefully removed (having previously arranged temporary platforms made of thick plywood measuring approximately 60 by 60 cm for movement on them) and adding expanded clay, carefully leveling it with a metal spatula without disturbing the surface level. On large areas, installation should be carried out in stages: having completely covered a certain area of the floor, you should begin further leveling.
Backfill leveling
On an absolutely flat surface with no deviations from the horizontal, expanded clay backfill is not needed. Instead, you can tightly lay sheets of polystyrene foam (extruded), making precise cutting. Install Knauf floors on polystyrene foam, following conventional technology.
Features, pros and cons
The method of dry floor screeding has been practiced by domestic construction specialists for quite a long time, so today we can judge both the pros and cons of this type of work.
pros
The main distinguishing feature of the dry screed method is the absence of so-called “wet work”. The resulting base does not require time to dry, as in the case of a classic screed with concrete mortar. This fact can be attributed to obvious advantages, allowing to reduce the time required for repairs and maintain cleanliness in the room.
Due to the absence of “wet work”, this method allows you to level the surface of old wooden floors without requiring their dismantling.
Another advantage the owners of premises call is the ability to easily dismantle the screed covering if it is necessary to access the floors or built-in communications and elements of the heated floor system.
In parallel with the leveling of the floor, its noise-insulating qualities increase, since the fine-grained expanded clay used for dry screed is an excellent noise absorber.
When only a 6 cm layer of expanded clay is poured, noise absorption occurs within 60 dB, and the effectiveness of noise insulation is enhanced by sheets of gypsum fiber on the surface of the expanded clay.
The next advantage is that dry screeding allows you to insulate floors even if a heating system is not installed in them. This effect is achieved due to the heat-insulating qualities of expanded clay and gypsum fiber sheets.
Since work using the Knauf “Superfloor” technology does not involve fixing the beacons inside the backfill, such floors settle more evenly, without creating pressure zones around the perimeter of the beacons.
Also a significant advantage is the not too heavy weight of the materials required for leveling floors using Knauf dry screed technology, which floors in old buildings can withstand. Using this method, any differences in the height of the floor base can be leveled.
Minuses
The main disadvantage of Knauf dry screed is its vulnerability to moisture. This point is associated with the use of gypsum fiber sheets as the main structural element.
One of the characteristics of GVL is swelling when exposed to moisture. Therefore, it is considered that it is irrational to use dry floor screed in the kitchen, bathrooms and basements.
However, today the manufacturer has developed a moisture-resistant GVL, which is called “Knauf-Superpol”. This innovation is recommended for use in showers and unheated rooms, as well as in those where the air temperature drops below +10 degrees.
In all rooms without exception, for maximum durability of the system, it is necessary to strictly follow the manufacturer’s instructions and apply vapor and waterproofing. In situations where leaks could not be avoided, it is imperative to open the floor and thoroughly dry all layers of the screed, replacing the gypsum fiber sheets if necessary.
Users consider one of the significant disadvantages to be the fact that the plasterboard laid as a subfloor cracks during use and falls under heavy furniture and women's heels.
To avoid this effect, the manufacturer recommends not laying plasterboard sheets as the top layer of dry screed. To do this, it is worth using exclusively gypsum fiber (GVL), which will be somewhat more expensive, but will last longer and will not cause such complaints.
The disadvantages include the fact that the dry floor system can reduce the height of the room by a considerable distance, from 5 cm to 12 cm. It is also necessary to remember that dry floors can only be effectively used in domestic premises and are not designed for objects with high traffic.
Hydro- and vapor barrier device
This is an important technological stage and must be approached responsibly - a high-quality insulating layer will help you get rid of floor problems for many years. If moisture penetrates, then individual sections of the floor may sag and the slabs may swell, leading to deformation of the flooring. First of all, it is necessary to check the horizontalness of the surface using a level and make marks on the walls along the entire perimeter of the room that determine the level of backfill. For waterproofing, you can use rolled self-adhesive waterproofing materials, PVC film (at least 200 microns thick) or vapor barrier. The waterproofing film is laid with an overlap of about 20 cm, the joints are fixed with tape.
The film must be secured to the wall with tape or a stapler.
The waterproofing film is laid with an overlap
Waterproofing on walls should be installed up to the marks that limit the backfill layer.
For wooden floors, glassine can be used as insulation to protect against moisture. Paper impregnated with bitumen is also suitable.
After installing the waterproofing, you should proceed to creating sound insulation. A 10-centimeter layer of insulation (edge tape) is laid along the walls, which will prevent the floor from deforming and create sound insulation. Regular foam tape can also serve as an insulator. They can be self-adhesive or regular (attached with construction tape or a stapler). A good option would also be to use a special damper tape.
Edge tape
Characteristics and performance
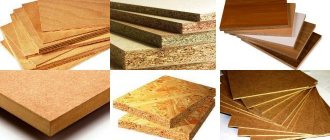
Sheets are produced in dimensions 1200×600 mm with a thickness of 10 mm. Unlike classic plasterboard sheets, gypsum fiber boards have a stronger weave of fibers instead of a paper layer, which provides the necessary strength. This allows them to be used for arranging floor coverings.
The slabs consist of two plates that are glued together with a slight shift. As a result, a “lock” is formed on the edges, which connects adjacent sheets to each other. The result is a continuous monolithic coating with excellent characteristics.
Important
Any finishing floor covering can be laid on top of the slabs, including tiles and self-leveling systems.
Fine-grained expanded clay or expanded clay sand is poured under the slabs to the required height. To ensure the stability and strength of the embankment, it is compacted. Then, when the slabs are loaded, the weight is distributed evenly in all directions. The sheets are joined together in stages: first, an adhesive mixture is applied to the ends, and after fixing, they are additionally tightened with self-tapping screws.
Superfloor installation instructions
- Work is being carried out to prepare the base and apply markings to the walls.
- Based on the marks made, the first backfill is made, which is laid out in ridges along the wall and with a distance of approximately 0.8-1 m between adjacent ones in one direction.
- Using a leveling rod or rule, the entire mixture is leveled over the base area, and strong islands can be formed along which it can be moved.
- The U-shaped profile is recessed on top of the installed bulk ridges.
- All guides are leveled to the markings previously applied to the walls.
- Starting from the far corner of the room, the entire dry mixture is leveled along the installed beacons.
- Immediately after leveling the bulk material from the far corner to the exit from the room, beacons are removed from it.
- Sheets or plywood measuring 0.5x0.5 m are laid starting from the area near the doorway. It will be possible to step on it and continue styling.
- In the area where the Knauf GVL adjoins the wall, an incision is made so that the dry mixture does not come out.
- The first layer of sheets is coated with adhesive in zigzags to cover a larger area for gluing with the second layer of sheets.
- Self-tapping screws are screwed in at increments of 27–30 cm to fasten the plates.
- Observing the offset of the joints for the next rows of slabs, the covering is laid.
- The offset of the sheets should not be less than 25 cm.
- After complete installation, a primer is applied to the entire surface of the slabs. Wait for it to dry. The joints are puttied and dried.
Important
If it is necessary to increase the strength of the Knauf superfloor, then with an offset relative to the seams and trimming the corresponding sheets, a 2nd or even 3rd layer of GVL is laid.
Flaws
KNAUF-superfloor is a factory-made floor element glued together from two small-format moisture-resistant sheets
If we talk about the disadvantages of Knauf technology, then there are practically none, although many here call this material “phobia of water”, but leaks and flooding can thoroughly ruin any type of flooring. Even if the consequences of such accidents do not appear immediately, after some time they will certainly make themselves felt in the form of fungus, mold and rot. But the ease of dismantling Knauf floors allows you to replace them with the least labor costs compared to other types of coatings.
Many homeowners and master installers, for reasons of economy, believe that on the upper floors of buildings and structures, laying a moisture-proof film under the base of a dry screed can be neglected. This is a serious mistake, since moisture can enter through the floor slabs from adjacent rooms. In addition, such a film also serves as a vapor barrier, protecting materials from condensation.
Conclusion
KNAUF is very good material. But installing it is not at all easy, as many describe. Be prepared for a lot of dust. My friend told me that if he had to lay such material again, he would already give up expanded clay.
A small layer of sand for leveling and sheets of foamed polystyrene on which the superfloor elements can be placed would greatly facilitate such work and eliminate dust in the apartment when laying the floor.
I hope that the article was useful and now you know how to lay Knauf superflooring. If you have any questions, ask and we will try to answer everyone.