A screed is a relatively thin layer of concrete. It can be applied to the base to level the surface, or used to cover elements prepared for final finishing. When laying heated floors, both of these functions find their application. In this article we will analyze the technology for properly pouring a heated floor, the solutions and plasticizers used, as well as the features of screed on wooden floors, soils and in winter.
Rough preparation
A warm floor is formed in several layers:
- Rough screed;
- Sound and heat insulator;
- Heating elements;
- Finishing screed (upper part of the structure).
The rough layer is leveling. It is not required if the base is a flat floor slab, like in an apartment. In a private house, floor heating is often installed on the ground; in this case, a self-leveling solid foundation is necessary.
To properly fill, you need the following materials:
- dry mix or cement mortar;
- reinforcing composition (can be replaced with a reinforcement mesh with medium-sized cells);
- waterproofing and insulating materials;
- fasteners;
- container where the solution will be mixed;
- construction mixer (can be replaced with a drill if you have a suitable attachment);
- putty knife.
Subfloor
Installation technology
Before pouring the solution:
- Make sure that the temperature at the work site is between + 5°C and + 25°C.
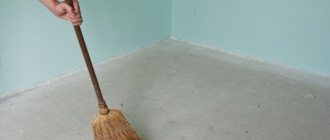
- Clean the working surface (the presence of debris will impair the adhesion between the solution and the base);
- Repair all cracks in the base;
- Line the perimeter of the wall with damper tape to the depth of the screed;
- Install level beacons.
After this, you can move on to the main part of the work:
- Prepare the mixture;
- Fill it, strengthening it with reinforcing mesh if necessary;
- Wait 24 hours, cover the dried concrete with polyethylene;
- After a week, remove the film (further hardening will occur without it).
Expert opinion
Sergey Permyakov
Heating systems engineer
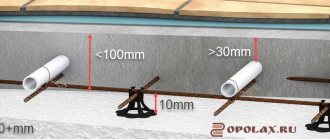
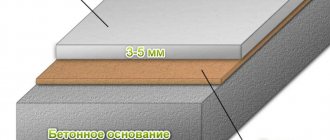
The minimum thickness of the rough screed must be at least 3 cm ; a thinner layer will crack and collapse. There is no point in pouring more than 5 cm under a warm floor; exceeding this limit will lead to a noticeable reduction in the volume of the room.
You can start the next stage of work in a week . The strength of the screed will be about 70%, this is enough to withstand the load. It will take 28 days for the base concrete coating to dry completely. During this time, concrete gains 100% strength.
Horizontal level tapping
The beating is carried out using the following technology:
- a laser level or a plane builder is installed in an area of one room so that its beam hits the walls of adjacent rooms through doorways, a mark is placed on the wall in each room of the house/apartment (it doesn’t matter at what level, the main thing is that it is at the same level) all rooms);
Positioning the plane builder.
The point of the actions described above is to find the highest point in the apartment/house. Where the distance from the laser beam to the floor is minimal, there is the highest point of the floor. It is from the highest point in the apartment that the finished floor level is measured, based on the requirements for the minimum layer thickness. For cement mortar, the minimum layer is 3 cm, so we add 3 cm to the highest point, this will be the level of our screed. All beacons must be placed at this level.
Example: For simplicity, we will not consider an apartment or a house; we will show an example for one rectangular room. Let's say, based on the results of measurements in the corners of the room, we got: 1st corner - 65.5 cm; The 2nd corner is 66 cm, the 3rd corner is 63 cm, the 4th corner is 62 cm. This means that the highest point is where we have 62 cm. It follows that in order to fill the cement screed you need to pour it to the level of 62-3 = 59 cm from the plane of the laser beam.
Then you need to place the beacons in the found level, i.e. the distance to the beacons is measured precisely from the virtual plane constructed by the level. For convenience, you can make a template from wood or other material on which the required distance is marked; this will allow you not to measure with a tape measure every time. The designs of beacons and methods for adjusting their level will be discussed further.
Advice! For the convenience of measurements, we recommend drawing a plan of the apartment/house on a piece of paper and putting each measurement on this plan, this will be more clear and practical. Alternatively, you can apply the measurement results directly to the walls, next to the measurement site.
Important! The floors of the apartment consist of laid large-format floor slabs, so the highest point most often (in 99%) will be located on one side of the slab, and not in the middle.
Finish filling on TP
If the rough screed has dried, it’s time to move on to the next steps:
- installation of heat insulator . Thermal insulating material is mounted only on a clean base (it is best to vacuum it). The heat insulator can be cork, foam, polypropylene, aluminum foil or metallized Mylar film. To secure it, tape, dowels and glue are used.
- Laying damper tape . The damper tape protects concrete from cracking associated with temperature fluctuations. Mounting area: along the perimeter of the room and between the contours of heated floors.
- Laying heated floor elements . Pipes need to be checked for breaks (especially at bends), and when running cables, grounding must be ensured.
- Reinforcement . Reinforcing mesh can be placed under the pipes, above them, or in both places at once. Pipes are easily attached to the lower metal mesh during installation, however, unlike the upper one, it does not provide reinforcement for the screed. If the concrete is of high quality, then this part of the work can be abandoned.
- Pouring finishing screed . Before proceeding to the last stage, you must check how well the heating system is functioning. The screeding solution is poured at above-zero temperatures and in one go. Partial filling is allowed only in rooms with a multi-level floor. The concreting process begins from the far side of the room and ends next to the door.
Pie TP
After finishing the pouring, it is recommended to make several punctures in the coating with a metal knitting needle or similar object. This will prevent the formation of voids.
In the next week, the concrete surface should be moistened with water 2-3 times a day. This will prevent it from drying out while it hardens.
The thickness of the finishing layer can be from 3 to 7 cm in a private house, and in an industrial area - 10 cm.
If a water heated floor is installed, the height of the screed above the pipes should be 3.2-7 cm.
Attention! If it is impossible to make a fill thicker than 3 cm, then it is better to use a self-leveling mixture, or mix cement mortar with a plasticizer.
Read more about the thickness of the screed and the design of heated floors in the article.
Preparatory work
Before pouring the screed onto a warm water floor, some preparatory work is required:
- level and clean the base;
- install a heating system.
When installing a heated floor, you need to fill it after installing the entire “pie”; it is important to lay all its layers correctly.
The sequence of laying layers in the “pie” of a warm water floor is as follows:
- Rough screed - it is cleaned and leveled.
- Waterproofing - a polyethylene film with a thickness of 200 - 250 microns is placed.
- Thermal insulation - foamed polyethylene with foil coating is installed.
- Reinforcing mesh - it is necessary to give strength to the structure. In addition, pipes can be attached to it if the polystyrene foam base with bosses does not fit.
- Heating circuit (metal-plastic or polypropylene pipes with a cross-section of 20 mm) - it is fixed either to the mesh with special fasteners, or is laid on polystyrene plates between the bosses.
- Reinforcing mesh - it can be laid on top of the heating system, if desired, to give greater strength to the structure.
Before filling, it is necessary to connect the system to the collector, check it for leaks and how it heats . After which, a beacon is installed, which helps to obtain a level base from the concrete composition.
Mixtures for self-leveling floors
Let's look at what you can use to fill the heating elements and the floor underneath them.
Cement-sand mortar . Due to the presence of sand, the mixture has good plasticity and is easy to work with. The most suitable brand is M200. For heavy loads, stronger solutions are used: M250, M300. If the room is damp, then M400 cement is suitable. To strengthen the cement mixture, fiber can be added to the composition.
Proportions of mortar for screed (by weight):
- M200 - water/cement/sand - 0.48/1/2.8;
- M300 - water/cement/sand - 0.4/1/2.4.
Concrete from ASG . Cement mortar on a sand-gravel mixture is classic concrete. When installing heated floors, it can be used to fill the rough screed. The result is a strong and inexpensive base.
The consumption of materials for concrete grade M300 will be: 1/5.6 - for one kg of M400 cement take 5.6 kg of ASG (group 4 with a gravel content of 60-65%).
Concrete from screenings . Screening is fine-grained crushed stone that has been passed through a sieve (particle size up to 10 mm). It is added to the mixture instead of sand. Irregularities characteristic of screening particles help strengthen the screed. However, this also makes placing and grouting the concrete more difficult.
Foam concrete . A distinctive feature of foam concrete is the presence of a foaming agent in its composition. This makes the material cellular (it has a large number of closed pores). It has increased sound and heat insulation properties, weighs less than conventional concrete and demonstrates greater strength. If necessary, it can be easily drilled.
Expanded clay concrete . Expanded clay concrete is similar to a regular cement mixture, but instead of heavy crushed stone, expanded clay granules are added to it. Thanks to this, the material is warmer and lighter. But expanded clay concrete is fragile, and it cannot be used for pouring surfaces that will be actively used. Those. Expanded clay concrete is used for screeding under heated floors.
More details about the construction of a subfloor made of mortar with expanded clay are shown in the video tutorial.
Self-leveling mixtures (self-levelers) . Self-leveling allows you to get a flat surface with less labor. Can be used both for pouring the base under heated floors and for the top screed on which the flooring will lie. This material costs a little more than others. You can use, for example, Ceresit CN 176, cement leveler Unis Horizon.
Gypsum solution. Not suitable for pouring floors!
"Semi-dry" method
There is much less water in the solution for the “semi-dry” method. If the mixture is made correctly, it will be moist but not runny.
They check it this way: squeeze a little semi-dry solution in your palm. It should form into a plastic lump without cracks. This is the consistency of a factory-made solution. It is more difficult to level, but then you can rub it to a shine, and ultimately get a surface that is dense and durable in structure.
If you order such a solution ready-made, you need to explain for what purposes it will be used. This concrete layer can withstand heavy loads. It is of higher quality than when laying concrete using the “wet” method.
You will have to grout very carefully; this requires skill and patience. You will need a long trowel or trowel. Semi-dry mixtures from screenings are practically not amenable to smooth grouting, so it is ground with sandy mortar.
Plasticizers
These are additives for underfloor heating screed that make it:
- fluid;
- plastic;
- durable;
- waterproof;
- homogeneous;
- resistant to cold.
The plasticizer increases the hardening time of the screed.
There are several types of plasticizers:
Liquid . It is convenient because it does not need to be diluted. It is enough to add the required amount to the filling solution.
Dry . It is used more often than others because it has a longer shelf life. The powder is first dissolved in water, and then added to the main screed solution during mixing.
Reinforcing . It is distinguished by the presence of polyamide substances, which make the screeds more durable and prevent them from cracking.
Anti-frost . It can be either dry or liquid. Contains frost-resistant components that prevent liquid crystallization even at subzero temperatures.
The selection of a suitable composition is made based on their characteristics, which will be useful when used in certain conditions.
Technology for installing beacons for “wet” screeds
Before correctly positioning the beacons for floor screed, it is necessary to prepare the base and tap a single horizontal level. When using a laser level, it is not necessary to make marks on the walls.
Important! To ensure a normal service life, concrete and mortar screeds must have a thickness of 3 cm at the top point of the base. It is forbidden to bring them “to zero”, therefore, when obtaining steps near the front door, it is more reasonable to use a lowering of the zero mark and the use of self-leveling floors.
How to install a finished screed
If the need to lay a heated floor arose after pouring, then you will need to do the following:
- Mill the channels for the pipes (using a grinder, milling cutter or wall chaser);
- Install thermal design elements - electrical cable or water pipes;
- Cover them with solution.
Scoring
The canals prepared at the first stage should have the shape of a snail or snake.
Unfortunately, this technology is very labor-intensive. In addition, there is no possibility of providing heat and sound insulation, and the drying solution may be squeezed out of the channels, which will damage the appearance of the floor.
Results
When installing heated floors, the installation technology is strictly followed. All stages, starting with the selection of building materials, design, installation of the water circuit, laying the screed, require knowledge and experience. It is necessary to select pipes that can withstand the pressure in the system. The water circuit must have acceptable bends so that the coolant circulates freely.
There are many subtleties that, at first glance, are not significant, but can lead to emergency situations if the technology is not followed. You can only undertake the installation of heated floors yourself when you are completely confident that everything will be done correctly. In another situation, it is better to turn to experienced craftsmen.
Source
On wooden floors
To fill a wooden house, you need to perform the following steps:
- Carefully inspect the covering (replace damaged joists, and turn over partially damaged joists);
- Add support beams (if the logs are installed in increments of 40 cm);
- Recess the nail heads into the boards by 2-3 mm (otherwise they will later tear the insulating film);
- Seal the gaps at the junction between the walls and the floor with thin boards (they are removed after pouring, which ensures ventilation of the base and does not allow it to rot);
- Eliminate deep and small cracks;
- Remove debris and dust, sand the base if necessary;
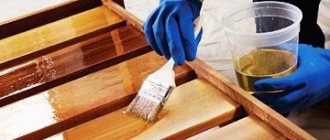
- Prime wooden surfaces (this will ensure their moisture resistance);
- Cover the bottom of the wall with damper tape (10-20 mm thick and 2-3 times thicker than the screed) to cut off its surface from the cement;
- Ensure waterproofing of the base using an intact polyethylene film (its individual parts are overlapped by 10 cm, the overlap on the walls is 20 cm, all tears and punctures are sealed with tape).
Option for installing TP on wooden logs
Attention! It is not recommended to fill if the wooden floorboards are fresh. They can become deformed under the weight of the screed.
Preparation
To make the floors wear-resistant, it is best to use M400 or M500 cement when preparing the mortar. As for the added sand, it should have large grains, approximately 0.8 mm in diameter. This will protect the surface from the appearance of cracks and other defects. The fine fraction of sand used for bricklaying is not the best option. When installing a warm water floor, a thickness of at least 20 mm will be required, depending on the type of screed. Use the concrete volume calculator to determine the quantity.
There is one nuance that allows you to eliminate the liquid solution - adding water in portions. The important thing here is to eliminate the possibility of using too much water.
Dry cement mixtures M300 sand concrete are presented in finished form. Here you no longer need to think about proportions and getting a quality fill. Dry mixtures can only be diluted with the required amount of water, which is prescribed in the instructions from the manufacturer. Separately, it is very difficult to obtain all the required components of the semi-dry mixture for pouring a warm water floor. For this reason, it is better not to experiment, but to buy a ready-made version for installation.
Each type of mixture can be accompanied by plasticizers that can give the final solution more qualities and characteristics. In any case, even if they are included when purchasing, you should adhere to the mixing options indicated on the package. If it is difficult to decide which mixture to choose for underfloor heating screed, it is better to seek help from specialists or company representatives.
On the ground
The filling technology will be the same regardless of the type of land and where exactly the groundwater is located. To work, you will need concrete grade M300 (or higher) and reinforcing mesh.
Before pouring the screed, the earthen flooring is leveled and compacted. Medium-fraction crushed stone or gravel can be used as the first layer of backfill. A second layer of sand is laid on top.
Each layer of bedding is compacted using a vibrating plate or manually.
Then the base for the rough screed is covered with waterproofing. These can be specialized materials or thick polyethylene film.
A subfloor 5-10 centimeters thick can be poured onto the finished base.
Video
In everyday life, people are faced with the problem of how to determine the readiness of the screed. All tables show average parameters. There is an effective and simple method. A paper napkin is placed on the screed. Cover the top with a mug. After 8-12 hours it is removed. If the napkin is dry, then the screed is ready. If it is wet, then you need to wait.
Are you planning to screed a heated floor, but don’t know how to organize the work? Today I will share my experience of pouring screed. You will learn what you need for the job, how to prepare the base and how to make a perfectly flat floor.
Pouring in winter
The strength of poured concrete decreases noticeably even at a temperature of +5°C. To prevent the solution from cooling in winter, it is necessary to pour it into wooden formwork designed for this purpose and heat it, using, for example, infrared heat sources.
In order for the solution to harden in winter, a minimum temperature of +10°C must be maintained until the concrete reaches 70% of its strength.
Heat gun
For heating it is allowed to use:
- thermal curtains;
- electric heating cables;
- electric heat guns;
- heat generator (it will have to be covered with concrete).
The use of the listed devices must be done carefully, without over-drying or leaving individual areas cold. If the conditions are acceptable, the concrete will gain half its strength within 4 days.
A short-term freezing of the screed will not cause serious harm, but its top layer may crack and crumble. In order not to completely freeze and destroy the concrete, you need to cover it with thick plastic film. In this case, you can expect that with the onset of spring warming, the concrete will begin to harden.
Expert opinion
Sergey Permyakov
Heating systems engineer
An important condition for pouring heated floors in winter . In a private house, the thermal circuit must be closed before starting pouring work. Those. Windows and entrance doors have been installed. A good option is to cover the window openings with reinforced polyethylene film in two layers. In this case, you can count on maintaining a stable above-zero temperature using heat guns.
By lighthouses
If the room is large, then beacons must be installed before pouring the heated floor. They represent levels - guidelines, based on which you can level the screed.
Types of beacons for heated floors:
Pin. Usually these are self-tapping screws on dowels. Pin beacons are suitable for semi-dry screeds and self-leveling floors. Their length should be 2-3 cm greater than the estimated height of the screed.
Beacon self-tapping screws are installed one for every 1-3 m2 and connected with a fishing line, which should be located exactly at the level of the future leveling layer. After this, the composition is poured. When the work is completed, the beacons are unscrewed so as not to damage the screed.
From mortar piles. To make such beacons, use the same solution as for pouring. Their height should also slightly exceed the expected level of the screed. They are most suitable for working with wooden bases, since they do not harm the insulating layer.
Mortar piles are placed along pre-marked lines. The outer rows retreat from the wall by 30 cm, the step to the adjacent rows is 1 m. The heaps located in the same row are spaced 30-50 cm apart. The beacons are given a day to harden, after which they are covered with a primer and the screed begins to be poured.
Linear. They are made from metal profiles, drywall, slats, boards, etc. This type of beacon is used more often than others. The rules for their installation do not differ from those described above. The only difference is that a number of small elements are replaced by one large one. When all the landmarks are placed, all that remains is to fill the screed.
After laying out the solution, you need to level it using the following rule: place the tool on the guides and pull it towards you, moving it slightly from side to side. After a day, the profiles are removed and the holes are sealed with a primer or mortar.
Attention! If the screed is dry, then there is no need to remove the profiles.