Properties
The composition of the self-leveling floor includes the following components:
- mineral mixtures;
- polymers;
- various synthetic additives.
They can be found separately in hardware stores at various prices. All that remains is to purchase what will be necessary to install the floor and mix it in full accordance with the manufacturers’ recommendations. The finished mass is very liquid and is capable of spreading independently over the surface of the subfloor. However, it hardens very quickly. For such an option as self-leveling flooring, reviews say that it is more widespread in apartments and private households.
The drying period depends on external factors, as well as on the solution itself and its technical properties. In addition, this option is used to level the floor if no other method is possible. The finished solution has the following qualities and properties:
- mechanical strength;
- plastic;
- easy fluidity;
- adhesion to the base.
To obtain the specific properties of the solution, you must correctly combine various resins and additives, and mineral fillers.
All self-leveling floor compositions will differ from each other if they are used in private construction or on an industrial scale. For example, in residential premises the combination of liquid rubber in solution, as well as polyester resins, is contraindicated. Another difference is that in industry it acts as a finishing coating, and in apartments - for subsequent finishing.
How to prepare the base
The reliability and strength of the leveling layer depends on proper surface preparation. Depending on the type of base, the preparatory work may vary slightly.
Preparation of concrete floors
To work you need:
- level;
- waterproofing material;
- damper tape;
- primer;
- roller
Step 1. Remove all debris from the concrete surface and carefully inspect every centimeter.
All debris is removed from the concrete surface and every centimeter is carefully inspected.
Cracks wider than 2 mm are sealed with mortar or polymer putty, and the same is done with recesses whose depth is greater than the permissible thickness of the leveling layer. All other defects will be hidden by the self-leveling floor.
Repairing a crack
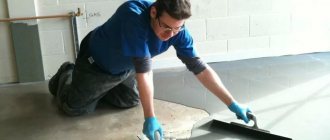
Step 2. The base is coated with primer twice using a brush or roller. The second coat cannot be applied until the first has dried.
the base is coated twice with primer
Step 3. Lay waterproofing. Polyethylene, waterproofing, roofing felt are suitable for these purposes; you can cover the base with two layers of coating waterproofing.
Waterproofing
Step 4. Using a level gauge on the walls, mark the zero level to which the floor should be poured.
Using a level gauge, mark the zero level on the walls,
Step 5. Damper tape is glued along the marking line. Its width should be slightly greater than the thickness of the leveling layer.
Preparation of cement-sand screed
Step 1. The screed is cleaned of dust and its integrity is checked. Remove peelings, embroider and seal wide cracks.
Concrete screed repair
Step 2. Check the differences in height with a level and, if the unevenness is more than 5 mm, perform rough leveling with cement mortar. This will reduce the consumption of leveling agent, the cost of which is much higher than conventional cement.
Rough floor leveling
Step 3. After the solution has dried, the base is vacuumed again and coated with a primer. If the primer is absorbed too quickly, re-treatment is necessary.
Apply primer to the floors
Types and types
All self-leveling floors receive excellent reviews from owners. But many say that the result is not only a perfectly smooth coating, but also one that can last for a long time. Externally, it attracts no less attention than expensive floor coverings.
Polymer materials contribute to the creation of high-quality self-leveling flooring, which can be done independently. Caring for a surface without joints is very simple: just wipe with a wet cloth. No dirt can cling to anything here.
If you want to learn and get more information about the positive and negative qualities of self-leveling floors, you should first decide what types and types exist. First of all, the classification is based on the composition (binders and plasticizers). These include:
- Cement-acrylic floors;
- Epoxy compositions;
- Polyurethane;
- Methyl methacrylate.
It is worth noting that they can be combined with each other and the result is something special. If you do not want to experiment and look for full proportions for the components, it is best to choose ready-made mixtures. Each case is considered individually and something suitable for a specific flooring option is selected.
Before you start pouring a self-leveling floor, you should think carefully. If the work is not done well, it will be almost impossible to remove this layer. You will spend a lot of effort and money, which will not live up to expectations.
Required tools for installation
To carry out installation work you will need:
- Large bucket for mixing components;
- Construction mixer or drill with mixer attachment;
- Level, usually at least 1.5 meters;
- A special roller with stiff bristles or rubber rings;
- Paint shoes for safe movement on the surface;
A set of spatulas for leveling the surface in various areas.
Don't forget about protective equipment: especially for your hands. High-quality rubber gloves will help prevent polymer from getting on your skin. You also need to decide in advance on the type of decor, select and prepare the necessary elements.
Cement acrylic floor
The simplest and most common method of installing a floor would be a cement-acrylic composition. In addition to the plasticizer, the composition contains quartz. It is most popular in industry (factories, warehouses). Apartments are no exception, where it also finds application.
This self-leveling floor has its advantages and disadvantages, which you should carefully read before choosing. The advantages include:
- There is practically no absorption of moisture by the frozen solution. This suggests that even in rooms with high humidity they will not deteriorate and lose their properties. Such premises include bathrooms, car washes, etc.
- Any category of citizens can use this flooring in their home due to reasonable prices compared to other analogues of self-leveling flooring.
- Ability to withstand enormous loads.
- If you follow the technology for making this flooring option, it can last for a long time, more than 30 years.
- The work can be performed by inexperienced craftsmen and apartment owners. The process will be clear to everyone from the very first step.
- The integrity of the surface will remain at the same level even in the event of cracks, chips and other damage due to mechanical stress.
Despite the fact that outwardly it is very simple to carry out the work of pouring it, labor costs remain at a high level. Cracks almost certainly appear due to the inelasticity of the cement-acrylic floor. This just spoils the appearance, but does not affect the durability of its use.
This flooring option in apartments or houses acts as a subfloor for subsequent flooring. Floor covering options include tiles, laminate, parquet, etc.
Expert advice
Let us immediately note an important point: any grotesque style in interior design can be quite tiresome. Therefore, if you don’t want to regret in a year about such serious work done and considerable money spent, follow our advice:
- Make bright and unusual 3D floors where your guests often visit and, less often, household members. Just so you don't get tired.
- Grinning animals and attacking predators will not put you in a good mood on weekdays. Yes, being in the mouth of a huge shark on the floor is fun to take pictures of and scare your friends, but on normal days the constant “sharknado” scene will affect your subconscious. The result is bad dreams and anxiety, I don’t understand why.
- In the nursery, it is better to avoid such floors - this is too bright an irritant for the child’s psyche.
- The fewer illusory-volumetric 3D elements in the floor decor, the better. This is a truly grand accent of interior design, and according to all the laws of style there should not be too much of it. And a bed on a huge waterfall looks ridiculous in real life.
- In a room with such a grotesque covering of the “future”, place the furniture in a simpler manner, and make the walls and textiles plain.
But where 3D design really looks amazing is the bathroom - the floor in it can really be made of nothing but fish and shells under water. But don’t forget - this is because the interior of the bathroom is usually minimalist: mostly monochromatic colors and the absence of additional accessories.
Cheerful dolphins and a girl underwater in a bathroom or swimming pool can really please the eye for a long time. Here dynamics are an exception to the rule. In a bright living room, the effect may be slightly different. Therefore, if you are going to choose a pattern for all rooms, make sure that there is a sense of harmony in everything and that it is pleasing to the eye.
READ MORE: Kitchen floor tiles and laminate interior photo beautiful combined design option
But it is not recommended to install lighting under a transparent polyurethane floor layer (believe me, very, very many people come to this idea). For the reason that later replacing burnt out lamps will be extremely problematic. Although we have no doubt that in the near future this problem will be successfully solved by enterprising manufacturers, and another new era will begin in interior design!
Experienced creators of polyurethane coatings advise listening to certain recommendations when pouring a structure:
- For a more harmonious and complete appearance of the coating, you can equip it with polyurethane skirting boards.
- When laying polyurethane flooring, add quartz sand to the soil mixture. It will help ensure better adhesion of the fill to the base surface.
- The most preferred base coating option for a polymer solution is a concrete floor. Polyurethane particles have the strongest adhesion with it.
By decorating the surface in this way, you will provide yourself with a durable floor covering that will delight you and your guests every day.
To learn how to make a self-leveling polyurethane floor with a pattern, see the following video.
Epoxy
The main component here is the hardener. The main thing is to comply with all proportions from the manufacturer. Only in this case the surface will be not only smooth, but also dense, high-quality, and hard. The advantage of such self-leveling floors is that they are not afraid of any mechanical impacts. Cleaning can be done using a variety of chemicals.
If you have a great desire to decorate the room where the installation is being carried out, then with an epoxy floor it is very easy to do. The solution itself turns out transparent. Consequently, a painting, wood, or any other material that can add zest to the room is placed on the base, under the future floor. After pouring all this mixture, you get a real work of art.
A huge disadvantage is the low elasticity of the finished mixture. It is very important to prepare the base where the pouring is performed. When everything is done efficiently, only then can the poured floor be installed. For this reason, reviews of self-leveling floors from owners give disadvantages, since they are not able to do high-quality work on their own.
It is worth noting that the positive qualities include the high environmental friendliness of the mixtures used to prepare the solution for pouring. This allows you to expand the scope of their application.
Flaws
But not everyone likes self-leveling floors. Owner reviews see the disadvantages in the fact that they:
- Easily scratched and faded.
- It takes a long time to harden, about 6 days.
- Difficult to care for. To ensure that the quality does not deteriorate, the floor is washed with special products using a washing machine.
Experts who install such floors claim that it is environmentally friendly. Consumers did not detect the presence of harmful substances that could cause an unpleasant odor.
What else needs to be considered is the color of the image. It's not enough to just watch it on your computer. It is necessary to print a test copy, as often the colors in the image do not correspond to the actual tone of the floor.
Polyurethane
If you need a floor that can withstand enormous mechanical loads, a base made from mixtures containing polyurethane as the main component is suitable. Due to this, the finished solution is elastic and, after drying, wear-resistant. It is most used in the construction of private houses, as it gives the house lightness, elegance and durability. At the same time, it will definitely not allow moisture to pass down.
A short period of time after installing the self-leveling floor, you can begin to move around it, not to mention the ability to install furniture. The smooth texture of the base will not allow microbes and bacteria to accumulate on the surface.
If you read about self-leveling floors, reviews from owners, the pros and cons, will say that it is not ideal, as it might seem at first glance. The main disadvantage is the strong smell of the components included in the mixture immediately after pouring. After installation, it is better to leave the room to avoid poisoning. In addition, the cost of the material is very high due to its high consumption per square meter.
To avoid crumbling of the material over time of use, a special underlay for this type of floor should be used. The consequences can also include crumbling of the material on the surface.
Semi-dry screed
The main distinguishing feature of semi-dry screed is the mixing of the cement-sand mixture (the composition is the same as for the wet method) with a three-fold reduced amount of water. This minimum is enough to hydrate the cement mortar. The minimum thickness of the screed layer after compaction is 4 cm.
Preparing a semi-dry solution is physically difficult, very difficult. That's why you need a concrete mixer. In addition, in favor of the mechanical stirring method is the need to add fiber to the solution, which cannot be manually distributed evenly over the dry composition.
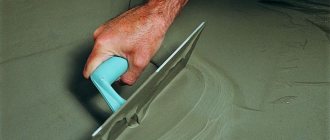
The process of laying the semi-dry screed is completed by compacting it with simultaneous grinding. The operation is carried out with a trowel.
Advantages of semi-dry screed
The semi-dry screed laying technology has many advantages:
- after setting, the surface is smooth and does not require additional leveling operations;
- quick setting - in special shoes (concrete shoes) you can walk on the surface immediately after laying;
- relatively high (slightly lower than that of a “wet” screed) strength characteristics: strength and hardness;
- no shrinkage;
- You can hide communications in the screed: pipes, cables;
- downward leakage of water is eliminated - there is no excess;
- possibility of laying on the ground and rough wooden flooring;
- relatively clean process - no dirt;
- a minimum of time is required to continue the work: tiles and porcelain tiles can be laid after 72 hours, linoleum and carpet can be laid after 7-8 days. But laminate and parquet can be laid in a month, just like with a “wet” screed;
- high speed of work completion.
Disadvantages of semi-dry screed
The technology for constructing this type of screed has disadvantages, although they are significant. Minuses:
- It is difficult to do the installation on your own (with proper preparation it is possible - full information about the technology of installation with your own feet is here);
- the height of the room is eaten away due to a thicker screed: at least 4 cm, under a “warm floor” at least 5 cm;
- high demands on sand - only quarry, sifted, and this is expensive.
Attention: more detailed information about the strengths and weaknesses of semi-dry screed can be found here.
Cement strainer.
Methyl methacrylic
Floors made of methyl methacrylates are very little popular for apartments and private households. The main area of application is rooms with low temperatures, stadiums, and parking lots. But still, first you should dwell on the positive manifestations of this type of self-leveling floor
- A few hours will be enough for the surface to become hard.
- Floors are matched to the design of the entire room due to a huge range of colors.
- The self-leveling floor is not afraid of temperature changes. It remains in its original form at sub-zero temperatures or in hot weather.
- You can choose the texture of the floor yourself: rough or smooth surface.
- Work can be performed at any temperature, even at negative temperatures.
- The service life of self-leveling floors made of methyl methacrylates is 40-50 years.
We must not forget about the disadvantages of this flooring option. Not only is pouring the finished solution very difficult and requires physical effort, but also, if necessary, dismantling it. In addition, chemicals release strong and unpleasant odors into the environment. If compared with the flooring options described above, the cost here will be slightly higher.
If desired, you can change the quality of the future floor covering on your own. For this, various additives are used to resist fire, hardness, and the ability to feel great in any environment.
Varieties
Polymer bases are currently manufactured by a variety of companies. These types of solutions are used to perform a wide range of tasks. Based on the composition, polyurethane floors can be divided into such varieties.
| View | Description |
| One-component | From a technical point of view, this type of product is very similar to oil paint. They are used in a thin layer, wanting to provide additional protection to the base. The thickness of the floor should not exceed 0.4 millimeters. |
| Two-component | Products of this kind are composed of a polish base and a hardener. To obtain a floor, the components are mixed and then covered with the finished base. Solutions do not spread so well, so the layer thickness sometimes reaches a couple of millimeters. |
Which is better - one-component or two-component polyurethane flooring?
Polymer bulk solutions can be divided based on the amount of filler in the composition.
- Thin-layer. Here the thickness cannot be more than a millimeter.
- Self-leveling self-leveling. If we talk about the percentage of filler, it already reaches 50%. It is applied in a layer whose thickness reaches 5 millimeters.
- Highly filled. In this situation, the filler already makes up 85% of the total volume. Using the named product, it is quite possible to obtain a coating whose thickness reaches 8 millimeters. These substances almost do not exfoliate and do not suffer from cracks in comparison with the types mentioned above.
The greater the thickness of the layer of this substance, the greater the quality it shows in terms of load resistance and service life. In this situation, quartz sand is added to the mixture mostly during the laying process by workers.
The more filler in the solution, the better the final coating will be.
There are several other classifications of polyurethane flooring. Today in stores you can find elastic, elastic-hard and hard surfaces. The top layer of the material can be matte or glossy, with different types of transition colors.
Advantages
Having studied the pros and cons for each specific type of self-leveling floor, we can give a list of general positive qualities:
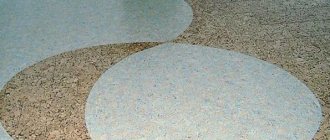
- The coating is seamless and perfectly smooth.
- The ability to create an imitation of natural stone, a mosaic floor, to create a so-called 3D floor.
- In addition to monotony, they have color schemes that will be of interest to absolutely everyone. The color palette helps you choose an option to match the design of the entire room.
- A wear-resistant final coating that can serve and show all its qualities for a long time. Furniture legs do not leave scratches on the surface if the work is made of high-quality materials and with strict adherence to installation technology.
- Easy care. They are not afraid of any, even the most aggressive household chemicals. There is no absorption of dirt, dust does not accumulate anywhere.
- Safety. The toxicity of materials only appears at the time of pouring. As soon as the floors dry, they are completely environmentally friendly and harmless to human health. During operation, no harmful emissions occur.
- Very popular in rooms with high humidity due to their ability to withstand it.
- The use is not only for finishing coating, but also as a subfloor. The installation technology will be clear to everyone, but the surface becomes perfectly flat.
It is best to install the self-leveling floor by two people. The drying time of the finished solution can be 20 minutes, and the entire surface should be poured evenly. It must not be allowed to dry out until the work is completed.
Laying technology
From the very name “self-leveling floor” you can easily determine the method of its installation - this is the pouring method. To carry out this process, it is necessary to dilute the selected dry composition with water in strict accordance with the instructions.
There are several types of such mixtures:
- one-component – completely ready for use;
- two-component - include the base and hardener that you need
- stir immediately before starting work;
- three-component – a set of the main substance, hardener and decorative additives.
After obtaining a homogeneous mass, it is applied to a carefully prepared base.
For an ideal final result, it is important to ensure that this process continues until the entire surface is completely covered. A squeegee, a tool resembling a wide spatula with a long handle, helps speed up the distribution of the mixture.
The performance and decorative characteristics of the finished coating can be significantly affected by the presence of air bubbles in it. Therefore, during the pouring process, it is advisable to periodically roll the applied layer with a special needle roller.
After completely distributing the composition over the working surface (sometimes several layers are required), all that remains is to wait the prescribed time (24–48 hours), and then thoroughly ventilate the room.
Disadvantages of self-leveling floors
With all the advantages of such floors, we must not forget about the disadvantages that can be encountered not only during installation, but also during its operation. Any self-leveling floor has the disadvantage that the coating itself is very cold and it will be difficult to walk on it with bare feet. If you use a warm floor, then this minus becomes not terrible.
It is worth noting that it is not considered a cheap pleasure. If there are large differences in the height of the floor base, then the prices for materials will be scary. It is better to leave all work to professionals, to whom claims can be made in the future. When installation is performed poorly, not only money is wasted, but also effort is wasted for subsequent dismantling.
With prolonged and constant sunlight falling on the surface of the self-leveling floor, it will begin to change color. This will be especially noticeable on colorful surfaces.
Video description
About calculating the amount of mixture for a self-leveling floor in the video:
Final calculations
As a rule, provided that the base is well prepared, calculations are made based on the data specified by the manufacturer of the self-leveling floor. As an example, we will give the procedure for calculating the required amount of mixture to fill a layer of 2.5 millimeters. At the same time, the manufacturer indicated that for 1 millimeter, when pouring 1 square meter, 1.5 kilograms of the composition are needed. The calculation requires three steps:
- The area of the filled plane is calculated. With the correct geometry, it is enough to multiply the width of the room by its length. Complex contours are divided into rectangular sectors and their area is summed up.
- The required thickness is determined using a level. In the case of a relatively flat surface, you can use a standard or laser building level. In case of significant deviations in height, it is necessary to use a water level.
- All received data is recorded and double-checked.
Let's assume that the width of the room is 4.7 meters and the length is 5.9 meters. Therefore, the area of the room will be:
As mentioned above, it is planned to pour a layer of 2.5 millimeters at a mixture consumption of 1.5 kilograms per millimeter. So per square meter you will need:
For the entire room:
When calculating, it is necessary to take into account the density of the composition. We provided approximate indicators for this parameter above, but for more accurate calculations you should check the data provided by the manufacturer.
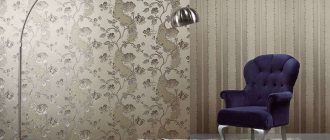
Self-leveling floor with colonial-style ornaments Source polsdelat.ru