When deciding to glaze a balcony with your own hands, users need to thoroughly prepare. First you will need to study the information, acquire materials, learn how to design windows, etc.
You will also need:
- Choose the appropriate glazing option (there are warm and cold);
- Determine time costs (for beginners, time costs need to be increased by 2-3 times due to lack of experience);
- Check the availability of a special tool for the job;
- Measure the amount of materials;
- Carry out preparatory work.
Glazing a balcony with your own hands - step-by-step instructions
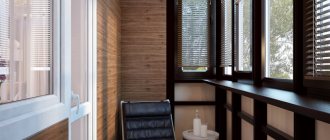
A couple of years ago I decided to glaze my balcony. I wanted to give it a cozy look, put an armchair and a coffee table. But without glazing this was impossible. I decided right away that I would carry out all the installation work myself, because I have little experience, and glazing a balcony with my own hands is a labor-intensive process, but quite realistic. Just a couple of decades ago, all apartments had only wooden windows, but nowadays in the modern world there are several options for glazing residential premises. They have different characteristics, composition, and each has its own pricing policy. Therefore, everyone can choose the most suitable option.
DIY balcony glazing
Some moments
Strengthening a balcony in a Khrushchev-era building
If you live in a Khrushchev-era building, then it should be noted that you will not be able to simply glaze the balcony, as you will encounter a number of difficulties. The first of them is that when the houses were originally designed, no one imagined that the balconies would subsequently be glazed. Therefore, the balcony was an additional concrete slab protruding from the wall of the facade of the house, which was simply surrounded by a fence on three sides. There were no frames with glass or other devices that would separate the interior space in such a balcony. That is why, when you decide to glaze a balcony with your own hands, it is important to consider that first you need to install a single structure, which would include a frame, opening mechanisms, and a balcony parapet that needs to be sheathed.
All these additional elements will naturally make the entire structure heavier, which, in turn, will place additional load on the balcony and supports. All this can lead to the supports collapsing.
It is worth considering that if you live on the top floor, then when glazing is carried out you will have to work on constructing the roof. Such work will significantly increase the labor intensity of the process itself, and will also affect the weight of the entire structure.
Choosing material
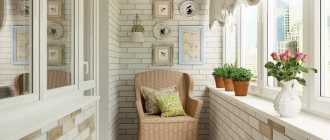
Since I wanted to give my balcony a cozy feel, the main task for me was thermal insulation. Therefore, I immediately chose the “warm” glazing option. But I’ll write more precisely about each one.
So, there are three types of glazing for balconies:
- Cold - does not retain heat in the room, used for glazing balconies where maintaining room temperature is not required
- Warm – maintains room temperature at any time of the year, does not allow cold to pass through. It differs from the cold look in the set of materials used and their characteristics.
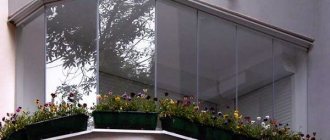
- French - the balcony is glazed along the entire perimeter and height. High-strength and tinted glass is used
French glazing of the balcony using transparent mirror windows.
All that remained was to choose the glazing option for your balcony. The most popular option today is glazing with PVC windows, but there are also:
- Aluminum profile
- Wooden windows
Aluminum profile glazing refers to cold balconies
The option of glazing with an aluminum profile immediately became impossible for me. This type of glazing refers to cold balconies. The material is not thermal insulating - it is used on those balconies that do not need to maintain room temperature. The aluminum profile serves to protect the room from wind, rain and snow. However, this form also has its advantages:
- Low weight of materials used
- Low cost
- Parallel sliding sashes
Balcony glazing - wooden frames
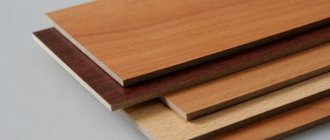
Wooden windows are made from two types of materials. If homogeneous wood is used, then the cost of windows is relatively low. If the material is laminated veneer lumber, then the price automatically increases and is already on average 60-80% higher than the cost of similar PVC windows. For me, the option with wooden windows was not suitable due to the price. Although this is beautiful, the financial side of the issue interested me no less. My choice settled on PVC windows. Good price/quality ratio, warmth and sound insulation properties have brought this material to the forefront in demand.
Glazing of the balcony with plastic windows
To create warm glazing for a balcony or loggia, the only market leader is plastic windows. The frame consists of frames and sashes made of a multi-chamber profile, which is reinforced with steel elements 1.2-2.5 mm thick. Single- or double-chamber double-glazed windows are inserted into the frame, providing a high level of energy saving. Excellent thermal insulation properties are achieved through the use of glass coated with metal in the form of tin or silver, the space between which in the chamber is filled with inert gas.
Plastic windows are the best option to make your balcony warm
The system is robust and durable. When choosing a window design, there are no restrictions in shape and size. The main requirement is to ensure proper strength and reliability of the foundation. The system can have any degree of thermal insulation, which is determined by the number of chambers in the profile. When choosing a metal-plastic frame, the required number of glasses in a double-glazed window is also selected. The presence of insulation creates good thermal insulation of the room. Thanks to its high tightness, reliable sound insulation of the internal space of a balcony or loggia is also ensured.
PVC is resistant to adverse environmental factors, so the system will last for many years without losing its original appearance. The structure does not require special care. The PVC frame is available in several colors, which makes it possible to obtain the original appearance of the glazing of a balcony in a Khrushchev-era building.
Plastic glazing is a reasonable ratio of price and quality. It is better to entrust the installation of a PVC frame profile to a professional, since errors made during installation can cause rapid wear of elements, inconvenient operation and a low level of tightness. The price of glazing a balcony with plastic windows is 18-30 thousand rubles.
For balconies on the first and last floors, it is recommended to use grilles and anti-burglary fittings
The installed accessories can expand the functionality of the product, ensuring convenient and safe operation. For balconies on the first and last floors, it is recommended to use anti-burglary fittings, which provide effective resistance to attempts to press the sash from the frame from the outside.
Which PVC window profile is preferable for warm glazing of loggias and balconies?
Glazing and finishing of the balcony must be made of high-quality material
When choosing a metal-plastic window, you should pay attention to the manufactured product and its base. It is better to give preference to galvanized steel, which does not corrode.
One of the main characteristics is the profile width. For the classic version, this value is 58 mm. The profile with an increased installation width is characterized by a size of 70 mm, due to which the product has increased sound-insulating and heat-saving characteristics. There is a thicker version with a value of 90 mm. Such qualified products have high energy-saving properties.
A profile with an increased installation width provides increased sound insulation and heat saving
The second characteristic feature is the number of cameras in the profile. In the standard version of the design there are three of them: the first provides condensate drainage, the second contains a reinforcing metal liner, the third is an additional cushion necessary for better sealing of the window, and is also used to secure parts of the fittings.
The number of chambers is determined by the profile width. For example, products with a width of 58 mm have three chambers, 70 mm - 4, 90 mm - 6.
The quality of the window and its cost are affected by the number of glasses. Double glazing is considered the most popular. It is warmer than single, but has more weight.
Double-glazed windows are considered the most popular for glazing balconies.
An important characteristic is the profile class. Class A is represented by high-quality certified products with a thickened outer wall
Class B is a lightweight profile with thinner walls. This option is characterized by low cost, poor dimensional stability, worse energy-saving characteristics, and a shorter service life.
Siding
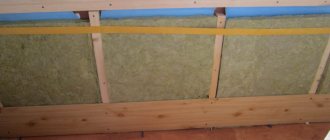
In addition to glazing the balcony, I was interested in the option of external cladding of the balcony. And for this I chose siding. This material is the most optimal, it is durable, consists of PVC and is not afraid of sunlight and precipitation. In addition, it enhances thermal insulation on the balcony. The siding has a wide range of colors, and the manufacturer claims a service life of no less than 50 years.
DIY balcony siding
Advice! For those who decide to carry out all the work on glazing the balcony themselves, you need to know that it is better to complete the outer cladding of the balcony before glazing. This will save time and money. After all, after glazing the balcony, it is not so convenient to carry out external cladding, and calling craftsmen who will do all the work with the help of climbing equipment will cost a lot of money.
It is quite possible to do siding work yourself, but only if you are confident in your abilities and have skills in such work. Otherwise, it is better to entrust all work on covering balconies with siding in apartments to qualified specialists who have professional equipment.
Finishing the balcony with siding
I have described the sheathing instructions below:
- First you need to build fastening belts from wooden beams - upper and lower. In the future, siding will be attached to them
- We attach the beams to the wall using liquid nails. They are connected to each other using iron corners
- Let's start installing the siding - you should start from the sides. We do not overtighten the screws; they should be left in the middle of the hole.
- Upon completion of the siding installation, we hide all the screw heads using platbands
Balcony siding
Glazing stages
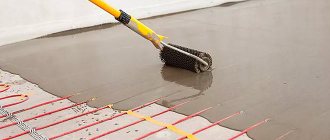
Step 1. Preparation .
The glazing process takes place in several main stages. Of course, the first thing to start with is preparing the site itself. It is necessary to strengthen the parapet, eliminate all gaps between the side panels, and also create thermal insulation.
Step 2. Selection . The second point in glazing is to select the fittings and window profile. If you are planning to decorate a balcony for thermal insulation, then a regular double-glazed window will suit you.
Also, you need to decide on the type of window sashes, which differ in the way they open: tilt-and-slide, tilt-and-turn, sliding and sliding.
Step 3. Sealing . The prepared base for glazing also requires sealing the gaps in the structure of the balcony with the extension and the window frames. Sealing is necessary, simply put, to ensure that the structure is as warm and reliable as possible.
Step 4. Fasteners . Having chosen reliable fasteners, you can proceed directly to installing window frames and double-glazed windows.
Step 5. Finishing the seams . It is imperative to seal the seams using polyurethane foam to add strength to the window system. Also, experts note that the foam layer should be from 20 to 40 mm. No more and no less than the specified limits, as this will affect the stability of the fasteners and the level of thermal insulation.
Step 6. Finishing . Having finished with the glazing, the final step is to carry out decorative finishing in order to achieve the desired result and achieve maximum comfort. Read more in the articles:
Video - glazing a balcony yourself (from an expert):
Frameless method
The origins of the frameless glazing system for loggias lie in Finland.
It is believed that this method came to us from that country. Visually, everything looks very simple and beautiful: instead of wooden or plastic frames, a solid double-glazed window is installed. And the base of the house acts as the frame of the balcony.
Despite the apparent fragility of such glazing, fairly thick double-glazed windows are quite shock-resistant and even strong gusts of wind are not scary.
Well, one of the disadvantages worth noting is the fact that frameless systems serve only as a decorative attribute, since the temperature will not differ from the street temperature, and no additional devices can change it.
Video - Finnish frameless glazing:
Balcony glazing
After all the work on the outer cladding of the balcony was completed, I proceeded directly to glazing my balcony. Next, I will write step-by-step instructions with which everyone can try to glaze a balcony with their own hands.
Advice! Start the glazing by installing the canopy - then you won’t have to guess where to attach this canopy so that it doesn’t fall off with the first strong wind. It will be enough to screw it to the ceiling using dowel nails.
Glazing of balconies with plastic windows
- Before purchasing windows, you need to find out what size they are needed. To do this, use a tape measure to measure the length of the parapet to the ceiling and from wall to wall. You need to know if there is a distortion on the parapet - a level will help with this. By the way, many companies selling glazing send their own specialist who takes his measurements. This is very convenient and minimizes the possibility of incorrect calculations. I took the measurements myself, leaving a gap of 1.5-2 cm in both directions; for those who are not sure that the diagonals are even, you can leave about 1.5-3 cm. In any case, it will all be blown away with foam.
- Next, we remove the double-glazed windows from the windows; this is not required for opening sashes. There are a couple of reasons for this action - firstly, together with double-glazed windows, the windows are very heavy, and secondly, there is a possibility of damaging the glass during installation.
- Afterwards we fix the stand profile. Turn the frame over and insert the profile into the grooves. Then we turn the frame back over. Doing everything will be convenient and simple; the frame without glass is very light.
- We set the fastenings for the frame at a distance of 15 cm from each edge. We hammer the fixing plate into the grooves with a hammer, then turn it 90 degrees to secure it to the concrete wall.
- The next step is to install the frame in the opening. A friend helped me with this. Using a level, we leveled the frame and secured it in the opening with self-tapping screws. There is no need to drive them in - you just need to screw them in.
- Afterwards, all frames are inserted according to the same principle, using a level and self-tapping screws.
- Once all the frames were in place, I secured them to the parapet, ceiling and walls using anchors. I deepened them by about 60 mm.
- All that remains is to cover all the cracks. For this, polyurethane foam is used.
- That's all there is left - we insert the double-glazed window into the frame and return the flaps to their place. It is enough to hang them back on the hinges and check the functionality of all mechanisms.
Related article: How much does it cost to make a balcony on the 2nd floor
Installation of low tide and window sill on the balcony
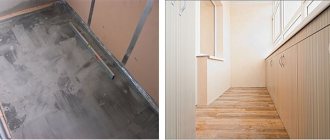
Finally, I installed a drip sill on the outside of the balcony and installed a window sill on the inside. Although I spent quite a lot of time completing all the work, and then cleaning the entire room from construction dirt, I was satisfied. Self-glazing of the balcony allows you to save a decent amount of money. In addition, I gained valuable experience and new skills in construction work, and the external cladding of the balcony with siding is doubly pleasing. Now the balcony looks perfect from the outside and this is due not only to the siding manufacturer, but also to me.
Window installation tools
To do glazing yourself, you will need the following tools and materials:
- Tape measure and pencil or marker;
- Hex key for tightening fasteners;
- Hammer, grinder, other electronic tools;
- Pads to level surfaces;
- Bolts and screws;
- Expensive sealant that will be resistant to aggressive environmental influences;
- Low tides and visors;
- Polyurethane foam.
How to glaze a balcony with your own hands: 6 glazing options
Many people today want to turn a balcony into a room where they can not dry clothes and store various rubbish, but spend time doing something interesting, or just drink tea with friends. To do this, you need to make a quiet, warm corner out of a cold, windswept space. No idea how to achieve this. Naturally, the balcony needs to be insulated. Today there are enough insulation materials on sale that can be used to insulate a balcony. But, before laying insulation and covering the walls, it is necessary to install energy-saving windows. This is the main requirement. Without it, insulating the balcony is pointless.
Pros and cons of wooden windows
Nowadays, many do not find enough advantages in wooden windows and believe that they have become unreasonably expensive. Why is it unjustified? Metal-plastic structures have more advantages, but this is only at first glance. Now I am speaking out in defense of this craft, and you will understand why.
Some point out that the main disadvantage is that wooden balconies are less suitable for retaining heat, and in winter you will not feel a single difference between the existing wooden balconies and the absence of glazing at all. But for some reason no one considers the fact that instead of ordinary glass you can use exactly the same two-chamber glass as in their metal-plastic counterparts, and fill the cavity between the inner and outer walls with insulation. In any case, the balcony will be ordered individually, so you can get everything you want.
If you decide on a wooden model, listen to the opinion of the craftsman who will do the work. Yes, you may want some patterns or carvings, but only he can explain to you how best to complete this work.
Every carpenter has one goal - to make you a satisfied client who will want to tell his friend about him who comes to him in a couple of weeks with a new order. An experienced carpenter will tell you which wood is best to use for the job, taking into account your financial capabilities and the climate of your region. Don't neglect his opinion.
For insulation, I advise using not polystyrene foam or mineral wool, but polystyrene foam plates. They are an order of magnitude smaller, so they will not create a bulky structure from the window, which will become even more inconvenient. In addition to this, they have more serious heat saving indicators.
On a note! Using the same principle, modern beekeepers insulate bee houses by making a polystyrene foam layer in a wooden hive, which helps the family keep warm in winter.
I want to immediately warn you that you will have to shell out a very good amount of money for all this. Someone says that wooden glazing is much cheaper than the same work, but with double-glazed windows. I assure you that there is nothing more expensive in this world than handmade work.
In addition to all this, remember that such windows require more meticulous care. If, for example, it is enough to simply wash the plastic, then in this case it will be simply necessary to re-varnish the entire balcony at least once every couple of years.
Glazing a loggia with your own hands: methods and types of work
Modern technologies provide the opportunity to turn a balcony or loggia into a real masterpiece. You can make a summer deck out of a balcony structure, or you can make an imitation of it, so that in both winter and summer you can be on the balcony or loggia, as if on an open, uncluttered terrace.
Glazing a loggia with your own hands is not an easy task. If you do not have skills in this matter, then it is better to seek the help of specialists. A balcony is not an interior space of an apartment, where errors in work will not be noticeable. The balcony requires skill and skill.
In order to properly glaze the loggia, it is necessary to install a strong fence that will withstand heavy double-glazed windows. In addition, the material from which the windows are made should be as light as possible and as energy efficient as possible. There are several types of glazing for a balcony or loggia, all of them differ in both the result and the installation process.
Types of balcony glazing:
- Cold glazing;
- Conventional glazing;
- Sliding glazing;
- Glazing with removal of window space;
- Complete removal of the balcony;
- Panoramic glazing.
The first option is the simplest. This is a long-known and cheap glazing of a balcony, when a wooden frame is inserted into the existing cladding, but you will not insulate it in this way. Panoramic glazing is an excellent way. The view from the window increases, much more light enters the room, it has a stylish design, but it is impossible to create panoramic lighting on your own.
How to choose a double-glazed window
Manufacturers complete frames with a set of fittings. But the double-glazed window is selected separately. The final decision depends on the purpose of the balcony. For the cold version, bags with one chamber and glass 4 mm thick are suitable. Warm balconies require a minimum of a two-chamber package and glass in a combination of 4-4-4 mm.
In passing, we note that for some reason consumers most often choose glass with a thickness of 5 or 6 mm for balconies, although it has been proven that heat retention does not depend on this indicator, but on the number of chambers in the double-glazed window and the quality of the seal.
When choosing glass, you need to pay attention to its type:
- sun protection (reflex) - designed to reflect the rays of the sun;
- impact-resistant (triplex) - reinforced with a special film that increases impact and bending strength;
- tempered (regular glass heated to 650-680o with rapid cooling with cold air) - to increase resistance to mechanical damage;
- low-emissivity glass - transmits long waves and delays (reflects) short ones (light passes through, heat is reflected back). It is placed inside a double-glazed window, significantly increasing its ability to retain heat on the balcony.
It is logical that the more useful properties a glass unit has, the more expensive it is, but the quality justifies the price, allowing the costs to quickly pay for themselves.
Where to start glazing a balcony with your own hands: preparation
In order to glaze a balcony, you need to have a strong and reliable base for installing frames. The balconies of houses that were built in the last century went according to plan with only a fence made of metal rods covered with boards. By today, these fences have turned into bent, loose, rusted reinforcement elements.
Glazing a balcony with your own hands must begin with preparatory work. If you see that there is simply nothing to put your new windows on, then you need to arrange a solid foundation for them.
If the fence is relatively new and durable, then perhaps it can simply be reinforced with additional metal supports. Do not lay out the fence from bricks or other heavy materials. The balcony slab may not hold up and collapse.
Work that needs to be done before glazing the balcony:
- Provide a base for your new windows. It is best to lay a new fence from a metal corner or profile pipe.
- Coat the metal fence with an anti-corrosion agent.
- Think about your own safety. If you have to work above the second floor, then purchase a safety belt. Work at height can only be carried out in it.
- Draw up a project for your future balcony. Calculate all the parameters; this will allow you to calculate the size of the windows, the consumption of glazing materials and funds for them.
- Prepare all necessary materials and tools.
- Find yourself a partner. It is almost impossible to install windows alone.
- If your plans include covering the balcony facade, then this must be done before installing new window frames.
If you have a small balcony in a Khrushchev-era building, it may be worth considering the option of installing a fence with remote glazing or the entire perimeter of the balcony.
Safety precautions
There is no need to show unnecessary heroism, you don’t have to carry out all the work alone, you can call good neighbors and friends who also like to work with their hands. Firstly, an extra pair of hands will never be superfluous, and secondly, in the event of an emergency, there will be someone to help.
You can reduce the risk of injury to a minimum by wearing a safety belt. A sports version with a cable length of up to 2.5 meters, designed for a weight of up to 400 kg, is suitable. The belay is attached using an anchor pin. First, a metal collet is screwed into the wall about 15 cm, then a pin is inserted into it with a screwdriver.
Safety is paramount.
How to glaze a balcony yourself: necessary materials and tools
Apart from finishing and preparatory work, you don’t need a lot of materials and tools to install the windows themselves.
It is quite possible to glaze a balcony, like a loggia, with plastic windows yourself. To do this, you just need to correctly calculate the required size of the windows and place them correctly in the prepared opening.
If you decide to increase the area of the balcony, then do not increase it with an aluminum profile. A steel profile pipe welded to the fasteners is better suited for this. When carrying out repair work on the balcony, do not forget about the safety of your family and friends.
Materials and tools you will need when installing plastic windows:
- Screwdriver;
- Screwdriver;
- Knife;
- Pliers;
- Hammer;
- Self-tapping screws;
- Polyurethane foam;
- Vapor barrier tape;
- Plastic for window sill.
Installation of double-glazed windows begins after clearing debris, waste building materials and eliminating dust from the balcony. It is not good to bring new glass onto a dirty balcony.
What's unrealistic about metal-plastic windows?
They have not been on the modern market for long, but have already gained popularity and taken a leading position. It is double-glazed windows that are considered the optimal answer to the question of how to properly glaze a balcony or loggia.
Such designs have many positive qualities. Let's start with the fact that they themselves are created for maximum heat conservation indoors. When ordering windows, I advise purchasing three-chamber samples. They are an order of magnitude warmer than their two-chamber counterparts, since the additional air cushion completes the process that inhibits the entry of cold.
Step-by-step instructions: how to glaze a balcony with your own hands
After all the preparatory work has been completed, you can begin the process of glazing the loggia or balcony. With loggias the situation is simpler. It is much easier to glaze one front wall than the entire perimeter of the balcony. But the result will be different. The loggia receives much less light than the balcony, and it looks smaller.
Glazing a balcony, like a loggia, with your own hands is not easy. To do this you will need an assistant and some construction tools. Work must be performed carefully so as not to damage the profile or scratch the glass.
Take your time, check the quality of the work after each completed stage. If the seal is broken, cold and dampness will enter your balcony.
Step-by-step instructions for installing windows:
- We remove the double-glazed windows from the frames.
- Carefully place them in a safe place where they are not in danger;
- Remove the opening sashes from the frame. Lock the window and remove the top and bottom trim. Pull the pin out of the loop at the bottom, bring the handle to a flat, horizontal position, tilt the sash towards you, and remove it from the bottom hinge.
- Attach the stand profiles that came with the windows to the frame. There are holes for them in the frame.
- Secure them with self-tapping screws.
- You should already have holes drilled for anchors around the entire perimeter.
- Insert the frame into your opening and align.
- Bolt the frame to the parapet, to the wall and to the ceiling. The distance between the bolts should be no more than 70 cm.
- Apply vapor barrier tape to the ends.
- Foam the space between it and the wall, and attach it to the opening, seal the joints
- Return the glass units and sash to the frame.
- Apply vapor barrier tape to the bottom of the frame.
- Install a window sill.
- Check the tightness and functionality of the structure.
Related article: Should the management company repair the balcony?
Preparing a balcony for glazing takes much more time than installing windows in ready-made openings. When we glass metal fencing from scratch, it takes a little longer.
Differences between a balcony and a loggia
Before choosing a glazing option, you need to understand some nuances, since many apartment owners confuse a balcony with a loggia. They are distinguished by the following parameters:
- the balcony is always located outside the apartment, completely protruding beyond the facade wall. It has one load-bearing wall, and the structure is open on the other three sides. However, there are exceptions to this formulation: there are balconies in brick houses with two walls, when one of them is load-bearing, and the second serves as a fence for the neighbor’s loggia on the other side;
- The loggia is located on the wall inside the building. It is limited at the back and sides - it is easier to glaze it.
Therefore, the glazing schemes for balconies and loggias differ significantly from each other. For a loggia, it is enough to make a large frame, and the balcony will need to be surrounded by a supporting structure under glass. Hence the different amount of materials for the work, and the complexity and labor intensity.
Balcony.
Loggia.
What you need to be prepared for before starting glazing
Balcony glazing requires a professional approach. In such work, it should be remembered that the balcony slab is designed for a certain load. Therefore, she may not be able to withstand the weight gain. To prevent a fatal collapse of the entire structure, it is better to seek advice from specialists. They will be able to give clear recommendations on materials that can be used for glazing in a particular case.
When glazing a loggia, such detailed calculations of the load-bearing capacity of the balcony slab are not required, since the load of the side of the loggia is transferred to the main wall of the house. Glazing can be produced using almost any materials and methods.
It is better to do the balcony glazing yourself with your own hands together with an assistant. In such work you will have to constantly lean over the parapet, so it wouldn’t hurt to have someone who can provide backup. For safety, it is advisable to prepare safety equipment in advance.
Materials for glazing balcony structures
Relatively recently, glazing of balcony structures was carried out using various available materials. Among them were old window frames and some other options. Nowadays glazing is performed using special structures. They are made of plastic, wood or aluminum.
PVC profile
The use of plastic in glazing has many advantages. It turns out to be better than other options. The structures are reliable and durable. Plastic does not collapse when exposed to moisture and temperature changes. It is very easy to care for the frames. They only need to be periodically cleaned of dirt. The cost of structures made from plastic profiles is affordable. They are not the cheapest, but not too expensive either.
A significant drawback when glazing old balcony structures in Khrushchev-era buildings is the significant weight of frames made of PVC profiles. The balcony structure is not always able to withstand such a load. The support requires a reliable fence, which is difficult to arrange, because the already small area will be reduced.
Natural wood
Quite often, external structures are glazed using wooden frames. Wood is environmentally friendly and beautiful, goes well with many interiors and is suitable for use with modern fittings. Wood is a lightweight, hygroscopic material with high insulation properties.
Everyone knows the disadvantages of wood. It is prone to rotting and requires regular impregnation with antiseptics and painting. Changes in humidity and temperature lead to drying out and cracking. Frames made of laminated veneer lumber are resistant to such influences, but they are much more expensive.
Wood is well suited for glazing balcony structures in Khrushchev-era buildings. It is not heavy, so it will not create additional load, but it will provide high-quality protection from cold and noise.
Aluminum profile
A very convenient material for glazing is aluminum profile. It is lightweight, which makes it a suitable option for structures in Khrushchev-era buildings, high strength and reliability. This material is fireproof, durable and resistant to most external influences.
Balcony glazing – choosing the best method
Glazing a balcony with your own hands can be done using both cold and warm methods. In the first option, lightweight frames with single glasses are most often used. In winter, it is quite cold on such a balcony, so during this period of the year this room is used as a pantry for food. Well, in the summer you can organize gatherings on the balcony with such glazing.
Cold glazing of balconies is most often carried out using wooden frames. As a rule, flaps are used. This option has priority in environmental friendliness and low price. But wood needs regular maintenance as it rots over time. You will have to constantly paint the frames and cover them with antiseptic impregnations.
To avoid unnecessary maintenance hassle, we can recommend an aluminum profile as a replacement for wood. This material is easy to install, environmentally friendly and lightweight. During operation, aluminum is not subject to rotting. Therefore, there is no need to worry about the destruction of this material. For such cases, the sashes can be used either rotary or tilt-and-turn. Recently, sliding doors have become increasingly popular.
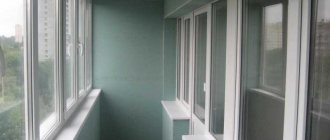
Warm glazing of balconies is done if there is a need for additional heated premises. In such a place it becomes possible to create a rest room. A warm balcony can be used as a workplace or simply as a winter garden. Alternatively, the balcony and room can be combined into one space. This will make the living space larger, which is a huge plus in small apartments.
Such balcony glazing requires a serious approach to work and careful calculation, since the dew point should not be inside the balcony. Due to improper insulation, condensation in the room can lead to mold throughout the apartment. To ensure that the dew point is not in the room, it is necessary to carry out high-quality hydro- and thermal insulation of the floor and parapet. Remember, even a small gap or cold bridge can lead to condensation.
For warm glazing of balconies you need a double-glazed window with seals. It is recommended to implement natural ventilation, which can be adjusted independently. For this purpose, the manufacturer of metal-plastic windows provides ventilation dampers. To get rid of condensation, air circulation is required between the balcony and the room. For this purpose, it is necessary to install a fan in the window of the room, which will draw air out of the room. A ventilation grille must be installed at the bottom of the balcony door.
Tips and tricks
- Before glazing a balcony, it is important to choose a suitable profile.
- All installation options are associated with certain difficulties in execution, therefore they are carried out in a certain sequence and are adjusted to the structure of the loggia.
- Measurements are taken and calculations are made after selecting the profile. Then the old glass, frames and fastenings are dismantled, starting from the balcony ceiling to the parapet.
- It is worth making all measurements with maximum accuracy to avoid problems during installation. Sometimes a few millimeters ruin the installation.
- Think about how the doors will open in the future. Won't you have to risk your life to reach the distant blind windows?
- It is advisable to hide the external joints using additional fittings so that the double-glazed finish looks smooth and beautiful in appearance.
- Be sure to align and adjust the openings during installation in relation to the bottom wall to avoid the cladding sticking out and leaving gaps.
- Full glazing is carried out only after the expert issues the final permit.
Types of glazing
In elite multi-storey buildings, as a rule, panoramic glazing of balconies is used. This option involves a glass fence from floor to ceiling. The most popular is frameless panoramic glazing; with it, the natural lighting of the room increases several times.
For such glazing, shockproof glass 6–8 mm thick is used, which is treated with metal oxide. Such a double-glazed window is quite difficult to break. Thanks to special coatings, glass can reflect heat back into the room and allow ultraviolet light into the room. Such double-glazed windows have very high sound insulation properties.
Glass sashes can be hinged, sliding (on rollers) or folding. If the balcony space is small, the best option would be to use a sliding mechanism. In this option, when opening the doors, the room area is not lost.
Aluminum profiles are also used for glazing. Weight depends on the thickness of the glass and the size of the sections, but, as a rule, does not exceed 20 kg per linear meter. m. Therefore, it becomes possible to glaze the balcony with removal. For this, detailed strength calculations are not required.
To assemble the sections, you will need to make guides at the top and bottom of the balcony opening. Then you need to install vertical posts. Then the frame is secured using latches and locks. It is imperative to measure the evenness of the location of the guides and racks. The skew should not exceed 5 mm per linear line. m.
Glazing of balconies can also be done using metal-plastic windows. In this option, the weight of the structure will be 40 kg per linear meter. m. It is recommended to install such glazing before installing the window sill. Racks made of metal-plastic profiles must be attached to the ceiling and parapet using self-tapping screws.
Before installation, it is necessary to remove double-glazed windows in all windows, since glass can easily be broken during installation work. To remove double-glazed windows from the frame, you need to pull out the window beads.
Also, before installing the frame, all sashes must be removed. To do this, you need to squeeze out pins in the upper loops, which can be pulled out using pliers. After this, the sash can be removed from the lower hinge.
Related article: Remove the wall between the balcony and the room
If it is decided to make a winter garden or greenhouse on the balcony, then you can use glazing of the balcony with removal. This will require a parapet of increased strength. Additionally, you will have to take care of installing the visor.
Technical features of frameless glazing
Frameless glazing is a sliding system made of transparent, stained or impact-resistant glass. Partitions and frames are not provided. The glass is mounted on metal profile rails. A rubber seal is laid between the doors and the aluminum profile.
The system is lightweight, durable with a glass thickness of 8-10 mm. Although it is not warm. After installation, there will definitely be cracks and gaps due to the impossibility of fitting the glass close to each other.
Professionals consider frameless glazing to be universal. The absence of frames allows the room to be heated by the sun and muffle noise from the street. Although the temperature on the balcony is unlikely to rise by more than 2 degrees, unlike outside. This option is suitable for gardeners who want to grow plants.
For frameless glazing, tempered thick, durable, impact-resistant glass with round ground edges is used.
The advantages of this glass:
- withstand high loads;
- inability to get hurt.
This option is suitable for dark rooms when you want to add sunlight. But it involves the complete demolition of the parapet. This means that we are talking about reconstruction and you will have to contact the relevant services to obtain permission.
Consecutive glazing of the balcony
Finishing and glazing of balconies is always carried out at different stages. For example, with lattice fencing, insulation and decorative external finishing are done before glazing begins. But the interior finishing and installation of the window sill must be done after the window frames are installed.
If you have a brick or concrete parapet, you first need to level its surface using cement mortar. Then do the exterior finishing. Only after this can glazing work be carried out. Interior finishing and insulation is done after the window sill is installed.
If the balcony does not have an upper ceiling or is hanging, then you need to use pipe supports. They will be able to withstand most of the glazing load. External frames must be made from 40–60 mm angles. Using a grinder, you need to smooth out all the welds. After this, you need to do degreasing and cleaning. Then you can cover the entire frame with acrylic enamel.
The most labor-intensive stage of the work is creating the visor. It should protrude 15 cm beyond the glazing. As a rule, 40 mm corners are used. The height of the visor is made within 40 cm.
The first step for the visor is to make a frame, in which you need to drill 10-12 mm holes for anchor bolts. The distance between the holes should be 40–60 cm. You need to ensure that there are at least 4 holes along the entire length.
To mark places for bolts on the wall, you will need to attach the frame, level it horizontally using a level and draw marks in the holes. After this, you can start drilling holes for the anchors. Once the bolts are installed, the frame itself can be attached to the wall.
The next step is to create cross members and slopes that need to be welded to the frame. Then the outer crossbar is attached. Upon completion, you can begin installing the canopy roof. As a rule, galvanized sheets are used for this. They must be laid overlapping in one wave. To prevent water from leaking between the wall and the roof during rain, it is necessary to insert the sheets into the grooves.
The width of the supporting frames must be made with a small margin (10–15 mm) from the thickness of the window. According to experts, the frame can have a maximum size of 1100x1500 mm (subject to the use of a 40 mm corner). If a 60 mm corner is used, then the length can be made 1300x1700 mm. Using pipe stands, the frame must be connected to the canopy by welding.
When the frame is completely installed, you can begin decorative finishing and insulation. For cladding it is possible to use metal sheets that must be welded to the frame. As an option, you can use moisture-resistant plywood or plasterboard for finishing. A balcony covered with siding looks quite decent. Basalt wool is used as a thermal insulation material.
The glazing process begins with the installation of window frames, which must be secured to the corners with 6 mm self-tapping screws. The distance between the fasteners should be 25–30 cm. After the window frames are secured, all grooves need to be foamed. Then the window sashes are installed and the double-glazed windows are put in place. Upon completion, you can begin interior decorative finishing. For this purpose, wooden lining, plastic panels or drywall, which can be painted, are used.
Preparatory work
Reconstruction actions begin with preparing the premises:
- the parapet is checked for cracks and cracks;
- the gaps are measured, the required pieces of galvanized sheet are cut off;
- sealing is carried out with fastening to self-tapping screws after installation under the tree from the outside;
- the old parapet is demolished, a new one is erected in case of a disapproving decision by the specialist;
- laid out 1 brick wide, one by one, on sand-cement mortar;
- all work is monitored by level to obtain a completely horizontal structure, problem-free glazing and no distortions;
- a frame is made if necessary, onto which the frame will be attached with self-tapping screws and dowels around the perimeter of the opening;
- The sash is removed from the frame and the lock is removed from the upper hinge of the sash.
Cold and warm: what's the difference?
In glazing, the terminology “cold” and “warm” is often used. This indicates the temperature the frames must withstand. Wood is more environmentally friendly, but it does not retain heat well. Therefore, aluminum and plastic options are recommended for low temperatures.
Glazing a balcony is not only about installing the glass itself, but also about building a strong support for it, so try to do everything as efficiently and reliably as possible.
For cold glazing, conventional designs are used, and for warm glazing, double frames and often an insulated floor are used. The difference between the options is several degrees, but at the same time you will have to spend much more in price.
Advantages and disadvantages of wood glazing
Wooden window blocks:
- reliable;
- environmentally friendly;
- visually attractive;
- suitable for self-installation;
- suppress noise from the street well;
- have increased thermal insulation properties.
The downside is water penetration or icing of window systems. Especially with a sliding design. Easy to produce.
If you assemble all the doors correctly, the temperature inside the loggia should rise by several degrees. Although the problem often arises when installing glazing beads from the reverse side, if the floor is higher than the first. Experts recommend first inserting the glass into the frames, then installing it on the base. If the structure is three-dimensional, then it is better and safer to carry out all the work from the inside
Aluminum profile
One of the most popular options. Using aluminum, you can make external frames (with the addition of additional space) and generally visually do without frames. Even with the cold method, the balcony is warm and dry, and in terms of price it is one of the cheapest options.
This design is quite durable, and the aluminum frames do not absorb much light. Service life is about eighty years. The glass itself can be mirrored, plexiglass, bulletproof and armored.
Step by step installation
Let's start with choosing a manufacturer and accessories: choose only high-quality options with certificates.
- Measure the exact size of the balcony, draw a sketch and calculate the amount of material.
- Make sure that the frame is strong and reliable, and that it does not need to be strengthened or rebuilt.
- If you decide to dismantle old glass, make sure that no one will get hurt below. Put up barriers.
- We seal the glass with tape. We remove the old visor.
- We take measurements again and make sure that the calculations are correct.
- We remove the railings or cover them with a steel apron.
- We install the frame on a concrete barrier or beams, fixing it with anchors (we attach special plates to the walls, screw in bolts from the bottom and top).
- Fill with polyurethane foam.
- Low tide installation.
- Installation of sashes (we check everything by level).
- We adjust the fittings.
- We seal the joints from moisture and unnecessary gaps.
The glazing is completed; in extreme cases, contact specialists to check and correct your work.
PVC frames
PVC is mainly suitable for warm glazing options. They provide tightness and sound insulation. This option is suitable for you if you are planning to make the balcony a full-fledged living space. They do not require special care, just regular cleaning. The smooth surface looks very aesthetically pleasing.
Wooden frames
This is the most environmentally friendly option, but there is a stereotype about their fragility. There is indeed a problem with wooden frames that they dry out and crack due to improper use.
But it is enough to cover them with the right varnish and periodically tint. Wood looks really stylish and cozy in the interior, and retains heat well if you use sealed compounds during installation.
Wood can easily be painted in any color: make sure it looks aesthetically pleasing. Here, by the way, is a clear example of responsible and not so responsible owners.
Installation of metal-plastic structures
How to glaze a balcony yourself with plastic double-glazed windows? The double-glazed windows themselves will still have to be ordered from the factory. You just need to take the measurements correctly. But step-by-step instructions will help you perform direct glazing of a balcony with your own hands:
- We start by installing support posts: corner, intermediate and end. For these purposes, it is advisable to use wooden beams. The installation of the structure is carried out according to a similar principle presented for a box with a wooden frame, secured with screws and corners.
- Carefully remove the glass units from the frames. This makes installation work easier and prevents damage to double-glazed windows. Remove the double-glazed windows using a narrow screwdriver. It is used to pry up and pull out the glazing beads, and then the glass unit itself.
- We are temporarily dismantling the sashes. The protective caps are removed from the hinges. The pin is removed from the top hinge, and then the sash can be easily removed.
- The frame profile is first fixed at the bottom and then with anchor bolts at the sides.
- Next, we install the window sashes in their place. We check that there are no distortions and fix them with wedges.
- We finally fix the frames and secure them with polyurethane foam.
- We check the functioning of the sashes and fittings.
Precautionary measures
All work on balcony glazing must be carried out with a safety belt. It is better to use a sports one - it is lighter and cheaper than an industrial one. The industrial type is more reliable and durable, but you don’t systematically engage in steeplejack work.
The belt halyard should be approximately 2.5 m long. A halyard that is too short will complicate the work, and if it is too long, if you suddenly fall, the jerk can cause dangerous injury. The halyard carbine, and the entire belt as a whole, must withstand a load of 400 kg. If the load value is not indicated in the certificate for the belt, or there is no certificate at all, such a belt should not be taken.
The safety cord must be securely fastened. To do this, you need to drive an anchor pin with a metal collet into the main wall for the duration of the work, at least 150 mm. The head of the stud is in the form of a ring with a generatrix at least 8 mm thick; pin body diameter – from 16 mm.
You need to screw the pin into the collet until it stops and tightly, inserting a powerful screwdriver or pry bar into the ring. At the end of the work, the head of the stud, so as not to interfere, is cut off flush with the wall with a grinder.