Before carrying out repair work, all people imagine the end result in their minds, in which everything is perfect and beautiful, but in practice various problems often arise.
One of the common problems is the appearance of seams and joints on wallpaper that lag behind the walls and become visible. At this time, the question immediately arises: how to remove the seams on the wallpaper?
This material will present all possible options for eliminating seams after pasting, as well as the reasons for the appearance of such defects.
Reasons for the appearance of joints
In practice, there may be several reasons for the appearance of visible seams. The most common of them are shown in the table:
| Reason for appearance | Description | Elimination methods |
| The divergence of joints due to swelling of wallpaper. | All paper materials swell from moisture. When pasting a room, the material swells from the glue and when the wallpaper is placed on the wall, the surface is created without joints. After the paper dries, it takes on its original shape, and a small area of bare wall appears. | To prevent this from happening, you should not allow the wallpaper to get too wet during the process of pasting the room. |
| Applying a large layer of adhesive composition. | The glue is applied in such an amount that it sets first, and only then the wallpaper begins to shrink. | It is necessary to prevent the reverse sequence of glue setting. |
When purchasing materials, you need to look and check the batch and number of each roll of wallpaper. They must be identical and made on the same day.
Defect options
Most often, owners blame both the craftsmen and the quality of the wallpaper. But if the craftsmen are professionals, and before this room they managed to glue kilometers of canvases with high quality without any comments, why did they not take into account the peculiarities of the brand of trellis when gluing. Indirect confirmation is the fact that the same problem occurs with both cheap paper and expensive non-woven wallpaper.
The answer to the question of how to make wallpaper joints invisible does not have a clear answer, since the defect itself at the joints can manifest itself in different ways:
- The neighboring canvases have separated, and a thin gap has formed through which the wall is visible;
- A lighter or darker uneven strip of glue residue appeared along the joint;
- The joints at the border of the wallpaper have risen like a “house”;
- At the joints, the difference in shades of the two canvases is clearly visible.
The last point is the most unpleasant. It often happens that when buying wallpaper in a company store, you can purchase rolls from the same manufacturer, the same brand, but belonging to different batches. To sell mismatched items and make the product attractive, salons collect leftover rolls from different batches into one and sell them at a slightly reduced price.
Many manufacturers, due to the peculiarities of the technology for applying paints to the panel, are not able to ensure ideal distribution of the toner; as a result, one edge turns out to be slightly darker and more saturated than the other. It is impossible to hide such a defect, so an icon with two vertical arrows directed in different directions is placed on the roll. This means "reverse sticker sequence". To hide uneven coloring, each subsequent roll must be turned 180 degrees before cutting and gluing. If you do not pay attention in time to the icon hidden in the text of the marking, the discrepancy in shades at the joints can only be corrected by painting the trellises.
Correcting seam gaps
Most often, this problem occurs with paper wallpaper.
Paper materials, after contact with glue, can increase in width by 6 mm, and after drying, a gap appears on the walls. To prevent such defects it is necessary:
- Control the layer of adhesive composition, which should not soak the material too much.
- After applying the glue, you should wait a little until the material becomes moisturized and immediately glue the canvas to the wall before it begins to swell.
As a rule, seams come apart if too much glue has been applied. In this case, the canvas cannot properly stick to the wall and you will have to glue the wallpaper again.
Using a special glue for joints that secures the edges of the wallpaper will help prevent the seams from coming apart. To do this, pry up the edge of the canvas and apply glue, after which the canvas is pressed against the wall with a rubber roller.
Tile grout applied to the joints in small quantities will help cope with the problem.
You can remove the distances between the canvases like this:
- Paint the entire surface.
- The seams can be hidden using tile grout. A dye of the required shade is added to the composition and applied to the joints in small quantities.
- You can remove the decorative layer from the remaining wallpaper using sandpaper. Next, add PVA glue to the resulting material, and after stirring, apply the product along the seams.
- If the seams are torn apart enough and you don’t want to re-glue them, you can decorate the wall or glue moldings.
- You can re-glue wallpaper on the seams. This method is the most optimal, all you need to do is soak the wallpaper with water and after it swells, apply glue, and then press the canvas to the wall. After holding for a few minutes, the canvas is leveled with a spatula or roller. How to properly glue wallpaper - read another article on our website.
After pasting the room, it is not recommended to open the windows for a couple of days.
Criteria influencing the choice of fastening method
Before we begin to consider the fastening methods themselves without the use of nails or screws, it is necessary to understand what parameters affect the possibility of their use. The most important indicators are:
- item weight;
- type of wall covering;
If you do not take into account such an obvious fact as the weight of a painting or plate, then all your efforts may not be crowned with success. Some fastening methods can securely hold objects weighing up to 9 kg. But most are still intended for small-sized elements weighing up to 1.5-2 kg. It is clear that a heavy clay plate cannot be held using double-sided tape.
The next important factor is the base material on which the fastener will be held. For example, the same double-sided tape will not stick well to textured wallpaper. However, it will feel quite reliable on smooth wallpaper or on a plasterboard surface. Brickwork or surfaces made of natural or artificial stone interact well with various adhesives.
Do not forget that it is not enough to securely fix the picture on the wall - it must be done relatively evenly. Only correctly located objects will create a harmonious environment. To do this, do not neglect the building level or marking immediately before starting work.
Removing glue from the front part
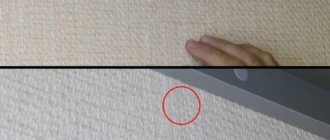
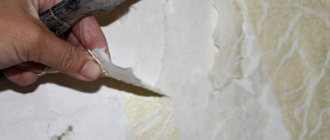
Often the seams are visible due to the glue coming out.
Often the problem is the appearance of glue on the seams. Such residues do not need to be removed, but they begin to shine in the light and may change color in the areas of development.
To prevent the glue from oozing out at the seams, during gluing you should apply the composition in the optimal amount without excess.
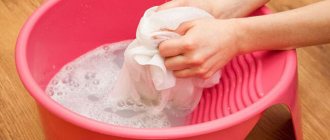
If there is such a manifestation, then you need to try to wash off the glue with a clean, damp cloth or other method.
When removing defects, it is better not to apply any effort, so as not to spoil the canvas.
A detailed reading of the instructions for the adhesive composition will help you avoid trouble.
What to do after gluing
The pads do not require complex care. The composition is fanned from time to time with a soft feather broom and wiped with a slightly damp cloth. It is important to ensure that dust does not eat into the decorative relief elements. If you allow a large accumulation of dust, the molding may darken, and then it will have to be repainted.
Cleaning can also be done with a vacuum cleaner with a very soft brush. On difficult terrain, remove dust with a soft brush or cotton swabs.
It is better not to use cleaning agents, as they are too aggressive on painted surfaces.
The wood can be wiped with plain water, and if it is heavily soiled, washed with liquid soap.
Removing edge curl on seams and evening out color
Curling edges must be coated with glue again.
If the preparation of the wall surface was carried out poorly, then after gluing the wallpaper, the seams may lag behind the walls and curl. At the same time, some of the plaster remains on the edges. This problem appears if low-quality materials were used, which means you shouldn’t skimp on surface preparation.
The defect can be eliminated by gluing the seams with joint glue. After applying the composition, you need to secure the canvas with a spatula or rubber roller.
Often, wallpaper may not match in shade on different edges. If you unwind the roll, the differences will be unnoticeable, but when gluing the walls, defects appear, the seams are obtained with sharp color transitions, which can be noticed without any problems.
Reversible pasting will help prevent this effect. In other words, one canvas is glued as usual, and the second is turned over and only in this state is applied to the wall. For more information on how to glue joints, watch this video:
If the work has already been done and such a defect has appeared or uneven cuts at the joints are visible, then painting the seams will help hide the defect. To do this, you can buy a special product in the store or use a regular pencil. The main thing is to choose the right shade. Uneven joints due to incorrect cuts can be covered with decorations: edgings, ribbons, etc.
Studying the instructions for the wallpaper will help you avoid correctional work. Manufacturers can write gluing procedures for different types of materials.
Fastening in “serious” ways
In this paragraph we will look at ways to fasten objects or a series of objects that have significant weight, without using nails. It is worth noting that dismantling some elements will be difficult and will leave behind characteristic marks . In this regard, it will be necessary to update the wall covering.
No. 11. Picture board
This method is used when you don’t mind the floor and ceiling , but you do mind the walls. Please note right away that if you have a suspended or suspended ceiling, then this method is not for you . Unless, of course, this was foreseen in advance. It is worth noting that using an entire separate wall to place objects will help achieve unique interior solutions.
Such a board can become the center of the room and set the rest of its furnishings. Compositions that are designed to tell about something look more harmonious and thoughtful. For example, a series of landscape photographs taken at different times of the year, which convey the brightest moments of each month and tell the story of the decline and rebirth of nature. Or a series of black and white portrait photos of a married couple, which depict the story of their acquaintance and the most significant moments. Or the story of a person dear to you growing up. to highlight such an element using spot lighting . And it’s even easier to build such a structure. You can use real wooden boards, knocked together into a single sheet of the required size. More affordable options involve the use of laminated or sanded chipboard or MDF.
You can paint the surface yourself in a suitable color. For fastening, you need special brackets , which are sold at any hardware store.
- You immediately need to mark the floor , and then transfer it using a plumb line or laser level to the ceiling . This way you will avoid distortion.
- Now you need to make holes in the floor and ceiling . They do not have to be located opposite each other.
- Dowels are inserted into the holes and a pin is screwed in . You need to screw the bracket onto it. The brackets must be able to be adjusted in thickness using a clamp.
- Now insert the sheet into all the brackets on the floor and ceiling at the same time. At this stage you will need an assistant. While one person holds the sheet, the second should clamp it in the brackets.
- Then you need to check the deviation of the plane from the vertical position using a level.
It is best to place 5-10 cm from the wall in order to emphasize the individuality of this object and direct maximum attention to it. If you have already decided on the order in which objects will be placed on the board, then it is better and more convenient to make fastenings for them before installation. If not, you will have to use the stairs.
Gluing the joint of vinyl wallpaper
Gluing vinyl wallpaper is very problematic. As a rule, problems appear with seams in the corners. If the surface is properly prepared, or rather all the corners of the room are level, then problems will not arise.
The basic rule for a high-quality corner connection of panels is to completely cut the seam. Both sheets are applied to the wall with an overlap of 3 cm. Then the seam is cut and joined end-to-end. This place is smeared with glue and then smoothed out.
To prevent joints from appearing during the process, all strips of wallpaper will need to be applied with a slight overlap. If the material has a non-woven base, then the overlap can be 20 mm, for paper material it will be 40 mm. After carrying out the work, it is necessary to cut the joint strictly according to the level and remove any remaining glue.
Upon completion of the work, the surface is checked for the presence of air bubbles and seam divergence. If necessary, you can get rid of bubbles under the wallpaper using simple methods. For the intricacies of pasting vinyl wallpaper, watch this video:
For vinyl wallpaper, different adhesives can be used depending on their base. In addition, the application of glue is different; the composition is applied to the wall and the canvas, depending on the base of the material.
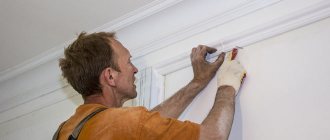
How to choose glue based on the material of the molding and base
The correct solution to the problem of what to glue the decorative molding on ensures the durability of the installation. Therefore, before you start decorating the interior with molding, you need to carefully select the adhesive composition. This choice is determined by the material from which the overlay strips are made:
- For PVC panels and light plastic flexible moldings, PVA or wallpaper glue is suitable; you can also use powerful products for decorative elements. Glue for polyurethane skirting boards is also suitable.
- Polystyrene baguettes require solvent-free products. Acetone is especially dangerous for them. It completely corrodes the foam parts.
- Planks and heavy figured gypsum stucco molding are attached to polyurethane compounds or gypsum solutions.
- Products made from duropolymer require powerful mounting and joining adhesives. You need to select carefully, since different compositions are recommended for different impact-resistant composites.
- Massive wooden decorative overlays, as a rule, are so heavy that they have to be additionally secured with self-tapping screws.
The main rule for choosing glue: carefully read the instructions that come with each package.
Gluing the joint of non-woven wallpaper
Non-woven coverings are best glued level.
Non-woven fabric is very convenient to use, since it does not stretch or swell. To make the coating look beautiful, the strips need to be glued level, after drawing lines on the wall.
Special attention is paid to the corners, each strip should fit 10-15 mm into the corner, the next strip is glued overlapping.
If folds appear, they will need to be cut and the air removed, after which you can inject a little glue with a syringe and smooth the wallpaper with a roller. For external corners, the sheets are glued with an overlap of approximately 25 mm.
Wallpaper overlap
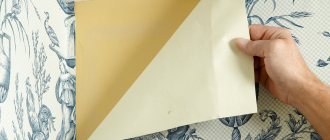
Have you decided to start a renovation and replace your long-tired wallpaper with new ones (you haven’t purchased wallpaper for this yet - we recommend buying wallpaper for your walls in the Sovatd.ru store), but you don’t have any experience in this area? Don't despair, even for novice builders there is a method of gluing wallpaper that will help you do it without much effort. The undoubted advantages of this method will be a significant reduction in time and effort spent on finishing, and wallpaper pasted in this way will hold up more reliably. It is worth remembering that when using this technique, you must ensure that the edge of the applied canvas is facing the light. All wallpaper should start from the window. This will help hide the shadows from the joining seam. If you start pasting on the left side of the window, then you will need to trim the right edge of the wallpaper, and if on the right, then the left. Thin paper wallpaper, without a relief pattern, is ideal for work, since thick finishing materials will overlap poorly. In order to wallpaper a room with overlapping wallpaper, you must follow the following instructions:
Gluing the joint of paper wallpaper
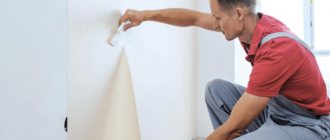
Seams are the most common problem with paper wallpaper. For proper gluing you need to follow certain rules:
- The wallpaper roll is unrolled and the strips that will be applied to the wall are cut out. It is necessary to leave a gap of 3-4 cm.
- Next, the cut strip is rolled out onto the clean floor, face down, and the adhesive composition is applied with a wide brush. After this, the strip is left for the time specified in the instructions for impregnation. During this period, you can prepare a second strip.
- The first strip is glued to the wall, starting from the door or window opening.
- Using a clean and dry rag, the strip is pressed against the wall, and then the remains are cut off.
- The second strip is applied with an overlap of about 30-40 mm, so that seams do not appear after drying. The whole room is glued in the same way.
Having familiarized yourself with the methods of wallpapering and how to remove seams on wallpaper after gluing, you can carry out the work yourself, it is only important to follow the rules and recommendations of the masters. For useful tips on gluing joints, watch this video:
Finally, you need to remember that each material has its own characteristics for use, so before purchasing and using it is imperative to study the composition and characteristics of the raw material.
Rules for high-quality butt gluing
Professional tilers are happy to share the experience that they have been able to accumulate over many years of performing a wide variety of repairs.
Experts advise adhering to some rules in order to achieve a positive result, as well as avoid problems; the recommendations look like this:
- To save on the purchase of materials, it is important to choose the right place from where vinyl trellises on a non-woven basis or another type of canvas will begin to be glued, it all depends on the layout of a particular room.
- The fixing mixture is applied to the wallpaper itself or the base, depending on the type of cladding chosen.
- When faced with a crooked angle in your work, you should not try to fit the pattern end-to-end; it is better to hide this defect by gluing it overlapping.
- Often, some joint areas begin to move away from the wall; for re-coating, you should use glue with higher adhesion rates.
Even having fully understood how to properly join wallpaper, some novice craftsmen discover unsightly seams; there is no need to make excessive efforts to smooth them out.
Such actions can lead to even greater damage to the canvas; it is better to resort to other methods, for example, painting or puttying the problem area, as well as using a special tape.