0
14.10.2021
Wallpaper is the most common type of interior wall decoration. As it may seem, the process is simple, apply glue to the cut strip and glue it to the wall. But, there are features associated with the corners of the rooms that should be taken into account in advance.
Pasting wallpaper in a corner is not as easy as it might seem at first glance
General recommendations
Page navigation
If the walls and corners are smooth, then absolutely anyone with no skills can cope with the task. But first, you should make sure that everything is as “smooth” as it seems. Do not forget that the quality of the result obtained and the appearance of the wall depend on the preparatory work.
There are some tricks that will contribute to high-quality gluing of the canvas:
- If there is no primer, you need to take regular glue used for wallpapering and apply it to the corners of the room. This should be done several hours before the start of the main work.
- Applying glue in the corners is done strictly with a brush, which will help to avoid omissions or insufficient amounts of adhesive.
- If you choose heavy and multi-ball wallpaper, you should buy transparent glue.
- Smoothing the canvas must be done until it is completely leveled and no trapped air is removed.
After trimming the wallpaper, you need to go again with a brush with glue along the inside of the butt joints and you can paste over the wall. This will make it easier to glue each individual strip so that none of them come off soon.
You need to choose a special glue, focusing on the material of the wallpaper.
It is important to choose the right glue
Where to start?
Attention:
Choosing an “opening” corner is not the first thing you need to start repairing. Usually, at least a week passes between the firm decision to update the appearance of an apartment or room and the purchase of materials, during which you need to get rid of the old covering, level the walls, and prepare them for renovation. Only after this the direction of gluing is determined.
Why can't you start from any convenient place? It is possible if the walls are in perfect condition and the repairs are carried out by a professional with experience. In other cases, you need to start strictly from a certain place, because the first canvas sets the direction for all the others : if you make a mistake with it, then everything will go awry.
For amateurs and beginners, you can start with a doorway or window. The materials are glued in a circle. Even if as a result the last canvas is wider than necessary, it will not be noticeable. This method of gluing will save you if you need to match a pattern (find out how to select a pattern and cut wallpaper in difficult places here).
For the first canvas you need to make a vertical marking using a plumb line . If the option from a window or doorway is not suitable due to their absence or unevenness, they start from the most inconspicuous corner: for example, where the cabinet will stand in the future. The angle cannot be considered a reliable guide, but in the absence of other options, it is better to be safe.
A vertical line must be drawn. They draw it on the wall at a distance equal to the width of the roll minus 2-3 cm. Then the first canvas is glued exactly along the line, and the remaining 2-3 cm cover the perpendicular wall.
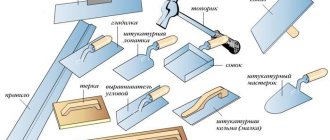
Materials and tools for wallpapering corners
To complete the work, you need to prepare tools, as well as materials that you cannot do without.
Among them: gypsum-based putty, angled spatula, metal profile, scissors, rubber roller for smoothing, plumb bob, glue tray, glue roller, brush, beacon profile, self-tapping screws, screwdriver, dowels with a hammer drill and tape measure.
It is worth considering that the length of the tape measure should be greater than the height from floor to ceiling. If you start taking measurements in several stages, there is a risk of making a mistake and then you will not be able to achieve perfect evenness at the time of gluing. Incorrect data will then affect the quality of work.
All cutting objects must be sharp so that when used, the base of the paper web does not tear and does not create jagged edges.
Of course, the main materials for gluing are the wallpaper itself and glue. You should not take everything exactly according to the calculation of the room; you should always take into account unforeseen situations, erroneous measurements, etc.
If we talk about rolls, you need to take one more, as well as a pack of adhesive. In any case, if you have a receipt, you can always return the balance to the hardware store. But if a piece of the pattern is not available, there is no guarantee that a roll from the same batch will be found.
Excess wallpaper can then be returned to the store
In addition to the key ones, there are also seemingly insignificant components, but which you cannot do without.
- If you apply excess glue, use a soft rag. It is better to buy cellulose napkins that will not leave marks, threads or streaks. The material absorbs glue residue well.
- In order not to stain the wallpaper, especially light colors, you must first place oilcloth or polyethylene under it. This will help protect the floor in the room from unwanted stains and scratches.
- It would be a good idea to provide a stable stepladder or stand of suitable height in order to easily reach all the highest points in the apartment.
What wallpaper do you buy most often?
Paper is a well-known material and gluing technology.
14.29%
Vinyl on non-woven base. This is just some kind of gift in terms of ease of gluing.
42.86%
We tried liquid wallpaper and now we only use it.
14.29%
I look at the situation. Most often I buy paper, non-woven ones.
14.29%
I gave up this type of finishing a long time ago.
14.29%
Voted: 7
Traditional cutting method
To cut material for wall cladding, you can use a knife with special blades divided into segments. This tool allows you to easily cut material in different directions.
Attention
To ensure cutting with maximum accuracy, a special level is required. The latter is produced on the basis of alcohol. It is used as a ruler. But it’s easier to use the usual rule.
To trim the edges of unused material, you can use a sharp, medium-length scissor blade.
- To start cutting the material, the surface is first prepared.
You need to stick a special film of a given thickness (from 80 microns) onto it. This will be the ideal surface for coating the material with adhesive elements. Initially, the number of stripes is calculated, which is important to maintain. If the width of the material is 500 mm, then before cutting the perimeter of the room is measured (read how to calculate the required wallpaper along the perimeter and area of the room here). Let's say it's 10 m. - Now this value is divided by the width of the material: 10:0.5=20. This means that for work you will need to use twenty solid strips of material. Then it is important to pay attention to the length of the bundle. Its indicator is divided by the height of the ceilings (in this case, it is two and a half meters).
Rapport is taken into account for combining the canvases. This way we can calculate the number of whole stripes in the convolution. The required number of strips is then divided by the number of whole sheets in the roll. The result will be an indicator equal to the number of rolls.The classic roll length is ten meters. This way you can get up to four strips per package. To calculate the number of rolls, the number of solid layers needed for one room is divided by the number of sheets in the roll. In the example under consideration it looks like this: 20:4=5.
- From this indicator you need to subtract the area that will not be used. This is the opening for the window and door. According to general rules, they take up half a roll. Accordingly, you will need to buy four bundles of material. You can buy a few extra rolls as a supply.
- After the calculations, you need to find out the height of the upper internal covering of the room.
The height is measured from the floor surface to the top point. It is important to take such measurements in all corners of the room. Suppose there is a traditional number of corners in a room that have different heights. For example, the minimum indicator is 220, and the maximum is 260. Here cutting is carried out according to the maximum indicator (260).
The material must be cut depending on its label:
- no ornament;
- with a selected pattern that does not move;
- with a selected pattern that moves;
- cutting without additional ornament or design.
This is the easiest and most traditional cutting method. At the maximum height of the upper interior covering of the room (in our example - 260 cm), the material can be cut 10 mm less, i.e. 259 cm. This is explained by the fact that the top is shortened by 10 mm, and the bottom by 50 mm, because the floor is supplemented with special wooden planks for decoration (plinths).
Important
Rolls without additional ornamentation are simply rolled out on the specified side and glued to prevent movement.
How to properly prepare a corner for pasting
Before you start gluing, you should make sure that the corner is even. It should not be wavy or fall over. In this case, the stage of carefully removing old wallpaper or washing out the whitewash is important. Priming is a mandatory preparatory work that should not be neglected. It should be applied both before the putty process and after the final cleaning of the walls.
By properly leveling the wall, you will be able to avoid future gaps, empty spaces under the wallpaper and folds.
Using a metal profile and holding it strictly vertically, you need to find the point on the wall that protrudes the most. Apply a spatula to this place, and on top of it a profile, check the level with a plumb line, and make notches. Afterwards, holes are made for the dowels using a hammer drill, they are installed and the profile is secured using self-tapping screws.
After pre-wetting the wall, putty is applied with a spatula, thereby forming an even angle. The final stage in preparing the corner in front of the wallpaper is cleaning, removing excess with the finest grit sandpaper.
The final stage of preparing the wall. Cleaning after leveling.
Corner gluing technology
During the process of transforming the walls of a room, everyone is necessarily faced with the need to paste internal or external corners. To decide how to glue wallpaper in the corners of the room, it is worth considering which angle you will have to work with.
Today in modern housing there are practically no external corners, so you only have to glue the internal ones. However, it is worth knowing how to hang wallpaper, both in the outer and inner corners.
You should start by preparing a strip of canvas: the width should be such that a few centimeters extend beyond the corner of the wall. Then you need to apply glue to the wallpaper and the wall and stick it. It is necessary to immediately walk over the entire surface to remove excess air.
If you do not carefully align the strip of wallpaper to be glued, air will collect under it, which will cause peeling from the wall. That is why this stage needs to be given due attention.
The next strip of wallpaper should be placed overlapping, so that it covers those centimeters that went around the corner from the first strip. It is important to retreat 0.5 centimeters from the outer corner. After that, make an even cut between the connecting strips, removing excess sections. Using a rubber roller, roll the outer corner well.
Pasting the outer corner of the room
You can also paste wallpaper in the inner corner using the overlapping method. If the seam is very noticeable, then you should try joining two strips of fabric end-to-end. However, this method is more complicated; you often have to make cuts to ensure an even connection and prevent the wallpaper from bunching up.
Features of trimming wallpaper in corners
The basic rule when gluing is to maintain symmetry, take accurate measurements and evenly trim off the excess with a sharp knife.
Then a strip of wallpaper is pulled up, and the joint is additionally coated and pressed. An uneven joint will look sloppy. If the corners are well and correctly aligned in advance, then the trimming process will not take much effort and time.
The pressure with a stationery knife should be strong enough to clearly cut two strips of wallpaper glued overlapping at the same time.
Evenness of corners
The first thing you need to check is the evenness of your wall corners. Because if the corners are not even, then you won’t be able to wallpaper them evenly. If necessary, you need to perform plastering work, install metal or plastic corners on the outer corners. The internal corners are leveled with plaster, without any corners. Aligning corners is a separate topic for discussion, so we will return to it in future articles.
Aligning corners
Subtleties of working with drawings
Having decided to paste wallpaper with a pattern, before the process, you must first place the canvas on the floor to adjust the image. When choosing the overlap method, precise measurements of every centimeter are taken so that the resulting result is whole and not assembled in parts. Measurements must be taken along the entire length of the segment, since the difference at the top and bottom may differ by several centimeters if the base, that is, the angle, is not level.
The final adjustment is made directly when the wallpaper strip is glued.
- Mark the points of contact between the drawings with a simple pencil.
- It is also necessary to make notes where the bottom and where the top of the strip is; incidents often occur in such situations.
- To avoid mistakes, one of the patterns is selected and orientation is carried out according to it when the wall begins to be pasted.
The joint will be almost invisible if the angle is not more than 2 centimeters, and the wallpaper is chosen with an even geometric pattern. Pasting a corner with a canvas with a complex image will be more difficult than when choosing plain colors.
Wallpapering the inner corner with patterned wallpaper
What to do with uneven corners
A crooked line of corners in a house or apartment is the most common problem that almost all owners face. It is not always possible to solve it on your own; sometimes you need a specialist.
It is not enough to tape up an uneven corner of the walls, trying to forget about the defect.
When deciding to wallpaper, you still need to take into account the following key recommendations:
- It is best to purchase wallpaper with a neutral, not flashy pattern. This will help smooth out the corner defect without attracting unnecessary glances.
- The choice of non-woven fabric is mainly related to the quality of such wallpaper. The non-woven fabric stretches, but at the same time it is durable and does not tear, and also does not get completely wet from applying glue. At the same time, the properties help hide minor imperfections on uneven corners of the room.
- To disguise the unevenness, you can use a painting mesh. It will help not only strengthen the corner itself, but also remove existing depressions.
- There is also a method of gluing wallpaper in two layers, which will help smooth out unevenness and visually level it.
Uneven corners are a problem for many homes.
conclusions
The price of high-quality wallpaper treatment of corners is neither more nor less, but the quality of the entire work. Therefore, approach this task with the utmost care and with a cool head - precise calculation, trimming, control verticals, one side with an allowance, let it dry, the other, trim.
Of course, the matter requires training. This means that start with corners that are not yet so significant, which will still be almost closed. Be sure to watch the additional video in this article, it will help you with advice in difficult times.
Sources
- https://roomester.ru/dekor/steny/kak-kleit-oboi-v-uglah.html
- https://www.spets-stroy-portal.ru/doma-i-dachi/kak-kleit-flizelinovye-oboi-v-uglah-instrukcija-po-montazhu.html
- https://J.Etagi.com/ps/kak-kleit-oboi-v-uglah-komnaty/
- https://bouw.ru/article/kak-kleity-flizelinovie-oboi-v-uglah
- https://2proraba.com/steny/oboi/kak-kleit-ugly-oboyami-na-flizelinovoj-osnove.html
- https://prorab.guru/kvartira/uchimsya-kleit-flizelinovyie-oboi-v-uglah.html
- https://okcomfort.com/steny/oboi/kak-kleit-v-uglah.html
- https://dekoriko.ru/nastennye-pokrytiya/oboi/kak-kleit-v-uglah/
- https://diz-kitchen.ru/%F0%9F%A4%A6%E2%80%8D%E2%99%82remont/kak-kleit-oboi-v-uglax-komnaty.html
6 934