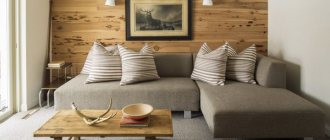
A wooden house is a fairy tale. Imagine for a second how happy it is to walk into a room with wood trim inside and feel that characteristic smell of nature and the atmosphere of naturalness. The tree is pleasant to touch and pleasant to look at. The style of an interior with wood trim becomes unimportant in comparison with the extraordinary comfort and beauty that the material gives.
Arch in a wooden house
A good decoration that adds some authenticity would be an arch in the house. Moreover, it can be done in any part, or even in the entire room. The presented photos of arches in a wooden house are examples of various categories of complexity. Of course, it’s good when you have carpentry skills, then you can easily design the arch of a house to your liking in a variety of directions.
Arches in a private house are more of an element of the interior; they do not carry a functional load, but without them the passage looks quite dull. Therefore, if a wooden house is bought for relaxation, if it should bring joy, pleasure and relaxation, let's try to create the right atmosphere there. Arches in a wooden house in this case will be an important attribute of visual comfort. Therefore, we look at the photo and try to make a beautiful arch indoors.
Beautiful arch in a private wooden house
A wooden house is a fairy tale. Imagine for a second how happy it is to walk into a room with wood trim inside and feel that characteristic smell of nature and the atmosphere of naturalness. The tree is pleasant to touch and pleasant to look at. The style of an interior with wood trim becomes unimportant in comparison with the extraordinary comfort and beauty that the material gives.
Arch in a wooden house
A good decoration that adds some authenticity would be an arch in the house. Moreover, it can be done in any part, or even in the entire room. The presented photos of arches in a wooden house are examples of various categories of complexity. Of course, it’s good when you have carpentry skills, then you can easily design the arch of a house to your liking in a variety of directions.
Arches in a private house are more of an element of the interior; they do not carry a functional load, but without them the passage looks quite dull. Therefore, if a wooden house is bought for relaxation, if it should bring joy, pleasure and relaxation, let's try to create the right atmosphere there. Arches in a wooden house in this case will be an important attribute of visual comfort. Therefore, we look at the photo and try to make a beautiful arch indoors.
Article on the topic: How to cover the walls of a boiler room in a wooden house
Portal
If you want to create a portal, then this is the easiest solution to implement. You need to purchase a door frame, but not for installing a door, but with a completely flat front part. Next, using a drill, you need to drill several holes around the perimeter for fastening. It is necessary to mark these points on the opening, for which the structure is applied and marks are made. We drill holes along them using a drill with an impact mode or a hammer drill. All that remains is to insert the dowels. Next, place the box again and secure it with screws.
Related article: How to sew loops on curtains with a needle or crochet?
All that remains is to decorate the box with platbands. They need to be matched to the color. We take measurements and cut the products at 45 degrees to join the elements. Essentially, you need to cut two doorways to cover the box on both sides.
Installing an arch in an apartment
You can install an incredibly beautiful arch in your home without the help of a construction team or engineering skills. It is enough to choose the arched design you like and the material with the tool to make it. If you follow the instructions below, you can avoid the most common mistakes that beginners make.
The arch structures themselves in the construction industry usually play the role of supporting elements in the construction of ceilings and walls. In our example, the doorways are not load-bearing structures. For the first case, materials are taken taking into account the serious load on the walls; decorative arched structures must only withstand their own weight.
The door arch in the apartment replaces the door; it is installed in the same place as the movable structure. This is a future design element.
DIY arch ideas are varied; we will describe the simplest ones in our article. You can make an arch using a beam with a 2-3 cm cross-section or a light profile. This design in any design will perfectly support the weight of the finish. The main thing is to securely fasten all the elements to the wall so that the beautiful decor does not crumble after a couple of days.
Note! The decorative arch plays more of a design function in apartments; it does not support the main structures. The main load in such a situation is on concrete walls and lintels.
There is a huge selection of arched shapes and design solutions, each of which is selected for a specific case.
The arch presented above as a visual example has the shape of a semicircle of regular shape. In the latter case, a passage with strict rectangular outlines. Next come intermediate versions of arched structures.
There are many other examples where only one support or curved posts are used. The appearance of the door arch directly depends on the chosen room design.
Article on the topic: How to paint a wooden staircase in a house forum
You should take into account the size of the openings, the height of the ceilings and some possible features of the room layout. For someone in a house in a classic retro style, an elegant arch with a semicircular shape will fit perfectly, for others in a modernist style - a rectangular portal shape.
These things are influenced by the tastes of the owners and the design features of the apartment. Some even choose cone-shaped arches.
Preparation
First, the interior opening needs to be prepared. To do this, remove the old door frame, if it is still in place. Then the surface must be cleaned of anything that could interfere with further actions. After this, you can start measuring its dimensions.
Next you need to prepare the tools:
- tape measure and pencil;
- level;
- sharp knife;
- wood hacksaw;
- screwdriver;
- impact drill or hammer drill.
To make a structure with your own hands, it is recommended to use either a solid custom-made product, or create it from several elements combined into a single composition.
Recommendations for finishing an opening with an arch
Preparation stage
All technological operations are almost identical; There may be only individual nuances, depending on the chosen decoration technique.
- Thorough cleaning of the base. It is advisable to level it as much as possible to facilitate the finishing process. This mainly applies to doorways in walls made of brick or concrete. In some cases, special arched structures are not placed in them, but the end parts of the equipped passage and the areas adjacent to it are directly decorated. This is typical when facing arches with a regular (square or rectangular) configuration with artificial stone or panels.
- Antiseptic impregnation and primer treatment. The latter agent “nails” the remaining dust and increases the adhesion of the base. Consequently, when gluing finishing materials there will be no problems with dirt pellets and air bubbles.
Sample cutting
Difficulties arise if it is necessary to cut the slats, which are often used to form vaults, at an angle; Otherwise, they cannot be joined together without creating a large gap. A miter box will help out - a simple device that costs no more than 100 rubles. It is necessary to have it on hand if you are finishing some unusual arch with a complex configuration.
Color design
There are many recommendations on this point. But if we sum them all up, then basically the following trend can be seen - most experts agree that the decoration of the arch should be done taking into account the shade of the wall in which it is placed. The completeness and originality of the design can only be emphasized by creating contrast. Monochromaticity eliminates all the advantages of such a room design.
Article on the topic: Is it possible to install a dry closet in a wooden house?
Doorway decoration
In the finishing process, you should not limit yourself to just one material. Even the cheapest cladding will be significantly transformed if, when decorating an arch in an apartment or house, you use various additional elements in the form of strips, inserts, ribbons (simple, embossed) and the like. The overall design of the room will only benefit from this.
Backlight
It is organized not only for comfort and partial energy savings. Spotlights (for example, LED devices) mounted in the arch are the same elements of its decoration. Properly placed and selected according to power, they can give a completely different look to the decoration in the evening; even the most inexpensive one will look impressive and quite presentable.
The above technologies and materials are not the only ones with which arched openings can be beautifully finished. With certain skills, you can create spectacular mosaic compositions, use cork panels, cut logs - the choice of decoration methods is huge.
Application options
Instruction 1: finishing with decorative plaster
| Illustrations | Stages of finishing work |
| Applying plaster. Ready-made Venetian plaster is applied to the pre-primed surface. Our task is to create a relief during application. We form protrusions on the relief with a trowel. After the plaster has completely dried, the surface is lightly sanded with a paint float. | |
| First coat of paint . When painting plaster, several colors are used, selected in the same range. The darkest paint is applied as the first layer. The paint is applied with a sponge and brush. | |
| Second layer . After the first layer has completely dried, a layer of light paint is applied with a foam sponge. Application is carried out with light touches so that the paint is on the surface. | |
| A layer of wax . After the last layer of paint has completely dried, a protective layer of wax mastic is applied to the surface of the arch. |
Instruction 2: facing with decorative stone
| Illustrations | Cladding stages |
| Preparing the stone . After purchase, decorative stone is washed in clean water and dried. The stone in the batch is all different sizes - there are pieces that are longer, shorter, thicker and thinner. Therefore, we immediately sort the stone into piles according to size. | |
| Trimming and laying decorative stone . The sorted stone is cut on a special machine so that the end has a 45° cut. Next, the tiles are selected by size and color, and laid out along a rule or even plank. | |
| Glue for stone . When gluing to putty and primed surfaces, it is advisable to use a special fast-setting mounting adhesive. When installing on cement plasters, it is advisable to use cement tile adhesive. | |
| Laying stone . The stone is laid out from bottom to top. We place the cuts made at 45° so that the joints at the corners of the end and side tiles are least noticeable. When laying out the sawn ends, we level the stone. |
Instruction 3: decoration with polyurethane molding
| Illustrations | Installation stages |
| Preparing the molding for the radius . A piece of molding is cut off, which will form the radius of the arch. From the front side, we drive nails into the molding in increments of 5-10 cm. Turn the prepared molding over and apply a strip of mounting adhesive. | |
| Forming a radius on the opening. The prepared molding is applied with the center to the center of the opening. We hammer the first nail in the center and fix the workpiece. Further from the center to the sides we drive in the remaining nails, gradually bending the molding to the shape of the opening. At the bend, the molding may move away from the plane of the wall. Therefore, as shown in the photo, we nail a couple of additional nails from the edge. | |
| Installation of vertical molding . Rigid polyurethane molding is measured from floor to radius and cut with a miter saw. Coat the joint between the vertical molding and the radius with polyurethane sealant. We attach the vertical molding with glue and fix it with nails. | |
| Finishing work . After the glue has completely dried, the nails are pulled out. The surface of the cladding is puttied and painted. |
Some tips
Decorating an arch in an apartment is a process that is carried out after the main work has been completed. The fact is that such structures are made from different materials using different technologies. The resulting architectural element serves to decorate the entire interior, giving it some individuality. We must not forget that cladding can play not only a decorative role, but also perform a protective function.
A few tips to help achieve the desired effect:
- The easiest way to decorate an arch in an apartment with your own hands is to highlight the arched opening with the desired color. Often shades are selected that will contrast with the walls. Thus, it is possible to obtain a completed design with a minimum of effort. This method can be used for other materials.
- Decorating material can be matched to existing colors. For example, if the cladding of interior arches is done with MDF panels, then it is advisable to combine them with closely spaced door leaves.
- The design can be decorated using various embossing and patterned ribbons that correspond to the general direction of the design.
- Nowadays stucco molding is becoming increasingly popular. Indeed, this is an excellent option that allows you to highlight an interior decorated in a classic style.
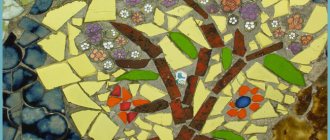
- The mosaic looks quite unique. Its use requires experience in installation. But if everything is done flawlessly, the effect will be amazing.
Article on the topic: How to make plumbing in a wooden house
Decorating an arch with mosaics is an unusual solution that deserves attention
You can go much further by replacing any materials with living plants. For this, special indoor vines and vines are selected, which create a real masterpiece.
Zoning
Today, the division of territory into zones is no longer done using solid fences. This solution is a thing of the past.
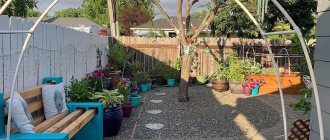
Arched structures came to the rescue. They don’t just divide the area, they make it functional. This means that each part will carry out the task that is assigned to it: a vegetable garden, a local area, a recreation area, etc., while looking beautiful.
Evergreens - a complete list with descriptions and recommendations from a gardenerVertical gardening - from idea to implementation, choosing options according to budget and attractiveness (photo + video)
- Vertical flower beds - basic principles and rules for choosing plants and arranging a suburban area with your own hands
And most importantly, it is quite possible to make a garden arch with your own hands.
Arch colors
The color of the wooden arch is selected either to match the main palette of the interior, or in contrast to it.
- A white arch with carved pilasters will decorate the interior in a palace style.
- Brown wooden arches are characteristic of classic English interiors.
- Beige color is “friendly” with most colors and has hundreds of shades. A beige arch will easily fit into both Provence and modern interiors.
Chocolate brown wenge looks very stylish; an arch made of this dark African wood will look impressive against the background of light walls.
Made from wood
Wooden arches are acceptable in terms of price. Their main advantages are appearance and environmental friendliness. This type of structure is popular among summer residents because its installation is quite quick.
You can create a real masterpiece from ordinary lining and fastening materials. At the same time, it can be coated with either paint or varnish.
However, there is a drawback - a rather short service life. Rotting, fungi, parasites, precipitation, and sunlight affect the service life.
To prevent these negative influences from damaging the structure for as long as possible, it is coated with special protective solutions and impregnations at the creation stage.
Decorative grass - 140 photos of original design. Review of the best varieties of grass for the garden, instructions, reviews, videos + gardener recommendationsWatering the site - types and types of systems, main differences and features, rules for selection and installation, as well as recommendations for operation
Ornamental plants - 140 photo options. Review of the most popular plants with names and descriptions. Gardener's recommendations + reviews
Peculiarities
Wooden arches are the embodiment of the natural beauty of solid wood and the variety of design solutions. They can be of any shape and realize even the most original ideas. An arch can visually expand the space, make the room more spacious and bright. It is actively used when zoning a room, as well as to hide possible shortcomings. With the help of arches, the geometry of the door opening is often changed.
Any arch includes a vault, side pillars and decorative elements. Its curved arch can withstand heavy loads. It should be borne in mind that when installing a wooden arch it is very difficult to bend the arch to any intended shape, so all parts are purchased only after the dimensions and shape of the future opening have been well thought out.
When making a wooden arch, various types of wood are used, such as linden, pine, ash and others.
Oak is usually used in rooms with high humidity. But the final cost of the element will be quite large. Pine boards are often used. This type of wood is softer and contains a large amount of resin, so it will not rot. Pine is more affordable in price than oak.
Article on the topic: How to fill the underground in a wooden house
Natural wood can be replaced with MDF boards. It is more convenient to work with them than with a solid massif, but in terms of endurance and durability it is significantly inferior to the latter.
The most economical option is vaults made from chipboard. A special decorative film is used to cover them. It can be of completely different shades, which allows you to get a very original final version of the product.
As an alternative surface covering, expensive wood veneer is used.
A veneered product is more durable, less susceptible to temperature fluctuations and fading under the influence of sunlight.
The type of arch for a particular room is determined by its overall design design. Often they are made either in accordance with the overall tone of the furniture, or in a contrasting color. Among the most common types of arched vaults are the following:
- The classic arch is the most common type. It is performed in the traditional style in the shape of a regular semicircle. This design is universal and fits into any interior design. This system is ideal for openings with a height of at least 2.5 meters. Half the width of the doorway is the radius of curvature.
- an elliptical arch for a low doorway. She succinctly emphasizes the uniqueness of the interior.
- A wooden arch in a romantic style is characterized by a straight central frame and rounded corners, the radius of which depends on individual parameters. It is determined, first of all, by the style of the room and its size. This design is quite compact and takes up little space.
- The “portal” design is the easiest and most convenient to install. It is also suitable for a rectangular doorway. Wooden portals are often used in offices, as they add elements of chic to the interior and increase the status of the room. In addition, such arched vaults are part of the interior in a modern minimalist style. Installation of this type of structure requires minimal costs and preparation of the doorway.
- The arched “yoke” vault is installed in doorways of various widths. As a rule, such arches are used in Provence and country styles.
Article on the topic: How to improve an old wooden house
- An exclusive solution in the form of a transom serves two functions. It promotes natural light in small darkened rooms and performs a decorative function.
- An arch in the Art Nouveau style is chosen for wide openings. It is made in the shape of a regular oval.
- An arched trapezoid vault is also an almost universal option and is easy to manufacture.
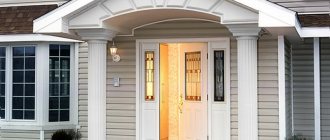
Interior wooden arches can also be decorated with various additional elements, such as side shelves, candlesticks, and lamps. This will add additional sophistication and comfort to the interior and make it even more luxurious. The front door can also be arched. She looks very original and elite.
How to choose for different rooms
Arches are installed for any premises. In country houses, an arch can frame the entrance. And inside apartments, such structures are installed in the living room for effect. It is not uncommon for an arch without doors to be used to decorate the partition between the kitchen and living room, allowing the rooms to be combined.
When decorating an apartment in an oriental style, it will be possible to install doors with an arched design in all rooms. And for small areas, shutters are often not installed in order to visually increase the space. Let's take a closer look at the application in different rooms.
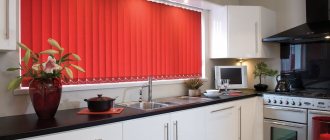
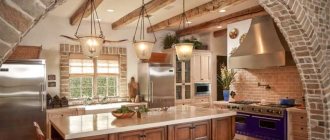
In the kitchen
If arched structures are made at interior openings in the kitchen, then you should consider the design of the adjacent rooms. The new door should fit both rooms so as not to become an out of place element. Before selecting a design, the style is assessed.
For example, plastic, stone, and drywall of various colors are suitable for a modern style. For classic rooms, gypsum board (plasterboard) is also suitable, but a carved pattern is needed; wood is also often used.
In the nursery
Arched openings for doors in a children's room are chosen to be smooth so that sharp corners do not injure the baby. Muted shades are suitable for colors, because the children's room is already filled with an abundance of bright colors from toys, furniture, and textiles.
Article on the topic: Why do you dream of a burning wooden house?
However, some owners, on the contrary, highlight the arched area with an interesting design, for example, in the shape of an apple or a gnome house. Having decided to install a gypsum plasterboard structure, you can further increase the storage area. For example, you can install many shelves on it to place books, toys, etc.
In the bedroom
Installing arches in the bedroom is often used. However, if you have a lot of noise that interferes with sleep, then you will need to install door panels. The absence of doors is suitable for young spouses and single people.
But if you want to install the arch too much, you can place it inside the room. For example, allocate a dressing table for her or after the doorway, making zoning of the room.
A natural stone
An arch made of stone looks solid and solid. The territory gains “status”. And most importantly, the design is durable, so the installation location must be carefully thought out.
The structures look massive; it makes no sense to install them in small areas; they will look ridiculous. And this is not to mention the fact that it will “steal” free space.
The only drawback is that without the skill of a mason it is unlikely to be installed on your own.
Features of arches
A wooden interior arch is an indicator of the beauty of nature. It implements the owner’s bold ideas, emphasizes subtleties, and complements the design. Such designs visually expand the space, brighten the room, zone it, and hide interior defects. Often by installing a portal, the doorway is expanded.
The arched passage consists of a vault, side pillars, and decorative elements. The vault can withstand a certain load - this is taken into account when planning to remove interior doors and design the passage. To build the portal, wood is used: oak, linden, ash.
Attention! Oak openings are installed more often; pine is used in damp rooms.
Wood is also being replaced by MDF. The material is easier to install, but has a shorter service life. Chipboard covered with film is an unpretentious material for creating an arched opening.
Formation of the vault
An important stage in the manufacture of a plasterboard arch is the formation of a curved arch of the structure.
In practice, two methods of obtaining a vault are used.
For small and narrow elements, the arch can be easily made using the dry bending method: the workpiece is bent along a contour outlined on a horizontal surface. Small notches are applied using a sharp knife; after installing the arch, they are masked with putty. The work should be done slowly and carefully to avoid breaking the workpiece.
Manufacturing an element for a large arch (span from 2 meters, width from 1.5 meters) requires wet technology.