OSB boards are a good alternative to expensive building materials. Widely used in the installation of floors, ceilings, and internal partition structures. The aesthetic appearance of the material allows it to be left without any finishing. However, quite often OSB is subjected to finishing - painting or applying decorative plaster, with preliminary putty. Whether it is possible to putty an OSB board, how to putty an OSB under wallpaper or painting, as well as the application rules will be discussed in this article.
Why and in what cases is OSB puttying used for interior and exterior work?
The material consists of slabs and sheets made from pressed chips (up to 150 mm long). They have several layers (3 or more). Thin chips are laid in different directions, which increases the resistance of the material to mechanical damage and deformation. Chipboards are pressed. The bonding of wood chips is ensured by resinous substances.
The abbreviation OSB stands for oriented strand board. But the American version is often used - Oriented Strand Board, or OSB. This material has a number of advantages. For example, due to its composition (the slab is 90% wood), it is noted for its environmental friendliness.
Due to the fact that the material exhibits the same properties as wood, there are disadvantages. The main one is low resistance to moisture. Accordingly, putty is used to protect OSB panels from negative external factors, as well as to improve the appearance of the coating.
The main reasons for using particle boards:
- prevention of exposure to moisture contained in the material used for decorative surface finishing;
- protection from UV radiation, humid air;
- reducing the risk of deterioration in the external qualities of the coating due to resinous substances that gradually appear on the surface;
- protection against formaldehyde contained in OSB boards;
- elimination of irregularities to improve the external qualities of the coating when performing certain decorative finishing methods;
- masking wood panels to create the illusion of using other types of material (for example, concrete).
Most often, OSB structures require decorative finishing. This is due to the unattractive appearance of the sheets. When using most finishing materials, it is necessary to create a smooth rough surface of the base, for example, if painting is carried out using the standard method or OSB putty under wallpaper.
They also note decoration methods that do not require leveling. These include varnishing, textured painting, installation of laminate or panels of various types. In the first case, the goal is not to disguise the natural structure of the material, but to create an emphasis on it. The varnish allows you to get a thin transparent layer, thanks to which the structure is visible, but at the same time provides reliable protection from moisture.
Textured coloring makes it possible to hide defects and the structure of the rough base material. This creates a decorative coating with unusual external properties.
The use of panels allows you to do without putty, because in this case the particle boards are completely covered. But, if you plan to perform external work, additional protection from moisture is required.
Positive qualities of the material
Many people ask the question: why use OSB if the cost of such boards is almost equal to all the usual drywall? There is every reason for this and they are expressed in an impressive list of advantages of this material:
- The panels are waterproof thanks to impregnation with special wax and synthetic resins.
- The strength of the sheets is much higher than that of gypsum board.
- Unlike gypsum plasterboard, self-tapping screws can be screwed into panels made from shavings and they will hold well.
- The outer side of the panels is excellent for applying finishing coatings - from simple wallpapering or painting to the use of plasters or putties.
- You don’t have to finish the surface with anything if you are satisfied with its appearance in its original state. It is enough to simply coat the surface with varnish, which will give it an even more beautiful look.
- The slabs are very easy to process - they can be sawed, machined or applied with an outer layer of finishing.
- Panels made from chips provide an excellent heat saving indicator.
- OSB is not susceptible to destruction by insects and pests.
- The service life of structures assembled from oriented strand boards is tens of years.
Choosing putty for OSB: what is better to putty indoors and on the facade
The simplest and most accessible to use are gypsum and cement mixtures. They allow you to get a durable coating. But in most cases, such OSB putty is not taken into account when choosing a composition for finishing the rough base. The reason is low resistance to deformation due to natural processes (changes in the volume of particle boards). The rough base expands under the influence of moisture and temperature changes.
As a result, the layer of cement or gypsum putty will quickly move away from the surface. This will lead to a decrease in the protective properties of the coating and a reduction in the service life of OSB boards. Under the layer of decorative finishing, the particle boards will absorb moisture. At the same time, the risk of mold development will increase and the strength of the structure will decrease.
For this reason, it is important to carefully choose what to putty on the OSB board. The most suitable are elastic mixtures. They resist deformation of the rough base material, do not lag behind the surface, and therefore last much longer. The best types of putty include: adhesive, oil, synthetic, etc.
Materials for OSB protection are divided into groups, taking into account differences in structure:
- ready-made putty - viscous composition;
- dry mixture.
The first option is preferable, since it does not require mixing the components yourself. In this case, there is a risk of reducing the quality of the mixture. Ready-made putty does not have this drawback, but it is distinguished by its high cost.
The second option is affordable, but if you lack experience, there is a risk of ruining the putty. The use of low-quality material will reduce the level of protection of OSB boards.
Oil-adhesive putty
Main components:
- glue;
- oil (drying oil);
- substances that accelerate the drying of film-forming compositions;
- filler (chalk);
- plasticizer - a component that increases the elasticity of the coating;
- water.
This type of mixture is often used as putty on OSB boards in rooms, provided that they are well heated. The material helps eliminate defects smaller than 0.5 cm.
Some types of oil-adhesive putty create a coating layer no more than 1-2 mm thick. The mixture is recommended to be used for leveling OSB before painting or before wallpapering.
Advantages of this type of putty:
- high drying speed: between layers up to 3 hours, complete hardening with increased coating strength - up to 24;
- the coating is characterized by elasticity and can withstand moderate loads that contribute to deformation;
- the absence of harmful components, which is important when finishing OSB panels containing formaldehyde even in small doses;
- the mixture is spread evenly on wooden, concrete, and plastered structures.
Oil-adhesive putty for OSB also has disadvantages. This is not a high enough reliability of the finished coating. Low resistance to moisture and gradual loss of properties during storage are also noted.
Polymer putty
One of the best ways to protect a structure made from OSB boards is to use an elastic mixture based on latex or acrylic. Chalk and talc are used as fillers. The composition includes film-forming components. The scope of application of polymer-based putty is wide. It is used for leveling if there are minor defects, in order to eliminate significant curvature of the surface. Cement compositions with the addition of polymer components are also noted.
When asked whether it is possible to putty an OSB board with this mixture, the answer will be positive.
Moreover, different types are used:
- universal - suitable for finishing structures made of wood, concrete and other materials;
- special - designed for working with wood.
Advantages of polymer putty:
- the finished coating does not deform as it dries and does not shrink;
- elasticity;
- vapor permeability;
- high adhesion to any material;
- strength;
- long service period.
The material has no significant shortcomings. The increased cost needs to be highlighted. But this drawback is justified by the properties of the putty when working with OSB sheets.
Other
In addition to the options considered, there is putty:
- epoxy;
- alkyd.
Both varieties provide resistance to mechanical stress. At the same time, increased adhesion of the finished coating and the finishing layer of finishing material is noted. But epoxy putty, like alkyd putty, is less often used for application to areas of structures made of OSB sheets of a significant area (walls, ceilings). This is due to the high price.
Criterias of choice
You need to choose putty for OSB taking into account the composition of the building material and the board itself. The product must have:
- high level of adhesion, hardness;
- homogeneous consistency after mixing (manual or instrumental);
- ability of uniform hardening;
- low shrinkage, which minimizes cracking during drying of the material;
- ease of distribution over the work surface (especially important for work at home);
- quick-drying abilities, providing the possibility of further finishing of treated surfaces.
The putty must be made on an adhesive, synthetic or oil basis. This allows you to avoid rolling of the material, create a dense protective layer, and not interfere with further finishing.
Question to the expert
Is it possible to putty OSB with regular putty?
It is highly undesirable to putty OSB boards with dry mixtures, which are produced for the purpose of treating concrete or brick surfaces. Such compositions will last on a wooden wall for no more than 1 month. It is better to use mixtures for finishing wood. To do this, you need to read the operating instructions, which are available on the packaging of each putty composition.
What tools will you need?
Regardless of whether putty will be used for OSB boards for painting, before gluing wallpaper or finishing in another way, prepare:
- sandpaper of different grain sizes;
- serpyanka;
- rubber spatula;
- wide spatula;
- roller, brush;
- roulette;
- container for mixing components (if dry mass is purchased);
- construction mixer.
Conclusion
Now you know how and how to putty an OSB board. If you have any questions on the topic, ask them in the comments, I will definitely answer all of them. And, of course, I recommend watching the video in this article, I’m sure it will interest you.
Did you like the article? Subscribe to our Yandex.Zen channel
December 12, 2016
Timber, Finishing materials, Wall timber, Plaster and wall putty
If you want to express gratitude, add a clarification or objection, or ask the author something, add a comment or say thank you!
Puttying OSB on walls
There are different finishing options. You can putty on OSB boards for painting or wallpaper. For this purpose, the sheets are prepared: they are sanded to remove the surface layer and removed from dust.
Instructions to make puttying easier:
- A primer is used. The surface is treated twice. Particular attention is paid to the end sections. After the initial application, take a break. You must wait until the layer of material dries. Start the priming procedure again. To do this, use a roller or brush.
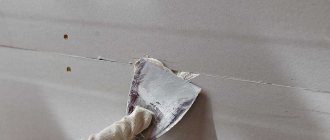
- The joints of OSB boards are puttied.
- Grind the treated areas after the composition has dried.
- Fiberglass mesh is installed along the entire wall.
- Fix the metal slats in the corner areas (external).
- Add 2 tbsp to the finished acrylic putty. l. PVA glue (increases adhesion and strength).
- Cover the wall with the prepared mixture. The procedure is repeated three times (with breaks of up to 12 hours).
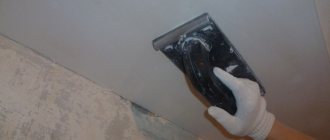
- Perform grinding.
- To strengthen the mixture, you need to prime the last layer with a special compound intended for finishing application.
Work technology
Any finishing work has a clear sequence. Skipping one of the stages reduces the quality of the future coating, and therefore the durability of the decorative finish. The preparation of OSB boards also consists of several stages.
Preparatory work, is soil needed?
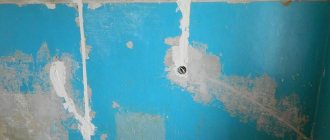
At the first stage, the paraffin coating is removed from the slab to improve adhesion to finishing materials. To do this, use a grinder or coarse sandpaper. After sanding, remove dust from the surface with a damp cloth.
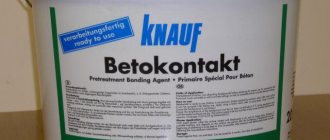
The prepared slab is coated with a primer. It is advisable to use seven types of concrete contact, then the adhesion to the putty will be optimal. The primer is poured into a plastic ditch (tray) and applied with a roller or wide brush. Hard-to-reach places can be painted with a narrow brush, and for the ceiling it is convenient to use a telescopic handle. It is recommended to apply the primer evenly and in two layers to avoid leaving dry spots.
Note! When priming the ceiling, after drying, the surface is cleaned of drops with a plastic scraper so that the putty lies evenly.
Sealing cracks and joints
When the soil has dried, all cracks and joints of the panels are filled with acrylic mixture or silicone sealant. The solution is applied with a special gun with a thin spout or using two spatulas: take the solution with a small spatula and distribute it over the larger one. All fasteners are painted to prevent rust. After the mass has dried (after about 3-4 hours), the finished surface is sanded with sandpaper or a sander.
Installation of plaster mesh
After sealing the joints, a flat base was obtained, on which a special fiberglass mesh was mounted. Secure it with a stapler or glue. Work begins from the corner and goes to the adjacent wall, the canvas is fixed tightly, avoiding waves and distortions. The reinforcing fabric will improve adhesion to further plaster mixture.
The plaster mesh is fixed with an overlap; joining of the material at the places where the panels are joined is not allowed. The joints must be covered with a continuous sheet.
If the OSB is attached to the ceiling, then the mesh is attached to the first layer of plaster, since it will sag when secured with a stapler.
Puttying OSB on ceilings
The instructions for walls are taken as a basis, but they take into account how to putty OSB on the ceiling. A number of features are noted:
- prime the surface only with a brush, then remove excess material with a spatula - remove the drops;
- the fiberglass mesh is not fixed with a stapler, it is secured with putty (when applying the first layer);
- The mixture should be scooped onto a spatula in small quantities.
When applying each next layer, the direction of movement of the tool changes: first parallel to the window, then from it to the opposite wall.
Installation of plaster mesh and corner
It is recommended to putty OSB over fiberglass. It will prevent cracking of the putty solution. The material should be attached to the ceiling using 1 layer of mixture or mounting adhesive. You should not fix the mesh on the stapler, as it may sag.
Technology:
- apply 1 layer of putty with a wide spatula, moving from the edge of the wall;
- do not apply putty, but smooth it in the direction of the lighting;
- instead of putty mortar, you can apply assembly adhesive, but you will have to work faster;
- you can cut the mesh into small fragments;
- fix the material at the edge of the ceiling, stretch it, smooth out the bubbles with a spatula;
- Cover the entire ceiling in the same way, covering the OSB seams with a continuous sheet.
Perforated corner slats with a flag are installed in the outer corners. The elements are attached with mounting adhesive or embedded in putty. The solution squeezed out through the profiles is removed with a spatula. After the corner and fiberglass have dried, you can begin to putty.
For corners, it is better to choose a material made of PVC or more durable aluminum. Galvanized steel can rust over time.
Features of puttying OSB boards before certain types of wall and ceiling cladding
Recommendations for finishing the rough foundation before starting work with different types of materials:
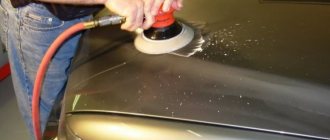
- painting - careful leveling is performed, step-by-step sanding is required (with a special tool or coarse, fine-grained sandpaper);
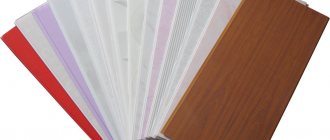
- panels of different types - OSB putty is not required, you just need to fill the joints of the sheets with elastic material and apply a primer;
- wallpapering - there is no need to carefully level the finishing layer, minor defects are acceptable;
- tiles - a special type of primer is applied to OSB boards: epoxy, film-forming (if you plan to finish rooms with a high level of humidity);
- liquid wallpaper, plaster - concrete contact is applied over the putty to increase adhesion.
Requirements for putties
Regardless of the material on which the putty is made, it must have the following characteristics:
- Excellent adhesive properties (the ability to adhere to dissimilar smooth materials), since not every putty can come into contact with a resinous surface.
- Slight shrinkage as a result of drying (this quality prevents cracking).
- The strength of the coating formed.
- The coating must not only be durable, but also be sandable.
- Uniform consistency.
- Absence of solid additives.
To ensure the absence of cracks in OSB, it is recommended to reinforce the surface with elastic materials. Painting non-woven fabric is best suited for these purposes. The interlining is glued on using wood glue.
Decorative putty on OSB
The goal when working with decorative putty mixtures is to prepare the surface (OSB sheets).
It is done this way:
- remove the protective layer;
- a primer is applied that provides increased adhesion (concrete contact) in 2 layers;
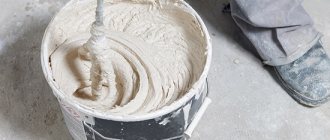
- prepare putty, but in small quantities, because it hardens quickly (after 30 minutes), an elastic mixture (acrylic, silicone) is best suited for this purpose.
To give the desired relief, different types of spatulas and rollers are used.
Making your own putty
The cost of factory-produced putty compounds is not too high. However, if large areas need to be treated, including walls, floors, and ceilings, then the total cost of leveling may not be so small. Therefore, some craftsmen decide to make their own wood putties.
To create a putty composition you will need the following components:
- linseed oil - 280 g;
- turpentine oil - 60 g;
- ground pumice - 30 g;
- gelatin - 20 g;
- casein - 20 g;
- ammonia solution (18%) - 17 g;
- water - 300 g.
First, grind the pumice stone to dust. Then pour the resulting mass into a container with linseed oil and stir until you get a homogeneous consistency. Next, pour turpentine oil into the same bowl and stir the mixture well again.
Let the stirred mass sit for several minutes, after which we add the remaining components from the list. The solution is prepared in a water bath, then stirred and infused again. After the last settling, the mixture is ready for use.
Review of popular manufacturers
It is important to pay attention to the fact that the compositions must be mixed before direct use. This is especially important for adhesive materials. If the work is done incorrectly, quartz sand will have a negative impact on the result, even if the base is a modern panel.
Among the famous names are the following:
- GF21;
- Moment SOIL;
- Kreisel 301;
- Master Inter;
Many of these primer mixtures are universal varieties, for which not only painting is allowed.
It is important to pay attention to the fact that the compositions must be mixed before direct use.
Depending on the constituent components, white spirit or turpentine, drying oils and solvents can be used for dilution. Compared to homemade compositions, the price of finished materials is slightly higher. But time is saved; the surface treatment method is indicated in the accompanying instructions.
Technological process
How to properly putty the surface? The work is carried out within the boundaries of the mesh strip, indentations are left along the edges - another piece of reinforcing material is placed on them.
The first putty layer secures and smoothes the mesh; its thickness should be minimal.
We work consistently and carefully, following all the rules for applying the mixture. We scoop up the solution with a small spatula, put it on the blade of a wide tool, and apply it to the wall surface with strokes.
The direction of movement does not matter; the main goal of the work is to obtain the most even surface possible. To avoid sagging and uneven areas, while applying the mortar mass, hold the tool at an angle of forty-five to sixty degrees, gradually leveling the angle to fifteen to thirty.
It is easier to apply putty for OSB boards by moving from the ceiling to the bottom of the wall. In this way we smooth out and evenly press the reinforcing mesh to the surface. In total, two to three layers of putty mixture are applied to the slabs, the thickness of which is one to two millimeters.
Having completed the next layer, it is kept for the time required for the mixture to harden. As a rule, this takes from thirty to sixty minutes.
If we fix the mesh with the first pass, then we cover it completely with the second layer. We apply putty a third time to smooth out the defective areas.
We finish the work by leveling the uneven areas with a spatula with a wide blade. The reinforcing material can be visible in places through the putty layer, but it should not protrude through it or be flush. As a last resort, it is allowed to treat the surface a fourth time.
The ideal location of the mesh is two to three millimeters from the surface of the putty layer.