Preparing to Draw
To begin following step-by-step instructions for children, you must first prepare your child for a creative activity:
- In order for the child to be more diligent during this period of time, it is better to initially conduct some kind of active activity before work;
- Careful preparation of the work area will also help to master the master class for beginners. Place the light source on the left, remove everything unnecessary from the table surface so that the child is not distracted.
- All tools also need to be laid out on the surface in advance, this will help you not to look for the desired object while drawing and, again, will not cause you to be distracted. You can involve the child in preparing for the lesson, then this will replace active play;
- Remember that children are just learning everything, so you shouldn’t demand a lot from them right away. While drawing, support your child and answer questions;
- The child must master a simple drawing technique; for this, you should not interfere with his creative process by introducing something or showing him in his drawing. Keep a separate sheet for this, otherwise interest in creativity may fade.
First floor project
We draw the vestibule and the hallway on the sketch - and from there there will be transitions to the kitchen and other rooms. The location of the premises must take into account the following points:
- The bathroom and kitchen should be placed in close proximity to each other - thanks to this location it will be much easier to carry out communications;
- It’s very good if the drawn up project implies the absence of passage rooms - this is an integral element of comfort;
- On the ground floor, it is necessary to take into account the presence of all auxiliary structures and premises - their location will be very important not only to ensure the functional suitability of the house, but also for the comfortable movement of residents.
Step 2: draw all the rooms and premises of the first floor with the required size
After this, we arrange and plan all the doors of our house
Step 3: designing doors on the first floor
Then windows, taking into account the desired lighting of the rooms and your budget
Step 4: designing windows on the first floor
As a result, we get this first floor:
This is how the 3D model of the first floor turned out
Materials for work
To know how to draw a house beautifully, you need to decide what will be useful for the job.
The list of materials can be varied:
- Paper or sketchbook;
- Regular pencil and eraser;
- Paints, brushes, sippy cup;
- Markers or colored pencils.
The main thing is to determine what the drawing will be drawn with before work, otherwise time will be wasted searching for the necessary materials.
Drawing the second floor
Here everything will be much easier - after all, the rooms in the house can be located identically (the most important thing is not to change the relative position of the bathrooms - in order not to complicate communications). It will be enough to design the location of the front door (many architects recommend making two entrances to the second floor - at home and from the street) and windows.
Step 5: We plan the premises of the second floor in the same way. Don’t forget about communications - we place the bathrooms and bathrooms one below the other
Step 6: Place the Doors
Step 7: draw the second floor windows
We received this 3D model of the second floor
Drawing a house with a baby
If you need to know how to draw a house easily with a 2-3 year old child, then this master class is suitable for you. It is necessary to take into account the age and restlessness of the child, so it is best to choose a simple design and materials that will make the task easier.
For example, colored pencils with three edges to make them easier to hold in your hand. You can also use wax crayons; they are easy to use and apply quite gently to the drawing.
Young children are not yet very good at figuring out geometric shapes, so a special ruler can come to the rescue. You can trace any shape using a ruler, then the drawing will turn out smoother, and the child will be happier that everything worked out.
In addition, such a process will be useful because while drawing you can voice the names of all the figures, thereby learning it all. If you notice that your baby is tired and starting to get distracted, it is better to interrupt the lesson and continue it later.
Stages of work:
- To know how to draw a house with a pencil, you first need to prepare a ruler. The child will do better and faster if you help him a little, holding the ruler so that it does not slip;
- A4 paper is placed horizontally to make drawing more convenient. All stages need to be explained to the child so that he understands what the house consists of;
- First, draw a small rectangle at the bottom of the sheet, this will be the foundation. Remember that the ruler should not slide, otherwise all the parts will move or be clumsy;
- The walls are depicted in the form of a square, which is located above the foundation.
- Help your child position the ruler correctly, because due to his age he may not understand where each element should be;
- The walls are crowned with a triangle roof;
- At this stage, the drawing with the baby can be completed. If the child is not tired, you can add additional elements in the form of a pipe and a window.
You can draw a single house with a pencil step by step, and all the elements may be different. The roof can be made semicircular, the foundation cannot be drawn. When all the main elements are drawn, the houses are painted.
Draw the roof
In order to draw a roof, you need to push off from the top edge of the cube closest to you. At an angle of 45 degrees, lay two parallel lines of equal length from the corners of this face. Connect the ends of these straight lines.
When the roof slope is ready, erase all unnecessary lines inside it.
Connect the top left corner of the cube to the top of the roof. You should end up with a rectangular slope connected to the triangular part of the roof.
Drawings of a house for older children
A child over 5 years old already has spatial thinking, so the task can be complicated. The following instructions will tell you how to simply draw a house with a 3-5 year old child:
- First you need to draw a square, explaining that these are the walls of the house. They draw a triangle on top of the wall and say that this is the roof.
- You can clearly show with an example why exactly these elements are drawn on paper;
- To the right of the main square you need to draw another one, this is the far wall. It is necessary to maintain parallelism of the lines so that the house does not move and turn out clumsy.
- You need to draw a window on the same wall;
- On the wall of the house you need to draw horizontal lines that will represent logs.
- Don't forget to add a pipe to the roof, to the front wall of the door;
- Then only the details remained. You can draw tiles on the roof or boards, add a landscape, fence and grass to the house.
- The drawing is ready, you can also color it with paints or pencils.
For older children, you can diversify the option by drawing the house from a different angle and with a larger number of elements.
Draw a cube
You need to start drawing a 3D cube with a large equilateral rhombus. Draw three lines coming from the corners down from it. The length of the lines must be the same. Now connect each end of these lines to each other.
The finished cube should have square sides or be very slightly elongated. This is necessary so that the house drawn in the picture is similar to the real one in its proportions.
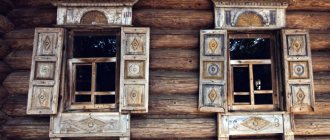
Baba Yaga's hut
Baba Yaga's hut is also considered a house, which can also be drawn. It does not require a ruler; all you need to do is draw all the elements by hand:
- Draw a pentagon-trapezoid, this will be the roof and the hut itself at the same time;
- Now you need to draw a window on the wall, you can add a hole in the attic. Frame the roof with edging;
- Logs are painted on the sides of the walls, shutter frames are added to the window;
- A pipe is painted on the roof, you can also draw horizontal lines to create the full impression of a log hut;
- All that remains is to draw the chicken legs below. You can add other landscape elements.
Baba Yaga's hut is drawn.
If you have the desire and opportunity, it is better to paint it.
Draw the roof
Drawing the roof of a house is very simple. To do this, use a ruler to create an isosceles triangle over the frame rectangle. Make the triangle wide enough so that the bottom corners extend beyond the sides of the rectangle. For the roof to look realistic, its height should be approximately equal to the height of the frame.
Photos of house drawings
Details of the future layout
Before you start designing a house and transferring your ideas onto a piece of paper, you need to decide on some nuances that our building will or will not comply with. This is done so that during planning the architect does not make too many mistakes, deciding to add, for example, a couple of extra rooms after the roof has already been drawn.
So, in order to draw a house plan yourself on a computer or on a piece of paper, you need to take into account the following nuances:
- the number of floors that will be present in the building;
- is a bathroom needed for the second and subsequent floors;
- will there be an attic under the roof;
- is there a garage in the building?
- what should the roof be like?
- how many rooms will there be;
- will there be a basement?
And these are just the basic nuances that an architect must follow when planning a house. Subsequently, you may have other questions during planning: does the house need a balcony, terrace, loggia, and so on.
Yard layout
After you have managed to draw a diagram of the house, we move on to the next stage of planning - drawing the yard area. You don't need to use a lot of detail to do this. It will be enough to mark the driveway for the car, porch and garage. However, do not forget to maintain all the proportions with your house and take into account the total area of the site so that you have enough space during construction.
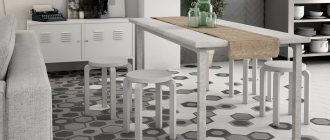
Coloring the rooms
After applying the inscriptions, we paint over the furniture and household objects with a felt-tip pen so that they somehow stand out and are different from each other. Brown is best for the cabinetry and wood dining table, while the porch can be painted gray since in most cases it will be tiled or grouted. The lawn with grass is shaded with green stripes, and blue is ideal for windows.
Sign the names of the rooms
If you decide to draw a house project on a computer, then for this purpose it will be enough to select the tab with the text window and install the required font. In case of handmade work, it is best to use a black gel pen. It is necessary to sign the purpose of each room so that the plan is convenient to use not only for you, but also for the people who will work for you. However, so that the inscriptions do not take up a large amount of space on a sheet of paper, it is recommended to use abbreviations, for example, TK - toilet room.
Drawing the internal walls
How to draw a house plan so that later there are no problems during construction? Carefully position all interior walls in the room. This planning stage involves a schematic representation of all rooms by drawing interior partitions - internal walls - onto the drawing. During this process, be sure to consider the total square footage of the home and the square footage of each room individually. For example, if you want to build a bathroom with an area of 8 square meters, then in the drawing it should look like a rectangle with sides of 4 and 2 or 3.2 and 2.5 centimeters.
Also, many people forget to include small rooms in the drawing, such as a utility room for a washing machine, a pantry or a room for a gas boiler, as a result of which they then have to redo the entire drawing. Therefore, it is recommended that before planning interior partitions, make a list of all rooms on a piece of paper.