What are the best brushes for painting with gouache? I have compiled for you a rating of the best brushes for painting with gouache. There are options that are suitable for both beginners and professional artists.
Well-selected materials are the key to success in many endeavors, including painting. The brush is one of the main components of a successful artist’s equation. With the help of properly selected brushes, you can not only make your work easier, but also make it more beautiful, high-quality and interesting.
In this article I will tell you about good brushes for gouache, which, by the way, can also be used to paint with acrylic and oil paints.
Gouache is an unpretentious paint, something between acrylic and watercolor, and in general, almost any brush will suit it. This paint is easily diluted and washed off with water, has a fairly thick consistency, but at the same time, it fits very well on surfaces - from paper and canvas, to wood and glass.
What brushes are suitable for this paint? Let's figure out together which brushes are best for gouache paints, using specific examples.
What are the differences between different types of hairs?
Hair tufts consist of hairs of natural or artificial origin - animal hair and nylon. Let's look at the most common types.
- Columnar brushes designed for watercolors, as well as tempera, gouache, acrylic and oil. The kolonok is a small predatory animal that lives in the North and Southeast Asia. Its very thin and elastic hair has a peculiar spindle-like shape and a soft long tip, used in professional brushes.
- Brushes made from Siberian squirrel hair are ideal for light paints such as tempera, gouache or watercolor, but are completely unsuitable for acrylic and oil because they have low elasticity. Thanks to the softness and conical shape of the hairs, the brush provides excellent control over the flow of paint.
- Pony hair brushes are a cheaper analogue of products made from squirrel hair. They have almost the same properties, are suitable for gouache, watercolor, tempera, but noticeably lag behind in the quality of writing. You can buy such brushes for a child, but if you want to paint at a high professional level, it is better to abandon them.
- The bristles are highly rigid and are excellent for thick, heavy oil paints, as well as acrylic, gouache and tempera. The best brushes are made from Chinese hog bristles, which are pre-boiled and bleached, and the ends are split so that the hairs pick up paint better and the strokes are even.
- Synthetic brushes have elasticity and strength, but hold paint a little worse than natural hair. These brushes are suitable for working with acrylic, oil, gouache, watercolor, tempera, and oil. They are easy to clean and are relatively inexpensive. If you're just starting out, buy these.
Now that we have decided on the choice of material, let's talk about what shape of brushes you need in order to create a beautiful finished piece.
Easy drawings with paints for beginners in watercolors step by step
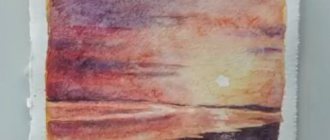
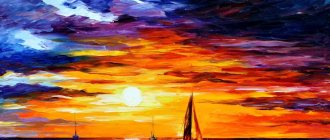
The best option is to draw a landscape. For example, this sunset in pink tones.
In order to make such a drawing, in addition to a blank sheet of paper and a brush, you will need to prepare four colors of paint: pink, blue (ultramarine), dark yellow and black.
We start with yellow, mix the paint with water, making the color saturated. After this, we begin to paint the sheet with a brush.
So, the background was applied. Now, as in the final version, you need to draw the sun. In the place where you plan to do it, wipe the area with a dry cloth. Making a white circle. The result should be the following.
Now add pink to the yellow color and mix to get an orange color. We put this new color on top of the yellow, but so that there is a yellow halo around the sun.
Now we take only pink paint and apply it in a third layer so that the sky has a slightly more pink tint.
Applying blue skies
You need to add a little blue color to the upper part of the sky. We apply ultramarine at the top of the picture. If the blue color begins to mix with the previously applied yellow, you can remove the previous shade with a cloth and apply the blue directly. Before each application of paint, the brush must be wiped with a cloth so that it is dry.
Now mix pink and ultramarine. The result will be a violet or purple hue. We apply it below the blue color. Subsequently, this will give the sky a more evening appearance.
Now, using the same pink and blue colors, we make a darker, rich purple shade. Here you will have to experiment with the amount of paint. Before applying the finished shade, apply it to a strip of paper. If you are happy with the color, then paint it; if not, we continue mixing further.
Using the resulting color scheme, we draw stripes of clouds parallel to the horizon.
We will also draw several stripes of clouds on the right side of the picture, where the sun is. So that the clouds are not very contrasting, they need to be blurred a little. To do this, take a dry brush and blur the painted purple clouds with it.
If the previous stages were drawn on wet paper, then subsequent drawings should be done on a dry sheet. Therefore, we wait for some time for the sheet to dry. After it becomes dry, we begin drawing the horizon. Take a light purple color and draw a horizon line with a thin brush tip.
Now the upper part of the drawing, above the horizon line, needs to be made somewhat pinkish. Take the pink color and apply it. To make it softer and more blurry, add a little water and “smear” the pink paint with water.
Then we move to the lower part below the horizon line. We draw the water and the shore. Since we have a sunset, a pink evening, we will paint the water pink.
After the water we move to the shore
To do this, take the intense purple we used to paint earlier and mix it with black paint. We get a dark shade for the shore, which we use to paint under the waves. We also make a few dark strokes for the water itself.
All that remains is to apply a few adjustments in the sky area; if you are not satisfied with it, use a dry brush under the horizon to blur the paint, making it look like glare from the sun on the water. That's the whole drawing. Perhaps something won’t work out right away, but with patience you can get the hang of it, and then everything will go like clockwork.
Round brushes
These tools are considered universal, as they can be used to create a variety of shapes and achieve interesting effects. They are also notable for the fact that they hold a lot of paint, so the strokes are clear and rich.
Round brushes come in pointed or oval shapes. The first ones are indispensable for writing thin lines, strokes and other small details. They are convenient for inserting individual strokes exactly where they are needed. The latter are useful for modeling the volume of objects and shading. The thickness and length of the stroke can be easily changed without taking your hand off the drawing. With the side you can make wide strokes of different shapes.
How to draw a beautiful landscape with paints on paper step by step
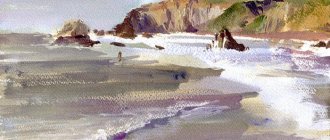
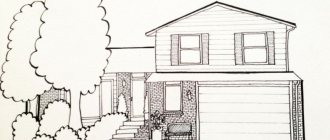
In this section I would like to offer a very interesting and simple autumn landscape.
Despite the apparent complexity due to the richness of the colors, it is not difficult to draw.
We start by drawing a blue horizon line in the middle of a sheet of paper. We make it not even, but a little winding.
Then we paint the upper part above the horizon - the sky - in two colors. We make the very top part blue, then paint it lighter below - we take white for this.
Now we go down and draw the water, also using a gradient shade. At the beginning there is a light blue color, and then it gradually turns into a dark blue.
The main background for the picture has been drawn, now let's move on to the details. We start by drawing the clouds. To do this, take the color white and start drawing lambs flying across the sky. It is not at all necessary to draw as shown in this picture. Draw them as best you can.
We have drawn the clouds, now we draw the shores. We take brown paint and also mix light brown with yellow to obtain the desired shade. Using these colors, making brush strokes, we first draw the shore along the horizon, and then at the left edge of the picture.
The shore is ready for planting.
Let's start drawing trees
On the far shore, near the horizon, draw a tree with a brown color, and a slightly lighter color – its reflection in the water.
We draw a few more trees in the same way. To make them more diverse, we make not only trees, but also shrubs. And to make the autumn picture look even more colorful, you can draw several birch trees: we draw the trunks with white, and the spots on the trunk with black.
The trees are drawn, now we need to draw the foliage. We use yellow, red and orange. Using small strokes we make leaf dots on tree branches. We use very bright shades of these colors – it’s autumn after all. But for reflection in the water we make them less bright. Don't try to make the reflection identical to the main drawing. If you don't look closely, you won't see the difference.
We draw a Christmas tree from the very edge and move to the foreground. To avoid cluttering it up, we draw just one tree. But it is large, from the bottom edge of the picture to the top, with a green crown. However, in the picture it is a pine tree. That's why it's green.
Under the pine tree we draw grass, then. Using yellow color we draw fallen leaves on the ground (on both banks). Next to the pine tree you can draw a couple more autumn trees.
And the final touch. Take white color and draw horizontal stripes on the water. Now that's it, the drawing is ready.
The result was a beautiful autumn landscape.
Flat brushes
This is the name given to brushes that have a flat barrel and a straight edge. They are also considered universal because they hold large amounts of paint well and are suitable for pouring, wide strokes with clear contours and a characteristic angled edge.
Flat brushes come in three main forms:
- square - give sharp, as if torn strokes, which is ideal for still lifes and landscapes;
- with rounded corners - give soft, delicate strokes, connected to each other and are suitable for drawing people and animals;
- oval - the strokes seem to rub into each other, the border between them is very soft, so they are good for portraits.
Oval (semicircular) brushes
They are very popular among artists because they combine the advantages of round and flat brushes. Their peculiarity is that initially the beam was enclosed in a round clip, which was flattened later. The brush is ideal for creating complex contours and expressive color transitions. The brush picks up paint perfectly and gradually releases it onto the canvas, so the strokes are voluminous, textured and moving.
To create a full-fledged painting, we recommend using all three types of brushes of different sizes.
Easy drawings about night in gouache on paper for beginning artists
In this section we will try to draw a night landscape. For this we use gouache. At the first stage, take dark blue paint and paint the entire sheet with it.
It is advisable to paint in one direction, for example horizontally from right to left. After the background has been applied, take white paint and draw a straight line just above the middle of the sheet. This will be the horizon. Then dip the brush in water and blur the white stripe across the entire upper half of the sheet.
We get a color change from dark blue to light blue.
The next step is to draw the moon. Select an area for it in the upper part of the picture and draw a circle in white. Then we blur it on the sides, as we did in the previous step. Just blur it in a circle. As a result we get:
We've drawn the moon, now we're making stars. There are several ways to go about this. You can take a very thin brush, dip it in white paint and put small dots on the sky. Or you can just spray it with a brush. You'll get a lot of star spray. With a thin brush, you can paint several stars with brighter white paint, designating them into constellations. Then we draw a circle of the moon with white paint.
The next step is to draw a path from the moon on the water.
Dip the brush into white paint and make horizontal movements with the brush from side to side.
Then we dip the brush in water and blur it along the bottom of the picture, where the path is drawn.
After this, with white paint we make a clearer highlight of the horizon line and the central part of the lunar path on the water.
Then we draw the winding line of the coast with white. Under it, with water in which we wet the brush, we wash it away in a similar way to the previous option.
Next, we apply strokes of dark yellow color, then again highlight the areas with white. The shore is ready. We draw the vegetation with black paint. Add a purple color to it.
In the foreground we draw longer stalks of reeds. Draw the spikelets. Then we draw white stripes along all the stems, which indicate the glare from the moon. This completes the painting and we get the following result.
This is such a simple, but at the same time interesting job.
Brush size
Each manufacturer has its own size range, however, they are all built on the same principle: the smaller the number on the shaft, the thinner the hair bun. The number indicates the width (diameter) of the beam in millimeters, for example, No3 corresponds to 3 mm. Brushes of different sizes have their own purposes:
- with large brushes (No. 20 – 30) they begin work: they apply the main color and tonal combinations;
- medium (No10 – 20) prescribe the shape of objects and figures;
- thin (No10 – 3) write small details and fine lines, highlights, etc.
Special brushes
This group includes tools intended for specific painting works, for example, calligraphy, or creating unusual artistic effects:
- Retouching brushes are called beveled due to their characteristic angled beam. They are usually used for sketching and sketching because the lines they draw are very clear with defined corners. They are also needed for drawing precise strokes in hard-to-reach places;
- Due to the peculiar shape of the tuft, Filbert brushes cat tongue . They are suitable for making large and small details, creating beautiful smooth lines and color transitions. Ideal for calligraphy and artistic painting;
- Fan brushes are used to shade already applied paint. A dry brush creates a shading effect, while a wet brush covers the background with graceful stripes of varying thicknesses;
If you are interested in high-speed drawing techniques or like to paint with watercolors on the street, then you should pay attention to brushes with a reservoir (brushpen). They have a special reservoir for water, from which it gradually flows into the bundle and wets it. You only need to brush the paint onto the palette.
How to paint gouache on paper, an example for beginners
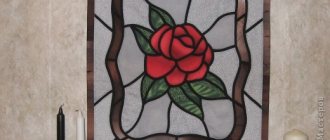
Another common drawing material is gouache. This paint is now used much more often than watercolor, especially when children paint. In this section, we will try to draw a flower using gouache:
As you can see, it is drawn on a black background. You can use a white background, but a red flower on a black background looks much better. Therefore, we take either a black sheet, or apply black paint to a white sheet as a background. In the second case, you will have to wait until the sheet dries.
We start by taking a pencil (light, since the background is dark) and drawing a flower with a pencil.
At the next stage you will need orange color, which will need to be used to paint over the flower.
Then take the red color and paint over the tips of the petals, as shown in the sample. We make the border between yellow and red not even, but slightly jagged.
Now the yellow color comes into play again. We use it to paint the inside of the flower, making strokes similar to those painted in red.
Now let's start drawing the middle of the flower. Paint the middle with red. After this we draw the stamens in green.