Are you looking forward to painting the walls? Choosing colors and paints is the easiest part of the job. After this comes a much more difficult stage - painting. And here the problem arises: what to paint with? The selection of brushes and rollers is huge. All you need to do is read this short educational article and you will be able to decide which surfaces are best to paint with: a roller or a brush.
Note! Are you planning a renovation? Everything you need is in one place, without even leaving your apartment you can buy building materials in Kyiv on the affordable Alkiv website. We always have a wide range of construction and finishing materials, all the necessary tools, go now to the website https://alkiv.ua or call (096) 439-60-91
Difficulty of choice
Naturally, when choosing a brush or roller for painting work, you should choose only high-quality and professional tools. In order to whitewash the ceiling in a utility room, of course, you can save money and buy a cheaper tool.
However, if you are going to paint or whitewash a living room, office or a high-traffic area, it is better to opt for a high-quality roller or brush. There are several reasons for this:
- When painting, a low-quality brush is almost guaranteed to leave lint on the walls. The same applies to rollers. In some cases, especially when using thick glazes, enamels or water-based paints, a problem with the quality of the coating is noticed too late to be able to change it. As the paint dries, it loses volume and air bubbles, protruding fibers or hairs begin to appear on the surface. It is better to immediately opt for a reliable brush or roller, so as not to encounter unexpected additional costs.
- Painting or whitening surfaces with professional tools is much more pleasant, faster and more convenient than using cheap analogues. Expensive brushes and rollers allow you to paint in a thick, even layer. This has an effect not only on the appearance of the ceiling or walls, but also on the life of the coating and its resistance to external factors.
- When painting, each task has its own specially designed roller or brush. Proper use of the tool will save you from large losses of paint that may fall on the floor, improve the quality of the finish, reduce material consumption, and help you complete complex painting work even without preparation.
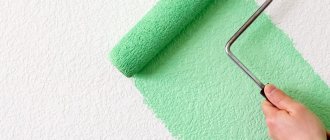
Both tools can be used for painting work
How to paint the slopes on the windows in an apartment with your own hands?
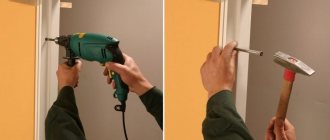
When replacing old windows in apartments, slopes made of PVC panels are not always installed; some owners prefer not to destroy the walls and install only one double-glazed window. In this case, the question is always logical: how to paint the slopes, what is the best way to do it and is it necessary to carry out preparatory work?
Installation of slopes for plastic windows.
Stages of finishing slopes
When installing double-glazed windows, chips and cracks inevitably appear on the outside and inside, which need to be repaired. Before painting the slopes on the windows, you need to carry out preparatory work, which consists of:
Scheme of the structure and insulation of the slope.
- There are cracks and crevices in the putty.
- Removing old paint, if any.
- Leveling surfaces.
- Sealing all cracks that appeared during the installation of double-glazed windows with special solutions.
- Primers for leveled surfaces.
- Painting slopes with your own hands.
Since slopes can be external and internal, you need to choose the appropriate paint for their repair. For external slopes, façade paint is suitable, and it is best to choose a vapor-permeable one: this will not allow moisture to settle and prevent the formation of mold. You can paint the slopes on the windows on the inside of the apartment with water-based paint, acrylic or enamel. Based on the shade, it is best to choose white, as it does not attract attention, visually expands the room, reflects sunlight and makes the room brighter.
Painting of the slopes is done after the primer layer has completely dried, otherwise the applied paint will collect in lumps and the work will have to be done again.
Painting with water-based compositions gives a matte effect, the enamel on the surfaces will shine, and acrylic paint does not change its external characteristics under the influence of ultraviolet radiation and sunlight. Each owner decides which paint to choose depending on his financial capabilities, the general style of the room and how many years its renovation is expected to last.
Painting stages
Finishing window slopes with plasterboard.
Before you start painting the internal and external walls adjacent to the window, you need to prepare the tools required for the work process. This will help you deal with the coloring in less time. So, in order to paint the space adjacent to the glass unit, you usually need:
- Roller.
- Brush. You will definitely need a narrow brush for painting the joints.
- Masking tape.
- Paint tray.
- Rags.
Scheme of strengthening waterproof plaster mortar in the corners of window openings.
Immediately before painting, wipe the surfaces with a clean cloth to remove dust. Then tape is glued around the perimeter of the glass unit so as to completely prevent paint from getting on the glass itself. It is advisable to cover the glass with polyethylene, this will help you not to worry about their cleanliness during operation. If the window sill is not planned to be painted, then it is also carefully covered.
Painting begins with finishing the joints; they need to be painted with a thin brush so that there are no breaks in the layer. Then the upper slope of the window is painted; this can be done with a roller or a wide paint brush. The work is done much faster with a roller, but here you need to have some skill so as not to grab too much paint at one time.
After painting the top horizontal surface, they move on to the side surfaces, which are easier to paint. It is advisable to paint the slopes on the windows in the apartment at one time. If you decide to paint the walls in two layers, then you need to wait until the previous one has completely dried.
After painting, you must immediately remove the masking tape from the windows, otherwise, after drying, it will firmly stick to the glass and will take a long time to tear it off. When performing painting work, safety precautions must also be observed. If you use paint with a smell, you must use a respirator and thoroughly ventilate the room. If paint gets on double-glazed windows, furniture, or walls, you must immediately remove it with a clean rag - after drying, this will be much more difficult to do.
Brushes
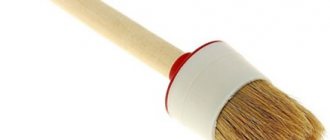
This tool is a wooden, plastic or polymer base that holds natural or artificial fibers in the form of a brush. Brushes are used to work with almost any type of paint, including alkyd, oil, acrylic, latex.
It is important to know what type of paint will be used in order to choose the right paint brush. For example, brushes with artificial fibers are used for more aggressive compounds such as latex or acrylic.
The fact is that to maintain the paint's liquid, powerful solvents are added to it, which can lead to the breakdown of organic fibers. This will lead to the fact that when painting, the quality of the coating will sharply deteriorate due to the appearance of bristle fragments.
Tips for choosing brushes
- In order for painting work to take place at a normal rate, so that the layer falls on the surface softly and evenly, it is better to choose a painting brush with split ends. The fibers should be elastic, not break when pressed, thick at the base and soft and thin at the ends.
- It is better to carry out painting work with brushes that have a bristle length at least one and a half times longer than the width. This rule applies to brushes that you are going to use to paint the floor, walls or ceiling.
- Contrary to the misconceptions of many, brushes just bought in a store are not ready for use. They require mandatory treatment with a soap solution to remove dust, debris, grease and broken bristles. Before you paint the floor or ceiling, be sure to dry your brush.
- It is better to carry out painting work by dipping the brush to ½ the length of its bristles. This will ensure normal flow and prevent paint from running down the handle.
- If you are painting a wooden floor or boards, you should work along the grain. Some brush bristles will be lost depending on the quality of the coating. Treat unplaned boards with cheap brushes.
Brushes can be used to work with almost any type of paint
Painting the facade and exterior walls of the house
Other Articles on this topic:
How much paint do you need for walls?
What paint to paint the house?
To choose the right paint, read the previous page about choosing façade paint
for painting the outside of the house.
It is quite possible to do the painting of the facade yourself; you only need time, knowledge and patience.
The paint packaging always contains information about paint consumption. Typically, the specific consumption of facade paint is indicated - the number of liters (kg) that will need to be used to paint 1m2 of facade in one layer, l/m2
.
Sometimes façade paint packages indicate the inverse consumption value - the surface area that can be painted with 1 liter of paint, m 2 / l
.
Usually the paint consumption is indicated in a certain range
, for example: flow rate 0.1 - 0.25
l/m2
. Here, a lower consumption value is for smooth primed surfaces, and a larger value is for rough, textured, unprimed facades.
On the websites of paint manufacturers and sellers you can find calculators for calculating the amount of paint chosen depending on the area of the house facade to be painted, the number of layers and the roughness of the surface being painted. Facade paint is usually applied in two layers.
To paint the outside of a house, the amount of paint is determined by multiplying the area of the surface to be painted - m2
, specific consumption -
l/m 2
, number of layers - 2, safety factor - 1.1.
A safety factor of 10% is necessary to avoid the unpleasant situation of running out of paint at the end of the job.
How to prepare the walls of a house for painting?
Preparing for painting old house walls
As a rule, it is always necessary to improve the condition of the base before painting the old walls of the house.
Before painting, the old wall must be cleaned of dust, mold, moss and easily peeling layers of old coatings . To do this, it is best to wash the wall with a pressure washer, for example, a car wash. Or you can wipe the entire surface of the wall with a stiff brush, but this option is more labor-intensive. It is better to use both methods; after washing, brush only areas of intense dirt.
After removing them, areas where mold and moss accumulate must be treated with a liquid bioprotective preparation. Otherwise, parts of these biological substances may remain in the thickness of the wall covering, which will quickly grow through the new paint.
Then the plastered surfaces are repaired, cracks and places with peeling plaster are sealed. Old paint on the facade should not peel off or become dusty. Places with peeling paint are cleaned, primed and covered with an additional layer of new paint.
If the old paint is damaged over a large area, then it is better to remove it from the entire surface of the wall. To remove old paint, it is convenient to use a sandblaster.
How to determine the strength of the surface of a wall to be painted?
To do this, stick a fairly large piece of transparent stationery tape to the wall.
and a minute later, with a sharp movement, they tear it off the wall. If pieces of the base do not come off the wall along with the tape, then such a wall can be primed and painted. Otherwise, the wall surface should be cleaned by removing the old paint.
Preparing to paint the facade of a new house
The plastered facades of new houses are quite durable. Preparing the facade for painting the outside of a new house comes down to the following steps:
- It is imperative to dry the freshly plastered facade for at least 30 - 60 days. The wall must be completely dry.
- Apply primer to the wall of the house.
Unplastered silicate brick facades
You can coat it with a special colorless protective compound, or you can simply paint it with façade paint. In any case, the surface of the wall is primed.
Facades made of facing ceramic bricks
Usually they don't paint.
New walls made of ordinary ceramic bricks
It is better to paint them in the first two years, before efflorescence appears on them.
Priming the walls of the house outside
The primer allows you to:
- strengthen the dusty base;
- increase the adhesion (adhesion) of paint to the base;
- reduce water absorption of the coating;
- reduce the consumption of facade paint.
Facade paint spreads more easily over a primed surface, and its consumption is noticeably reduced
.
It is best to use a primer recommended by the façade paint manufacturer.
chosen to paint the exterior of the house.
The quality of painting the facade of a house can be improved if the primer is tinted to match
, close to the color of the façade paint.
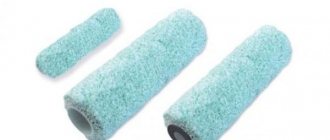
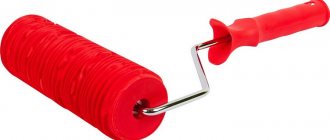
Roller
A paint roller is a tool for working over areas. It can have different coverage, depending on the tasks performed. The use of a roller is quite extensive, however, in most cases it involves painting a large, flat area. They are easy to paint ceilings, walls and floors, but the roller is absolutely useless when working on curved objects of complex shape.
The soft working surface of the cylindrical part is called a fur coat. It allows you not only to balance the flow, but also to give the ceiling, walls or floor a certain texture, which cannot be achieved using a regular brush.
There are large, medium and small rollers. It is better to use large rollers for those operations that involve a large consumption of material, for example, if you need to quickly whitewash the ceiling. Small ones are used for working in hard-to-reach places, for painting corners, junctions, and ends. A professional painter always has these three sizes on hand to work on a variety of surfaces.
Rollers are more expensive, but they are more durable and allow you to solve a number of narrow-profile tasks. Depending on the material from which the handle and fur coat are made, the properties and characteristics of the tool are determined. In construction stores you can find rollers made of the following materials:
- foam;
- felt;
- velours;
- fur of various animals (goat, sheep and even llama);
- mohair;
- vestan, polyester and other polymers.
If you are going to paint the ceiling with acrylic paints or latex compounds, it is better to buy a synthetic roller, as this guarantees the quality of the painting. Any rollers are suitable for working with oil paints.
Rollers are more durable and allow you to solve a number of narrow-profile tasks, but they also have a higher cost
The larger the fur coat, the higher the paint consumption. This should be taken into account when buying rollers made of velor or mohair. The roller takes up many times more paint than a brush, which speeds up work and reduces labor costs.
Advantages of a roller over brushes:
- A roller can whitewash, paint or treat a huge area very quickly and easily for the painter. One pass with a roller can equal hundreds of brush strokes. It is especially convenient to paint the floor with a roller; even if it has an uneven surface, the work will be faster.
- The roller covers the surface evenly, even if it has not been previously prepared.
- There is a huge selection of the type of texture to apply paint or other decorative coating. Brushes are not designed to work with a large number of modern finishing materials, such as liquid decorative plaster.
- No visible marks on the working surface.
Flaws:
- The cost of a high-quality roller is higher than the cost of a brush, however, if you buy only a replacement coat, the roller will be a more profitable tool.
- It is impossible to process joints, corners, and junctions. In any case, you will need brushes.
- The roller has an extremely short service life. In the future, it is necessary to change at least the fur coat.
Application with a pneumatic sprayer (spray gun)
The spray gun has rightly earned its reputation as a professional painting tool. It is used by professional painters in a variety of fields - from painting car bodies to restoring antique furniture. Pneumatic spraying, by finely crushing the paint composition into the smallest particles, allows you to achieve the best quality coating. However, this is only true for small areas to be painted. When painting a wall with an area of 50 square meters, it is unlikely that even an experienced painter will be able to avoid overlaps and sagging. Again, the main problem is the inter-crown joints, even if it is possible to adjust the width of the spray torch, as in the figure (the distance between the wall and the spray gun must be constant, and the speed of passage of the spray gun must also be constant), there will be overlap and excess paint at the joints. This application method is absolutely unsuitable for glazing (translucent) compositions. Using a spray gun for covering (opaque) finishing is possible, since with covering finishing the overlaps are almost invisible.
Roller or brush
It’s worth starting the comparison with the fact that a roller and a brush are not mutually exclusive things. To carry out high-quality painting work, both the first and the second are required. A more correct question is: what is more effective in a painter’s work? And in what cases should one or another tool be used?
Some tips to make the right choice:
- The larger the area, the higher the efficiency when using a roller. Moreover, over large areas, stains, smears, and uneven paint application are noticeable. Despite the fact that you can paint the ceiling or walls with a brush, spending more time will result in extremely low quality.
- With a roller you can paint surfaces almost without leaving the spot, performing reciprocating movements. This is important when working in cluttered or cramped conditions. The brush requires simplified access to the working surface.
- The roller requires a special tray and container for storing paint. This is not only an additional expense, but also an inconvenience for the painter, who must hold several objects at once instead of one brush while working.
- Lint rarely falls out of the roller, which is very important when working with “light” paints that are applied in the thinnest layer.
- It is convenient to whitewash the ceiling and walls with lime with a large brush, but it is difficult to work with this material with a roller.
- A brush is an indispensable tool, even if you use a professional and high-quality roller - you will need to buy several brushes to work with corners. It is also necessary when painting window frames, objects such as pipes, radiators.
- A roller is often used to work with stencils, but it is impossible to draw any design with it. It is best to whiten with a roller over the stencil
Therefore, each tool has its own advantages and disadvantages, which allow them to be used effectively and to rationally regulate material consumption, only depending on the type of painting work.
TOP 9 mistakes when painting walls
Painting a surface is not an easy job, which is not without its nuances: the process can be delayed due to the wrong paint, roller, or layer applied at the wrong time. The time of day at which you pick up the instrument also matters. Below are a number of common mistakes, avoiding which you can always make your walls perfect.
Mistake #1: Painting unprepared walls
Minor defects, dust, grains of sand, and brush fluff from a previous painting may appear under the paint and negatively affect the result. All the imperfections will be visible under the layer of paint - all you have to do is either accept it or clean the wall and paint it again. And possible greasy stains will appear, no matter how many layers you cover the surface. Defects will be especially noticeable if you use glossy paint.
What to do: To avoid double work and unpleasant surprises, prepare the wall in advance. Take sandpaper or a special plaster sanding tool and go over the uneven areas and defects. After this, brush off the dust with a brush or broom. Stains can be removed by wiping the wall with a damp cloth and soap.
Mistake #2: Ignoring Primer
Don't use primer before painting walls? Don't be surprised if you end up with an unevenly painted wall or overused paint. The fact is that the primer provides a lower hygroscopicity of the surface, which allows you to save paint. The base also gives the surface “adhesion” to the paint, which improves the painting of walls.
What to do: Choose the appropriate primer for the walls. Apply it with a brush vertically in small stripes, and then horizontally - perpendicular to the first layer. After the base has dried, you can cover the surface with the first layer of paint.
Mistake #3: painting without testing
Choosing a color is a rather complicated process, especially if the shade has to be combined with another tone or pattern. The unfortunate masterpiece will have to be repainted, and so the process can be repeated ad infinitum. The same goes for the shade, which you have to “extract” with your own hands using toner.
What to do: if you are tinting the paint yourself, add the coloring concentrate to the paint a little at a time, thoroughly mixing the contents. To begin, pour a small amount of paint into a small container and add a couple of drops of color – see what color you get. Achieve the desired tone, and then do the same in a larger jar if you like the result.
To make sure the color is compatible with the overall decor of the room, try doing a test paint - apply the paint in an inconspicuous corner and wait until it dries. If the result suits you, let’s get going.
Mistake #4: choosing the wrong tool
Using the right brush or roller is just as important as choosing your paint. And this is not a matter of taste. In order to paint the wall evenly, you need to purchase a couple of rollers and a brush. You will be the first to “roll” the surface, and use a brush to paint corners and hard-to-reach places.
What paint to paint the ceiling
The choice of paint for the ceiling should be approached carefully and without haste. For kitchen or bathroom ceilings, you need to select paints that are resistant to soot and soot and can withstand high humidity.
Semi-gloss and semi-matte latex ceiling paint containing antifungal additives provides good results. It can be used to cover putty or primed concrete surfaces, glass wallpaper, ceilings lined with fiberboard and chipboard, and even apply it to an old layer of alkyd paint.
On top of the whitewashed ceiling, you can apply latex paint, which contains new generation polymer fillers. Its consumer properties are quite high, it does not peel off, does not drip when painted from the ceiling, is convenient to use and very economical.
In hardware stores you can find latex paint, which has very high vapor permeability. It can be applied to porous surfaces in dry, heated rooms and even to ceilings with oil paint residues.
There are emulsion water-soluble paints based on organosilicon acrylic copolymers. They are used for painting brick, concrete and plastered ceilings.
Untreated particle board (chipboard) ceilings in residential areas are painted with matte latex ceiling paint.
Possibility of sharing
A priori: a brush and a roller can be used when working on separate parts of the same object. There is no contradiction between these instruments; on the contrary, they complement each other well.
Application of rollers
As already mentioned, a paint roller is a flat tool . Its task is to paint large surfaces; in relation to ceilings, these are primarily plasterboard and plastered ceilings, previously well-primed and puttied for painting (it is best to use fiberglass to avoid cracking). Small rollers are also good for painting wide ( from 150 mm and wider ) ceiling, window and door slopes.
Using brushes to paint ceiling elements
No matter how good and effective a roller is, there are places that are inaccessible to it or where painting, although possible using a roller, is ineffective. These include:
- Areas where the ceiling meets the walls, corners.
- Narrow ceiling slopes (for example, differences between levels of a multi-level plasterboard ceiling).
- Niches in the ceiling (for placing lighting and hidden ceiling cornices).
- Elements of stucco decor: ceiling cornices and moldings, rosettes, caissons, etc.: it is in principle impossible to paint these elements efficiently without using a brush.
In some cases, brushes are also used to paint the ceiling plane : wood, concrete, etc. to create a deliberately roughly painted surface - similar decoration techniques are often used in loft and vintage styles. It turns out that a perfectly evenly painted surface is not always needed; some trends in interior design, on the contrary, require the creation of “brutal” textures (when painting wood with a brush, you should work in the direction of the grain).
A brush and a roller can and should be used together when painting ceilings; the question is “which is better?” there is no clear answer: it all depends on the stylistic solution of the interior, the design of the ceiling and the specific element that is to be painted; the main thing is to choose the right tool for a particular operation.
What possible defects should you pay attention to?
When buying a roller for water-based paint, carefully inspect it for defects. Poor quality products can spoil the results of your work.
- Test the roller for resistance to deformation by squeezing it tightly. The pad should quickly return to its original state.
- Pay attention to the joint on the fur coat; it should not protrude much; a noticeable joint will leave unaesthetic marks that will reduce the quality of the painting.
- If you buy a tool with a lot of lint, pull on a few lint so it doesn't fall out. The falling lint will remain on the surface being painted, giving it an untidy appearance.
In general, these actions are enough to choose a roller suitable for water-based emulsion, the work of which will bring pleasure due to its speed and quality.