How to work with a stencil for decoration
The ideal option to inexpensively decorate the walls and ceilings of your home is to use DIY decor stencils for these purposes.
Another article has already described how you can easily make such stencils using the most readily available materials - film, cardboard or plastic.
This article will also tell you how to work with a decorative stencil and apply a design or pattern through it to the wall.
What is screen painting
Stencil coloring or footage is a coloring technique in which designs are applied to the hair using stencils. Stencil coloring is a creative technique, as it helps in achieving an unusual result.
The stencil dyeing technique is attributed to hairdresser Janine Ker, but she herself admits that she has seen designs on hair in photographs since the middle of the last century, so the technology itself is not new.
View this post on Instagram
Posted by Janine (Cortez) Ker (@janine_ker_hair)
Screen painting can be done using:
- Temporary dyes . Tint sprays that envelop the hair shaft with color and are washed off after the first wash of the hair;
- Semi-permanent dyes . Such dyes last longer than tint dyes, as they are absorbed into the upper layers of the hair shaft. They are washed out after about 4-5 washing procedures, but sometimes the period may vary depending on the type of hair;
- Permanent dyes . The most durable dye with a long-term effect, achieved through the penetration of artificial pigment into the deep layers of the hair. The pattern will last for 6-8 weeks, but this is again an approximate period and may vary depending on the frequency of washing, the aggressiveness of the shampoo, and hair type.
The choice of a specific dyeing method depends on how long you want to wear the design on your hair, as well as how willing you are to damage your hair shafts. A colored spray is suitable for a one-time event - theme parties, for example, and a permanent dye is for those who plan to surprise others with a creative hairstyle for a long time.
Who is suitable for screen painting:
- Brave girls who want to stand out. With flowers or patterns on your hair, you definitely won’t go unnoticed;
- For women and men for themed events. Drawings can help better convey a costume look or highlight an elegant dress.
View this post on Instagram
Publication from BEAUTY SALON ULYANOVSK (@wella_art73)
If we talk about the length of hair or its quality, you can use the futuja technique - hair coloring with a stencil, for different lengths, as well as for any type - dry, oily, normal. There are no age restrictions either - the variety of prints, colors and patterns makes footage an almost universal technique.
Why practically? Because it only suits girls with straight hair. To create a clear, noticeable pattern, the surface must be smooth and the hairs must lie one to one. If the hair is curly or wavy, the pattern cannot be traced, as it is distorted by waves or curls.
And one more feature for those who decide to stencil hair coloring - keep in mind that the pattern will be viewed in the position of the hair in which the pattern was applied.
If you made a design on your hair flowing over your shoulders, then you can please others with a stylish hairstyle only with your hair flowing. If you collect them in a ponytail, colored stripes and spots will be visible on your hair.
The main advantages of stencils
Stencils have a number of advantages, thanks to which they significantly expand the boundaries of creativity:
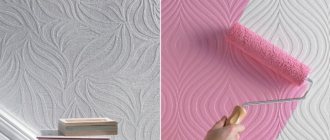
- the stencil is easy to use - to transfer the image from the stencil to the object, you do not need to train for a long time and carry out preparatory measures;
- the stencil is suitable for any surface - if you need to apply a design on a horizontal plane, just lean it against it; in the case of vertical and convex surfaces, you can use tape to secure it;
- a stencil allows you to repeat the same ornament an infinite number of times with mathematical accuracy;
- With a stencil, applying a pattern to an object is much faster than drawing, and you can immediately see what the result will be.
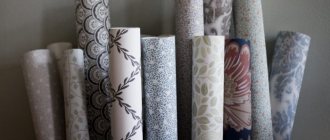
Stencils for painting: what they look like and where to get them
You can make a stencil for hair coloring yourself or buy a ready-made one. There are not many ready-made stencils on the market, and this is due to the fact that when choosing a design, the master needs to take into account the client’s requests and ready-made templates will not help here.
If you don’t want to waste time making your own stencil, take a look at ready-made templates, for example, from the Batiste brand. The products are made of durable plastic that does not slip on the hair. Includes 11 different designs.
You can also view stencils on Chinese sites - Aliexpress or Pandao. There are disposable paper stencils, as well as more durable plastic ones. Both are equally often used for coloring, but the leader among all templates is homemade.
To make a template, find any picture you like on the Internet, preferably with a simple design, print it on thick paper and cut out the design along the outline. Please note that the paper should be really thick - you can take glossy photo paper or something between paper and cardboard. This is important, since the template should not allow the dye to pass through - otherwise all streaks will be visible on the hair.
Such templates will be disposable, but will cost only 10-12 rubles per print, while the price of ready-made reusable templates can reach several thousand. Another advantage of homemade templates is the unlimited choice of designs.
You can make a template from flexible plastic - a folder cover, for example. To do this, print the drawing on a sheet of paper, cut it out and then transfer the drawing onto the plastic using a paper template. Cut along the contour and you will get a reusable and practical stencil for screen painting.
Some craftsmen manage to use silicone confectionery templates or templates for scrapbooking in their work, which in general also happens if this method is convenient for you.
A couple of years ago, Imprinting graphic stencils were popular - long plastic plates that allow you to create different patterns on your hair - animal, floral, abstract prints. However, we have not been able to find these stencils for sale now. Do you know where to buy? – share in the comments.
View this post on Instagram
Posted by Beauty Proff Perm (@beauty_proff59)
Temporary adhesive for stencils
Stencils are now often used to decorate walls and various surfaces, and temporary stencil adhesive is used to temporarily attach them to surfaces. The most convenient, effective and popular, both among professional decorators and amateurs, is aerosol glue for stencils.
This holds the stencil quite reliably for some time, does not leave stains or other marks on the surfaces, and becomes completely transparent after drying. In addition, high-quality glue for temporarily fixing stencils eliminates the risk that when removing the stencil from the wall, paint or even wallpaper will come off along with it.
Spray adhesive for stencils - application features
Spray adhesive specially designed for stencils should be sprayed in an even layer directly onto the stencil. After this, you need to wait a few minutes to let the adhesive dry a little. A thin layer will be enough; you need to spray from a distance of 8-10 centimeters, holding the can at a right angle.
After the glue has dried, the stencil should be pressed tightly against the wall (or other surface to be decorated), wait about five minutes, and only then start working with paint. Particular attention must be paid to the places of thin bridges on the stencil; here you need to press harder to the surface.
You can see aerosol temporary adhesive in action in this video:
What is important to know when working with stencil glue:
- the composition should not be applied to the wall, but directly to the stencil, only then the adhesion will be maximum;
- the greater the weight of the stencil, the worse it will adhere to the glue; heavy stencils need a “safety net” of masking tape;
- glue for fixing stencils will not prevent the paint from flowing under the stencil;
- a stencil with glue applied to it can be used several times, for some time the glue will be “active” and will fully retain its properties;
- to reuse the stencil, you need to wash off the glue from it with plain water after completing the work;
- high-quality stencil glue does not leave any stains or other marks on the walls.
You can not only purchase fairly effective glue, but also make it yourself. However, professionals say that high-quality aerosol adhesive works much more efficiently, is guaranteed to leave no marks and lasts longer.
Stencil painting and other techniques
It is generally accepted that drawings on hair and stencil dyeing are the same thing, but there is a difference between the techniques:
- When a master creates drawings, he affects all layers of hair, that is, the chosen pattern, for example, leopard print, can be traced when the strands move and in different hairstyles;
- Stencil dyeing is a superficial technique that affects exclusively the top layer of hair and is visible in its original position.
Another peculiarity of coloring using drawings is that it is done manually, without the use of stencils. Now the boundary between these concepts has become more blurred and the stencil technique is used to refer to any designs on the hair, just like vice versa.
View this post on Instagram
Posted by Karen Rowley (@karenrowley72)
Block or segmental coloring is also not related to stencil technology. These techniques also involve full coloring of the entire thickness of the selected area, do not include the use of templates and are focused on highlighting segments, clear blocks, and not on the consciousness of the drawing.
View this post on Instagram
Publication from Galina Menshikova (@gala_mix)
Does not fall into stencil technology and pixel coloring. This is rather one of the varieties of drawings - “pixels” are created manually, usually on a lined background. Pixel coloring can be both deep - throughout the entire depth of the selected strands, and superficial - on the top layer.
View this post on Instagram
Publication from KOPNINA NATASHA COLORIST MOSCOW (@nataliakop)
The procedure for transferring a picture to the wall
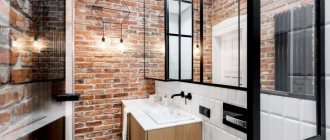
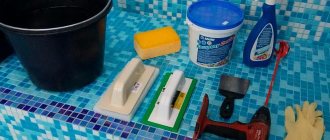
To decorate the walls, in addition to the stencil itself, you will also need glue (adhesive tape), a thin brush (roller or sponge), acrylic paint, but you can also use a spray can. The wall itself also requires preparation - cleaning from dirt and dust, ideally even rinsing if conditions permit.
The whole job looks like this:
- Marking. It is recommended at this stage to use a building level, which will avoid distortions and distortions. Using a pencil, marks are made around the entire perimeter of the stencil.
- Next, the cliche is fixed at the specified marks using glue. Do not rush to apply all the paint at once, especially when using a complex pattern. When working with a spray can, you need to keep it at a distance of 30 - 40 cm, however, this application is more convenient for stencils of the external outline.
- The template can be removed without waiting for the paint to dry. BUT. It is important to look at what kind of paint was used. For example, if it is very dense and not diluted, then when removing the stencil it may partially pull behind the template. Then it is better to wait until it dries completely. But the aerosol dries very quickly.
Advice. To ensure high quality work, it is best to practice on a piece of old wallpaper or whatman paper. This approach will even allow you to experiment with colors, which is especially interesting when choosing the design for a child’s room.
Screen painting with color spray
For the procedure you will need:
- Sample;
- Clamps to secure the template;
- Tint spray or colored varnish;
- Peignoir to cover your shoulders;
- Comb;
- Thermal protection, ironing.
You can do coloring through a stencil using a spray yourself, but when spraying a colored spray, it is better to hire an assistant who will cover the remaining hair to protect it from droplets of color.
Instructions for performing stencil spray painting:
- Dry clean hair, treat with heat protectant and straighten with an iron. It is important that the canvas for the drawing is perfectly flat, otherwise it will not be possible to convey the drawing;
- Attach the stencil to the selected location using clamps. It is important that the template fits tightly to the head and holds well;
- Ask an assistant to cover the strands next to the stencil with paper, cloth or any other material at hand. If this is not done, the spray will fly through the air and settle on the hair, ruining the design;
- Shake the colored spray and spray it into the stencil from a distance of 10-20 cm. Do not hold the stream for a long time in one place to avoid smudges - carefully move the spray can to evenly cover the entire pattern;
- Wait 20-30 seconds for the paint to dry and carefully remove the stencil. It is better not to touch the hair for the first few minutes so that the dye sets. The hairstyle can be lightly sprayed with regular hairspray.
If you want to diversify the pattern, try using several colors in one design, creating a gradient with them.
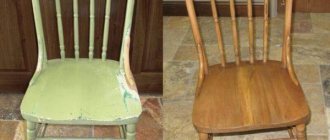
DIY furniture decor using stencils and tape
If you need to draw a clear straight line or mark the boundaries of geometric decorative elements on the surface, use masking tape. With its help, you can create, like a stencil, clear boundaries between the surfaces to be painted.
Any novice decorator can decorate furniture with stencils using a minimum of materials.
The adhesive tape must be of high quality, with good adhesive properties. This will ensure 100% adherence to the surface and prevent paint from flowing under it.
Acrylic paint can be applied with a brush, sponge, or roller. The paint should contain a small amount of water, otherwise bleeding is inevitable.
We invite you to take a master class with a stencil made from adhesive tape, where an old TV stand is transformed into a spectacular bedside table in the British style:
- Draw an old cabinet with a pencil, reproducing the design of the British flag.
- Apply masking tape along the pencil marking lines. Apply tape along the width of the light lines of the flag.
- Using acrylic paint, first cover the surface intended for red, and then paint the areas intended for blue paint.
- After the paint has dried, after 5 minutes, remove the masking tape with a sharp movement.
Painting through a stencil
Hair is rarely dyed using the stencil technique. It's all about the impracticality of the hairstyle and the pattern, visible only in one, static position of the hair. Creating a design with permanent or even semi-permanent dye makes sense on short hairstyles, when the layers do not shift when walking and moving the head.
View this post on Instagram
Posted by Janine (Cortez) Ker (@janine_ker_hair)
For the procedure you will need:
- Paint – permanent or semi-permanent and its oxide;
- Composition for bleaching - powder and oxide, if the hair is initially dark;
- Stencil and clamps for fixation. For short haircuts, as in the photo below, clamps are not needed, but then you need assistants who can hold the template while applying paint;
- A medium-width or narrow paint brush, depending on the size of the design and the number of details.
How to paint using a stencil:
- Select the desired section of hair and attach the stencil to it;
- First of all, the dark base needs to be bleached, otherwise the colored dye will be difficult to see or will give a “dirty” tint. Apply the bleaching composition according to the template and leave it to act depending on the type of hair and the percentage of oxide;
- Wash off the composition with plenty of water and shampoo;
- Place the stencil again, but so that the discolored drawing appears clearly along the boundaries of the template. Apply paint;
- Soak according to the instructions for the dye, rinse with warm water. At the end, it doesn’t hurt to apply a mask for colored hair.
Paint Application Tools
Acrylic paint, which is used in decoupage, when applied with a brush, can be applied in accordance with its shape - thin relief stripes. You can avoid their appearance on the work surface by using pressure tools:
• Stencil brush – round, voluminous, with perfectly even bristles, it is used for “driving in” paint. In this case, an important condition is a moderate amount of paint on it. Therefore, before starting work, you should tap it on the palette, lightly spread it on paper or a napkin, and knock off excess paint.
• Foam sponge. You can find it not only on the virtual shelves of our store in the form of a brush with a handle, but also in the kitchen in the form of a regular dishwashing sponge. It picks up paint well and releases it in small portions, thanks to which, by first knocking off the excess, the pattern turns out uniform and neat.
• Foam roller. It is used mainly on large surfaces, and the severity of the pattern is directly related to the pressure applied and the amount of paint in it. To avoid unevenness, it should be rolled several times on a sheet of paper before work.
Stencil technology allows you to create attractive designs, backgrounds and borders not only with paint, but also with other compositions. In our store you can purchase voluminous materials to complement your works with original relief motifs.