Walls are usually finished with MDF or PVC panels, non-woven, paper types of wallpaper, but recently textured plaster has taken a significant part of the market. Designers of various levels appreciated its unique qualities. With its help, you can create something unique based on the imagination and skills of the master. Among its types, the bark beetle stands out because it allows you to create the most interesting wall decorations.
Next, we will figure out how to work with bark beetle in order to make the most of the properties of this finishing material. Let's touch a little on the history of its appearance and talk about its characteristics.
This type of plaster was first used in the West, but it did not appear in Russia for a long time. But towards the end of the 90s, it gained popularity in the domestic market as a universal finishing material for working with facades, walls and ceilings of the interior of premises based on the finishing stage of work.
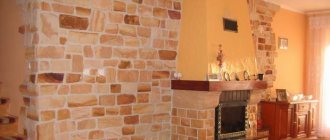
Domestic consumers noted its reasonable price and ease of application to any surface. You can see photos of bark beetle plaster based on various design ideas. It got its name due to the formation of similar patterns with a cut of wood that the beetles feasted on.
Characteristics of the "Bark Beetle"
The material does not require high qualifications when working with it, is in no way inferior to other finishing materials during operation and gives the house an exquisite appearance. In addition, its texture allows you to hide defects in wall coverings.
The base of the plaster is gypsum or acrylic. Packaged in the form of a ready-to-use mixture or powder. Marble chips with a grain size of 0.08-0.35 cm are added to the mixture. This component gives the coating a grooved relief.
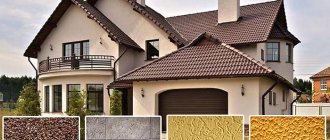
Most often, this plaster is used to cover the façade of a house. The color of the material is light shades, so after plastering the facade is painted, choosing a color to taste.
Preparing the mixture
Construction mixtures are prepared according to the instructions. They are diluted with water, which is preheated to 20 degrees.
Figure 3. Ready-made building mixture.
How to properly mix the decorative mixture?
To avoid the appearance of lumps, stir the plaster with a construction drill. Immediately after preparing the solution, it is applied to the wall.
Bark beetle mixture consumption
During finishing work, the material is simultaneously applied to the entire wall, so the mixture is calculated first. On average, 3 kilograms of material are used per 1 square meter. This figure is multiplied by the area of the wall.
Methods for staining bark beetles
Several methods of staining bark beetle . You can add color to the mixture, which will ensure color stability. If the plaster is not pre-tinted, then it is painted with paint after drying.
Color and appearance of plaster
The façade finishing technology involves using a variety of colors. The original option is deep painting of the base with all the cracks and depressions, rather than surface painting of the walls. You can finish decorative panels that use a dark color. The wall itself is painted in a lighter shade.
Material advantages
- Mechanical strength and no harm to the environment. The starting components of plaster are only natural materials.
- Light weight. Reduces the load on the supporting structures of the house due to light mineral fillers.
- The ability not to lose strength, moisture-proof and color characteristics over a long period of operation.
- Fire resistance, ability to withstand open fire.
- Variety of colors. Choosing the right bark beetle color for the facade will not require significant labor costs. Ability to resist mold fungi.
- Attractive prices and a wide range of pricing solutions.
Disadvantages of the material
- If the coating is damaged, it is very difficult to repair it. To do this, it is necessary to remove the damaged layer of plaster and reapply it.
- Application technology requires professionalism. In this case, a special trowel is used.
- It is quite difficult to remove contaminants from a surface plastered with “Bark Beetle” and having a complex topography.
Methods for creating a textured surface
The pattern always turns out different and appears based on your movements:
· To achieve a rain effect, move the grater from top to bottom or from left to right.
· A cross-shaped texture can be achieved by alternating vertical and horizontal movements.
· If you like the wooly effect, use short, circular strokes.
· You can make circular movements with a foam grater, pressing it firmly against the coating.
With bark beetle facade plaster you can really achieve an interesting result. It's an economical and versatile material that's worth working with.
Varieties of "Bark beetle"
Manufacturers offer two types of bases - gypsum and acrylic.
The acrylic-based mixture is applied using special technologies and requires a professional approach. This composition fits well on concrete and surfaces made of cement-bonded particle boards.
Painting acrylic-based plaster requires the use of computer technology and special machines. May contain mineral chips, the grain size of which is 0.1-3.5 mm.
Manufacturers guarantee the service life of such coatings for at least 15 years. After drying, it becomes resistant to adverse external influences.
The color of the coating is selected in advance, after which painting is not required. However, applying such a coating requires special knowledge and experience.
Gypsum-based bark beetle is more economical and less difficult to use. To work, you need to prepare a solution by mixing the dry composition with water.
It is applied to the walls manually, and no high qualifications are required, that is, finishing the facade with your own hands is quite simple. The material is durable, and its price is not high.
There are two varieties of bark beetle. The binder can be silicate or silicone compounds. The first is characterized by resistance to microorganisms and vapor permeability. The second is chemical resistance.
Technology for applying bark beetle plaster: preparing the base
Bark beetle plaster can be applied to pre-prepared brick, plasterboard, particle board, concrete bases, sandwich panels and to a layer of insulation.
An important step when applying decorative plaster is preparing the surface before final finishing.
Before performing facing work, the surface should be thoroughly cleaned of old finishes, oil stains, dirt and dust. If the base has significant unevenness and cracks, it should be leveled using gypsum, lime or cement mortar for plastering walls. The proportions of the constituent components must be strictly observed in order to obtain a finishing material of appropriate quality with the necessary strength characteristics.
Helpful advice! To seal seams and large cracks, they must first be opened using a grinder and then sealed with gypsum putty.
If wall cladding is carried out in a room with a high level of humidity, then the surface must be treated with an antifungal compound, which will prevent the formation of fungus and mold.
To create good adhesion of the base and future plaster, the leveled surface should be treated with a primer using a roller, brush or spray gun. It will also regulate the absorbency of the prepared surface and ensure uniform drying of the decorative plaster layer. In order to prepare the future color shade of the surface, you can add a coloring pigment of the required shade to the primer. Under bark beetle plaster, it is better to use a thick acrylic primer, which can prevent excessive moisture absorption while working with this decorative mixture.
In order to improve adhesive properties and protect the surface from harmful bacteria, you should use a high-quality primer
Concrete and cement-lime exterior walls do not need to be treated with a soil mixture. To create good adhesion, it will be enough to thoroughly moisten the surface with water an hour before starting facing work using plaster.
Apply a dry coat of primer, which will take about 40 minutes to dry completely. at a temperature of 20 degrees, a base layer of plaster mixture with a thickness of no more than 2 mm should be applied. It should be compacted and rubbed at the same time. It will play the role of the basis for the future texture.
Description of the technology of facade plastering using insulation
Many owners of country and private houses strive to make their premises as warm as possible. To achieve this, exterior walls are often finished using insulation, which needs to create high-quality protection from the negative effects of the external environment. To do this, it is necessary to use facade plaster, which is applied on top of the heat-insulating material.
Technology for cladding external walls using decorative bark beetle plaster over insulation
The technology for plastering external walls involves creating a wet facade, which consists of insulation, reinforcing mesh and textured plaster.
Expanded polystyrene or mineral wool can be used as insulation for walls outside the house under plaster. The first material is an inexpensive and fairly easy-to-install product. It is used for thermal insulation of concrete, slag concrete, expanded clay concrete and brick facades.
Mineral wool in the form of two-layer basalt or diabasalt slabs is considered a more durable, non-flammable and breathable insulation. This material is advisable to use for walls made of expanded clay concrete, gas silicate, aerated concrete and wooden beams.
The technology for insulating a facade under plastering with mineral wool or expanded polystyrene involves the use of a special adhesive composition, which is applied in a thin layer to the base of the insulation. Next, the slabs are attached to the wall surface using the principle of brickwork.
If you plan to decorate the external walls of a building with decorative plaster, you should choose the right material for insulation, for example, polystyrene foam or mineral wool.
After the adhesive composition has completely dried, the insulation boards should be additionally secured using dowel umbrellas. A fiberglass reinforcing mesh must be secured over the insulation using plastic fasteners. After three days, you can begin plastering the surface, the principle of which is the same as for finishing interior spaces using beacons. The cost of plastering the walls outside the building is on average 400-500 rubles/m².
Here you can immediately use “bark beetle” facade plaster, a video of the application technology of which will show in detail the sequence of actions.
Helpful advice! After finishing the facade of the building with bark beetle plaster, it must be protected for two days from direct exposure to UV rays and precipitation.
Reinforcing mesh is used to improve the adhesion of plaster to the wall and prevent the formation of cracks
Coloring
In the case of gypsum-based plaster, any coloring substance can be added to the dry mixture. If the plaster is acrylic-based, then painting should be done with great care, otherwise the color may be overly saturated.
After plastering, the surface can be coated with enamel on a base similar to plaster. Today, brown, beige and yellow colors are popular.
However, the color of the house should be in harmony with the color scheme of the entire site. Experts recommend using several colors when painting your home, including gray and green.
Peculiarities
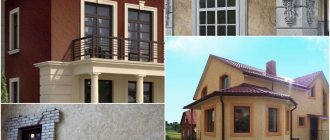
For this reason, it is not for nothing that bark beetle plaster is considered a finishing material unique in its qualities. When applied to the base, you will get a surface with many grooves, pits and stripes. Thanks to the interesting texture, you can easily hide all the imperfections of the walls, as well as disguise small surface irregularities.
This plaster is available on a gypsum and acrylic basis and is available in the form of a ready-to-use mixture or in the form of a dry powder. The granular structure gives the coating an unusual design, since the composition contains fine marble chips. The grains can vary in size (from 0.08 to 0.35 cm), depending on which larger or smaller grooves will be obtained.
Please note that with the help of this plaster you can create an unusual coating for any surface. It is in great demand when performing external work when cladding the facade. Usually the material is white or gray, so you can give the desired shade only after applying the mixture and drying it, and then you can paint it.
Advantages and disadvantages
The main advantages include the following:
- Environmentally friendly and high strength. The material is made only from natural raw materials, and thanks to a special production technology you get a coating that is reliable in use.
- Light weight. Another advantage, as this will reduce the level of mechanical load on the entire structure. The mineral fillers included in the composition make the material light, which is also a plus.
- Resistance to external influences. Bark beetle plaster tolerates direct sunlight and temperature changes, and is also not afraid of moisture. In addition, the finish will not fade in the sun and lose its original appearance throughout the entire period of use.
- Resistant to mold and mildew. Thanks to the special composition, the surface will be reliably protected from various microorganisms.
- Fire resistance. The material has a low ignition coefficient.
- Wide range of colors. Even though the base color of the material is white or gray, you can always make color adjustments.
- Reasonable price. The market is full of products from foreign and domestic manufacturers, and you can purchase material at
Flaws
If we talk about shortcomings, then there are enough of them. The “bark beetle” finish for the façade of a private house deteriorates when subjected to serious mechanical loads, and this is difficult to correct. To restore the appearance, you will need to do the cladding from scratch and remove the damaged coating. It is also not easy to use such plaster, since you need to know a special application technology. Usually, to complete complex decorative elements, one cannot do without the help of specialists.
Important! Not everyone can do everything at the proper level, as there are special subtleties. For example, you will need a special trowel. And the grooves do not appear on their own, but by moving the tools up and down. After this, the layer needs to be smoothed a little. The difficulty of cleaning the surface is also important. In the future, dust will get into the furrows, and it will not be easy to remove it from there.
Varieties
“Bark beetle” as a decorative plaster is presented on the construction market in 2 varieties, namely, it is based on acrylic and gypsum. The acrylic-based mixture is applied using a special technology, due to which the facade gains its attractiveness. But to create a visually rich decor, you will need to take into account various finishing nuances. You can purchase the material in buckets of different sizes. The mixture can only be applied to walls made of fiberboard, as well as to a concrete base.
To give acrylic plaster color, you need to use a tint. Usually you cannot do this without the help of computer technology, since it is difficult to achieve the desired color manually. The material contains abrasive granules, and this is in addition to the fact that it contains marble chips or minerals. The grain size directly depends on the size of the abrasive and ranges from 0.01 to 0.35 cm.
The service life of this coating is up to 17 years. Thanks to the unique structure of finishing the house facade with bark beetle plaster, application of the mixture will be ideal, and after drying it will not crack. In addition, high adhesion of the material is noted. To obtain any shade of plaster, you do not need to additionally paint the facade. The only disadvantage of acrylic-based plaster is the difficulty of application.
Interestingly, a similar material, but on a gypsum basis, is simpler and more economical in consumption. The difficulty when working is that before using it you need to prepare the solution yourself and mix the powder with water. But we also note that gypsum plaster is made from environmentally friendly raw materials and is easy to apply manually. This material is inexpensive and very durable.
Depending on the type of binding component in the plaster, bark beetle is divided into silicone and silicate. The latter option is produced on the basis of liquid glass, and is characterized by microbiological resistance and vapor permeability. Silicone plaster is made from acrylic modified substances and silicone resin. It is chemical resistant and is often used when working with stone.
Color palette
To add brightness to the design, you need to tint the mixtures. Gypsum-based materials are much easier to paint, since it is a dry mixture, and the required amount of dye can be added at the mixing stage. Acrylic plasters are more difficult to tint and getting the desired color is not so easy. When dyeing, be careful not to make the shade too saturated.
But in general, it is not at all necessary to paint, since the plastered surface can be coated with enamel on the same base as plaster. At the moment, warm shades of the palette have taken leading positions in modern facade design. The decoration of the facade of the house with “bark beetle” in red, yellow, beige and brown shades looks great in the photo. The color of the facade should be selected taking into account the design style of the land plot. An excellent option for country houses would be green or gray cladding, while a monochromatic design is not necessary; ideally, the composition should consist of several shades.
Popular manufacturers
Ceresit, Baumit and Dufa are the most popular among consumers. The use of plaster from these manufacturers does not require high qualifications and time spent on preparing the mixture.
The plaster of the Unis consortium, which also includes domestic manufacturers, is particularly successful. It is produced both in the form of a dry mixture and in a ready-to-use form. Resistant to fungi, ultraviolet radiation and frost.
Consumption rates
Before work, you should calculate the amount of mixture required as accurately as possible. Otherwise, the excess will become unusable, and the deficiency will lead to a disruption in the texture when the solution is re-applied.
It should be noted that if the wall is uneven, then the layer of plaster must be increased. The packaging of the mixture always indicates the approximate consumption, on average it is up to 3 kg per 1 sq. m. m of surface.
Wet façade installation technology
House wall before insulation
Upper part of the facade
Calculate the amount of building materials with a margin of approximately 10%, prepare the tools. We recommend using foam plastic boards as insulation; this is the cheapest and very effective option. The disadvantage of polystyrene foam is that it is completely impenetrable to moisture, but you have to put up with this. Moreover, brick or concrete surfaces hardly breathe anyway.
To finish the facades you will need scaffolding; it is better to use metal ones. If not, make it yourself from lumber. Pay special attention to safety precautions and install them on stable surfaces. Check the position by level; if the building has more than two floors, then you need to tie the vertical posts to the facade walls with special metal hooks.
Frame scaffolding
Important. When installing the scaffolding, leave a gap between it and the wall; the gap size should ensure comfortable hand operation when plastering or painting the insulating layer. Otherwise, the scaffolding will have to be dismantled and reinstalled, which is a waste of time and money.
Step 1. Check the surfaces of the façade walls; uneven surfaces larger than 1 cm need to be cut down; all others can be smoothed out using glue. Don't be afraid that the cost of work will increase. If you calculate the time for additional plastering of the walls and the price of materials, then using glue as a leveling solution will be much more profitable.
Step 2. Use a special rope with blue to beat off the bottom horizontal line, do it in a strictly horizontal position. If you are afraid that the first row of foam plastic boards will slide down, then you need to fix a flat wooden or metal strip along the line. Fasten it with dowels or nails, it all depends on the material of the façade wall.
Drilling holes for dowels to fix the starting profile
Fixation is done with dowels
Pinned profile. Cut off the excess with tin snips
Practical advice. The disc dowels must match the base; they differ for wooden, foam block and brick walls, keep this in mind when purchasing materials. Dowels can be screwed into wood or driven into a prepared hole. The length of the dowel should be equal to the thickness of the foam sheet and glue, plus approximately 60 mm for fixation in the wall.
Step 3. Porous surfaces should be primed, use a deep penetration primer. Apply the solution liberally for maximum penetration of porous substrates. Spray cement laitance onto smooth cement or brick façade walls. Such operations will increase the adhesion coefficient of the glue to surfaces.
Step 4. Measure the deviation from the horizontal of the corners of the house and check the plane of the walls. This can be done with a plumb line and rope.
- In the corners of the house, install plumb lines along the entire height of the wall. Tie the rope at the top and bottom to specially installed metal rods, and stretch it well.
- Attach a horizontal cord to the stretched ropes; do not tighten the knots.
- Gradually pull the horizontal cord up along the vertical ropes and measure the distance between it and the wall.
This data will make it possible to assess the condition of the wall. If deviations exceed a centimeter, they will have to be repaired.
Step 5. Prepare the adhesive mixture according to the manufacturer's instructions. The quantity depends on your productivity. While preparing the mixture, pour water into the container, and then pour in the dry ingredients.
Mixing glue
Consistency of the solution
Practical advice. If the walls of the facade are covered with old paint, then do not rush to remove it, it will be long and difficult. First check the strength of adhesion to the base. To do this, cut a grid of grooves about 1x1 cm in size in the paint, stick masking tape to the surface and tear it off. If the paint remains on the wall, great, the insulation of the facade can be done using it. If not, you will have to remove it from the surface of the walls.
Step 6. Glue must be applied to the surface of the foam. If the wall is smooth (unevenness does not exceed 5 mm), use a comb. But this happens extremely rarely. In most cases, the solution will have to be applied with a trowel or spatula using the beacon method. One sheet requires up to eight beacons up to two centimeters high around the perimeter and in the center, with a diameter of approximately 10 cm. Due to this height, the foam plates are easy to level. Along the edges of the slab, glue should be applied at an angle to prevent it from getting into the seams.
Apply glue around the edges
Add the solution to the center of the sheet
Important. After one or two rows, eliminate the possibility of natural air convection between the insulation and the facade wall, otherwise natural draft will appear and the insulation will be ineffective. Not just bad, but ineffective, keep that in mind. To eliminate draft, the mortar on these slabs must be continuous along one line, and there should be no gap between the slabs.
Step 7. Immediately after spreading, apply the slab to the surface. Press and level the foam using a long wooden trowel or lath; control the position with a level.
Important. Inexperienced builders may deviate vertically and find it difficult to control the position with a level. We recommend making a template for yourself from ropes. Pull them at the desired distance from the wall and secure. The ropes will need to be installed at a distance of approximately 2–3 meters. Such simple devices will allow you to constantly monitor the position of all sheets of foam along the height of the facade wall.
Using a laser level to control the level of adhesion of foam sheets
Gluing insulation sheets
The difference in height of the planes of two adjacent slabs cannot exceed two millimeters. If deviations are found, then after the glue has cooled, the protrusions must be carefully cut off with a very sharp knife and the transition made invisible. If you get wide joints between the ends of the slabs, it’s okay, they will then be blown out with polyurethane foam. It is recommended to start the second and subsequent rows from the inner corners and move to the outer ones; the inner ones are more difficult to adjust.
Step 8. To increase the fire resistance of buildings, fire lintels must be made between each floor. This requirement of the new legislation is aimed at improving the safety and fire resistance of buildings. Fire resistant cuts are made from pressed mineral wool of the same thickness as foam boards. The width of the cuts is at least twenty centimeters. Lintels are installed along the entire perimeter of buildings and at window and door openings.
Step 9. Finishing window and door openings. Take the dimensions of the slopes and cut the slabs along them. Don't rush, all joints should be as even as possible. It is better to use mineral wool as insulation, but the choice is yours. If the finish is relatively massive, then use polystyrene foam. The insulation should cover the frame of the window and door, thereby reducing heat loss and improving the appearance of the façade wall.
Important. In the place where the window sill will be installed, the foam must be cut at an angle to ensure unhindered flow of water. One more thing. The seams of the slabs should not be a continuation of the slopes. In these places you need to use whole slabs and make appropriate cutouts in them to fit the size of the window. This method prevents water from accidentally entering the gap between the façade wall and the foam. The minimum permissible distance from the seam to the slopes is 15 cm.
No glue is applied to the part of the slab adjacent to the window block. Subsequently, the gap is foamed with construction foam.
Seal all the cracks with polyurethane foam, and after it has cooled, carefully cut off the remains. Fill the voids with foam to the entire thickness of the slabs; it is recommended to moisten the surfaces before foaming.
Foaming
Removing cured foam
Grinding
Step 10. After the glue has completely hardened, increase the fixation strength with special dowels with large heads. They need to be installed at the junction of the corners and in the center of each sheet. We have already mentioned that no technology recommends installing insulation boards without dowels; no most expensive glue provides such reliable fixation as dowels. There must be at least four pieces for every square meter of slab.
Fixing the plate
Use at least 5 dowels per sheet of foam
At this point the insulation process is complete, you can begin further finishing.
Coating technology
Finishing the facade is the final and most important stage of construction, because the impression of the house depends on it.
Stages of work:
- Installing beacons and leveling the surface.
- Primer. A solution with increased adhesion is considered the best.
- Facing. This is done with a spatula. Preference should be given to coarse-grained compounds
- Areas not to be covered are covered with masking tape.
- Creation of the required texture. It is created with a special grater, which is used to process the wet surface of the plaster. The process is similar to conventional puttying, but in our case the solution is “smeared” until grooves form. If it sticks to the grater, the mixture must be allowed to dry.
- Varnish coating. Gives the surface an attractive appearance and protects it.
Plastering technique
Since the exterior decoration of a house is considered the most important stage of construction work, which creates the entire image, let’s find out how to decorate the facade of a house with “bark beetle” with your own hands.
The technology includes several important stages:
- To begin, carefully prepare your work surface. To do this, you will need to install beacons on the wall to level the coating.
- After this, you should start priming, and you can use either regular or acrylic composition. The ideal option is a product with good penetrating ability.
- Once everything is ready, you can start applying the mixture. Facade cladding is most often done with coarse-grained plaster. The finished solution is distributed with a steel spatula over the entire surface.
- If you do not need to decorate the entire surface, but only a separate area, then before application you should insulate the walls with masking tape.
- After this, we begin to create the texture using a grater. To do this, run the float in a circular motion over the plaster. At first the drawing will not be very beautiful, but in the end the effect will amaze you.
- And the final step is to cover the “bark beetle” with a layer of protective enamel, which will give a glossy or matte appearance.
And when working, be sure to observe the thickness, which should be the same as the grain size. The application method is similar to putty, but in this case the plaster will have to be slightly stretched over the surface until grooves appear. Under no circumstances should the material be allowed to stick to the tool when forming the pattern. If this phenomenon does not go away, wait until the plaster dries and then repeat.
Finishing
Bark beetle finishing is mainly used in low-rise construction. This finishing method allows you to give the building a unique look.
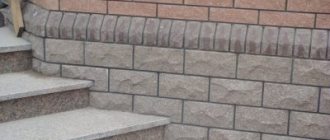
To make an error-free choice of coating technology and design, it is recommended to familiarize yourself with photos of beautiful bark beetle facade decoration posted on the Internet. For example, giving the house an "antique" feel. To do this, use plaster of dark colors and create the appropriate surface texture. The effect can be enhanced by a brick plinth, columns and a wide staircase.
A classic design will require understated elegance and simplicity. The coating is carried out with acrylic plaster of light colors. A tiled roof and brick gazebos will complete the impression.
For small buildings, a combination of plaster with natural materials is recommended. For example, inserts made of wood and natural stones harmonize well with a tiled roof, flower beds and shell paths.
Designers recommend plastering all loggias and terraces in the same way, but using different colors. This will highlight every architectural detail of the building and emphasize its individuality. At the same time, they stick to brown and light beige shades. Each floor of the house can be painted in different colors, and a wide staircase with carved railings will give the building an original and attractive look.
What tools are needed for the job?
To ensure high-quality cladding of the building's facade and quick work, it is better to prepare all the means and tools in advance. For facade work with bark beetle, you will need a finishing trapezoidal trowel; it is needed for mixing the solution and for plastering, and it is used for picking up and measuring bulk substances. For convenient application of the solution and its leveling, you need a drop-shaped plaster trowel. For facade work, a trowel and a corner trowel can also be useful. There are a large number of types of Kalma on the market, and they are all interchangeable with each other.
When cladding a house, you will need rollers; when choosing them, pay attention to the composition of the material and the design, if you need an interesting design on the walls. The materials of the rollers are very diverse. They can be plastic, wood, rubber, leather, fleecy and foam. Regarding the ornament, there are rollers that give an imitation of structures or rollers that give a clear finished pattern.
To prepare the walls for applying plaster, you will need containers for mixing mortar, a hammer drill with a mixer attachment, a ladle for pouring mortar, a leveling rule, a spatula and a trowel. For decorative finishing you will also need containers for mixing the mortar, a construction mixer and a hammer drill with an attachment, a wide spatula and smoothers. For patterns, you may need plastic bark beetle graters, a fleecy roller, ready-made stamps, the rollers we talked about earlier, and various additional things - washcloths, brushes, plastic bags.