Differences between primer and putty
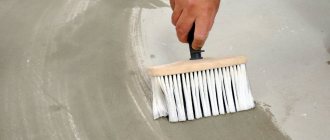
The main purpose of the primer is to improve adhesion between applied layers of paint and varnish coating (LPC). In addition, it performs other functions:
- Removes air bubbles from minor defects of the treated surface (scratches, chips invisible to the naked eye).
- Serves as a connecting component for layers that are poorly compatible with each other and can enter into a chemical reaction, subsequently delaminating.
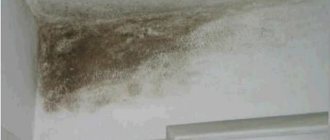
- Protects from external influences - contact with water, air, sand and other substances. Due to the fact that the primer prevents external access to the metal, the formation of corrosion is eliminated.
Putty is a composition that has a plastic form and is intended to fill cavities formed as a result of damage to the element. Due to the peculiarities of the action of primer and putty mixtures, the order of their application differs - first, large defects are eliminated, then the composition is distributed, ensuring reliable adhesion of the paint and the surface being treated.
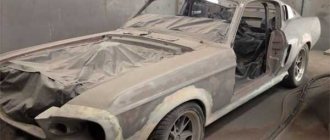
Priming the car body
Now, as for application, that is, how to putty a car.
1. Apply the first layer of putty as carefully as possible using a spatula, this is necessary so that the mixture can fill in uneven surfaces and scratches. 2. Let the first layer dry; if the room is cool, use a household hair dryer or heater.
Important. When drying, observe the temperature regime; overheating is extremely undesirable; check the temperature with your hand between the drying surface and the heater. Place your hand, if your hand does not tolerate it, then the temperature is too high, the putty may rise, but we do not need this.
3. Apply the second, as well as the third and all subsequent layers in the same way, until the surface is leveled to the thickness you need, that is, when the putty surface is flush with the painted surface, the putty can protrude slightly.
Source
Do I need to prime before puttying?
The technology for processing body parts before painting does not involve priming before using putty. The defective composition is intended for application to “bare” metal; good adhesion is achieved by adding special components to it.
It is allowed to prime the car before puttying only if the mixture contains epoxy. Painters do this when carrying out long-term repairs of body parts. Most often, restoration work takes a long time. When metal is left in the open air, in conditions of high humidity, corrosion processes are activated.
Professional auto repair shops also prime the car before applying putty. This is done to ensure that corrosion will not appear on the metal under any conditions.
It is allowed to prime the metal before puttying the car until it is completely dry. The components that make up both products interact with each other and are tightly connected. To improve adhesion, the surface is lightly cleaned, removing protruding elements.
The property of shrinkage and disruption of application technology at home
In the question of how to properly putty a car, a very important problem is the shrinkage of the putty mass.
This characteristic mainly depends on the components. 30% of the volume is the optimal amount of solvent in the composition, according to the recommendations of many manufacturers.
Exceeding this indicator affects the price of the material. Thus, cheap products usually contain a larger amount of solvent, which significantly increases the shrinkage of the material.
This is due to the fact that when drying, styrene evaporates, reducing the total volume of putty applied.
High-quality polyester putties decrease in volume after drying by 2%. If you apply them in a thin layer, the shrinkage will not be noticeable visually. The most important task in cosmetic repairs is to hide the traces of restoration and make them as invisible as possible. To do this, you need to correctly choose one of two methods of preparing the surface for putty work and take into account shrinkage.
In some cases, it is optimal to smoothly mow the old coating; other damage is best restored with a sharp break. With a smooth bevel, the shrinkage rate of the mass at the border with the unputtyed area will be 2 microns, and with a sharp break - about 20 microns.
There is, in addition, secondary shrinkage. When soil or liquid mass is applied to a dry putty surface, the upper layers dissolve and substances penetrate through them to scratches and marks. During the drying period, the layers are gradually compacted due to the solvent escaping from the putty. This phenomenon is often observed in materials containing low-quality fillers and resins.
Incorrect application technology can also cause secondary shrinkage and subsequently cracks. The mass must be carefully placed into deep grooves with a special spatula. If it falls into the recesses later, dissolved by the surface coating, secondary shrinkage will occur. This undesirable effect can also be caused by low-quality, cheap primers with a low solids content and a base made of an aggressive nitro solvent.
Important! The use of such materials can lead to two serious problems: strong dissolution of the putty with pronounced shrinkage and weak filling ability of the soil, which prevents the defect from being accurately hidden.
Is it possible to apply putty to old paintwork?
It makes sense to putty old paint when there are concerns about the appearance of corrosion a short time after treatment. To improve adhesion, it is recommended to treat the paintwork with sandpaper, making it porous. The putty will subsequently penetrate into these pores and adhere firmly.
Procedure for applying putty to old paintwork:
- Clean the surface to be treated in problem areas - remove loose paint, bitumen stains, etc.
- Degrease the body element using a solvent or alcohol.
- Fill existing defects.
The putty composition can only be applied to paint that is in good condition - has no cracks, chips, or peeling. If there are a large number of defects, it is better to clean the old paintwork down to the metal surface.
Puttying a car yourself
Sometimes situations arise when a car requires repairs (puttying), but there is practically no money, then you have to take on the work yourself. All it takes is time, patience and a little skill. If you are unfamiliar with the material, it is better to contact a competent specialist who will help you master the basics of technology. When getting started, there are a few things to remember:
- Before puttying, the surface of the body must be degreased, which is necessary for the subsequent application of an even layer of paint.
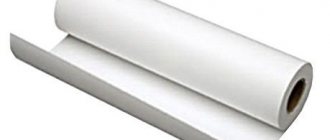
- An important stage in surface preparation is cleaning (“sanding”). Typically, coarse sandpaper P60-P180 is used for this (the surface must be dry).
- You must first decide what quality of putty you will use, whether you will need one putty or will have to resort to several types
- The putty tends to settle quickly, so you must not forget to stir it periodically
- For putty, you need a vessel with a volume approximately equal to your material costs. If you take a larger volume, the putty remaining after work will very quickly become unusable.
- Before adding hardener to putty, carefully read the manufacturer's recommendations. You must know exactly the ratio of substances.
- Do not dilute a large amount of putty at once, because after 8-10 minutes it begins to harden. Work with the material quickly.
- Before puttying, prepare several spatulas; this will make the work easier and more convenient.
- The spatula must be held at an angle of 50-60 degrees.
- When working with putty, you should not use water, as it quickly absorbs moisture, and you need to perform all operations on a dry surface. The presence of moisture is unacceptable.
How to choose a suitable putty, application features
The putty composition is selected depending on the problem of the body element being processed. Types of putties differ from each other in the active ingredient:
- Fiberglass. They are used to eliminate large defects, since fiberglass fibers have a rough structure and require subsequent sanding and application of a finishing layer. This material is characterized by the formation of a rigid fixing area that is resistant to damage even under intense load.
- With large grain. Used for rough processing of areas with significant damage. It is flexible and well putty in hard-to-reach places. Due to the presence of large components in the composition, the primer does not shrink and has increased adhesion.
- With fine grain. Some painters call it finishing, as it is used to fill small defects. The fine-grained primer is easily processed using sandpaper; no marks or other visible defects remain on the surface. The primer is suitable for filling not only metal, but also plastic and fiberglass elements.
- Acrylic based. The structure does not resemble the usual putty - the acrylic composition is liquid and resembles a primer in appearance. It is used for filling large areas, it is distinguished by its plasticity and ease of application. The manufacturer of the product allows painting the treated surface without subsequent priming.
Procedure for applying the putty composition:
- Clean the surface.
- Coarse-grained (fiberglass) filler is placed in large pores.
- Use fine-grained or acrylic putty to remove minor defects.
- The body element is primed and painted.
Some painters do not use coarse aggregates, eliminating unevenness with finishing putty. This option is acceptable, but it is more expensive.
Sanding for car painting
To prepare the metal for applying the putty mass, use P80 abrasive paper. This grain size is optimal to prevent shrinkage of the putty. Surface treatment with sandpaper of this size prevents sanding marks from appearing through the layers of coating, and also ensures active adhesion of materials.
In some cases, coarse P80 sandpaper is not the best option when preparing the surface for putty work. To remove, for example, small scratches on plastic or metal, use P150 sandpaper and fine-grained putty.
A thin layer of putty may shrink, and small scratches will be enough for the material to adhere to the surface. Therefore, in this case there is simply no need to treat the area with coarse sandpaper.
Another example is incomplete, fragmented puttying of parts. This restoration method is used in most cases. The center of the dent is sanded with coarse sandpaper, as a thick layer of putty will be applied to it.
Peripheral areas of damage, on the contrary, will be covered with a thin layer, so it can be rubbed with fine-grained sandpaper P150 .
Mandatory removal of dust deposits is carried out both after grinding work and before it. It is convenient to use special blow guns for quick and effective cleaning. And it’s not only convenient, but also beneficial in terms of economy.
The permissible air flow when using this tool is 150 l per minute. At the same time, when blowing the surface of a car from a hose with an internal diameter of 9 mm, compressed air in a volume of 1000 liters per minute is a net loss.
Service departments with a modest set of equipment thus incur material losses due to unnecessary energy costs. A well-equipped service center, on the other hand, saves costs by using a blow gun.
To roughly calculate the average loss when blowing with a hose, you need to multiply the cost of electrical energy consumed by the compressor available in the workshop to produce this extra 850 liters per minute.
It is advisable to thoroughly degrease the surface, as well as remove dust deposits, before and after grinding. This is no less important task than other preparatory operations, and the final result largely depends on it.
Before you properly fill your car, it is extremely important to select the appropriate grease removers and other chemicals.
By choosing a product with aggressive components, an inexperienced motorist risks damaging the structure of the sanded areas of the coating.
When treated with a caustic intensive composition, the top layer may dissolve, warp, or rise.
Reference! You should choose the least aggressive liquids for these purposes, be sure to consult with a store salesperson or consultant.
Often, surface treatment with anti-corrosion primer as a preparatory stage is skipped by novice craftsmen. But this approach to work is not always justified. There are two weighty arguments in support of the need to use primary anti-corrosion primer :
- When planning to paint the body or plastic parts of the interior, you need to strive for the greatest possible identity with the factory technology. And conveyor painting involves anti-corrosion protection of the metal as a mandatory stage of surface treatment;
- Each layer of coating (and during puttying work their number increases) must have high adhesion to the material applied on top of it.
Adhesion is the property of adhesion, adhesion of dissimilar surfaces. The anti-corrosion primer covering the cleaned metal adheres firmly to it. Putty applied over the protective layer receives a double adhesion effect. The scratches formed on the surface during processing with sanding paper provide the mass with mechanical adhesion, and the semi-dry anti-corrosion agent firmly adheres to the putty (chemical adhesion).
For some types of work, this stage is strictly necessary. For example, puttying operations on galvanized or aluminum surfaces . There are special types of putty on sale with high adhesion rates to these coatings. But if the car is severely damaged, such remedies will not give an effective result.
Fiberglass putty is useful for filling deep dents and cracks, but it does not have high adhesion to aluminum. In this case, it is rational to apply an intermediate layer between the metal and the mass, which is precisely the anti-corrosion primer. On the one hand, it firmly adheres to the surface, and on the other, it reliably holds any putty material.
To have an idea of how to properly putty a car, you need to know, first of all, for what work certain consumables are used, their composition and effect on different coatings. Such information will help you avoid making mistakes in choosing a tool for a specific task.
How to choose and apply a primer
Before application, you need to study the types of primer mixtures, since the scope of their application varies depending on the purpose.
How to wipe down the primer
Types of soil:
- Epoxy based. It is characterized by a liquid structure, as well as chromium content. It is resistant to aggressive chemical compounds and prevents the formation of rust. Epoxy primer does not require additional cleaning before painting (except in cases where the composition was applied carelessly and drips formed).
- Primary. The main purpose is anti-corrosion protection of areas exposed to direct contact with water. It is allowed to apply a primer before puttying the car.
- Sealed. It eliminates contact between two layers of paint and prevents the negative impact of one on the other (the paint may contain aggressive chemical compounds that destroy the putty).
Primer application procedure:
What mistakes do beginners make?
To carry out the work correctly and achieve the desired result, you should strictly follow the instructions, choose the right material and listen to some recommendations.
Beginners often rush and manage to create problems that are then more difficult to fix than applying the coating.
It is important to remember and follow these recommendations:
- Carry out all work on a dry surface, because moisture forms corrosion, which corrodes the surface. During preparatory work, when you wash the car, let it dry thoroughly;
- You cannot put putty on a glossy surface; it will simply peel off. Degreasing, cleaning and only then applying a layer of putty.
- Two spatulas are used in the work - for applying large and small putty.
- Before each application, stir your mass, because thick components form at the bottom, and resin on top.
- draw up a work plan for yourself, describe at what stage and what materials will be used, then you will definitely not confuse anything.
- You should not add hardener to the jar of putty material; try to follow the proportion specified in the instructions;
- Many people mix more putty, and then are left without material, because they forget that the material hardens in 10 minutes. During this time it is impossible to process all areas, so separate the material.
- hold the spatula at a 60 degree angle.
- acid primer, primer-filler is used in areas with corrosion, which cannot simply be left without treatment.
- To avoid the appearance of pores when applying the material, the material should be thoroughly mixed.
Puttying a car is a very labor-intensive process, especially if you decide to do it yourself.
It is important to take this issue responsibly and carry out the work calmly and confidently; this is the only way to achieve a perfectly flat surface, onto which paint can then be applied.
We putty the body no worse than professionals: tips and procedures
Putty can help restore your car's perfect appearance and repair bumps, dents or other surface imperfections. Despite the fact that this material is quite easy to handle and safe, it is important to know how to putty a car correctly. This will help quickly remove the problem and disguise any unevenness. In addition, the putty can act as a base layer before painting the car. So, let’s learn how to carry out restoration putty work on a car with your own hands, based on the instructions and video of the master.
Finishing layer of automotive putty
The finishing coat is applied to the entire repair area. This is a thin layer of putty. You can add some polymer from a fiberglass repair kit to the putty. Approximately the same amount is added as the hardener from the tube. Next, add putty hardener and stir. The resulting putty is easily applied in a thin layer and is well leveled. When curing, a slightly sticky layer may form on top of the putty surface. You can remove it with a solvent and start sanding.
Source
Recommendations
- Mix the putty and hardener thoroughly. A hardener that does not react with the putty will subsequently appear through the layers of the coating in the form of spots.
- In hot weather, the amount of hardener that needs to be added to the putty is approximately halved.
- In order to dilute the thick putty, you can add a little polymer from the fiberglass repair kit to it.
- The jar of putty must be tightly closed during storage to prevent the putty from drying out, otherwise it will lose its elasticity.
- The roof, hood, and doors are body elements that are affected by increased vibration. On these elements you need to use elastic putty to avoid cracks. Putty with aluminum powder and putty with carbon fiber are suitable.
All automotive putty offered on the market is divided into:
The putty is selected based on the planned work and the nature of the damage to the car body. Only with the help of a good and correctly selected mixture can you achieve the desired result.
Auto putty is a finishing material presented in the form of powder or finished paste. The powder is diluted in the required proportions, while the paste is completely ready for use. The putty mixture is required for finishing the damaged surface of the car followed by applying a paint layer.
To put it simply, you need to putty your car in case of damage, chips and scratches that disrupt the attractive appearance of the car and potentially threaten the gradual spread of corrosion.
Putty is used to repair both metal and plastic parts. But not every putty is suitable for certain tasks. It is important to understand which mixture to choose, what its features and advantages over competitors are.
We choose wisely, taking into account key factors and with an emphasis on achieving optimal quality of body repair. To choose the composition, you need to study each type of putty.