22.01.2014
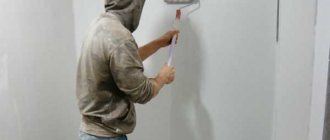
Puttying walls is necessary in order to obtain a perfectly flat surface, which is necessary for some finishing materials, such as paint, decorative plaster or wallpaper. Puttying walls is a complex and time-consuming process; it involves carefully applying each layer of putty in turn and sanding them. It is almost impossible for a beginner to do this work efficiently, so it is better to entrust the puttying of walls to professionals. Our company’s craftsmen have been working in the field of wall finishing for many years; they have the necessary experience and knowledge to perform fast and high-quality putty. The quality of the putty greatly determines how the finishing of the walls will look; without a flat base you will not get either smooth wallpaper or beautiful painted walls.
Many may ask why putty is needed? After all, the plaster is also quite smooth and can serve as a basis for applying paint or wallpaper? But the answer here is simple. The composition of solutions and mixtures for plaster includes large particles, which makes the surface of the plastered wall very rough; all that an experienced master can do is rub the wall to an acceptable condition. Only if thoroughly grouted can plastered walls be suitable for certain types of wall decoration, for example, wallpaper. But, the plaster will no longer be suitable for painting, no matter how thoroughly it is rubbed down, since all the imperfections will be visible on the painted surface (and they will definitely be) despite the lighting of the room. Paint will only aggravate the imperfections of the wall and will bring out all the bumps and depressions of the plaster for everyone to see, and, as a result, the walls will look unprofessional, cheap and ugly, and thin wallpaper will also look terrible.
The difference between putty is that it consists of tiny particles, which allows you to apply the thinnest layers (from 0 millimeters) to the walls. As a rule, a layer of putty ranging from several millimeters to one centimeter thick is first applied to the plastered surface; it hides all major imperfections in the base. Next, a thin finishing layer is applied (up to 2 millimeters). The last layer allows you to remove all minor defects. Moreover, after applying each layer, the wall is sanded, which allows you to smooth out the defects as much as possible. If necessary, apply more layers until a perfectly flat surface is achieved.
Wall structure for finishing:
- Wall base (concrete slab, wooden logs, bricks, etc.).
- Plaster.
- The first layer of putty (2-15 millimeters).
- Second layer of putty (1-2 millimeters).
- The third layer of putty (0-1 millimeter).
Puttying walls requires careful preparation and, first of all, preparation of the base. The plastered wall must be completely dried naturally. You cannot dry the plaster using heating elements; the use of fan heaters will only lead to the appearance of cracks and peeling of the plaster.
An important step in preparing for wall finishing is the choice of putty, because the quality of the surface will directly depend on this choice. Putty acts as a link between the rough finishing of the walls and the finishing coating and cannot be done without it.
First, let's figure out how to pronounce this word correctly. In colloquial speech, three words are used to refer to this material: “putty”, “putty” and “putty”, but which one is correct. Dictionaries also use all three definitions, but, nevertheless, the most correct would be “putty,” since this term originates from the word “putty knife.” Although, people often hear “putty”, so choose the most convenient option for yourself and don’t be afraid to fall flat on your face.
If we talk about the types of putty, they are divided according to two criteria, the first is by the degree of readiness, the second by the binder.
Types of putties according to degree of readiness:
- Dry putty.
- Ready-made putties.
Types of putty based on binder:
- Cement putties.
- Gypsum putties.
- Polymer putties.
- Oil-adhesive putties.
Dry putties
Dry putties are most often used to level walls. Manufacturers produce them in bags or bags of different sizes.
Advantages of dry putties:
- Just cook.
- You can prepare a solution of the required consistency.
- They are inexpensive.
- They are stored for a long time regardless of air temperature.
- Easy to transport.
Disadvantages of dry putties:
- Time is spent preparing the mixture.
- It is mandatory to follow the given instructions.
- The shelf life of the finished mixture is limited.
Textile
There are two types of textile wallpaper. The first involves gluing multi-colored fabric threads onto a paper or non-woven base. This way texture and pattern are created. The second method involves gluing a single piece of fabric onto a base. Both natural and synthetic fabrics can be used: fly or felt, silk or jute, cotton, wool, viscose, polyamide or polyacrylic.
Textile wallpaper for walls absorbs sound well and is a good heat insulator. However, in everyday life they require careful care, and gluing them is also quite difficult.
Cement putties
The advantages of cement putties include high resistance to moisture, which allows them to be used in rooms with high humidity, for example, for finishing walls in the kitchen, bathroom, etc.
Disadvantages of cement putties:
- The likelihood of microcracks appearing.
- The putty shrinks when it dries, which requires the application of several layers.
- Due to the cement, the mixture has low elasticity.
- The putty takes a long time to gain strength.
Preparing the base for putty
Puttying walls must begin with preparation. First of all, it is advisable to ensure that the surface is clean and dry. All old finishing materials are leveled and removed.
The room must be warm so that the surface dries quickly.
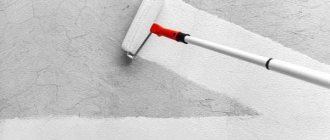
The next step before puttingty is applying a primer. The soil increases adhesive properties, and it is easier to lay the material. This is very important for people who do not have the necessary experience in construction.
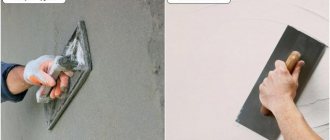
The solution should be of uniform consistency
Oil-adhesive putties
This type is one of the oldest putties and is most often used for repairs on a limited budget, where low cost is important at the expense of quality.
For those who decided to putty the walls only on their own, we will tell you about preparing putties at home.
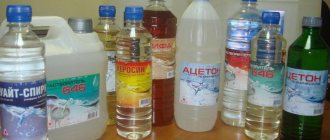
Oil emulsion. It is used exclusively for interior wall decoration. To prepare it you will need:
- Natural drying oil (1 kilogram).
- Solvent (400 milliliters).
- 10% bone glue (2 liters).
- Ground chalk (as needed).
First, prepare a glue solution, into which drying oil is poured with rapid stirring, then a solvent is added. Chalk is added to obtain the required consistency.
Putty on a primer composition. To prepare such a mixture you will need 10 liters of vitriol primer, 1 liter of animal glue and ground chalk.
Putty made of synthetic materials. To prepare such putty, you need to mix CMC glue (1 liter) and a 10% soap solution (200 grams), add 500 grams of latex, mix thoroughly and add 200 grams of asidol. Lastly, chalk is added until the required consistency of the mixture is obtained.
When choosing the type of putty, the most important thing is that the mixture meets all the requirements; for example, polymer or cement putties can be used to decorate walls in the kitchen, but gypsum cannot be used due to instability to moisture. In addition, it is worth noting that when choosing putty you need to pay attention to the size of the fractions; the smaller the particles, the smoother the wall surface will be.
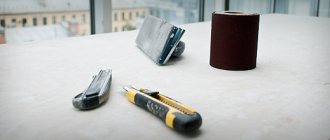
If you decide to putty the walls in the house yourself, then you will need the following materials and tools:
- For a base layer of putty, 0.1-0.3 centimeters thick, you will need a 15-20 kilogram bag of the mixture.
- For the finishing layer, up to 0.5 millimeters thick, you need another 3.5-7 kilograms of putty.
- For the superfinish layer you will need a 1.5 kg bucket.
- A small spatula (from 80 to 100 millimeters).
- Large spatula (from 300 to 400 millimeters). It is important that the metal is not crooked, otherwise the layers will end up with defects. To check this, just look at the instrument from the side; all irregularities will be immediately noticeable. If the spatula is new, then all labels and price tags must be removed from it, but if the tool has already been used, then it must be thoroughly cleaned of dried mortar and other contaminants.
- Spatula for external corners.
- Spatula for internal corners.
- Sanding mesh or fine-grained plaster.
- Grater with mesh clamps.
- Universal primer.
- Roller for applying primer.
Don’t rush to immediately stock up on large quantities of consumables; if necessary, you can always buy more.
In order for the putty to be as smooth as possible, it is necessary not only to choose the right type of putty, but also to carefully prepare the surface of the walls. All major imperfections in the plaster are cleaned with a sharp spatula. All sockets and switches are removed, electrical wires are de-energized. After which a layer of primer is applied to the walls using a special roller, work is suspended until it dries completely. Then the level of the walls is checked, and areas with maximum height differences are determined. For clarity, they can be marked with a pencil.
Finishing layer
To create it you will need more effort and accuracy. The layer is thin and will serve a decorative function. Before applying the finishing putty to the wall, you need to check whether the starting putty has dried. The principle of application is no different, all the same movements from bottom to top. The only thing is that to create a thin layer you need to stretch the mixture. The pressure is light, the layer is made no more than 2 mm thick. The excess is stretched by re-working the surface.
Good lighting will help to immediately detect and eliminate irregularities and defects. The finishing putty is usually applied in two layers, it all depends on the quality of the starting surface. Next, the walls are grouted after puttying. Without it, applying a second layer is not recommended. The corners of the room are treated with special care, since imperfections there will be most visible. At the end, the final sanding of the walls after puttying is performed.
Now everything is ready to apply the selected decorative material. Some people prefer to leave everything as is, simply painting the surface. In any case, before applying the decorative layer, you need to re-prime. The mesh for puttying the walls is not needed for the finishing layer. All that remains is to wash the puttying tools used and dry them, so they can be used again.
Starting wall putty
This is the first layer of putty, which is made from a rough material that has the same name - starting putty. Serves as a starting putty for filling large irregularities, differences in height or holes. The thickness of this layer can reach 150 millimeters, and, if necessary, several such layers can be made, after allowing the previous one to dry.
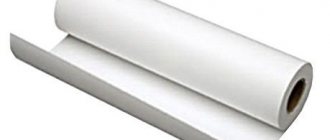
Now, to obtain a perfectly flat surface of the wall, it is completely puttied with starting mixtures, using a painting mesh. It allows you to quickly achieve a perfectly flat surface; the plaster adheres more firmly to the walls. In addition, the painting mesh prevents the appearance of cracks in the putty.
First, prepare a mixture of purchased putty. Following the instructions on the package, you should prepare a small portion, since the prepared solution cannot be stored for a long time, and if you do not have time to apply it to the walls, you will have to throw it away. To mix the mixture, you can only use a clean container, since all the impurities in the solution will end up on the walls and will have to be removed for a long time.
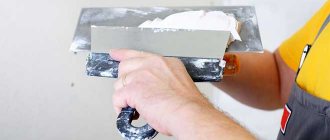
Using a small spatula, take the solution from the container and apply it to a large spatula, and then apply the putty to the walls. The spatula should move across the surface in arcs, applying the mixture to the wall. But here it is impossible to say exactly with what force it is necessary to press on it, what radius the arc should have, and at what angle the tool should be held. You need to feel everything with your own hands: the direction of the spatula, the force of pressure, and the moment of tearing it off the wall. Over time, an understanding of these points comes and then the putty surface will be smooth, but the first layer may turn out to be far from ideal.
After applying the first layer, all tools must be washed and the spatulas wiped dry, since while the putty dries, they may rust.
Preparatory stage
Without careful preparation of the surface, it cannot be said that the putty will last a long time and its quality will be at the highest level. This stage cannot be neglected. But how to prepare walls for puttying? Sequence of work:
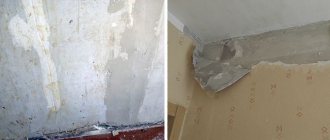
- If this is an old room, then the previous decoration remains on it: wallpaper, plaster, putty, paint. All this needs to be eliminated and the wall cleaned. You can remove old wallpaper by moistening it and peeling it off with a spatula. The same goes for plaster. With paint it will be more difficult; mechanical cleaning or special compounds are required.
- After removal, the wall may show its defects: unevenness, cracks, dirt and stains. They are also eliminated. Cracks are not repaired immediately. They need to be expanded a little so that they don’t go further again in the future.
- Afterwards, the wall must be cleaned of dirt, dust and construction debris. A small brush is suitable for this. Cleaned cracks are first primed to increase adhesion, and only then, after drying, are sealed with starting putty or sealant. The composition is well pressed inward and leveled on the surface. After drying, the area is processed with a grater.
- If the surface is treated with drywall, the sequence is slightly different. The surface is flat, a starting layer is not needed. The main thing is to seal the joints between the sheets and the screw caps. For this purpose, starting putty is used.
- The final stage of work is a primer for plastering the walls. It is recommended to choose a composition with antiseptic properties so that mold and mildew do not form on the surface over time.
This completes the preparation of the walls for puttying.
Mayachnaya putty
This is a type of starting putty, it is made from the same materials, only using guide beacons. Metal, plaster or wooden beacons are used, which are installed vertically and horizontally, leveled with the building level. Due to the use of beacons, the starting layer of putty is smooth not only by visual assessment, but also by fanning as a rule.
Now lighthouse putty is used only in elite repairs, since its cost is quite high, and in appearance it is almost no different from ordinary starting putty.
Surface preparation
How to do without wall putty for wallpapering? In order for the repair to be of high quality and last for many years, you need to prepare the surface for applying the material. To work you will need the following tools:
- glue bucket;
- sandpaper;
- measuring tape;
- roller and brushes;
- plumb and level;
- scissors and knife;
- spray bottle with water.
When installing wallpaper to replace old wallpaper, the latter must be removed from the wall. Removing them is quite simple. Old paper sheets are moistened with water and carefully removed using a spatula.
If it was not possible to remove all the material, then the surface is cleaned of irregularities and paper residues with sandpaper.
Wallpapering tool
After cleaning, the walls are washed with water and dried. Pits, cracks and other serious defects will have to be smoothed out using putty. You can use starting mixtures for this.
Nails and screws must be removed or recessed into the wall and also puttied.
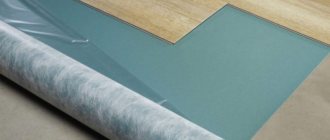
Uneven walls will have to be brought to perfection with starting putty. Especially if the finishing material is very thin. Liquid wallpaper can be applied to a concrete wall without putty.
When the walls are leveled with plasterboard, the joints are treated with putty. After it dries, they are cleaned with sandpaper. GCR also needs additional processing.
Without a primer, when gluing wallpaper onto drywall, all the moisture from the glue will be absorbed into the surface, which will lead to peeling of the canvas and soaking of the base.
Intermediate grinding
After applying the starting layer, the wall already has a completely different look. You can check the evenness of the work by applying the rule to the wall. To see a more accurate result, you can illuminate the rules on one side with a flashlight and, if light leaks from the other side, then there are depressions in these places. Pronounced tubercles are cut off with a sharp spatula, and the remaining excess is removed by grinding. Large bumps are removed using a mesh, and fine-grained sandpaper is used for finishing sanding. It is better to sand large areas with a special machine, and collect all dust with a vacuum cleaner, but for final sanding it is recommended to use manual work, since this is the only way to achieve a perfectly smooth surface. For grinding, you need to stock up on appropriate clothing, a respirator, and safety glasses, since the work is very dusty.
After the first sanding, the walls are cleaned of dust using a construction vacuum cleaner, and a layer of primer is applied. The remaining layers are applied in the same way as the first, now you already know how much material you can use for the wall and prepare the appropriate amount.
What to putty on
Before you putty the walls, it is important to choose the right tool. The work comes down not only to processing smooth walls, but also corners, of which there are 4 in the room. For each type of work there is its own tool for puttying walls. Let's look at the features of each of them.
- Painting spatula. It is narrow, allowing you to correct defects after the starting layer of material has been applied. It is also suitable for sealing defects, cracks and seams. He also transfers the putty from the container to a large spatula (facade). The shape is trapezoidal, with a wooden handle. The blade is flexible and thin.
- Wide (facade). Intended for basic types of work. The blade is wide, so wall puttying is done quickly and efficiently. It is they who transfer the mixture to the surface. The blade can reach from 30 to 60 cm.
- Angle putty spatula. The main task is to create an ideal angle, smooth and without defects. Internal and external corners are processed. This is a metal plate bent at an angle of 90 degrees. Has a handle.
And you can’t do your work without such an arsenal:
- basic putty (also known as starting putty) and finishing putty;
- roller and paint brush;
- mesh for putty;
- plastic bucket for mixing the composition;
- construction mixer;
- plastic tray for roller;
- primer for walls;
- a rule that checks the evenness of walls;
- mounting knife;
- sandpaper or float for sanding walls.
Preparation of putty mixture
Dry mixtures must be properly mixed with water. The proportions are shown on the packaging. First, water is poured into the bucket, then the mixture is poured in, wait until the water absorbs the mixture, soaking the entire mixture, this happens quickly in literally half a minute.
After using a construction mixer, mix the composition for 2 minutes until a homogeneous mass is obtained. The solution is infused for a minute, and the composition is stirred again.
Adding more water or mixture is not acceptable.
Using a construction mixer, mix the composition for 2 minutes until a homogeneous mass is obtained.
Material consumption, how to calculate
When purchasing putty for uneven walls before wallpapering, it is important to check the consumption of the dry mixture and the finished paste. It is recommended to “stock up” on the scope of work for the room. Consumption rates are indicated in the instructions. It happens that recommendations are written illegibly, in an incomprehensible language, or are lost during transportation. Then they focus on general norms.
Experienced craftsmen know that a 1 mm layer takes about 1-1.5 kg of mixture distributed per 1 m2. This rate varies depending on the composition and method of preparation of the mixture.
Consumption is determined by the method of applying the putty, the experience of the technician and the type of surface. A rough wall “eats” the mixture much more than a smooth surface with a primer. Sometimes a base is not needed. In this case, craftsmen prefer a universal composition in order to properly putty the walls under the wallpaper and save a little money.
Coarse mixtures require more consumption than is indicated in standard calculations. But it is impossible to do without a base layer when preparing a brick or stone wall for wallpaper. Dry starting putty is sold in paper bags of several kilograms, so the consumption has to be rounded up. There is at least 1.5 kg per square meter.
Under the painting mesh, which is embedded in the putty, you need to double the consumption rate. To level out crooked walls when the house shrinks, you will need a thick layer - up to 5-8 kg of base for each square. If you trim off the bulges, alignment will be easier and there will be less material consumption.
The instructions for the Ceresit CT 29 starting mixture indicate great variability - 1 layer can be in the range of 2-20 mm, respectively, the consumption in a thick layer increases several times.
Consumption is determined by the method of applying the putty, the experience of the technician and the type of surface.
Important
Both “blades” of the spatula must be clean, free of old adhering building materials, since the remains of dried putty or cement will leave marks on the fresh layer of coating.
Once the topcoat has dried, you can begin painting.
Tools
We have sorted out the materials, but this is still not enough. To get started, you need to collect the necessary set of tools, namely:
- Spatulas (narrow and wide);
- Container for mixing the composition (a clean bucket will do);
- Drill with mixer for mixing.
For a beginner, this set will be enough.
To the hallway
Wallpaper for the walls in the hallway can visually enlarge the room. However, before choosing the right type, you should pay attention to the following details - they must be non-staining and easy to clean. For such purposes, the following are optimal:
- Washable
- Vinyl
- Liquid
So what are the materials for the hallway? First of all, pay attention to the washable ones - they themselves are simple paper ones, on which a protective moisture-resistant layer is applied on top, allowing you to clean them with a sponge or brush.
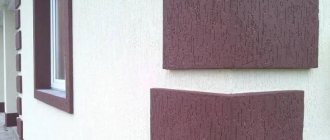
Vinyl hides uneven walls, which is often found in the corridor. Their textures and colors will allow you to choose an option that perfectly suits your corridor and turns it from a rough room into an equivalent part of the apartment.
When choosing which products to glue into the corridor, you cannot ignore liquid ones. In the hallway, a uniform coating is most often used.