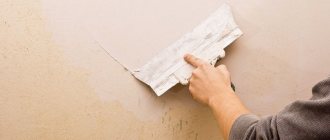
People who do not have experience in construction, having heard about two-layer drywall (the installation technology of which is much more complicated than single-layer), do not always understand why such a design might be needed. Carrying out renovation work often involves the need to divide a large room into several parts using additional partitions. For these purposes, plasterboard finishing in 2 layers is usually used.
Pay attention to the shape of the gypsum board edge
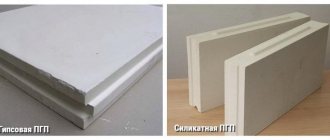
Standard gypsum board sheets are produced with two forms of longitudinal edges: straight (PC) and thinned on the front side (UK). Gyproc gypsum board with thinned edge (Edge Pro) is suitable as the outer layer of multi-layer structures or for single-layer cladding. During installation, two adjacent sheets with CC form a groove, which is filled using special joint putty and reinforcing tape. The result is a strong, smooth, continuous surface.
Gyproc gypsum boards with a straight edge are used as a basis for the production of decorated (painted, wallpapered) sheets. The same sheets can be used for the inner layer of two- and three-layer frame cladding.
Material parameters
In addition to the types of drywall described above, the material may vary in the following parameters:
- thickness;
- edge type;
- color.
To understand how these parameters influence the final result of the repair, let’s consider them in more detail.
Thickness. It can vary in the range from 6 to 25 mm. The thinnest sheets are used to form arches and structures of a purely decorative nature. They are also used for mounting complex multi-level ceiling structures. In such a situation, you need to use a thickness of 8-10 mm. A thickness of 12-14 mm is suitable for walls, and 7 mm for decorative elements.
Arched sheets
But such plates are much more expensive than sheets of standard thickness.
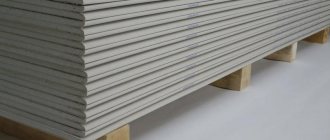
The standard thickness is 12.5 mm . These are the sheets that are used most often.
The edge on the slab can be:
- direct (PC). It is used for dry installation, since there is no need to lay joints. Suitable for finishing the ceiling as an inner layer;
- round;
- semicircular. Sealing of seams can be carried out both with and without reinforcing tape;
- semicircular and refined (PLUK). They make it possible to perfectly align the sheets together;
- rounded (ZK). Their use does not require the presence of reinforcing tape when puttying;
- refined (UK). After installation, they require protection with reinforcing tape followed by putty. Used more often than others.
Types of edges The color range of the sheets varies depending on their type:
- grey colour. Characteristic for ordinary and standard sheets, which are used to cover any residential and non-residential premises with a normal microclimate;
- green or blue. Moisture-resistant drywall has this color. They line kitchens, loggias, balconies and bathrooms;
- red or pink. Color is used to indicate fireproof sheets. Much less often, such sheets are gray with red markings;
- green with red markings. Thus, a hybrid type of material is marked, which has both moisture-resistant and fire-resistant properties.
Color range of sheets
Note! Of these parameters, the most important are the thickness of the material and its type.
Knowing all the parameters, you can easily and absolutely correctly determine for yourself the type of drywall that you will need for finishing work in each specific room.
Strengthen walls with heavy storage systems
If you plan to place storage shelves on the wall, a large TV, or decorate vertical surfaces with heavy decorative brick, ordinary drywall will not work. Bet on Gyproc Strong with increased thickness and reinforcing fibers in a gypsum core. This is a good alternative to “wet construction”: a partition made of Gyproc , with a smaller thickness, provides better sound insulation, and the process of installing a gypsum plasterboard structure is significantly reduced, due to the absence of such lengthy “wet processes as plastering.
And 3 more tips from an expert
Today, not a single renovation can be completed without the use of drywall. Therefore, it is important to have an understanding of its installation to avoid mistakes. Blogger Alexander Perikov answered the most pressing questions.
1. How many layers of plasterboard are best used in partitions and cladding? With a partition height of up to 4 m, you can install one layer of gypsum board on both sides. If the partition is about 4.5 m, then it is necessary to sew up the gypsum board on both sides in two layers; for a height of 5 m or more, three layers of gypsum board will be needed. By increasing the layers of gypsum plasterboard, you increase not only the stability and strength of the partitions, but also sound insulation.
2. Is it possible to glue wallpaper without first puttingtying the sheet over the entire surface? You shouldn’t do this: the sheet may be damaged from transportation and the wallpaper will not lie flat. Apply at least one layer of putty: it will not only level the surface, but also make it uniform - when hanging light-colored wallpaper, the drywall may show through.
3. How to hang heavy objects on plasterboard walls? In places where heavy objects are attached, for example, kitchen cabinets, it is best to install fasteners made of thick plywood. If you want to secure less bulky items, use special dowels for attaching to gypsum boards.
Cost of leveling walls using drywall
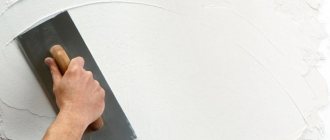
Installing drywall on walls makes repairs much faster and easier. GCR, unlike building mixtures, does not require a long drying time and after working with it, much less dirt remains.
Which is better: heated floors or radiators?
Warm floorBatteries
An additional plus is convenience. For example, with the help of plasterboard sheets you can very quickly align the corners of a room at 90 degrees without using a huge amount of materials for this. This is especially important in older houses, where over the years the size discrepancy can be measured in tens of centimeters.
For apartments, the soundproofing properties of gypsum boards are important, as well as simplification of the installation of hidden communications (electrical wiring or plumbing). If the walls are leveled using plasterboard , there will be no need for gating, which is always associated with a large amount of dust and construction debris, plus it takes a lot of time and money.
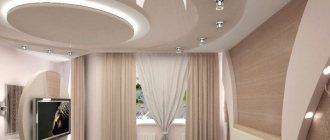
Finally, drywall opens up truly limitless possibilities for the designer’s imagination. Niches, decorative protrusions and other interior elements - with gypsum plasterboard all this can be achieved quickly and without spending extra money.
Cost of work
| № | Type of work | Unit change | Cost per unit | |
| 1 | Wall covering with plasterboard in one layer (profile pitch 40 cm) | m 2 | from 400 | |
| 2 | Wall covering with plasterboard in two layers (profile pitch 40 cm) | m 2 | from 500 | |
| 3 | Sheathing walls with plasterboard in two layers on a reinforced frame | m 2 | from 600 | |
| 4 | Soundproofing with mineral wool | m 2 | 60 | |
| 5 | Installation of niches in drywall | PC | 1000 | |
| 6 | Box arrangement | p/m | from 500 | |
| 7 | Custom designs | PC | from 1500 | |
| Other jobs | ||||
| 8 | Installation of embedded parts (plywood, profile) | PC | from 150 | |
| 9 | Painting work on drywall | m 2 | from 250 | |
| 10 | Laying laminate, parquet boards | m 2 | from 350 | |
| 11 | Tile work | m 2 | from 1000 | |
| 12 | Installation of skirting boards (plastic) | m 2 | from 90 | |
| 13 | Wiring of sockets, lighting | PC | from 350 | |
| 14 | Complex repair | PC | from 1500 | |
- If the ceiling height is more than 3 meters, then the price increases by 80 rubles/m2 for each meter exceeding 3 meters in height.
- The calculation was made for an area of 100 m2, when installing a frame with a distance between profiles of 400 mm.
- We provide discounts for large volumes. Call!
- Minimum order from 20 sq.m. (complex structures), from 50 sq.m. (straight).
Ceiling markings
First of all, you need to use a tape measure to determine the lowest angle (or lowest slab) of the ceiling. It is necessary to measure all heights with a tape measure - in the corners and in the center. The minimum deviation from this height is 50 mm. (If you plan to install built-in lamps - 80 mm).
Having determined the future height of the ceiling, you need to make a mark in one of the corners. Then, using a water level, mark the same height in the remaining corners and draw horizontal lines using a paint cord along the perimeter at the same height.
Creating a frame
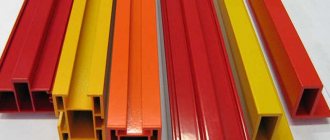
Let's make a reservation right away. There are many profile options on the market, but note that their quality often varies significantly. The price depends primarily on the thickness and composition of the steel, as well as on the layer of protective anti-corrosion coating. If you want the wall structure to last as long as possible, try not to skimp on the quality of the profile. But if you decide to save money, buy a profile with a thickness of at least 0.4, it will cost you less than “brand” ones, and the quality will be much better than Chinese fakes.
Installation of plasterboard begins with the creation of a frame based on metal profiles. To do this, guide strips (UD) are attached to the ceiling and floor using dowel nails driven into pre-prepared holes. Thus, the guides will actually follow the contours of the room and CD profiles can now be attached to them, which, if properly marked, will take a strictly vertical position.
CD profiles, depending on the weight of the structure, are located at a distance of 40 to 60 cm from each other. Then, using direct hangers and dowel nails, each profile is firmly attached to the wall. Thus, we will get a rigid frame to which, in fact, the drywall will be attached.
Ceiling hangers
The transverse dimensions of plasterboard are 120 cm. Therefore, it is recommended to place profiles at intervals of 40 or 60 cm, strengthening the sheet in the middle and at the edges. So first you need to draw parallel guides on the ceiling, in increments of 40 or 60 cm.
To calculate the location for the anchors, place the suspension in place (in 60 cm increments) and mark on the ceiling the locations for two holes for each.
After marking, start drilling holes in the ceiling. This is the most dusty and hard work. It is advisable to use a respirator and safety glasses.
When all the holes are drilled, we proceed to attaching the hangers. It is better to secure the ceiling with anchors - they stay in the ceiling more securely than dowels. Before attaching, apply sealing tape to each hanger. After fastening, carefully bend its ends - otherwise the ceiling may go into waves after fastening.
We install plasterboard sheets
Before you begin installing the drywall itself, you need to determine the locations of sockets and switches, as well as do the wiring. Mark the points where you plan to install the switch on the wall. Later, cutouts will be made in the gypsum board opposite them. Do not lay wires inside the profile under any circumstances, as screws will be screwed in here in the future.
Plasterboard sheets are screwed with self-tapping screws so that, on the one hand, they do not sink too much into the sheet, and on the other, so that their caps do not protrude beyond the cardboard. Otherwise, over time, rust from the screw will appear on the surface of the wall. Usually the cap extends 1mm into the thickness of the sheet. The joints between the sheets are reinforced with sickle tape or reinforcing paper tape and covered with putty. After drying, the putty is applied in a thin layer to the entire wall, which has been previously primed.
A layer of building mixture is necessary so that plasterboard walls can be painted or wallpapered. When replacing wallpaper, the putty will not damage the layer of cardboard on the sheet itself, and after it has dried, you can begin finishing work. of the plasterboard wall is complete.
In the article we outlined only the main points of wall alignment. It only takes our specialists a couple of days to finish drywalling an average room, while it may take weeks for someone with no experience. In addition, there are a lot of nuances, non-compliance with which often leads to damage to the material and the need to constantly return to previous stages, redoing seemingly completed work. Be careful!
Incorrect installation of screws
The hardware should not stick out above the surface - this will make it difficult to putty the seams. You can check the level of the screw with a spatula; if the blade catches the head, then the hardware must be tightened.
During work at the last stage, it is necessary to reduce the speed on the screwdriver, because excessive depth will cause the head to tear the material and the fastener to lose its strength. If this does happen, then the self-tapping screw must be unscrewed, then the hole must be covered with putty.
The self-tapping screw should enter the profile at an angle of 90 degrees, make sure that the hardware does not bend.
Our services
If necessary, our craftsmen will level the walls in your home. Many years of experience of each of them is a guarantee that the walls will become perfectly smooth and will receive a new life for many, many years. We never rush or chase the number of orders, but treat each object as our own brainchild, taking care that every detail becomes flawless. This applies not only to the alignment of walls. Plasterboard partitions, plasterboard ceilings and suspended ceilings – the company’s specialists perform any task conscientiously and at the highest technological level. Plus, we can provide you with impeccable sound insulation , as well as a full range of electrical installation services - from wiring and installing switches with sockets to installing ceiling and wall lighting. There are no impossible tasks for us.
If necessary, we will completely relieve you from the hassle of repairs by providing all the necessary materials.
Our warehouse contains only high-quality metal profiles, drywall and everything that is required for construction work.
You can order specialist services by either filling out a form on the website or by calling.
Installation diagram - you can draw a diagram of the installation of gypsum plasterboard sheets according to the drawing of the future ceiling on a reduced scale in order to clearly see how the ceiling plasterboard will fit on the frame, and how many sheets you need to buy. Plasterboard floor. To level the floor and give it thermal insulation properties, waterproof plasterboards are used. Calculations of the required number of sheets are made similarly to the formula for a single-level ceiling.
It is important that the profile thickness is at least 0.55 mm, otherwise it will deform over time, resulting in cracks along the seams.
How to secure
When fixing plasterboard sheets to the ceiling, the choice of screwing method is determined based on subsequent operating conditions.
Rigid attachment will require further complete dismantling of the coating. Permanent fasteners are made with screws.
Collapsible (movable) fasteners give freedom, when replacing a single part of the material, to move the fixed sheet in relation to the frame.
The strength and resistance to deformation indicators depend on the direction of laying gypsum boards. Transverse laying is productive and practical, in which stresses in the plasterboard board arise perpendicular to the fibers. Then increase the distance between the frame posts. The labor intensity of work is reduced and the cost part of the project budget is reduced.
Installation of drywall in two layers
Before answering the question: how many layers of cladding are required, you should understand for what purpose it is carried out. In the case of conventional finishing of the ceiling or walls, one layer of plasterboard will be enough, which allows you to achieve the desired result without additional costs. It is worth noting that it is quite difficult to fulfill all the rules and conditions for the correct installation of the partition; for this, all calculations should be carried out in paper form and save until finished.
The first stage of manufacturing a plasterboard partition involves covering the metal structure with plasterboard. You have to act while observing some rules, namely: To create partitions from plasterboard in two layers, you will need to use not only step-by-step instructions, but also suitable tools and components for installing gypsum boards. In this case, it is worth preparing in advance: To create a partition from two layers of plasterboard, you should think about the output of sockets and switches in advance.
In this case, they are made twice as deep as when using one sheet of cladding. After fixing the plasterboard sheets, you need to proceed to the final stage of manufacturing the partition:
Double-layer gypsum plasterboard partition
Good evening (it’s my evening here), friends! The New Year is approaching, I have no time to write, you understand, so this article will be the last in the outgoing 2013. In it I will talk about the nuances of installing an interior partition with two layers of drywall. The fact is that everything here is somewhat more complicated than in the case of one layer. As you can see, there is a gap of about 10 cm between them.
The easiest way out here would be rough marking with the expectation that the front edge will extend 2-3 mm beyond the plane of the wall. If you make it so that you can then simply plaster those 10 cm, it’s easier than accurately adjusting the HA to the plane. But we will go the hard way, because it is not always possible to act according to a simplified scheme. Our example is a completely real construction that I have been working on quite recently.
It actually consists of two partitions, but we will consider the larger one. There are three atypical points here: You ask - Roman, why make it two-layer at all? There are two reasons for this: increasing the stability of the structure due to its almost twice the weight and, accordingly, increasing its soundproofing ability.
If my memory serves me right, by 7 dB (52 versus 45). I wouldn't say it's worth it, but if finances allow, then why not? Naturally, in order to understand this article, you must definitely read the main article about a single-layer plasterboard partition. If you have already done this, then move on.
The easiest way to do this is as follows. Several pairs of plasterboard strips are sewn onto the rack profile, after which it will be much easier to adjust its offset from the base plane. We apply a level or a piece of the rule to the base wall and rest our PS against it with a pair of sheet scraps sewn onto it.
Doorway
How can we now make a doorway in a plasterboard partition?
Yes, everything is quite simple. 2 paired profiles are placed on the sides (that is, 4 in total), this is done for strength. One is inserted into the other, but it should not turn out that one profile is completely inside the other, but this kind of mutual insertion is done. Look at the diagram and you will understand everything. Inserting them into each other is not an easy task. If they don’t fit, just turn one of them over, their sides are somehow made a little differently. After this, it would be a good idea to put 2xPS on the floor and walk on them with your feet to be sure.
The upper lintel is cut from the PN, the length is taken to be approximately 10 cm greater than the width of the future opening. Then, on each side of the PN, two oblique cuts are made at a distance of about 5 cm, followed by a bend of 90 degrees, this is shown in the following figure.
“Self-tapping screw” here means automatic fastening of profiles after sheathing with plasterboard. To prevent the jumper from slipping before this, you need to fix it with self-tapping screws and a press washer from inside the opening. In this case, be careful and strictly maintain the intended width of the opening.
I’ll tell you about one problem that has been annoying me for a long time. When two PSs are inserted into each other (on the sides of the opening), their total thickness increases by at least the thickness of their walls, that is, by 0.6 mm. It would seem that this is negligible, but for me personally these profiles always go beyond the general plane of the partition, and at 2.5 meters in length there is already a noticeable difference - 2-3 mm. I'm mad all the time because of this.
If any of you know a way to avoid this, please share it in the comments, I would be extremely grateful! Of course, nothing is noticeable to the eye, but somehow it’s all wrong... In general, be prepared that the plane on these racks will “break” a little. It will also break on the overlap of the PN by 2xPS in the upper corners of the doorway. Always control the plane of the frame even at the stage of its assembly, and on both sides of the partition.
Another important point! Stock up on thin metal drills in advance. An ordinary self-tapping screw for drywall may not “take” a double rack profile. More precisely, it will pierce the outer one, but the inner one will simply bend, and the entire structure will be skewed. And if you pre-drill places for screws, then everything will be great. This is done, naturally, after you have screwed the gypsum plasterboard in place. That is, drill through the grommet, and then drive a self-tapping screw into the hole.
And another mega-important feature! Under no circumstances should sheets be joined on the posts of the opening! Only ABOVE him. If you fasten it with 2xPS, I guarantee you cracks. The minimum distance from the side posts is 10 cm.
Double-layer plasterboard sheathing
Since, as mentioned earlier, two-layer cladding is used more often on partitions than on walls, we will consider the installation process using this design as an example. The covering begins, naturally, with the first layer. You need to remember four basic rules that remain relevant for covering any partitions. However, as was said earlier, the first layer of sheets was laid on the profiles and lintels; only on them should the joints be located. It would seem that all the joints of the second layer will automatically fall on the jumpers.
To solve this problem, the distance between the profiles is made 2 times smaller than the width of the sheets. Thus, the edges of one layer fall on all even edges, and the other on all odd ones. You need to insert cotton between the profiles, leaving no free space. You need to use a little more cotton so that it sticks without additional fastening. First of all, you need to calculate the required amount of materials.
A calculator of components for covering a partition on both sides in two layers will help us with this: To correctly complete this task, it is recommended to write down all the parameters of the sheets, namely their size, as well as the coordinates of the placement of all profiles and lintels. This will help you not to miss when installing the second layer. Also, it will be useful to draw up a diagram of the partition in advance, indicating the parameters of the frame and all the necessary sheets.
Instructions for installing a plasterboard partition with a door
Attention! To install the structure on the upper levels, you will need a durable stepladder. Working with metal profiles and drywall requires the mandatory use of personal protective equipment - goggles or a mask, thick gloves, a respirator.
Expert advice: Any construction work using plasterboard should be carried out at a room temperature of at least +15 C. It is better to install structures before finishing the floors and painting work. Before creating a partition, the surface of the main floors should be leveled, filling potholes, seams and cracks with putty. Summarizing the calculations, we can conclude that to create a 5x3 m plasterboard partition with a doorway we will need: Expert advice: Double-sided installation of gypsum board sheets with offset joints will increase the rigidity of the structure, significantly reducing the possibility of deformation and reducing the likelihood of cracks on the surface of the material. If you need a more durable partition, use two layers of plasterboard when covering it. So, all the important stages of preparation for work are completed, let’s be patient, enlist the support of loved ones, get the approval of neighbors and begin installing the structure.
If the frame is not made strong enough, the 2-layer plasterboard finish will soon crack. To ensure the safety of the structure, it is advisable to be careful when exposed to vibration (painting with a roller or sanding). After this, covering the partition with plasterboard sheets can be considered complete. The result is a dense structure with noise-insulating properties.
Next, all that remains is to mount switches and sockets in pre-prepared niches and carry out cosmetic finishing of the double plasterboard wall. Soundproofing material fits comfortably into the grooves of the upper and lower profile. It will rest against the back of one post profile, but will fit well into the intercostal space of the second post. For this reason, the racks are placed so that they all face the same direction. Some people prefer to install two posts back to back so that the soundproofing fits into them and does not rest against anything.
In most cases, the cavity is filled with soundproofing material. Therefore, vertical racks are often installed in increments equal to the width of the soundproofing material. Then it fits without the need for additional trimming and does not tilt to the side.
Soundproofing of interior plasterboard partitions should be carried out after one side of the structure is sheathed with plasterboard.
How to treat the surface → Room decoration → How to choose the right paint → Surface treatment technologies → Leveling and finishing the walls → Selecting and applying a primer → Removal from the surface → Stretch ceilings and technologies → Reviews and testimonials
Calculation of the thickness of the structure
To do everything right, the main parameters must be determined at the preparation stage.
The most common options are:
- 75 mm. This indicator is the minimum, which is obtained from the thickness of the profile (50 mm) and two layers of gypsum plasterboard of 12.5 mm each. The corresponding type is S-111, for S-112 25 mm is added.
- 175 mm. Racks – 100 mm, 3 layers of plasterboard on each side – 75 mm. This thickness is typical for the S-113 design.
- The indicator for the S-115 variety must be calculated individually. With a profile thickness of 75 mm, the value is multiplied by two and the thickness of the gypsum board is added - 50 mm (12.5 * 4). Thus, the width of the wall is 200 mm. With 100 mm racks installed in two rows – 250 mm.
A more complex calculation is made for the partitions in which communications will be located. In this case, not only the dimensions of the profiles and drywall are taken into account, but also the parameters of the pipes with a margin.