When choosing a method for installing floors in a dacha, take into account the structural features and operating conditions. If the house is used only in the summer, then the requirements for the floor are the same, but if year-round living is expected, then the floor design must meet more serious requirements. Today we will look at options on how to arrange floors in a dacha, how to insulate them and finish them.
Country house floors
terms of Use
First of all, before choosing a flooring option, in addition to the climatic features of the region, the characteristics of the relief and soil, the purpose of the country house, its size and seasonality of operation are taken into account.
Small country house with seasonal accommodation
If this is a small house, which on the site is used mainly as a summer kitchen and a utility room for storing equipment, then you can get by with a simple wooden flooring along the joists using expanded clay.
Expanded clay
Floor insulation with expanded clay
If people sometimes come to the dacha to spend the night, then the floor will need to be insulated. High-quality thermal insulation will allow you to stay comfortably in such a house even in winter. For a dacha with year-round use, special attention should be paid to the floor - a single-layer structure will not be enough. Careful insulation of the subfloor and installation of a finishing floor followed by finishing will be required. As an option - installing a concrete screed. The floor will be warm and reliable. Additionally, it will be possible to install a water heating system.
One of our articles will help you calculate a warm water floor In it you will find a special calculator, calculation examples and installation instructions.
Wood floor construction
How to make a floor in a country house
To determine how to make a floor in a country house in the most optimal and inexpensive way, you need to know some nuances. After all, there are differences between the dachas, and there are also many options between the genders:
How to make a floor in a country house
1. For a small house, which is used only in the summer for relaxation after working in the beds, a regular wooden flooring on joists without insulation is suitable. In this case, it is enough to pour a thin layer of expanded clay into the subfloor and seal the cracks in the floor well.
2. For a house that is used all year round, but comes from time to time on weekends, you will have to install a more reliable floor with insulation. This is necessary so that in winter the heat from the house is not blown out through the uninsulated floor.
3. The third option is a dacha where they live all year without leaving. In this case, you will need to make a two-layer heated floor with thick boards. You can, of course, install a concrete screed and lay insulation on top, but this is a more labor-intensive process, although its result will not disappoint expectations - the house will be warm, dry and not dusty, since the soil will be covered with a screed.
4. A large country mansion, which serves not only as a summer house, but also as permanent housing, requires a good-quality floor, not only insulated with appropriate materials, but possibly also with the installation of electric or water heating.
So, it is necessary to consider the different types of floors that can be installed in a country house, based on its intended purpose
Wooden floor
It’s not difficult to make a regular plank floor on joists, the main thing is to purchase high-quality material. Depending on the overall design of the foundation, the choice of supports for the decking board will be determined.
- If the rooms in the house have a small area, and the house is installed on a strip foundation, then the floor joists can be embedded in the base, having previously wrapped them with waterproofing material, for example, roofing felt. In this case, you should not save on the thickness of the logs - they can serve as logs of medium thickness, hewn on one side in the required way.
- If the rooms are large, then to install the log, one way or another, it will be necessary to install retaining pillars.
Whether the floors are single or double, it is recommended to cover the underground with a 15-20 cm layer of expanded clay. This material will not allow cold and moisture to penetrate from the ground to the floors, which means it can serve as an additional natural insulation. In addition, there will be much less dust in the house, since it will be covered with expanded clay.
It is best to place an expanded clay pillow on top of the soil
Wooden flooring has many advantages, but the main thing is its environmental friendliness. In addition, it will fit perfectly into the interior of a country house.
The material for flooring must be chosen of high quality, having the necessary moisture content, since the wood should not be either overdried or damp. Floor boards should not have damage, cracks or a large number of knots. Before laying the material, it is necessary to prepare it, cover it with antiseptic agents that will protect it from damage by insects, mold, dampness and rotting.
Preparation for installation
If floors are to be made in an already built house, instead of old ones, then first of all, you need to dismantle the existing covering.
The floor has become completely unusable and requires dismantling.
— Having lifted the old boards and discovered that the logs are lying on the ground, the owner will be forced to correct this, since the tree, which does not have the opportunity to be ventilated from below, quickly deteriorates and rot appears on it.
In order for the logs to last for a long time, it is necessary that they are located at a height of 15-20 centimeters above ground level.
— If the height of the ceiling allows, then new logs can be raised above the surface of the underground by installing them on brick columns. To do this, holes are placed at a distance of a meter or one and a half from each other, which will serve as pits for the foundation of the columns. The depth of the holes should be at least 40-50 centimeters.
The bottom is compacted and a ten-meter sand cushion is poured onto it, which is also compacted. Then, medium-fraction crushed stone, also 10 cm thick, is laid on top of the sand, and it also needs to be compacted.
The next stage of work can be structured in different ways:
— Waterproofing made of thick polyethylene film is laid in the pit and wooden formwork is installed - a kind of box.
— Reinforcement is installed on the prepared waterproofing material, sunk into the ground, it should rise to the height of the pit, to its upper edge. A rough concrete solution of gravel and cement at the very top is poured into the formwork. The concrete is leveled and left to dry - this will become the foundation for the brick columns. When the base is ready, a piece of roofing felt is laid on it - this is additional waterproofing for the brickwork.
Foundation “spots” for posts
A column of the required height is laid on top of the finished concrete “patch”. The top edge of all columns must be at the same height, so they are adjusted according to level.
Brick pillars
— Another option would be a column made entirely of concrete. In this case, the bottom of the pit is compacted in the same way as in the first case, but the reinforcement is placed over the entire height of the column. When the concrete has hardened in the formwork installed in the pit, it is raised above the ground to the full height of the future support. To prevent concrete from flowing out through the gaps between the boards, they can be sealed with clay or plastic film can be secured inside the box. Next, concrete is poured into the box and left until completely mature. Before laying the logs on the posts, you will need to lay pieces of roofing felt.
If the ceiling is low and it is undesirable to raise the floors, you will have to carry out the following work:
- you need to loosen and select the soil to a depth of 30-40 centimeters, and only then holes for the posts are dug in this pit to bring their height to the previous floor level.
When the posts are ready, it is recommended to completely cover the underground with roofing felt waterproofing, and it is better to lay the sheets with an overlap of 10-15 centimeters and glue them together using tar or sealant. The roofing material should extend onto the walls by 15-20 centimeters, and it also needs to be sealed tightly in the corners.
Expanded clay can be poured onto this base, which will create an insulating cushion.
Floor construction
Fastenings for the logs are installed on the posts, then the guides themselves are laid. If they are made of massive bars, then they can only be fixed to the walls, since due to their heaviness, they are unlikely to budge.
Logs installed on finished posts
Further work can proceed in different ways:
— If a single floor is laid, then most often a counter-lattice is installed on the joists, and only then a flooring is made from boards.
Counter-lattice and wooden flooring
— If the coating is planned to be insulated and made double, then the subfloor is installed first.
To do this, bars measuring 5 × 5 cm are attached to the bottom of the side surfaces of the logs, on which the subfloor boards will be laid.
Approximate subfloor diagram
The boards can also be secured to the bottom edge of the joists, but this is not always convenient simply due to the cramped nature of the subfloor.
Subfloor
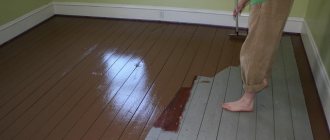
If you want to make the floor warm and reliable, then it is better to nail the board solid, as shown in the photo. It is recommended to seal all cracks with clay mortar.
Subfloor covered with a layer of vapor barrier film
“You can do it another way - fasten the boards at a distance of 20-30 centimeters from each other, and cover the top with sheets of vapor barrier material, which is secured to the joists with staples using a construction stapler.
- Insulation is placed on the vapor barrier material between the joists. Most often, mineral wool, expanded clay, slag, shavings, ecowool and other materials of your choice are used for wooden floors.
- Another layer of vapor barrier is fixed on top of the insulating material.
Thermal insulation is laid - you can lay the board
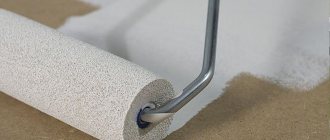
- On top of it, 5 × 3 cm bars are attached to the logs, on which the floorboards will be mounted.
- When laying floorboards, it is very important to step back from the walls by 5-7 millimeters for air circulation. When the board is laid, a plinth is installed around the perimeter.
Concrete floor
Another option for installing a floor in a dacha could be a concrete screed. Concrete is a cold material, so the floor will require mandatory insulation if you plan to use the country house all year round.
Approximate section of a concrete floor with rough screed, insulation and top reinforced coating
A concrete screed can have several schemes according to which this work is done. The figure shows a more complex scheme, which is used mainly for installation in country houses, where living is carried out all year round. In this case, a rough screed is provided, which can be dispensed with if the house is used only in the summer. But it’s worth considering both flooring options.
Preparation for laying a concrete floor is carried out in the same way:
— leveling and compacting soil in the underground;
- arrangement and compaction of a sand cushion, a layer of 10 centimeters.
Further work differs somewhat from each other.
Concrete floor with rough screed
— A rough screed is laid on the sand layer, the solution for which is made from a gravel mixture and cement. The screed should not have a perfectly smooth surface structure, but it should be leveled quite well.
— Next, the screed should dry very well. Since the rough screed is laid with a thickness of 12-15 centimeters, its preliminary maturation will take up to fifteen days - this period will depend on temperature and humidity.
— A vapor barrier film is laid on the finished rough screed.
— The insulation is filled in or placed on a vapor barrier. For these purposes, it is best to choose extruded polystyrene foam, as it has a fairly solid base. Natural materials can also be used for insulation - middle fraction expanded clay or slag.
— If loose insulation is used, it is advisable to compact it as tightly as possible.
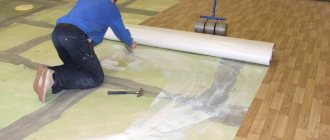
— A polyethylene film is laid on top of the insulation, which will act as waterproofing for the top, final screed. The film must be glued with waterproof tape and raised to the walls by 15-20 centimeters.
Along the bottom of the wall, along the entire perimeter of the room, a damper tape is glued, which preserves the screed from destruction when temperature conditions change.
Damper tape
— A metal mesh is laid on the film to reinforce the screed, and beacons are installed - made of reinforcement or a galvanized metal profile. They are set to the ideal level, since they will determine how even the floor will be.
A semi-dry mixture or liquid concrete solution is laid out on the prepared surface. The volume of the solution should be such that its thickness is slightly higher than the installed beacons.
Then, using the rule, the laid cement mixture is leveled.
After leveling and drying the screed and, if necessary, hardening and removing dust from the surface with impregnating compounds, you can lay a decorative coating or logs for installing a wooden floor. In the case where raising the floor with joists is unacceptable, but it is necessary to insulate the floor, then you can use electric infrared film heaters, which will very quickly heat the rooms after the owners arrive at the dacha.
Simplified version of the screed
- As mentioned above, the first two preparatory stages - compacting the soil and laying a sand and gravel cushion - are the same for both cases. Next, in a simplified version of the screed, expanded clay is poured onto the compacted base and well leveled
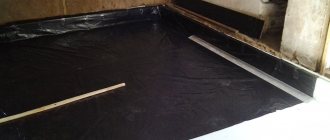
Waterproofing film over expanded clay
- Waterproofing made of thick polyethylene film is spread on top of it. It is arranged with an overlap of 15-20 cm and glued with special tape. On the walls, the waterproofing should also extend at least 15-20 cm. In the corners, the film must be glued with waterproof tape so that there are no cavities left in which moisture can accumulate.
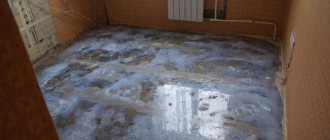
- Next, pouring the screed differs little from the method described above - the same principle of reinforcement, gluing the damper tape, setting beacons, laying out and leveling the concrete solution.
Leveling the concrete screed
- The finished floor, which has gained the necessary strength, can be additionally leveled using a self-leveling self-leveling composition.
It is often most beneficial to install a wooden deck on top of a concrete base.
Wooden flooring on concrete base
There are two options for fixing the logs to the concrete surface: fixing them directly to the concrete, or raising them 10-15 centimeters above the base.
The ability to raise the logs above the concrete surface will depend on the height of the ceiling and on the height at which the heating radiators are located if they are installed in the country house.
- If the joists are laid directly on concrete, a polyethylene film is first laid out for waterproofing and protection from cement dust.
Then the logs are fixed in place (to the walls, or with anchors - directly to the base) with a distance of 60 cm (standard insulation width) from each other, and at a distance of the thickness of the insulation from the walls.
Logs can be laid directly on the screed after waterproofing
Along the perimeter, between the wall and the joists, strips cut from mineral wool or foam plastic are laid - they should be higher than the joists by the thickness of the board or plywood.
Next, the selected insulation is laid between the guides, and then the entire system is covered with a vapor barrier material.
Between the logs there are thermal insulation panels, and then a floorboard
A solid floorboard or thick plywood can be laid on top of the vapor barrier. Plywood is laid faster, but it usually requires additional decorative covering, such as linoleum or laminate. Solid wood floors can simply be coated with tinting varnish, preserving the textured pattern.
- If you decide to raise the logs above the concrete floor by a few centimeters, you will have to make an additional effort to level the logs - this can be done using bars or special stands adjustable with a threaded connection.
A convenient method is adjustable supports for joists
To level the bars with them, you simply need to tighten the legs, pre-installed on the logs, in certain places, relying on the level readings. The advantage of this option is that thicker insulation can be laid under the wooden covering without spending money on solid lumber. In addition, this approach eliminates the need to straighten the screed curve. The legs of the stands have special holes through which they can be secured to the concrete surface.
Further work on laying the wooden floor proceeds in the same way as in the first case.
Video: a good practical guide to flooring in a country house
Since there are several ways to install floors in a country house or mansion, you can choose the one that is more suitable for a particular home and will not put too much of a burden on the homeowner’s pocket.
Requirements
If we assume that a dacha is a structure that does not require year-round living, then the floors are subject to requirements regarding strength, reliability, and ease of maintenance. There is no point in laying expensive flooring. The floor should be easy to clean and wear-resistant.
Subfloor filing with docks
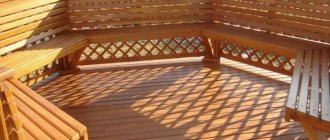
It is worth taking into account the operating conditions of the floor covering in rooms for various purposes so that the floor lasts as long as possible. The aesthetic component is also an important factor. After all, a person comes to his dacha to relax, sometimes invites guests, so the house should be neat and cozy.
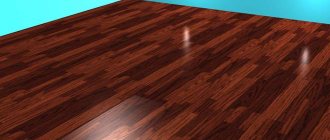
Texture of a finished wooden floor
Linoleum
Linoleum is an excellent floor covering for a country house, which is not at all afraid of moisture. The range of applications for linoleum is very wide, because it can be used throughout the house: in heated rooms, cold rooms, a terrace and even an open veranda (read: “How and what to make a floor on an open veranda from - consider the options”). You can easily choose linoleum to match the design of your room, because there are a huge number of variations in its coloring.
Linoleum is distinguished by thickness, number of layers and surface shape. The price of linoleum is quite low: even the highest quality linoleum is sold at a price not exceeding 1000 rubles per square meter.
Scheme and conditions for pouring a concrete floor in a private house on the ground
In order to properly install concrete floors in a private home, certain conditions must be met. These include the following circumstances:
This do-it-yourself floor pouring scheme allows you to ensure high performance qualities of a concrete floor poured onto the ground. Trying to save on its arrangement, some owners of private houses exclude from the scheme the implementation of individual elements of preparing the concrete screed, which leads to the risk of its damage in the future.
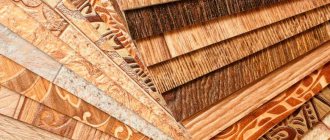
Flooring boards, installation features
To lay the floor, different boards with their own installation characteristics are used: wet, dry, tongue and groove.
Damp boards
Coverings made from wet boards may have cracks and deformations. However, by ventilating the room during the “test period” you can obtain reliable coverage.
The work is done in two stages. The boards are laid on the joists, fitted tightly, without fixing with nails, without installing the last board, especially if it does not fit. When working with damp boards, you need to stock up on spare ones to replace the deformed one. This floor is left to dry, and after 10 months the damaged parts are replaced, adjusted, secured with nails, and varnished.
Dry boards
Dry board flooring is different. Each one is immediately nailed to the joists with 2 nails, the distance between which is equal to a third of the width of the board, driving the caps in completely.
The gap between the boards is left 1 mm. For a tight fit, use a 40 cm timber sawn diagonally. The resulting wedges are used to adjust the boards, resting on a bracket, which is driven shallowly (2 cm) along the joists.
The wedges are installed with saw cuts between the bracket and the board. They are tapped at the ends of the wedges, pressing the board tighter, then nailed.
tongue and groove board
Laying a wooden floor
A board with a locking joint is preferable for laying the floor, since there are no gaps between the elements. It is recommended to nail the boards at an angle so that the nail fits into the ridge, ensuring a reliable connection. To adjust the boards, use a block, which is placed under the side of the board and lightly hit on it until the ridge falls into the groove and the boards are tightly connected.
Last floor board
The last board is installed in a special way. Often it turns out wider, and the excess is cut off with a plane. To do this correctly, you need to calculate the extra part. To do this, measurements of the clearance along the wall are made in three places. Subtract 1-1.5 cm from the result obtained and remove a fragment of the board of this width. To press the last board with the flooring tightly, wedges are driven in between the wall and the board and tapped. The gap is closed with a plinth.
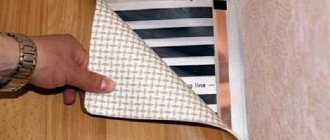
Laying insulation
Choosing insulation for a country floor can sometimes be difficult. After all, he must:
- be light;
- retains heat well;
- do not absorb moisture;
- Mice don't like it.
The insulation is laid close to the joists.
Common options - polystyrene foam and mineral wool - do not fully satisfy these requirements. The first serves as a home for mice and is not entirely harmless. The second tends to accumulate moisture, which spoils the wooden elements of the floor. There is an alternative to these materials. This is expanded clay, glass wool, wood concrete - here it is a fairly loose wet mixture of cement and old sawdust.
But no matter what kind of insulation is laid on the floor, the principle remains the same. A “pie” is formed, each layer of which serves a specific purpose.
- A membrane layer is laid on the subfloor to protect against steam from below.
- Insulation is placed tightly between the joists. All cracks in the insulation layer are carefully sealed, most often with construction foam. Check for a gap between the top edge of the joist and the top of the insulation; the insulation should lie slightly lower. If this condition is not met, additional bars will have to be placed on the joists.
- The entire floor overlaps the walls with a layer of vapor barrier to protect against steam penetrating from the room.
Laying wood concrete mixture
If everything is done exactly this way, the insulation will be carried out properly. The bottom membrane layer cannot be replaced
Ceramic tile
Tiles in the country are a popular material, because they can cover not only the floor, but also the walls of bathrooms, kitchens, garages, etc. This is one of the most durable and undemanding materials, because there are only two threats to tiles: a powerful blow that will make it crack, or a fungus that loves such surfaces.
Ceramic tiles are made from environmentally friendly materials and also have various design solutions, including patterns that you can assemble like a puzzle.
Installing tiles requires some skill, but even a beginner can handle it with practice.
Common Mistakes
- Poor preparation of the soil or sand and gravel cushion - if the layers are not compacted well enough, the concrete floor will be weak and may even deform the finishing floor covering.
- Poor quality of fillers - if the gravel or sand is not washed, the floor will be weak even if high-quality cement is used in large volumes.
- Incorrect reinforcement - if the mesh or reinforcement is laid directly on the base, the frame will not fulfill its task. It increases the strength of the structure and ensures that the floor and the finishing layer of laminate or linoleum laid on it will not sag, only if it is completely filled with screed on all sides.
- Failure to comply with technology, saving on materials - all this leads to deterioration in performance characteristics and a decrease in the service life of the concrete floor.
It is quite possible to pour a concrete floor over the ground in a private house with your own hands. By paying attention to all the important points and strictly following the technology, working with high-quality materials, you can create a strong, durable and reliable floor.
Tools and materials
Filling the floor with your own hands requires careful preparation. To avoid the need to interrupt the work process and go to hardware stores in search of missing materials, it is recommended to make a list of the necessary devices and materials in advance. When compiling it, it would be correct to be guided by the recommendations presented below.
Instrumentation that will be required during the work:
Tools for pouring concrete floor
Tools include:
Pouring a floor in a private house requires the following materials:
To properly pour the floor, you need to choose good concrete. There are two options for the development of events: purchasing a ready-made mixture at a factory or preparing it yourself.
To purchase from the manufacturer, it is enough to know the strength class of concrete.
Table of mortar proportions for screed
For screeding there is no need to use high-class concrete; a mixture of class B12.5 - B15 will suffice. This is true if you are pouring the floor yourself for a residential building where the loads are not very large. It is possible to make a rough layer from a more durable material, but this is not economically profitable; the use of lower classes is not recommended.
If you decide to prepare the concrete solution yourself, then you need to familiarize yourself with its proportions.
The main components of a cement-sand screed:
If the concrete floor is thick and high loads are expected on it, then crushed stone or gravel is added to this composition.
Laminate
As you can see in the photo, laminate flooring has an excellent appearance, and you can choose its design to match the style of your dacha. Laminate is a demanding material, so think carefully before using it in your country house.
The main disadvantage of laminate is that it does not withstand moisture at all, which is inherent in most dachas. If you still decide to use it, then buy moisture-resistant samples, because this will reduce the risk of deformation of the material (read: “Which laminate to choose for a summer house and how to lay it”).
Also remember that you will have to lay plywood or chipboard under the laminate to level the floor. The base of the floor must be rigid, otherwise the laminate will “walk” and the locks connecting the slats will quickly become unusable.
Speaking of advantages, it is worth noting the longevity of the material: laminate will retain its original appearance for up to 10 years, unless you spoil it yourself. This flooring also stands out for its environmental friendliness, because no chemicals are used in its production. The slats make it difficult for fungus to form and do not need to be treated with antiseptics, but its substrate (plywood or chipboard) should be further treated.
Device technology
You should start working only after all supporting structures have been installed: walls, ceilings, roofing. It is important to correctly determine the design of the pie before starting work. It may differ for different cases. There are three options for the location of the concrete screed:
In the first and last cases, it is necessary to lay heat-insulating materials, the layer thickness of which is calculated according to the requirements of heating engineering. In the second case, thermal insulators can be laid for noise insulation reasons, since concrete does not prevent the spread of noise well.
Work order
If the floor is poured onto the ground, then the order of work is as follows:
Scheme of pouring concrete on the floor
If you plan to create a heated floor system, then the pipes should be laid before the floor is made, immediately after reinforcement.
The procedure for interfloor, basement and attic floors looks approximately the same as pouring onto the ground, but compacting the base and laying bedding is excluded.