- Primer characteristics
- Primer for painting
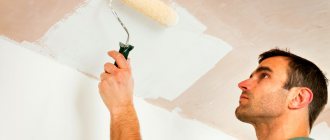
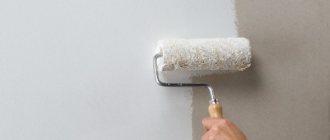
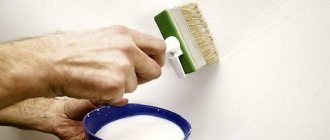
- Application of primer
- Types of primer for metal
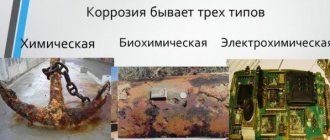
In the modern world, there are a large number of materials that are used to protect against corrosion. They cover the metal surface with a thin layer of film, which prevents iron and other types of metals from oxidizing. Many types of anti-corrosion agents are applied immediately before paint coatings. One of these products is metal primer.
Alkyd primer
This type of primer is intended for coating with alkyd enamels and is used somewhat less frequently, which is also due to a longer drying time. It has a low cost and forms a durable coating that is resistant to the adverse effects of external factors, including chemicals.
Alkyd primers are one-component products, so their drying time depends solely on the evaporation of the solvent. However, one negative feature can be noted: the solvent quickly evaporates from the surface of the freshly applied layer, forming a film that prevents the deeper layers from drying. This significantly increases the drying time and, accordingly, lengthens the entire working process.
As in the previous case, drying time can be significantly reduced by using a spray booth with a fairly high temperature - about 110 degrees. In this case, drying will occur in about an hour, while when drying under natural conditions this process can last from several days to a week. And in particularly unfavorable conditions, for example in a cold room with high humidity, the drying time may increase even more.
Primers for plastic
Plastic elements have special characteristics, so special primers are used for them that are capable of strong adhesion to a smooth surface. A regular primer will not be able to cope with this task, so it is not used for plastic car parts.
Primers for plastic can be produced both in the form of two-component products and in a completely ready-to-use aerosol form in convenient compact cans. When determining the drying time in this case, you need to rely on the manufacturer’s recommendations indicated on the packaging. Usually such products have a short drying time.
Anti-corrosion primers
These are highly specialized products that are usually applied before the main primer. They are two-component formulations or are available in aerosol cans and are applied in two layers. When determining the drying time, it is necessary to rely on the manufacturer's recommendations, since such products can differ significantly from each other in composition. Most often, before applying the second layer, intermediate drying is required for five minutes, and complete drying takes about one and a half hours.
Epoxy primers
Epoxy primers can be either one-component or two-component, which allows you to choose the most suitable option for use in a particular situation. They are distinguished by excellent performance characteristics: they have high adhesive properties, provide excellent surface protection from adverse external factors and prevent the occurrence and development of corrosion.
With natural drying, drying occurs within four hours, and when using a drying chamber, you can begin the next stage of work in 45 minutes.
Tips and recommendations for use
- Don't buy the first priming mixture you come across. To make the right choice, you need to carefully study all the characteristics of the metal.
- In some cases, for better protection, it is recommended to apply a layer of moisture-proof coating. As a rule, this is done when using a frost-resistant composition that is used to treat objects located in the fresh air.
- Stick to the temperature regime. Regardless of the selected primer, it must be applied at temperatures from -10 to +27 degrees Celsius.
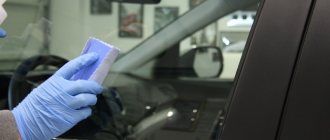
- Despite the specifics of priming, carry out the work wearing personal protective equipment. Take care in advance about purchasing glasses, a respirator and gloves. Wearing protective equipment is extremely important when using a sprayer.
- Observe the operating conditions of the soil, do not use it after its expiration date.
Solving problems that arise during the application of primer and paint
Before deciding whether to apply a primer to the ceiling surface yourself, a thorough study of the paint composition is required. This will determine the degree of compatibility of the primer and paint.
In general, problems of various kinds can be avoided by using a coloring composition and primer from one manufacturer. In this case, it is possible to guarantee the compatibility of materials and completely eliminate their conflict with each other.
The next problem is the appearance of stains on certain areas of the surface. Most often, this situation arises when work is performed by a master without skills and experience. The reason for the formation of streaks on the ceiling after water-based paint has dried is the following:
- The paint composition used was too thick, resulting in excess paint on the roller forming streaks on the ceiling. To prevent this phenomenon, it is recommended to use formulations of a certain consistency. In most cases, the manufacturer indicates on the paint package the optimal proportions for a certain type of surface.
- There was too much paint on the roller, resulting in an uneven layer. To avoid this situation, after each dip, you need to roll the roller along the ribbed shelf of the bath and remove excess paint.
Very often, during the operation of a painted surface, paint peeling or fading is observed. The main reason for such phenomena is poor preparation of the ceiling surface. Neglecting the steps of cleaning the surface from dust and stains of various origins, or incorrect application of primer leads to peeling of the paint composition and subsequent shedding. Therefore, the answer to the question whether it is necessary to prime the ceiling should always be positive.
Required tools and materials
Having chosen a primer suitable for metal processing, you need to take into account all its features and select the appropriate tool that will be needed to apply the composition:
- A spray gun will help to coat a metal surface with a large area of paint with a liquid solution. This device is indispensable when working with large iron objects.
- The use of a roller is possible for any type of primer mixture.
- It is not advisable to use a brush as an independent tool - it significantly increases the consumption of material. It is worth giving preference when applying primer in hard-to-reach places.
Attention! Today it is possible to purchase soil in cans. The aerosol composition is very convenient to apply, since it does not require additional tools for work.
Where to start bodywork?
The first stage is to thoroughly clean the surface on which the future putty will be applied. This is a very labor-intensive process, especially if you are working with body corrosion. The market today offers a lot of different types of putty mixtures.
When removing all protruding defects, be careful that the putty is applied to a perfectly cleaned surface without dust. Therefore, after cleaning, the surface of the part is washed and dried.
When the preliminary work is completed, you can immediately see all the defects that need to be repaired. Experienced repairmen can determine “by eye” how much putty will be needed for the job.
If you are a beginner, it is better to follow the instructions included with the mixture. It specifies the proportions necessary for diluting the mixture.
Before as…
Before you start priming, do not forget to cover the “non-working” parts of the body with masking tape and film (or paper). Unless, of course, you want to spend a long time and painfully scrubbing the glass, handles or moldings off the ground.
If you are priming partially, when masking, do not paste it too close to the repair area in order to avoid applying the primer “end-to-end” - otherwise a step will form, which may eventually be visible even on the paint. You can read more about camouflage here.
When you degrease the surface before priming, remember that the putty cannot be heavily wetted with a degreaser, as it absorbs and retains moisture for a long time. Therefore, it is enough to lightly walk over it with a dampened napkin.
How to properly prime before painting a car
Primer is a mandatory step before painting a car. On the Kuzov Lab channel, Pavel Nikiforov will tell you how to apply primer correctly to avoid mistakes and get an excellent result.
Secrets of the craft: priming the car correctly
We offer step-by-step instructions from our specialist - a simple and understandable video.
We’ll reveal all the secrets and show you in practice how to properly prime a car before painting. At the same time, we will test the new Europroject Trading primer SOLID 500.
As an example, let’s take a wonderful repaired car part, puttied with materials from the SOLID digital line.
1. Repaired auto part for priming
Let's get to work.
Initial stage
We completed the preparation of our sample at P150 gradation. The material is to be applied at 240 strokes. We will prime the part locally. We will treat the peripheral area at the border of the primer with P320 abrasive. Please note: if you have areas of bare metal, they must be covered with primary adhesive primer: acid, epoxy, or simply apply primer in a can.
We carry out grinding. It is first necessary to apply a dry developing coating in order not to miss unnecessary marks and to check defects.
2. Apply dry development coating
We start sanding from the side of the old paintwork. We will treat corners, edges and various hard-to-reach places of the car with abrasive on a soft backing.
Prime without mistakes: technology inside
The most common mistake at the car priming stage is the desire to prime more in the repair area. This method is called "priming out" - and it is the wrong approach.
We will explain and demonstrate how to properly prime a car “inside” when painting locally.
First, spray the areas of bare metal from a spray can and let it dry for 10-15 minutes. Next, apply 3 layers of primer-filler.
Correct order of execution, inward priming technology:
4. Apply the first layer of primer
- Cover the entire area of the part being repaired with the first thin layer. Leave until completely matte for 10-15 minutes.
- Apply the second layer slightly lower than the first, moving inward. It's drying out faster.
- Apply the third layer directly to the repair areas.
- All you have to do is wait for the third layer to matte. During this time we will have time to wash the spray gun. Then we install infrared drying.
5. Install infrared drying.
The primed area of the car is completely dry. Before we start sanding, remove the masking and evaluate the result. The transition boundary turned out to be very smooth, without a hard cutoff. Everything is correct. Exactly the way it should be.
6. Ground transition boundary
The final stage is sanding
Let's start sanding. Don’t forget to apply a dry development coating - we control the repair areas. To perform the manipulation, we take abrasive material P240 and a hand plane.
7. Take 240 grit and a hand plane
The task is to level the place where we applied the putty.
So, the auto repair area has been polished.
8. Repair area sanded
There is no need to completely sand the entire primed area with 240 grit. We take a grinding machine and a 320th wheel. But first, at risk 240, we will also apply a developing coating.
With the 320th circle on an eccentric machine we level the main plane. We do not use a soft substrate.
9. We work 320 circles on an eccentric machine
Please note: we first processed the periphery zone with 320 gradation. And now we also perform grinding using P320. This is important and correct: the same risks under and on the ground help to avoid defects in the process of painting a car.
10. We process the periphery zone with 320 gradation
The ground has been completely leveled. We begin to prepare the entire surface for painting. The color of the car is light, so we will paint it at 500 gradation. Before grinding, according to the algorithm, a developing dry coating is applied to control the smallest defects. Before final processing with P500 gradation, we install a soft spacer so as not to rub the edges. We process hard-to-reach places and edges of the car manually with a soft abrasive.
11. Soft-based abrasive for processing hard-to-reach areas
And here is the result: the part is already ready for painting, all that remains is to blow it with air.
What determines the drying time of a car primer?
Accidents, scratches while parking, or suddenly appearing pockets of corrosion force car enthusiasts to restore body parts. The painting procedure involves a preliminary preparation stage, during which the surface is leveled and coated with a special composition.
The primer dries before painting the car in different ways, this is influenced by several factors:
- type of product;
- density and number of layers applied;
- features of the atmosphere in the room where work takes place, air humidity.
A special chamber where a high temperature is maintained helps speed up the process.
It is worth determining in advance how long it will take to apply paint after priming the car. To make sure you don’t make a mistake, it is advisable to postpone the next stage for at least a day.
How long does GF 021 metal primer take to dry?
Dries quickly
: Drying time to degree 3 at temperature: (20±2) °C – 1 hour; quick set of coating strength - 2 hours; The soil film can withstand temperatures from -45°C to +60°C.
Interesting materials:
How to connect AUX to an old stereo? How to connect car speakers to a TV? How to connect a car DVR to a computer? How to connect baseus to iPhone? How to connect BBK home theater? How to connect a gasoline generator to your home? How to connect free digital television 20 channels? How to connect free 20 digital channels? How to connect free TV channels? How to connect a wireless active subwoofer?