Only high-quality preparation of surfaces for applying plaster allows you to ultimately obtain the desired result. Most of the time is spent working with deformed old walls, on which a thick layer of old plaster remains. Even if the master plans to use plasterboard slabs, the surface of the brickwork or concrete base still needs to be properly prepared. You cannot neglect the basic recommendations of specialists, since the quality and durability of the finish depends on this.
Professional training
Main stages
The master must follow some recommendations in order to ultimately achieve maximum adhesion of the prepared solution to the base. The durability of the plastered wall, as well as the aesthetic appeal of the final finish, depends on the quality of preparation. The structure must be perfectly level at any angle.
The specificity of the work depends on what material the structure is built from. You must be prepared for the fact that you will have to check the plane of the wall with a special level. Beacons must be installed before applying plaster. All equipment and mixtures should be prepared in advance.
Preparation process
Which plaster is most suitable for the job?
In fact, you cannot choose plaster at random. You need to take into account a number of factors.
The choice of finishing material depends on:
- the material on which the plaster is applied;
- purpose (basic or final);
- how uneven the leveling surface is;
- strength;
- level of complexity of plastering work.
Important! If a beginner gets down to business, it is better to choose options that stick to the base better. Experienced plasterers recommend a plaster finish.
Required Tools
To efficiently solve all the tasks, you need to purchase the following devices:
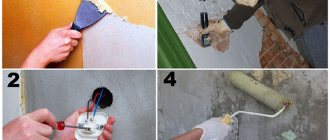
- Putty knife. It is useful for applying stone-like plaster, as well as for faster removal of old finishing material.
- Steel brush. Helps remove large dirt from the wall before plastering.
- Scraper. Relevant in situations where there is a need to remove problem areas of the old finish.
- Paint brush. Used for applying primer.
- Hammer. Ideal for tapping old plaster and knocking down finishes.
- Construction guides or beacons. Without these devices it is difficult to create a perfectly even coating.
- A small container for preparing a working solution.
- Construction mixer. This unit is designed for mixing the mixture. If you don't have a mixer, you can use the attachment of an electric drill.
- Trowel. The ideal tool for mixing, applying and then leveling the solution.
- Small grater. Used by craftsmen to give the surface an aesthetically attractive appearance.
- Rule. The tool is designed to check the evenness of the base and the alignment of corners.
- Half-grater. A universal device for applying and then rubbing plaster.
Important! To make it convenient to apply the solution, you should use a small shield made of wood or metal.
Basic set
What is needed for preparation
Preparing walls for decorative plaster requires the following tools and consumables:
Tools necessary for preparing walls for decorative plaster
- spatulas;
- building level and plumb line;
- sandpaper, sanding machine with polishing and cutting wheels;
- paint brush;
- drill with impact function (the hammer drill is too heavy and powerful for this work);
- plastic film, masking tape or tape;
- sponges and rags;
- screwdrivers;
- mixer attachment;
- mixing container;
- putty;
- solvent;
- primer.
A spray bottle may also be required. If the walls were previously covered with wallpaper, then they may have to be soaked using this product.
Removing old plaster
Depending on the situation, experts practice using one of two options for solving this problem:
- The plaster is completely removed.
- Only those areas that do not hold up well are dismantled. Peeled fragments can be identified by tapping with a hammer. A specific sound indicates a loss of traction.
The second option is used most often. But there is no guarantee that a particular property will be able to fall into this category. That is why it is better to remove the plaster completely immediately. This process is very labor-intensive and takes a lot of free time. For work you will need the following tools: a small chisel, a hammer, a wide brush, several spatulas of different sizes.
Important! To quickly dismantle a dubious coating, you can use a hammer drill with a chisel, but this option is only relevant for concrete and brick walls. When working with aerated concrete, a drill with an impact function is useful. The final cleaning of the walls is carried out with a metal brush.
Professionals use a grinder with an attachment made in the form of metal bristles. Buy special bags in advance for cleaning broken pieces of plaster. At the initial stage, the room must be de-energized to avoid a short circuit. When working with power tools, it is best to use an extension cord.
Dismantling the old coating
A thick layer of plaster can be removed with a spatula. To do this, the blade of the tool is inserted under the loose crust and knocked down with a hammer. The easiest way to remove a thin ball of plaster is to first moisten it with water using a paint brush. Moistening is carried out until the surface is completely saturated with moisture. Instead of water, you can use an electric drill with a brush. But in this case, you need to be prepared for the fact that there will be too much dust that freely penetrates into all the cracks.
If global repair work is ahead, then you can use a grinding machine and a construction vacuum cleaner. But these units are expensive and are not suitable for household work. In all other situations, you can cope with the assigned tasks using a chisel, hammer and hammer drill.
Important! In the same way, remove plaster from the facade of a building to apply a decorative layer with your own hands.
A universal unit for large-scale work
Plaster removal tool: which one to choose?
When starting work, you need to prepare the necessary tools, the number and name of which will depend on the degree of complexity of dismantling. In order to remove the plaster coating, you will need:
- safety glasses and respirator;
- rubber or canvas gloves;
- an ax/hammer/small sledgehammer for beating old plaster;
- chisel, preferably with a long handle;
- scraper/spatula;
- metal brush for cleaning cracks;
- machine for removing old plaster/perforator/grinder;
- garden sprayer/bucket with a wide brush;
- shovel, brush, broom, polypropylene garbage bags.
An effective method for removing unwanted wallpaper
If the walls were taped more than seven years ago, then tools with a sharp blade will do. Old canvases often separate on their own due to time and dampness. It is necessary to find swollen areas in order to pry them off with the edge of a spatula or a sharp knife. It is better not to pull paper wallpaper, as it becomes dilapidated. Fragments that have become embedded in the plaster are pryed off with a wide-based spatula. For more effective cleaning, you can use a water spray bottle and a sander.
Attention! It doesn't take much effort to remove the old finish. The base crumbles badly, leaving dents and holes. For this reason, the master has to spend additional time and solution to level the walls.
Wallpaper glue can be steamed with an iron. To work, you need to prepare a thin towel or sheet and a bucket of clean water. The action diagram looks like this:
- The towel is generously moistened with liquid, carefully twisted and applied to the wall.
- Turn on the iron at maximum power.
- Iron the towel several times with a hot iron.
- Quickly remove the fabric and remove sticky residue with a spatula.
You can soften the paper web using a steam cleaner. This device does an excellent job of removing wallpaper residues. Use a steam cleaner to iron problem areas, after placing a clean and dry sheet. If you do not use a cloth, then dust and dirt will get into the internal compartment of the unit, which can cause breakdown.
Since the hot layer penetrates into the deep pores of the putty, the cleaned surfaces must be dried naturally for several days. Only after this can primer and paint be applied. Otherwise, spots of black mold will form on the wall.
Efficiency of regular water
The need to prepare the surface for finishing
Preparing the base is just as important as applying the plaster. How well the surface is pre-treated determines how long the finish will last. Otherwise, the following problems will occur:
- The solution does not adhere well to the wall. Even at the application stage, the composition does not adhere well to the surface, which means that the duration of the work increases.
- The appearance of small cracks. The reason is incompatibility of the composition with the base or poor adhesion.
- Peeling plaster. The solution was applied in too thick a layer and beacons and reinforced mesh were not used.
If the first and second problems can be dealt with without redoing the façade. To solve the third problem, it is necessary to plaster the outside walls again, which means spending even more money. Therefore, by properly preparing the foundation, you can protect your home from unnecessary problems.
Removing paint marks
Professionals actively use a chemical method, which involves applying a special remover to the base. The technology itself is quite simple and is described in detail in the attached instructions. The master only needs to apply a thin layer of the solution to the paint. After a few hours, the chemical will begin to take effect. At the final stage, you just need to carefully tear off the semi-soft substance. But even this method has its own characteristic disadvantages:
- The product has an unpleasant odor.
- High price.
- If the paintwork was applied in several layers, then the washing process will have to be repeated many times.
All manipulations with chemicals should be performed only with full equipment: glasses, respirator, gloves.
Removing paint from a concrete structure
The mechanical method is safer for health. The first step is to apply sharpening marks with an ax onto the previously painted surface. After which the wall is generously moistened with water. The moisture should saturate the base within 5 minutes. You can easily remove all the paint with a chisel or spatula. It is advisable to have sandpaper on hand, which can be used to quickly and efficiently sharpen a dull unit.
Illustrative examples are presented in the video:
Expert advice
Preparing walls for plastering should be carried out taking into account the following nuances.
Before starting work, it is recommended to cover the floor surface, windows and furniture with plastic film. The ceiling area near the wall and baseboards must be sealed with masking tape. For each layer of putty, it is necessary to allow at least 48 hours for complete drying, and it is forbidden to use heaters or hair dryers to speed up the process. Otherwise, the surface may crack.
Wall repair
Every centimeter of surface should be inspected for defects. They may have cracks of different diameters, chips, or damage to masonry joints. Problem areas must be eliminated. Loose bricks in the masonry must be removed, and all the cement on top and sides must be carefully beaten off. Re-fixation is carried out using polyurethane foam or cement-sand mortar.
Small cracks should be expanded, and large cracks should be reinforced with self-tapping screws. At the next stage, treatment is carried out with multifunctional “cement laitance”. During standard priming, the edges of the cracks are fixed, which prevents their further destruction and also ensures adhesion. At the final stage, a repair solution is applied.
Creating a perfectly level base
Why do you need to plaster the walls in your apartment?
It will not be a secret for any builder that plaster solves many problems:
- strengthening the brick covering;
- provides protective properties against moisture and air for concrete coatings;
- prevents the appearance of wall fungus;
- does not allow the wood to lose its presentable appearance: become damp, crack, rot;
- helps to level and eliminate defects on walls and ceilings;
- has the ability to absorb noise;
- helps create a comfortable microclimate in the apartment;
- performs the function of additional insulation;
- prevents wood fire;
- has protective functions against external negative influences;
- facilitates subsequent work on the walls: gluing wallpaper, laying tiles.
Thus, plaster greatly facilitates the work of builders and repairmen. It also allows you to preserve the quality and attractive appearance of your home for as long as possible.
Anti-pollution
All traces of greasy oil, soot and paint negatively affect the adhesion of the plaster. That is why you need to get rid of contaminants. Classic dust and dirt are removed with a wire brush. Oily clay removes traces of oil perfectly. It covers all dirt and allows it to dry. You can remove the resulting crust using a spatula. In wooden structures, oily stains must be cut out, since after some time they will inevitably protrude and destroy the plaster.
If you can’t get rid of stains with clay, then you can use a 3% hydrochloric acid solution. After such cleaning, the walls must be washed with clean water several times. Brickwork can also be cut out with a chisel and hammer. To fill cavities, craftsmen prefer to prepare a cement solution. Surfaces can be plastered only after all basic manipulations have been completed.
Installation of beacons
Previous measures to prepare walls for plastering may be ineffective if this stage is not performed correctly. Key notes and tips on the issue:
- Beacon pitch recommended for beginners: 0.8-1.3 m;
- distance from door and window openings: 0.1-0.15 m;
- metal beacons are removed after the composition has set, all others remain;
- wooden ones are not recommended in rooms with high humidity;
- plastic ones are easily deformed, so they are relatively difficult to install.
Algorithm of actions when placing beacons:
- Perform markup.
- Set guidelines for the outer beacons.
- Create an auxiliary strictly vertical plane using laces and a level.
- Determine the level of deviation of the wall from the auxiliary plane.
- Correct the auxiliary plane.
- Set the extreme profiles.
- Install intermediate beacons.
To perform installation, you may need metal scissors, a plumb bob, a marker, a hammer drill, a screwdriver, and pliers.
Remove the previous layer, clean, degrease, install reinforcing tape and beacons - this is how you need to prepare the walls for plastering. Additional steps will be required for some types of partitions. The metal structure is roughened, and notches are made on the brick or concrete structure.
Ensuring maximum adhesion
The master needs to resolve all issues about creating optimal conditions for excellent adhesion of the plaster solution to a certain surface. Each wall has its own adhesive properties, which is why certain technological standards must be observed. A metal mesh is attached to concrete structures, which provides optimal adhesion. To do this, using a hammer and chisel, you should make small notches 6 mm deep and 8 cm long. After this, apply a primer with a small brush or textured roller. Due to this, several important issues can be resolved at once:
- After hardening, a film is formed, which is a specific adhesive element between the plaster and concrete.
- The wall is saturated with moisture as much as possible and does not draw it out of the finishing coating.
Important! If the structure is built from different materials, then it is imperative to fix the plaster mesh. Fastening to wood is carried out with nails; for concrete, stone and brick, dowels with self-tapping screws are chosen.
Primer coating
Requirements for walls intended for plastering
The primary factor determining the further quality of the plaster is its strong adhesion to the working surface. If there is insufficient adhesion or the wrong working solution, unfortunately, the plaster simply peels off from the surface of the walls and falls off. In order to ensure proper adhesion of the plaster mortar to the surface, the working surface must be carefully prepared. Therefore, the surface is cleaned of dust, oil or dirty stains and roughened. These are the basic requirements that are presented for subsequent plastering of apartment walls with your own hands.
Plastering can be done on the following surfaces:
• stone
• brick
• concrete
• slag concrete
• wooden.
However, each work surface requires different wall preparation.
Surface priming
For better adhesion of the plaster, the walls are first coated with a layer of primer. The primer, penetrating into the wall material, strengthens the delaminating areas of the surface material, while improving moisture repellency. Thanks to the primer layer, the material applied over it is absorbed evenly and improves adhesion to all subsequent layers.
Initially, the surface is treated with a primer primer. The primer is chosen depending on the type of walls. Water-repellent primers are used to prime bathroom surfaces.
Wall surfaces are primed using a roller or brush. For surfaces that absorb moisture well, the primer is applied in two layers.
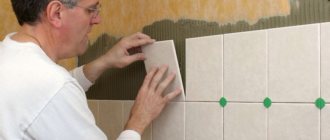
Test application of plaster
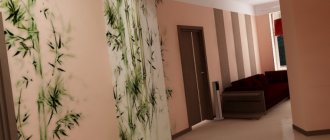
Professionals with many years of experience can skip this step, but inexperienced people are strongly advised to do a trial application. To do this, you need to select a small section of the wall closer to the corners or use a sheet of plasterboard that has been previously finished in the same way as the surface of the walls. After the test layer has dried, you need to evaluate the quality of the resulting surface, its texture and color. If everything suits you, you can safely start plastering.
Test application of decorative plaster allows you to evaluate its texture and color
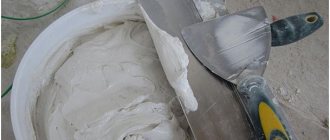
Preparation of material and its consumption
The modern construction market offers customers ready-made mixtures in plastic containers and dry powdery substances that must be diluted with water. In the first case, it is enough to simply open the container and mix the composition with improvised means (a long screwdriver, a wooden plank, and so on). In the second, you must first study the instructions provided by the manufacturer, and then prepare the solution in the required proportions. To do this, you will need a mixing container and an electric drill with a mixer attachment.
Preparing a solution of decorative plaster with a mixer
Consumption of main types of decorative plaster:
- Structural compositions - approximately 3 kg of material per square meter of surface.
- Textured plasters - on average 1.5 kg per square meter.
- Venetian plaster - about 150 g per square meter. meter for one layer, the total consumption must be calculated based on the number of layers.
The above data is approximate. Actual consumption depends on application method and desired result.
Preparatory work is both a simple and important part of finishing. In order for the stage of preparing the surface for plastering to be successful, and for the coating to last for many years, it is necessary to follow the above instructions and the recommendations of the manufacturers.
How does the process differ for interior and exterior walls?
External plastering of brick walls is somewhat different from working inside a building. Professionals highlight the following differences in external processing:
- For external work, it is optimal to use a sand-cement composition;
- Requires mesh installation;
- In front of the beacons, plastic corners are placed on the corners, partitions of windows and doors;
- The thickness should not be more than 15 mm;
- Before the coating stage, two coats of primer are applied.
For exterior work, it is optimal to use a sand-cement composition.
Plastering brickwork allows you to get a smooth surface to finish the walls with any material. If desired, the work can be carried out independently; special attention is paid to preparation; three layers of plaster are applied and the surface is rubbed until smooth.
Plastering technology
High-quality wall finishing can be achieved by following the work production technology and using plaster compositions that are most suitable for the structures being finished.
1.Marking
Inspect the surface of the walls using a long rule and a level.
Applying a long rule to the walls at different angles, find all the bumps and depressions and mark them with a marker.
If the walls are fairly smooth, you can plaster them using the rule, without beacons.
For large differences and unevenness, it is necessary to install beacons.
Figure 7. Marking walls for installation of beacons.
Start marking the beacons from the corner with the door. Stepping back from the corner 20-30 centimeters, draw a vertical line.
Draw the next line in the opposite corner. We draw intermediate lines of beacons in increments of 130-160 centimeters.
At a distance of 15 centimeters from the floor and ceiling, we drill holes in the outer lines and install dowels with self-tapping screws.
From the top screw, using a plumb line or a laser level, we adjust the vertical installation of the bottom screw.
We stretch the cords horizontally between the screws from below and above.
To control the correct installation of the beacons, we pull the diagonal cords. Beacon profiles must pass under them freely.
2. Reinforcement of plaster
If it is necessary to apply a thick layer of plaster, when plastering on facing bricks, monolithic or cellular concrete, the plaster must be reinforced with reinforcing mesh.
A plaster layer up to three centimeters thick can be reinforced with a mesh made of fiberglass or polymers.
If it is necessary to apply a thicker layer, it is necessary to use a metal mesh made from galvanized wire welded together or a chain-link mesh.
Figure 8. Fastening the reinforcing mesh under the plaster.
We fix the polymer mesh onto the first plaster layer. We fix the metal mesh with dowels and mounting tape.
3.Installation of beacons
To apply a perfectly even layer of plaster, it is necessary to install guide beacons.
For these purposes, you can use a metal profile installed on the screw heads and fixed to a gypsum mortar, strips of gypsum mixture or beacons made of high-strength plastic.
We place the beacons in increments of 1 - 1.5 meters, so that the leveling rule follows two adjacent profiles.
After plastering the wall, we remove the beacons, seal the seams with mortar and rub down.
We control the verticality of the profiles using a plumb line and a building level.
Figure 9. Installation of beacons.
A flat wall can be plastered without metal beacons, using plaster guides. To do this, we install dowel screws on the wall level. We place a galvanized steel profile or wooden strip on the screw heads. We place a plaster solution under it and press it with a lath.
We check the evenness of the installed beacon using a long rule and a level. By cutting off the excess plaster, removing the screws from the wall and removing the slats, we get even strips of plaster that will serve as beacons.
We do the rest of the guides in the same way.
4. Preparation of the solution
The construction market offers a large assortment of dry construction mixtures for preparing plaster solutions, with detailed instructions on the packaging. But such a solution will cost much more than one made with your own hands from individual components.
By following the recipes for plaster solutions and observing the exact dosage, it is not difficult to make them yourself.
Table 1. Ratio of solution components
| Solution | Compound | Ratio of components in parts | ||
| spray | priming | cover | ||
| lime | Lime and sand | 1:2,5 – 1:4 | 1:2 – 1:3 | 1:2 |
| Cement | Cement and sand | 1:3 | 1:3 | 1:2 |
| Cement-lime | Cement, lime and sand | 1:1:5 | 0,7:1:3 | 1:1:4 |
| Gypsum-lime | Lime, gypsum, sand | 1: 1:3 | 1:1,5:2 | 1:1,5:1 |
| Clay | Clay and sand | 1:3 | 1:3 | 1:3 |
Lime mortar is used to level brick walls of dry heated buildings.
Cement - for plastering internal and external walls made of brick, concrete and aerated concrete in buildings with varying humidity and any operating conditions.
Cement-lime is suitable for plastering interior walls made of brick, concrete and aerated concrete.
Gypsum mixtures are much more expensive than other analogues and are used for repair work, pulling out cornices, making decorative interior elements and plastering walls on concrete and brick in dry rooms.
Clay mortar is used for plastering stoves, fireplaces, and wooden structures over shingles.
Important!
The thicker the layer of plaster, the thicker the solution should be.
First pour water into the container, and then add the mixture according to the recipe.
Using a drill with a special attachment or a construction mixer, mix the mixture until it is homogeneous and plastic. Leave the solution for a few minutes and then stir again.
Figure 10. Mixing the solution using a mixer.
It is necessary to take into account the setting time of plaster solutions:
- the cement mortar must be used within one hour;
- plaster - in 25-30 minutes.
When choosing a mortar for leveling walls, it is necessary to take into account the advantages and disadvantages of mortar mixtures:
- gypsum and lime mortars are used only in dry rooms, cement mortars - in any;
- the permissible layer of cement mortar is no more than 20 millimeters, gypsum mortar can be applied in a layer of up to 50 millimeters;
- gypsum plaster, unlike cement plaster, can be polished to a gloss and does not require puttying;
- Gypsum plaster is not subject to shrinkage and cracking; it can be used to plaster concrete walls without prior reinforcement.
- cement plaster is stronger and more durable.
Following the rules for preparing the solution and choosing the right mixture will allow you to achieve a durable and strong base for any decorative finish.
5.Applying the solution
Plastering technology involves applying three layers to the wall: spray, primer and cover.
I recommend!
Thoroughly moisten the wall before plastering. If this is not done, the dry surface will draw moisture from the mortar and the plaster may crack before it has time to set.
The first layer, the spray, is made from a solution with a creamy consistency. We throw it on the wall using a trowel in any order. The solution applied in this way fills all cavities and voids.
Figure 11. Spray application.
Lightly level the first layer, removing protruding areas.
The thickness of the spray for concrete and brick walls should be no more than 5 millimeters. For wooden walls - 10 millimeters.
The second layer - apply the primer no earlier than a day after the spray has dried. The soil is the main layer, the thickness of which can reach three centimeters. We apply the solution with a wide spatula or throw it on with a trowel and pull it from bottom to top, using the rule, with zigzag movements along the beacons.
Figure 12. Leveling the soil layer using the rule.
The soil should completely cover the beacons, being on the same level with them. After the soil layer has dried, the beacons can be removed.
Important!
If you plan to cover the walls with ceramic tiles, the installed beacons do not need to be removed. When painting or wallpapering walls, the guides can show through the finish, so it is better to remove them, and fill the resulting voids with mortar and rub over them.
The third layer is a covering , 1.5-2 millimeters thick, applied after the previous layer has hardened. Prepare a solution with a creamy consistency from sifted components. Any large particles or debris can cause problems with the grout.
Figure 13. Leveling the cover.
A thin layer of the solution is applied to the pre-wetted surface and smoothed over the surface with wave-like movements using a trowel or wide spatula.
6. Grouting the plastered surface
Without waiting for the finishing layer to dry, we grout it in a counterclockwise circular motion with a wooden or plastic trowel.
The final sanding is done with a grater with felt or felt attached.
Figure 14. Grouting plaster.
Important!
When leveling walls in a bathroom or toilet under tiles, grouting is not necessary to ensure adhesion of the leveling layer to the adhesive.
After completion of the work, we obtain a surface completely ready for finishing.