The condition of the ceiling surface depends on many factors, but it is close to ideal only after recent repairs. In all other cases, there are defects on the ceiling - the most visible base of the room - that homeowners strive to eliminate as quickly and efficiently as possible.
The main criterion for the quality of ceilings is their evenness, if you do not take into account some original finishing methods, for example, wooden beams. Only on a leveled base or by hiding the defective surface under a masking shell can a decorative or, at least, classic finishing of this structural element of the room be performed. Let's look at several of the most common ways to level a ceiling with your own hands, depending on the significance of its defects.
Types of ceiling bases
In modern housing construction, the most common are beam or beamless reinforced concrete floors, which can be of the following design:
- monolithic;
- prefabricated;
- prefabricated monolithic.
There are other technological solutions - arched brick, hipped, wooden and other structures, but homeowners are much less likely to encounter the problem of leveling such foundations.
Monolithic floors are made by pouring concrete into formwork with reinforcement installed locally - in the interfloor plane.
Prefabricated roof structures are made from ready-made reinforced concrete slabs (hollow or monolithic), mounted end-to-end on beams or load-bearing walls.
Prefabricated monolithic floors are a relatively new technology that consists of installing hollow aerated concrete blocks end-to-end between beams, on top of which cement mortar is poured, connecting the structure into one whole.
Each method has both certain advantages and disadvantages, which must subsequently be neutralized.
Modifiers used
The tenacity and performance qualities of DSP can be improved using various modifiers added to solutions for cement and concrete screeds. The concentration for dry powders is regulated by the mass of added cement (from 2 to 10%), liquid additives are diluted with water in a ratio of 1:5 to 1:20 and a mixture for plastering is prepared using this solution.
The main effect of modifiers is to increase adhesion due to polymer adhesive components. It is also possible for air to be entrained, increasing plasticity and slowing down the release of water from the mixture. The latter is of key importance for plastering ceilings; adjusting the rate of cement hydration within 40–60 minutes will also be a useful property.
Ceiling defects
The degree to which it is necessary to level the ceilings after installing the floors depends on many factors, but even with an impeccable base, it is largely determined by the installation technology.
The ceiling surfaces of monolithic reinforced concrete coverings require the least correction - they are located in the same horizontal plane and have no joints.
The situation is different with prefabricated and prefabricated monolithic structures.
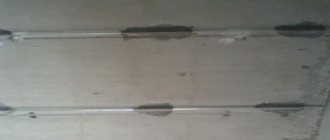
On prefabricated floors there are differences in the level of the slabs, which can also be located at some small angle to the horizontal. In addition, to mask such installation defects or cracks, builders often cut rustications along the seams, which eventually collapse and require repair or sealing.
The prefabricated monolithic floor structure has a flat surface of the ceiling base, on top of which plastering is performed to hide the joints of the blocks. But the difference in the materials used to make the blocks, the mounting mortar and the leveling composition causes cracking in the plaster.
Ceilings of any design require routine maintenance and repair, but the list and volumes of finishing work required may vary significantly depending on the types of defects that require a specific elimination technology.
The complex of finishing works to eliminate ceiling defects can be combined with the general definition of “leveling”, which, depending on the method of execution, will include certain operations.
Where do the irregularities come from?
Irregularities can arise due to slabs that lie one higher and the other lower, deep seams are formed at the joints, and the horizontal plane of the future ceiling is disrupted. This problem is relevant for residents of Khrushchev.
In modern houses, monolithic concrete is often used instead of floor slabs. But even in this case, defects arise: seams, concrete sagging in places where the formwork sheets are joined, the formation of “sinks” on the ceiling surface or horizontal slopes due to unevenly aligned boards.
If you do not level the ceiling, the defects will be noticeable, and further finishing will only worsen the flaws.
Methods for leveling ceiling surfaces
In essence, ceiling leveling methods can be divided into wet and dry. Wet includes leveling using various hardening mixtures, dry includes installation of plasterboard, suspended and suspended ceilings.
Wet and dry leveling methods, naturally, differ in the composition of the work required.
Generally speaking, wet leveling methods include:
- removal of poor quality or worn coating;
- sealing old or cutting new rustications;
- filling potholes and cracks;
- bringing the base of the ceilings into a single horizontal plane;
- final leveling of the surface.
Dry methods consist of the following basic operations:
- installation of the frame with leveling;
- ceiling installation.
Let's consider these methods, which are equally widely used when repairing ceilings.
Formation of beacons
Beacons help maintain a uniform level during plastering work. The installation step is usually made so that it is no more than the length of the rule (100 - 130 cm). Galvanized slats, wooden blocks or mortar can be used as beacons.
Before installation, the appropriate locations must be marked. For convenience, you can stretch strings in these places.
In the places where the beacons are attached, small piles of mortar are glued in increments of 30 cm. You need to use the composition of the mixture that will then be used to level the ceiling.
A galvanized profile or bars are glued onto the solution. You need to press in until the level of the beacon reaches the level of the mark.
If the solution itself serves as a beacon, then you need to lay it out in a long strip, and not pointwise. The correct installation is checked with a bubble level. This method is more difficult, since it is more difficult to form an even strip of solution.
Repair of ceilings using leveling mixtures
If the ceiling base is concrete, the height of the premises is around 2.5 meters, and there are no large differences in surface level, then the most rational method of repair would be to level the ceiling using special mixtures, since installing the frame will significantly reduce the height of the room.
Surface preparation
Preparatory work when repairing ceilings is especially important, since the force of gravity will constantly act on the leveling layers, aimed at breaking.
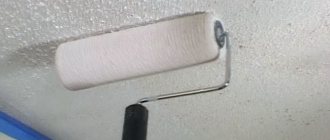
If the ceilings are finished with water-based paint, then it must be completely removed. The whitewash is moistened and soaked in water using a paint roller, after which it is easily removed with a narrow spatula.
If the finishing material is oil paint or enamel, then the amount of work to remove it depends on the condition of the base. If the ceilings are smooth, then the surface is tapped with a hammer, and the paint along with the plaster is removed only where the plaster solution has peeled off.
If there are differences in height or deviations from the horizontal of the slabs, when leveling mixtures have to be applied to them, the oil paint from the ceiling must be completely removed. This is done with a grinder with a steel dry-cutting disc - the paint layer is chipped off the surface along with part of the plaster; unevenness in the form of small convex areas can also be removed with a grinder.
Important! Work as a grinder (grinder) is performed in protective glasses and a respirator.
The joints between the slabs are also cleared of fillers - damaged rustications are knocked down manually with a chisel and hammer.
After removing construction waste, the room is ventilated and treated with a vacuum cleaner, and then the ceilings are primed with a ready-made hydrophobic primer or a self-prepared aqueous solution of latex in a ratio of 1:4. In this case, it is convenient to coat with a primer using a spray gun.
After a day, the surface is ready for the application of leveling mixtures.
List of required tools and materials
You will need:
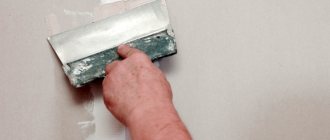
- Spatulas of different sizes. These tools are convenient for removing old ceiling coverings, as well as applying mixtures.
- Drill with mixer attachment.
- Plates that will be used for grinding.
- Malka for mixing plaster.
- Maklovitsa and roller.
- Painting cord that allows you to mark a control line.
- Rules 2 and 3 meters long.
- Plaster or putty.
To ensure safety, it is important to have reliable mobile ladders and platforms.
How to level a defective concrete ceiling?
Leveling the ceiling with your own hands begins with sealing the rust. The gaps in the joints of the slabs are filled to the maximum depth with polyurethane foam, the excess of which, after curing, is cut off with a stationery knife, going 2-3 cm into the seam. A layer of basic cement-based leveling mixture is applied over the cut of the polyurethane foam. If the ceiling plane is flat and has no differences, then after the composition has cured in the sealed rusts, the ceiling is waterproofed, and then the finishing putty is applied with a gypsum-based composition, preferably with preliminary reinforcement over the seams with sickle tape.
The number of layers depends on the skill of the performer; usually two layers are applied - the second after the first has cured. Then the surface is sanded, cleaned of dust with a vacuum cleaner and coated with a primer.
If the ceiling slabs have differences in height, then the amount of leveling work increases significantly. In this case, the range of the magnitude of the differences is important, since the solution to the question of what exactly and what mixture to level the ceiling with depends on it.
You need to proceed from the fact that leveling ceilings using the wet method is carried out with differences in height up to 50 mm - a layer of plaster of even less thickness, made with violations of technology, poses a danger to life if it peels off and collapses.
Plastering ceilings with cement-sand mortar requires professional skills - applying freshly prepared mortar to the ceiling base and fixing it to it is difficult, and the slightest deviation from the recipe or the correct execution technique leads to the mixture falling. Therefore, taking on this work on your own without practical experience is a fool’s errand. And with differences in height up to 30 mm, leveling the ceiling with your own hands is quite possible - the characteristics of special mixtures based on cement or gypsum simplify this operation.
Marking the horizontal plane of the ceiling
Under the ceiling surface, a horizontal plane must be designated, to the level of which all base points must be lowered. To do this, first of all, determine the lowest corner of the ceiling. The easiest way to do this is with a laser level - the device is placed in the center of the room, leveled and, rotating it in a horizontal plane, one mark is made on the vertical corners of the walls of the room. Then measure the distances from these marks to the ceiling and select the smallest value - at this level the new ceiling plane should be located after leveling.
In the absence of a laser level, horizontal marks along the perimeter of the walls under the ceiling can be set using a transparent flexible hose with water - if you fill it with water, then, according to the law of communicating vessels, the liquid levels at the ends of the hose will be located at the same height.
Holes are drilled along the perimeter of the walls at the top and self-tapping screws are screwed in at 0.5 m increments, along which control cords are pulled along and across the room, forming the plane of the future ceiling.
Important! If any section of the ceiling surface is located below the level of the cords, then it must be cut off with a grinder with a cutting disc or all control cords must be lowered to the required amount.
Having the outline of the future area, measure the maximum thickness of the layer required to be applied to level the base. If this value is from 30 to 50 mm, then, as mentioned above, it is better to entrust this work to professionals who will plaster the ceilings with cement-sand mortar. If the layer does not exceed 30 mm, then you can level the ceiling in the apartment yourself using cement and gypsum mixtures.
Construction of control beacons
It is better to make a layer with a thickness of 20 to 30 mm from a cement-based mixture, laying it on a reinforcing steel mesh, fixed to the ceiling with staples or secured with self-tapping screws. The reinforcement will prevent the layer from collapsing even if it detaches from the base due to some factors.
Beacons are installed on top of the mesh - rows of cones made of cement mixture with a height equal to the distance to the cord in this place. After the cones have hardened, they are connected with the same mixture in such a way as to create even and smooth guides for the rule, which will remove excess of the subsequently applied composition.
The leveling composition prepared according to the instructions is applied to the base with a wide spatula, if necessary, in layers, after the mixture of the previous application has cured and dried. In this case, the surface of the previous layer must be “combed” before setting - run over it with a notched trowel to create a profile to which the next layer will adhere more firmly.
Important! You cannot speed up the curing and drying process of plaster or putty on the ceiling by creating a draft or increasing the temperature in the room.
After completely filling the gaps between the guides, excess plaster is removed by running the rule over a fresh, slightly set layer - the device is moved along the guides, pressing against them and at the same time performing movements in transverse directions. The sinks remaining after the rule are filled with the same solution and grouted.
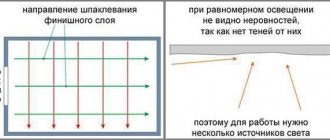
Leveling the ceilings is completed by applying finishing putty - this is done in two or three layers with intermediate drying and removal of convex marks from the movements of the spatula. Then the surface is sanded with sandpaper secured to a flat block or a special holder. The sanded base is primed with one of the hydrophobic compounds, after which it dries, the surface is whitewashed or decorated with decorative tiles.
Technology of work execution
- Floor seams are usually sealed simultaneously with ceiling repairs, so it is more convenient to carry out the preparatory work as a complex. The old coating is removed from the ceiling: whitewash or water-based paint is moistened with water from a spray bottle, left for 10-15 minutes and removed with a wide spatula until the plaster is applied. If the ceiling is covered with a thick layer of putty, it is cleaned only in those places where it has poor adhesion. If there are traces of rust on the ceiling, they are removed with special compounds. The seams between the slabs are opened: the old putty and plaster that are poorly secured in the joints are removed. If necessary, you can use a hammer drill. After processing, the seam should have a U-shaped or slightly expanded inward shape so that the putty holds better. Remove dust from the resulting seam by sweeping it away with a brush and wiping it with a damp sponge.
Removing the old coating from the ceiling and preparing the seam
Inspect the resulting seam. If its width is more than 3 cm and its depth is small, it is sealed with polyurethane foam. To do this, lightly moisten the seam with clean water and apply foam from a balloon. Wait for it to expand and begin to harden, after which the excess is removed, cutting it off with a knife so that a triangular-shaped depression with a maximum depth of 0.5 cm is formed at the seam site. If the seam is deep and not wide, it must be sealed with polystyrene foam, polyethylene foam or any other elastic material. The seam is pre-treated with a deep penetration primer and dried well. The seal is secured using a moisture-resistant sealant; the surface of the concrete must be dry. The sealant is placed deep into the slab, and the seam on the outside is sealed with NTs grade cement mortar so that a small depression remains at the joint. The cement mortar is dried.
Removing old coating from the ceiling and preparing the seam
Sample of a putty seam with polyurethane foam inside
Putty for rust with residual elasticity, for example, latex, is applied to the prepared recess with hardened mounting foam or cement mortar. Level it flush with the surface of the slab. It is convenient to put putty into the seam using two spatulas: apply a sufficient amount of putty to the wide one, and put it into the seam with the narrow one, compacting and smoothing it inside the seam. After applying the putty to part of the seam, smooth it out with a wide spatula, removing excess.
The process of applying latex putty
The solution is dried for 24 hours and the joints are puttyed. Apply a layer of preliminary putty to the seam and adjacent surface of the floor slabs and glue sickle or paint mesh over it, pressing it into the layer of putty. Iron with a spatula along the direction of the seam. The width of the serpyanka or mesh must be at least 20 cm. Dry the putty and, after drying, level it with sandpaper. Apply another layer of preliminary putty with a finer grain to the entire ceiling, leveling it with a wide spatula. Dry and sandpaper. After this, a layer of smooth finishing putty is applied, dried, smoothed with fine sandpaper and painted.
After applying the putty, dry it for a day
If the floor slabs have a height difference of more than 1 cm, the ceiling will have to be plastered after sealing the seams. Plastering is done with a gypsum-based composition over a reinforcing painting mesh. The ceiling is treated with a special “concrete-contact” primer containing solid particles - it creates a rough layer on the surface of the slabs and facilitates the adhesion of the solution. The mesh is attached to a layer of plaster, carefully smoothing it out. After the plaster has completely dried for 2-3 days, you can begin to putty.
Ceiling plastering technology
The ceiling made in this way looks absolutely smooth, there is no destruction of the seams, and the resulting microcracks, due to the plasticity of the putty, remain invisible. However, this method is unacceptable for apartments in new buildings - the house will settle within three to four years, and the slabs will inevitably move. Therefore, for new houses it is better to use other types of ceiling finishing, for example, suspended ceilings.
Leveling ceilings with plasterboard
This method of repairing ceilings is less labor-intensive and, unlike plastering work, does not require strong practical skills, although this technology has enough rules, non-compliance with which can result in damage to the coating soon after finishing.
Preparing the base
Exfoliated putty and plaster are removed from the ceilings, ceiling rustics are freed from old filling materials and sealed after priming, along with significant potholes. Then the ceiling is completely waterproofed - this will reduce the consequences in case of flooding from above, since drywall, even moisture-resistant, is not designed for direct contact with water.
Marking the frame plane
Let's consider the design of a simple, flat plasterboard ceiling, as many other, more complex types of design are used.
Along the perimeter of the room at a certain distance from the ceiling (depending on the choice of design for future finishing), using a level or a transparent hose with water, markings of the starting level are applied - a horizontal line along which the installation of boundary profiles will be carried out.
The location of frame parts is marked on the ceiling, which can be of two types:
- continuous sheathing with cells measuring 60x60 cm - the joint of two adjacent gypsum boards should be located on the same profile, along it;
- linear arrangement of profiles - for longitudinal installation of gypsum boards along them with a distance between parallel guides of 40 cm, and transverse jumpers are mounted only under the joints of the sheets.
Calculation of material consumption
Both frame designs are reliable, so choose the one that requires less material consumption for the specific dimensions of the room.
Based on the completed markings, the material requirements are calculated:
- ud-profile – along the perimeter of the room plus 20%;
- cd-profile – total length of jumpers on the ceiling plus 20%;
- suspensions - based on a step of 60 cm.
The standard dimensions of a plasterboard sheet are 2.5 x 1.2 (m). With a simple ceiling configuration (flat, single-level), draw a sketch with dimensions and assemble the gypsum board on it, taking into account the design of the selected frame.
The number of self-tapping screws for installing drywall is taken as 100 pieces per 1 sheet.
Screws with holes - double the number of hangers plus the cost of installing the ud-profile in 40 cm increments.
Frame installation
Work begins with the installation of ud profiles along the perimeter of the room along the starting level. Then hangers are attached to the ceiling along the frame markings with screws, which, after installing the CD profiles, will be bent to attach jumpers to them with self-tapping screws.
The connection of perpendicularly located frame elements is carried out using a special cross - a “crab”. To increase the length of the profile, a special device is also used, but you can do without it - apply an overlay to the part of the next fragment with an overlap of 10 cm and side fastening with self-tapping screws.
In a room with a flat, but not smooth ceiling, metal profiles can be replaced with wooden blocks, but they need to be treated with an antiseptic and primed with nitro varnish to protect them from moisture.
Laying drywall
Installation of gypsum boards is best done by two people, so as not to make special T-shaped supports.
Sheets are cut by cutting the product on one side with a stationery knife along a ruler, followed by a break in the direction of the cut.
If the humidity in the room is high, then use moisture-resistant drywall - marked GKLV and with a green shell. In addition, the cutting surfaces of the sheets are coated with a primer nitro varnish - gypsum is hygroscopic. It would not be superfluous to cover the gypsum board with a layer of hydrophobic composition on the inside - this will protect the sheets from deformation in case of minor leakage from above onto the stone base.
Basic rules for installing drywall on a frame:
- a gap of 2-3 mm is left between the sheet and the wall;
- installation of elements is carried out in a checkerboard pattern so that the transverse joints of the gypsum boards do not coincide;
- the fastening screws are screwed in in increments of 15-20 cm, also in a checkerboard pattern, deepening the cap into the sheet by 1 mm to subsequently hide it with putty;
- the ends of the gypsum board sections at the joints are chamfered at an angle of 30-40 degrees (with treatment with nitro varnish) to allow for subsequent filling with the mixture to the full depth.
Plastering gypsum board ceilings
A ceiling mounted from gypsum plasterboard is primed along the joints with a latex-based composition using a paint roller or spray gun.
A day after priming, it is necessary to putty the drywall, starting with filling the seams along the perimeter of the walls and between the sheets that were chamfered before installation. Using a narrow spatula, fill the joints with a special mixture, for example, “Fugenfüller”, while simultaneously covering the screw heads recessed into the sheet with putty. On top of the layer of freshly laid putty along the seams, a reinforcing serpyanka tape is laid, which is embedded in the mixture with a spatula and additionally covered with the same composition.
The ceiling is given time to dry (1-2 days), after which the putty is treated with sandpaper over the serpyanka on the seams and in other areas where it was used. The sanded base is primed over the entire area, and the ceiling is ready for painting or other type of finishing.
Preparatory stage
Before leveling a crooked ceiling, it is important to clean the manipulation area. The method is determined by the type of coating:
- Removal of water-based paint will be easier by pre-treating it with water and removing it with a metal spatula.
- It is possible to speed up the washing of whitewash by applying special compounds, soda ash or whitewash.
- Layers of persistent paint or enamel coatings are removed with an angle grinder with an abrasive attachment.
- Wallpaper is removed by moistening and then scraping with a spatula.
- To remove greasy stains, you should use soda ash or laundry soap.
- To remove rust, it is good to use hydrochloric, sulfuric or phosphoric acid. It is permissible to use anti-corrosion agents produced for the car.
- White or yellow stains caused by salt deposits can be removed with organic acids.
- To eliminate mold and mildew, you can purchase an antiseptic for concrete.
- Removal of dirt and soot is done with laundry soap or bleach.
The final stage of preparation is washing and priming the surface. These works are required when filling joints and sealing holes.
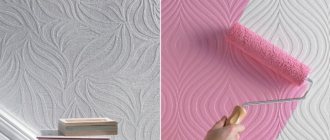
Leveling the ceiling with plastic tiles
Another way to level ceilings is to install strip or rectangular plastic tiles. The essence of the principle is the same - creating an additional shell below the ceiling that will hide defects in the load-bearing base.
The technology for laying tiles is similar to installing drywall:
- preparation of the base;
- frame installation;
- laying tiles.
In this case, the edges of the tiles are made with a locking device, eliminating the need to putty them after installation.
It is not difficult to cover an uneven ceiling with plastic tiles even on your own - by analogy with plasterboard, a frame is mounted, which is more conveniently made from wooden blocks - the tiles are attached to it with small nails driven into the underlayer.
The advantages of this method are that PVC tiles are not afraid of water, are easy to maintain on a daily basis and are available in a wide range of prices.
Gypsum plaster or gypsum plaster
Gypsum mixtures are good for everything except cost.
They are flexible, easy to use, and adhere well to almost all surfaces. However, with a large difference in levels, a plaster ceiling can cost a pretty penny. In addition, there are restrictions on the maximum layer to be applied, on average about 15–20 mm. The maximum layer in practice can reach up to 40 mm, but the risk of peeling increases many times over. Cement-sand mixtures do not have such high adhesion, and the lifetime of the solution is significantly longer: up to two hours versus 30–40 minutes. They usually perform rough leveling of surfaces with large differences in levels or significant curvatures of the plane, and then apply a thin (5–6 mm) layer of gypsum mixture for general strengthening and thorough smoothing.
Dropped ceilings
This type of work can be considered not only as a method of leveling ceilings, but also as an independent type of finishing, the main purpose of which is the artistic cladding of the ceiling base, with a secondary result being its leveling.
The method is not always budget-friendly, unless you consider a type of suspended ceiling made from plasterboard. Suspended structures require significant ceiling heights, as well as professional skills, since, depending on the characteristics of the room, the finishing frames may differ in both material and installation method.
Therefore, there cannot be a universal instruction on how to level ceilings by installing suspended finishing - each specific case requires an individual approach.
Work execution algorithm
After the applied primer has dried, we measure the gap between the PP and determine the materials that will be needed to seal it and their quantity. Next we do the following:
To fill the seam, you can use plaster based on either gypsum or cement. The finished solution should have a creamy consistency. If the gap is shallow and not wide, then the plaster can be applied in one layer (after wetting the groove with water). If the seam dimensions are larger, then we fill it in several stages. Moreover, we apply each subsequent layer only after the previous one has already dried.
On a note! To prepare the mixture, it is better to use tensile cement (NC). Of course, it is 20 percent more expensive than Portland cement, but it differs in that its use promotes rapid hardening and expansion of the concrete solution (thereby improving adhesion to the floor slab).
To seal a deep and wide seam, you can use polyurethane foam (it is applied to a pre-wetted surface in small portions), the excess of which, after hardening, is cut off with a construction knife. If the gap is narrow and shallow, then a polyethylene foam roller is suitable for sealing it. After the elastic materials have been laid in the seam, we lay a layer of plaster (for example, gypsum) on top of them.
Regardless of what materials you choose to seal the seam, the subsequent stages of work are identical:
We embed a painting fiberglass mesh (that is, serpyanka) into the still uncured plaster layer, the use of which prevents cracking of the material used after drying. We smooth out the reinforcing tape with a spatula so that a small depression remains in the sealed seam (this is necessary for better adhesion with subsequent decorative finishing).
On a note! To make laying the serpyanka easier, you can cut it into small pieces. They must be overlapped (its value is 10 mm).
- After 3 days (when the material placed in the gap has completely dried), we wipe the entire surface of the ceiling with a rag soaked in water. We are waiting 24 hours.
- Next, using a spatula (preferably a wide one), apply a layer of starting putty to the ceiling surface (its thickness is 2-3 mm). We leave it to dry.
- We level the ceiling surface using an abrasive material (having a medium grain) applied to a paper base (that is, “sandpaper”).
- Apply a layer of finishing (leveling) putty.
- After it has dried, we sand the surface of the ceiling using fine-grain sandpaper.
We are painting the ceiling.
Stretch ceiling
This is another technology that allows you to hide an unaesthetic ceiling base under a decorative shell. Stretch ceilings differ in the material of manufacture (elastic, fabric), the method of fastening to the base and artistic design.
Without professional skills, it is not reasonable to undertake leveling the ceiling with your own hands using this material - correcting errors made during the installation process reduces the aesthetics of the workmanship, and the cost of such cladding is quite high.
A number of nuances that everyone should know
As we mentioned earlier, if you decide to line the ceiling with plasterboard or any other material, then in this case there is no need to think about how to putty the seams on the ceiling. However, this method of getting rid of ceiling unevenness is not highly reliable, so it is better to choose materials that are best suited for this type of work. Expanding cement, for example, is suitable.
Before sealing ceiling joints with cement, you will need to acquire the following materials:
- NTs grade cement is used for sealing deep joints. This material is capable of expanding during the process of its hardening, which leads to filling the entire space of the gap between the plates.
- To eliminate fairly wide seams, insulating materials with satisfactory density will be required. Quite often, polyurethane foam is used as such a material.
- Elastic, starting and finishing putty.
- Polyurethane foam will be necessary to eliminate wide cracks. This material adheres well to the primed base and, after expansion, can completely fill the gap.
If, after cleaning the surface, you find a very narrow and, at the same time, deep joint, then you will need to carry out a number of such actions. Having chosen a sealing material of suitable thickness, take the sealant and apply one layer of this composition to one of the sides of the seal. Next, such material is pushed into the gap between the plates with a spatula, and care is taken to ensure that there is room left for further filling with any mixture.
This is one of the methods for deciding how to seal the seam on the ceiling between the slabs. It is similar to the technology by which tiles are laid on an adhesive mortar, only in our case, expanding concrete is used. The cracks are closed with such a solution, with the obligatory leaving of small recesses, since the material we use has the property of expansion. In addition, decorative plaster will be applied at the end.
Coating the joint with elastic putty begins after the solution has completely hardened and the groove is prepared for the next finishing step. To carry out the above work, it is best to use not one spatula, but several, having a working surface of different widths. This will make the workflow easier to some extent.
A large spatula is needed for scooping up putty from the container, and a narrow one is used to remove the putty little by little from the large spatula and apply it to the seam being restored. Thanks to this process, it is possible to completely align all the cracks with our ceiling.
At the same time, do not forget about the timely removal of excess putty. Next, it is necessary to reinforce the working areas. At the final stage, after all the seams have been restored, it is strongly recommended to putty the entire ceiling to achieve maximum evenness of the entire surface.
Now we can assume that the question of how to seal the seam in the ceiling has been resolved. If all the work is carried out according to the technology specified by us, the ceiling will delight you for a very long time.
https://youtube.com/watch?v=v6UT7tJufkw