When should you plaster the ceiling?
Sometimes, instead of plastering, putty is used to level the base. But how do you know which alignment method is appropriate in each specific case? To begin with, it is worth saying that putty differs from plaster in the graininess of the mixture. Putty has a fine-grained structure, and plaster is a coarse-grained solution. In this regard, the putty mixture must be applied in a thinner layer and used to eliminate minor defects in the base.
Large holes and cracks, as well as unevenness with differences of up to 5 cm, can only be removed with plaster mortar. In this case, plastering the ceiling for painting is an intermediate stage of work on preparing and leveling the base. Plastering can be called rough leveling, which is necessarily followed by puttying and priming of the base.
On a note! Leveling ceilings for painting can be done with a plaster or putty mixture. The choice of solution depends on the evenness of the base and existing defects.
How to plaster a ceiling: mechanized method
For finishing large volumes, special non-compressor nozzles powered by a concrete pump are used. They spray the mixture onto the ceiling, and leveling is done manually. To keep the amount of falling mortar to a minimum, the plasterer sets the pressure that gives the desired length of the jet and the spray pattern of the plaster.
Electric trowels are used for leveling. They are connected to external AC power through a converter, which reduces the voltage and ensures operator safety.
Grouting is carried out before the solution begins to set; sometimes the surface is additionally wetted. Working with the device increases labor productivity, but requires strength and endurance. Disks for the trowel are made of fiberboard, nylon, expanded polystyrene or polystyrene. When using an attachment with sandpaper, the surface can be sanded, including after puttying.
Methods for leveling ceilings
In practice, one of two technologies is used - plastering the ceiling using beacons and without using them. The first option is considered correct, since then a ceiling surface lying in the same plane is obtained.
But sometimes you can find a ceiling that has a large difference in height. It is dangerous to apply a 5 cm layer of plaster on the surface, as it will most likely fall off. Even if you apply several coats of primer, there is no guarantee that the finish will hold.
In cases where the ceilings have a large curvature, experts advise leveling them by installing suspended ceiling structures made of plasterboard. True, not in all rooms the height allows you to take 10 centimeters from her. In such a situation, there is no need to doubt whether it is necessary to plaster the ceiling using beacons.
The essence of this technology is that in a certain area the ceiling surface will become smooth. There will not be too noticeable changes on it, it will look even. And the fact that the distance to the floor covering in different corners differs by a couple of centimeters cannot be determined by eye.
The main task that should be solved when using this technology is to make the junction of the ceiling and walls as smooth as possible. The resulting line should be straight. When using this option, you need to start plastering in the direction from the walls to the center.
Types of plaster for walls and ceilings
The most commonly used types of plaster are:
- Cement;
- Cement-lime;
- Plaster.
Architectural concrete is actively used by interior designers, as it combines perfectly with wood, metal and glass.
Of course, applying architectural concrete using the traditional method, with formwork and long drying, is quite lengthy, but today it is often replaced with ready-made cement-lime plasters or much lighter and suitable for installation on plasterboard walls with gypsum plaster imitating concrete.
Beautiful but expensive cladding made of marble or travertine (lime tuff), known already in antiquity, can be replaced by mineral decorative plaster resembling them.
It is produced on the basis of a lime binder and is supplied to the customer in bulk form. The powder should be mixed with water in appropriate proportions and then applied to the wall, usually in two layers.
Travertine plaster is waterproofing, easy to clean and abrasion resistant, but its application requires a lot of practice. For a natural look, you need to use the right colors, shades and imitate the natural pattern of the stone, which is not an easy task.
How to properly plaster ceilings: choosing a mixture
To get a good result, you need to choose a suitable plaster material. Properties of a quality mixture:
- good adhesion of the solution to the surface;
- the mixture should not be too sticky to avoid inconvenience during application;
- The plastered surface should not be deformed before hardening.
You can buy a ready-made mixture or make it yourself.
Types of plasters according to filler
Cement
This type is typical for application to concrete surfaces. The advantages include high strength, long service life and versatility.
This species is not afraid of moisture and feels great in rooms with high temperature changes. If you do not adhere to the preparation technology, the mixture will crack easily and quickly, especially on ceiling coverings.
The opinion of professionals is divided into two camps: some say that there is nothing better than cement mortar, others do not recommend using it on ceilings.
Plaster
Plaster filled with gypsum is ideal for wooden or plasterboard ceilings. The mixture has quick-drying properties and a high level of adhesion, so it adheres firmly even to smooth surfaces.
New items contain sand (quartz, perlite or lime).
One of the disadvantages is that it dries quickly, which means that the solution can be used for a short time. Therefore, it is necessary to cook it in portions so as not to throw away excess.
Clay
The clay-based version has a uniform composition (no lumps) and is intended for application to other clay surfaces. If the composition is applied and prepared according to the instructions, it will have increased adhesion.
The solution is not afraid of temperature changes and high humidity. Does not crack even if the temperature limits are not observed. It is enough to cover the cracked areas with a clay mixture and the ceiling will be as good as new.
It is a pleasure to work with this composition, and even a child can handle it. Clay has hygroscopic characteristics and is not damaged by insects.
Limestone
Lime plaster mixture is considered a cheap material, which in addition has increased thermal insulation properties. Lime mortar does not burn, has high plasticity and is able to withstand mechanical loads.
Lime has anti-fungal properties and is perfect for applying to wooden ceilings. Surfaces coated with lime will no longer be touched by rodents and insects.
Types of decorative plasters
If you are going to finish the ceiling with additional finishing materials, then 4 main types of plasters will be enough for you. Decorative types are finishing and are applied in a thin layer. Some require finishing skills to apply.
Mineral
Mainly consists of Portland cement, which increases the strength of the finished surface. The mineral mixture is considered the most budget-friendly of the decorative class.
It has antifungal and antibacterial properties. One of the disadvantages is the paucity of choice, although this can be easily corrected with the help of silicate color.
Acrylic
A popular type of decorative composition. It has high properties of plasticity and resistance to temperature changes. The downside is electrostatics, which directly attracts dust and dirt to its surface.
Working with acrylic plasters is difficult; not every professional will agree to this. The quick-drying base plays on both sides at the same time. This is both a plus and a minus.
High vapor permeability, low adsorption properties and a large selection allow us to maintain a leading position in sales.
Silicone
One of the most expensive plasters. The final appearance of the ceiling will make you forget about its cost. Only with the help of silicone solutions can you create an imitation of stone.
This type is available in a wide range of colors. The finished coating is easy to clean, has vapor permeability and makes the surface literally breathe.
Technology of finishing the ceiling with decorative plaster
Decorative plastering is carried out in several stages. Each new layer is applied after the previous one has dried. The technique of applying decorative plaster is similar to conventional plastering of walls and ceilings. Technologies for different types of finishing have their own nuances, but some work is performed in the same way.
Materials and tools
To finish the ceiling with decorative plaster, you need a minimum of tools, the same as for regular plastering: scraper, spatulas, rectangular trowel, graters, rollers, sander, construction mixer (optional). Fine and fine-grained mixtures can be applied mechanically.
To create texture, rollers, stencils, stamps, a shaped spatula, a trowel, sponges and even a broom or broom are used.
If color pigment is not added to the plaster mixture, the finished surface will have to be painted. To do this, you will need painting supplies: brushes, roller or paint sprayer. Materials other than plaster mixtures include primer, putty, colored pigments, wax, varnish or paint.
A trowel and spatula are used for application.
Preparation of the composition
Most types of decorative plaster are sold ready-made, so all that remains is to mix the selected composition. If the mixture contains large granules of filler, then it is better to do it manually. The composition with fine fractions can be mixed with a power tool at low speeds. After opening the container, the remaining solution can be stored by tightly closing the container, but its properties may deteriorate.
To prepare a mixture of dry powder, water is added to it and mixed, and then left to swell. The consistency of the solution should be paste-like. To increase adhesion, you can add PVA glue to the water in a ratio of 5:1.
The difficulty in finishing the ceiling lies in the uncomfortable position of the master. Your arms, back, and neck get tired, so you have to take breaks often. Because of this and because the plaster mixture dries quickly, a small amount of solution should be prepared at a time.
Ceiling preparation
The surface must be dry and clean. It is prepared as carefully as before gluing wallpaper to the ceiling: it is cleaned of old coating, paint, dirt, grease stains, and dust.
The previously plastered base should be tapped to identify places where the solution does not adhere well to the base.
Use safety glasses and a respirator when working
Defects and irregularities are repaired and leveled with ordinary putty. After this, the surface is primed twice, preferably with a deep-penetrating compound. The soil is chosen depending on the type of surface. For damp rooms, compositions with an antifungal effect are used.
The seams on the plasterboard ceiling are unstitched, cleaned of dust, covered with mortar and reinforced with sickle tape, and the screw heads are deepened. The soil is chosen so that it does not wet the gypsum core.
The cleaned ceiling is puttied and primed
Applying decorative plaster to the ceiling
Decorative plaster is worked as with ordinary putty. Using a spatula, apply a small amount of solution to the trowel, apply the layer to the ceiling with careful, smooth movements and rub thoroughly. In this case, pay attention to the thickness of the layer - it should be the same over the entire surface. Some types of plaster (for example, roller plaster) are applied once, and “Venetian” contains 3-8 thin layers, which are applied diagonally in a special way.
It is important to apply the plaster in an even layer around the entire perimeter
If it is textured plaster, immediately before the solution hardens, using a trowel, roller or stencils, apply the previously selected relief images. Do this carefully so as not to damage the inner layer. After applying the structural plaster, the ceiling surface is smoothed in a circular motion so that the granules are distributed evenly.
For final decoration, the surface is painted, varnished or waxed.
It is more convenient to paint the ceiling with a roller with a long handle.
Tools and accessories for leveling the ceiling
Finishing work, in particular leveling the ceiling, is an expensive process, so you can try and do it yourself, without the help of a specialist. If you decide to plaster the ceiling yourself, stock up on materials and tools. We will need the following tools and accessories:
- Plastic or galvanized buckets of sufficient volume (15 liters minimum);
- An electric drill with different attachments (a mixer is required) and a power of at least 800 W;
- Set of spatulas - 50, 100, 200 mm;
- Trowel (trowel) made of stainless steel;
- Plaster comb;
- Plaster float;
- Metal smoother (grater);
- Plaster falcon, long enough to suit the size of the room;
- Sponge grout;
- Wide brush or roller;
- Small pickaxe, hatchet, scoop;
- Aluminum rule 2-2.5 m long;
- Bubble level (preferably laser);
- Plaster mixture Rotband (Knauf);
- Screws 6x45 mm;
- Beacon profiles 6 mm;
- Primer “Concrete contact” (Feidel);
- Gloves to protect hands, respirator, tape measure.
Each master may have his own set of tools, but the standard minimum is approximately the same. Materials for work may also differ from those listed; the best options are listed here.
What plastering work is done - tools and materials
Before plastering the ceiling, you need to prepare the following tools:
- a set of spatulas of different sizes made of metal and rubber;
- construction trowel;
- brushes;
- rule;
- roller;
- sheets of sandpaper of varying degrees of grit;
- construction mixer or electric drill with an attachment;
- serpyanka;
- trowel;
- construction cord;
- lighthouse strips;
- containers for solution;
- ladder;
- protective equipment (rubber gloves, mask, respirator, goggles), etc.
In the list of materials:
- plaster (ready-made or in the form of a dry mixture);
- primer;
- putty, etc.
Preparing the ceiling for leveling with plaster
It is possible to plaster ceiling coverings made of any material - wood, stone, concrete. Before leveling the ceiling with plaster, it is necessary to carry out preparatory work.
Disinfecting the ceiling before plastering
Particular attention should be paid to the condition of the ceiling surface. Maybe it will show not only contamination, but also fungal disease and mold. Disinfect if necessary. Remove traces of fungus and mold with a sponge soaked in water and treat them with a special compound. For disinfection, you can use the following disinfectant solutions from domestic manufacturers (some are made on the basis of copper sulfate) or imported products:
- Homeenpoiste (Finland);
- Pufas (Germany) - in the presence of small spots of mold and mildew;
- Feidal Schimmel - Ex-concentrate (Russia);
- Belinka (Slovenia);
- Bagi Anti-Mold (Israel);
- Deo-anti-mold (Russia);
- Sepotosan-T (Russia);
- Mogel-Fri (Sweden);
- NEOMID (Russia).
In case of large-scale infections of the ceiling surface, it is better to subject the “mycelium” to firing with a blowtorch or plasma welding. Chlorine-containing mold repellents do not provide long-term results and require careful handling.
Cleaning the ceiling before leveling with plaster
Completely clean the ceiling from old paint, whitewash, plaster, and various contaminants. It is recommended to remove the old coating, even if there is visually invisible wear. This way you can avoid cracking in the future and save centimeters of ceiling height. The main tool for this work is a hard spatula. Depending on the coating material, various cleaning agents and methods are used:
- Whitewash can be removed with hot water.
- To remove plaster, wet the ceiling using a sprayer or a roller with a sponge, and you will not only get rid of dust, but its removal will also become less labor-intensive. When scraping off plaster, use a hammer chisel, ax or crowbar.
- The enamel is removed in layers with a spatula, and a particularly durable type will require the use of a drill with a special brush attachment (don’t forget to wear a respirator and goggles).
- Removal of old paint is carried out with special solvents - domestic (Shchelkovo, Volgograd) or “Pufas” (Germany). If the paint is applied to the plaster and “fused” with it, then they are removed together 30-40 minutes after coating with the product.
Not only the surface of the ceiling must be cleaned, but also all connecting seams and pipe passages. After completing all cleaning work, the ceiling should be thoroughly cleaned of crumbs and dust.
Primer of the ceiling before applying plaster
The primer is applied to the cleaned ceiling to eliminate defects and strengthen it so that the plaster does not fall off later. The holes near the pipes are filled with foam. After it has completely dried, the excess must be carefully cut off at ceiling level. If there are a lot of potholes and they are deep, then it is advisable to purchase fast-hardening cement-based putty “Spachtelmasse” or “Uniflot” from Knauf. Wide seams and cracks are additionally sealed over the putty with sickle tape. If there are only a few damages, sealing them with Rotband gypsum putty is sufficient. The entire surface of the ceiling is treated with Knauf-Betonokontakt or a similar primer. Using a brush dipped in the ready-to-use Betonokontakt primer mixture, work on all the rust - ceiling connecting seams, chips, pipe passages. This primer makes the surface slightly rough, which helps the plaster adhere well. The work is carried out with a medium-sized rectangular spatula. Defects are covered with small strokes so that there are no gaps. After a strip of putty of about a meter is formed, the excess is removed with a large spatula. Primer smooth surfaces as follows:
- Concrete primer. A smooth concrete surface does not hold the coating well. To increase the adhesion of concrete to the soil, the surface roughness is first created using a sandblasting machine or notches and cuts are made on it, for example, with an ax.
- Primer for wood and steel surfaces. Plaster will not adhere to such complex surfaces without the use of a special plaster mesh with 10*10 mm cells. The metal mesh is attached to the ceiling with staples or nails with a wide head.
How to remove plaster from a ceiling
Do-it-yourself ceiling plaster for painting is carried out after removing old finishing materials. Cleaning is necessary if the previous coating crumbles, is unsteady on the base when tapped, there are cracks, or mold.
Work is performed in the following ways:
- standard manual;
- mechanized.
Standard manual
When performing work using the standard method, a chisel or spatula is used. A hammer and hatchet may be required.
The work is carried out in stages:
- The edge of the old plaster coating is pryed up with a tool, then the material is removed in pieces.
- The gypsum plaster mixture is removed after moistening the ceiling with warm water using a roller.
- The softened composition is removed with a spatula or scraper.
- It is prohibited to treat drywall with water; work on removing the old composition is carried out using a dry method.
- Materials that are securely fixed are removed with a hammer or chisel.
Mechanical approach
The mechanical option involves removing the old coating using a hammer drill or an electric drill with a special attachment. When working on small areas, you can use a grinder. First, using a grinder, cracks are marked on the old layer. The material is then removed with a tool. Work is carried out in a respirator from a stable support (construction ladder, stepladder, pedestal).
Plastering a concrete ceiling with your own hands for a beginner
To carry out plastering work, a novice master needs to study as much information as possible. Don't expect the first result to be perfect. Any repair technique requires practice.
Installation of beacons
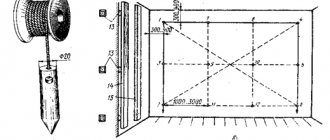
The first stage of ceiling plastering is the installation of beacons, but first you need to determine the maximum and minimum height difference. It is more convenient to do this using a laser plane builder. It is installed under the ceiling and turned on the horizontal plane. They measure at a certain number of points and measure the distance from the ceiling to the luminous beam. In this way, the maximum and minimum deviations are found. The thickness of the plaster layer should be slightly greater than the most significant deviation.
The same operation can be done with a water level, but it will be much more difficult. First, you need to apply a horizontal line along the perimeter of the walls at some arbitrary distance from the floor. We fix one end of the level at this mark. With the second one, we go around the room, measuring the distance from the water column in the level to the ceiling. So calculate the same maximum and minimum points.
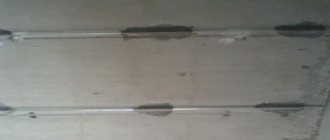
Having decided on the thickness of the layer, we select the beacons. These are galvanized perforated strips with a protruding back. These backs will be the supports when leveling the solution. The height of the back of the lighthouse can be 6 mm and 10 mm. We choose the one that is slightly larger than the found maximum deviation.
Installation of beacons on the ceiling
Beacons are placed in increments slightly less than the length of the rule - the tool used to level and cut the mortar. With a rule length of 1.5 meters, the beacons are placed at a distance of 1.1-1.3 m. Longer ones are difficult to work with if you are not used to them; shorter ones are not worth it - there are too many seams. First, the outer beacons are placed, retreating 20-30 cm from the walls. The remaining distance is divided so that the distance between the beacons is within the specified limits.
Attach the beacons to the gypsum mortar and mix it thickly. Islands of this solution are applied along the beacon installation line (can be drawn on the ceiling). The beacon strips are pressed into it, exposing their backs in one given plane. If you have a plane builder (level), everything is simple - set it according to it - the beam should slide along the back.
If we work with a water level, we transfer the required “finishing” level of the ceiling to the walls, stretch several cords so that they are directed along the lighthouse. Using these cords we insert the backs of the slats. Having set all the beacons, check the plane using a rule with a bubble level installed on it.
The distance between the beacons on the ceiling is 1.1-1.3 meters
After the plaster has set (this should take several hours), you can begin plastering the ceiling.
Plaster application procedure
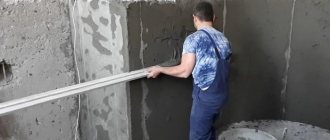
The application procedure involves spreading the plaster evenly and thinly. It must be applied so that it extends beyond the level of the beacons. Anything unnecessary is immediately removed. Each new layer is applied after complete drying. If the base coat is even, then one coat is enough. In this case, a reinforced mesh is used, which is pressed between the beacons. The edges of its layers should overlap at least ten centimeters.
The application procedure involves spreading the plaster evenly and thinly.
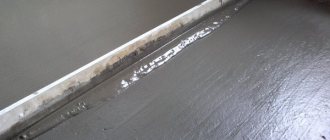
Finishing layer
After the first layer of coating has dried, begin applying the second, final one. When the material has dried, you can begin the final stage of finishing - sanding. It is produced manually or using grinding equipment. The final stage is the dustiest, so you can’t do without protective equipment.
The final stage is the dustiest, so you can’t do without protective equipment.
How to properly plaster a concrete ceiling with your own hands (what is the sequence)
Novice craftsmen are interested in how to properly plaster a ceiling. First, an action plan is drawn up.
According to the rules, the following steps must be observed:
- surface preparation;
- mixing plaster mortar;
- plastering (the required number of layers is performed);
- drying;
- grinding;
- decorative finishing or painting.
For the ceiling, it is important to calculate the thickness of the plaster layer in accordance with the base material, the level of surface curvature, and the type of mixture used.
The standard layer thickness, taking into account the composition, is as follows:
- cement mortar - 10-50 mm;
- gypsum - 15-25 mm;
- clay-sand - 10-35 mm;
- gypsum-sand - 10-25 mm (when using reinforced mesh - up to 35 mm);
- clay-cement-sand - 15-35 mm;
- decorative plaster - 10 mm.
Depending on the base material, the coating thickness is:
- flat concrete base - 2 mm;
- concrete surface with height differences with reinforcement - up to 20 mm;
- brickwork - 5 mm;
- brick bases when leveling - 20-25 mm;
- brick with reinforcement - up to 50 mm;
- aerated concrete - 2 mm (for unevenness - up to 8-15 mm);
- wooden surface when applied in 2 layers - 15-20 mm;
- drywall - 1.5-10 mm.
If the planned thickness of the plaster is less than 6 mm, the work is carried out without beacons. Before painting and gluing wallpaper, the ceilings are rubbed and sanded.
Surface preparation system
Before leveling the ceiling with plaster, you need to prepare the base.
The work is carried out in stages:
- Remove old paint, wallpaper, fasteners (nails, screws and other steel elements) from the ceiling.
- Old whitewash and plaster are removed.
- Dust is removed from the ceiling.
- Cracks and tile seams are opened and cleaned with a stiff brush.
- Traces of mold and mildew are removed with a damp sponge, and surfaces are treated with antiseptic compounds.
- After cleaning, a deep penetration compound is applied to the area.
- After 24 hours, the ceiling is covered with cement mortar, in which the reinforced mesh is fixed.
- After drying, a second cement layer is applied to the reinforcing mesh.
Primer
The ceiling is primed using products suitable for the base. Smooth concrete surfaces are treated with Betonokontakt primer mixture. For porous areas, deep penetration soil is used. The material is applied in 2 layers using a roller. Each primer is allowed to dry for 24 hours.
Preparation of ceiling plaster mixture
The solution is prepared before starting work. The prepared compositions are mixed in containers and water is added if necessary. Dry materials are diluted with water in containers taking into account the proportions specified by the manufacturer. Stirring is carried out with a mixer until a homogeneous consistency. The solution is infused for 20-25 minutes, then mixed again. With the mechanized plastering method, the composition is poured into a special compartment in the unit, and mixing is performed automatically.
Installation of beacons and their thickness
Plastering the ceiling along beacons is necessary in the presence of unevenness, chips, and cracks.
The work is carried out in stages:
- The ceiling is first marked and a cord is hung to check the plane.
- Nails are driven into the corners along which the cords are pulled.
- Then the beacons are fixed at intervals of 1-1.5 m.
- You can fix the elements onto the solution, leveling them with a spatula.
Plastering the surface on the ceiling
Plastering is performed using different technologies depending on the design solution. The composition is applied by throwing it with a trowel or spreading it. When plastering without beacons, the solution is distributed with a spatula in an even layer. The first coating is dried, then the next one is applied. After the mass has hardened, rub the surface with a damp sponge in a circular motion.
How to apply the final plaster layer to the ceiling
Ceiling plaster for painting is carried out with a mandatory finishing layer, because... the surface should be smooth. The presence of small cracks and irregularities that will appear after applying the paint is not allowed.
The finishing layer should be thin (about 3 mm) and is done with a covering or a special finishing mixture. The composition for this stage should be more plastic and liquid in consistency. The work is carried out with a spatula or trowel. The tool is held at a slight angle when applying the mixture.
After hardening, the covering is leveled with a grater, and the remaining material is removed. Movements with the tool are performed first in a circular manner, then in a straight line without pressing firmly. The ceiling is dried and sanded with sandpaper.
Features of plastering ceilings made of other materials
The application of plaster coating to different types of ceilings differs only at the preparatory stage. The coating technique remains unchanged.
Wooden
A different technology is used to finish wooden ceilings. The base is reinforced with shingles or chain-link. Thin wooden slats are stuffed crosswise. The heads of nails or screws should not stick out from the wood. The finishing mixture can be made based on clay. Peculiarities:
- environmental friendliness;
- affordable price;
- can be used in premises of any purpose;
- The mixture cooks quickly, but takes a long time to harden.
The thick solution is thrown onto the chain-link and well leveled. After the 1st layer has dried, you can apply the 2nd. The clay solution should harden at above-zero temperatures. The ceiling cracks when using heat guns and other heaters because they dry out the air.
Note! The corner between the wall and the ceiling may crack after the mixture dries. Therefore, such places are reinforced with metal perforated corners. They weigh little and hold their shape perfectly. A wooden surface can be plastered manually or using a station.
A special technology is used to finish the wooden surface.
From plasterboard
The plasterboard ceiling covering is flat. If you want to save time, it is enough to apply one layer of putty to such a surface.
At least a week should pass between the procedure for installing drywall to the ceiling and finishing it. The screws should not protrude above the surface of the coating.
The process is over. After priming, putty all fixation points. The joints are sanded after complete drying. After some time, the ceiling is ready for re-priming. The final stage is applying putty and sanding.
If you want to save time, it is enough to apply one layer of putty to such a surface.
Repairing the ceiling with plaster is a great way to create coziness in your home, show your imagination, while maintaining the family budget. Using a variety of materials will help bring your individual design to life.
Plaster on insulation
Ceilings are often sheathed with sheet insulation. Finishing is carried out according to the following rules:
- the material is impregnated with a primer and dries;
- the insulation is coated with a liquid plaster solution, a painting mesh is placed on top of it;
- the mixture dries and is primed again;
- the surface is equal to the next plaster layer.
Important! This surface leaves marks from impacts or pressure, so it requires care.
Step-by-step instructions for a beginner on plastering a ceiling
Experts recommend that beginning craftsmen perform the work step by step.
At the first (preparatory) stage, the following actions are carried out:
- Furniture is removed from the room, old finishing materials are removed.
- The surfaces are covered with film.
- The room is de-energized.
- Dirt and mold are washed away.
- Antiseptic treatment of the areas is performed.
- Cracks and seams are opened, repaired, and sealed with primer.
- The reinforced mesh is installed, secured with a solution, and dried.
At the second stage, the following work is performed:
- Surfaces are primed with a roller and brush.
- After drying, the next layer is applied.
- These places are dried and checked with a level for any unevenness.
At the third stage, beacons are installed:
- Marking is carried out, checking possible height differences on the ceiling.
- Fixation of beacon strips in the corner areas.
- Placement of the remaining guides with the required pitch.
- The solution on which the elements are attached is dried.
At the fourth stage of work, the solution is prepared using a construction mixer and infused. If necessary, color is added to the mixture.
At the fifth stage, the ceiling is plastered using beacons or without planks:
- First a thin layer is applied.
- Then the bulk of the plaster is distributed on top and leveled.
- Excess composition is removed with a spatula.
- Smoothing is done according to the rule.
- Finally, the surface is glossed with a spatula.
- The beacons are removed from the solution.
- The grooves are filled with plaster mixture and the surfaces are leveled.
- Final polishing is performed.
Is mechanized ceiling plastering possible?
Machine plastering of the ceiling is used if a large amount of work is required. The mixture is quickly and easily applied to the surface using a special station. In this type of work, a special machine-applied plaster is used, which dries longer and does not get stuck in the device. The ceiling is plastered in beacons, the mixture is applied to the entire area at one time and is equal to the rule. The amount of mortar is calculated so that after leveling, the excess can be loaded into the plastering station and applied again to the free surface.
How best to level a ceiling with plaster
Ceiling leveling technologies differ depending on the quality of the surfaces:
- smooth, without defects;
- with differences in height, roughness, bulges or depressions.
Relatively flat ceilings
Smooth surfaces can be prepared for plastering without the use of beacons. The coating is carried out in 2-3 layers. Some areas can be treated with more leveling solution. The final layer should be of uniform density.
When applying plaster with a thickness of more than 1 cm, reinforcement is required. Fiberglass or metal mesh is fixed to the ceiling before plastering and covered with plaster.
How to plaster ceilings with large irregularities
When processing ceilings with uneven surfaces greater than 2 cm, it is necessary to install beacons. The plaster material is applied in a dense layer that protrudes above the beacon strips. Then the mass is leveled over the surface using a rule. Finally, the material on the ceiling is sanded.
Which mortar to choose: gypsum or cement?
To make the right choice between cement and gypsum plaster, you need to have a good understanding of what both of these mixtures are used for, what their main advantages and disadvantages are.
Gypsum gives the finish greater plasticity. Plaster based on it has a lower density than cement plaster. It has a more attractive texture and there is practically no shrinkage. Gypsum mixtures are porous, the finish is vapor-permeable, which prevents the development of mold on it. In addition, such gypsum hardens quickly.
However, such mixtures have two drawbacks: they do not tolerate high humidity and cost 1.5-2 times more than cement ones. In this regard, the use of gypsum plaster for finishing the ceiling may be limited.
Mixtures based on cement binder have high strength. In addition, they have higher adhesion and are not afraid of water. The components from which such plaster is made cost less, which reduces the overall cost of repairs.
Cement compositions take a long time to harden. Due to its lower plasticity, the mortar is more difficult to level, and finishing putty is additionally required before painting. Large weight creates additional stress on the building structure. When cement plaster falls from the ceiling, it hits harder and poses a serious threat to those living in the house.
Based on the listed properties of these two finishing materials, it becomes obvious that cement mixtures are more suitable for plastering the ceilings of wet rooms, such as a bathroom, and also when you need to obtain high strength and good adhesion to the ceiling, for example, when sealing slab joints and cracks. Gypsum mortar is more often used for small uneven areas, as a finishing touch on beacons in rooms.
Dry and wet plaster
Plasterboard sheets as a dry type of plaster are a fairly popular type of finishing material. It is used for arranging uneven walls and ceiling surfaces. Sheets of gypsum covered with cardboard are easy to use and quickly installed using screws. But you should know that in small rooms it is not advisable to use such sheets, the area of the premises is reduced, and the sheets cannot be left for a long time without finishing. To avoid deformation of sheets in rooms with high humidity, it is recommended to purchase moisture-resistant plasterboard sheets.
Wet plaster mixture requires mixing with water, and the process of its application is considered more energy-intensive, and after its completion it is necessary to carefully and for a long time clean the room.
Cost and expense
The consumption of dry mixtures when plastering ceilings can be completely different. There are many influencing factors here, such as flatness of the plane and quality of cleaning. Focus primarily on the consumption prescribed in the instructions. As an example, consider the average value:
- plastering the ceiling with gypsum plaster has a consumption per 1 m2 of about 9 kilograms with a layer of 10 mm;
- for cement plaster the data is higher, on average almost 17 kilograms per 1 sq.m.
- Decorative dry and liquid mixtures have significantly lower consumption when plastering ceilings. About 5-6 kg per square meter. This is because there is no task of leveling the plane, you just need to decorate it. Application is made in a layer of 1-2 mm.
The cost of Rotband is 360 rubles. for 30 kg bag. The price of other mixtures is approximately in the same category; the domestic manufacturer always dumps a little. Liquid compositions for decoration can cost 2500-3000 rubles. for a 25 kg bucket.
Calculator for calculating the amount of dry building mixture for plastering the ceiling
The initial values for the calculation will be:
- Ceiling area. For a rectangular room, calculating it is not difficult.
What to do in more complex cases?
If the room has a special configuration, then you can apply different approaches to calculating its area. All this is described in detail, with the application of convenient calculators, in a special publication on our portal “How to calculate the area of a room”
- The planned minimum thickness of the plaster layer depends only on the specific conditions of the room being finished and the wishes of the owners. As a rule, a layer less than 5 mm is not applied when plastering.
- The amount of difference in ceiling height that needs to be eliminated by plastering.
- Master's qualification level. A professional will waste no more than 5% of the solution, but for a beginner, at first, even 15% of the solution may not be enough.
The resulting value will initially be expressed in kilograms. But dry plaster mixtures are sold in paper bags of 25 or 30 kilograms, and purchasing an open bag is great stupidity, since no one can guarantee the quality of the solution. This means that one way or another you will have to round up the amount of purchased composition up to the whole number of bags. This supply will still not be superfluous - all the repairs are still ahead! This is also taken into account by the calculation program.
Pros and cons of plaster
Applying plaster is a universal option for finishing ceilings, because it can be done on any building base - concrete, brick, wood. On each type of floor, the material will hold tightly, reliably, be strong and durable.
Other advantages of finishing ceilings in this way are given below:
- Economical. The cost of plaster is lower than the price of panels and suspended ceilings, especially if applied independently.
- No hiding of space. The plaster layer minimally reduces the height of the ceiling: if there are no strong differences, it will become lower by only 3-5 mm. For small rooms with low ceilings, this can be a significant advantage.
- Environmental friendliness. Plaster is the cleanest, safest material that does not produce harmful fumes. It can even be used in children's rooms.
- Easy care. Plastered and painted ceilings can be washed with a brush, roller, or painted again - refreshing them a couple of times a year will not be difficult.
Also, the advantages of applying plaster to the ceiling include the strength and solidity of the completed layer, the absence of the need to install a frame, a long service life, and the repairability of the coating.
The disadvantages of plastering ceilings include the following:
- Possibility of increased cost of work. If you hire a team of finishers to put the ceiling in order, their services will cost a decent amount. The more defects and differences there are on the ceiling, the more expensive it will be to repair it.
- Limitation on layer thickness. Differences of more than 5 cm will have to be smoothed out in a different way. If you decide to apply plaster, if the humidity or temperature in the room changes, it may peel off and fall down. In addition, the consumption of the mixture will be significant, and this will again cause an increase in the cost of work.
- Need for skills. Before deciding to plaster the ceiling, it is better to practice finishing walls or other structures. When you touch the ceiling for the first time, it is unlikely that you will get an ideal leveling result.
- Need for evenness. As a rule, after plastering, the ceiling is painted, and it cannot be hidden with wallpaper like walls. The surface to be painted must be prepared especially carefully so that it is as smooth and even as possible.
Coating repair and care
If the painted surface is damaged, you need to remove the paint around the crack or dent and cover the defect with putty. After drying, rub the surface, prime and paint. Caring for decorative plaster is more difficult. Rules:
- Venetian requires careful handling. Serious contamination should be avoided and wiped regularly with a dry cloth. Do not treat with household chemicals.
- Quartz-filled materials withstand friction better, so they can be wiped with a damp cloth and vacuumed.
- Relief decorative plaster can be wiped with a regular cloth or sponge and is not affected by household chemicals.
To properly care for the surface, you need to read the recommendations of the manufacturer of the facing materials.
If you act according to the presented technology, your ceiling will become smooth, even and ready for whitewashing, applying paint, and gluing wallpaper. In the future, it is possible to apply a decorative texture to create a unique design. The technology for plastering the ceiling is not very complicated, but some stages of the work require special skills. The right choice of materials and tools allows you to do the finishing yourself. High-quality plaster will look no worse than a suspended or suspended ceiling.
Share in the comments whether you are ready to carry out the leveling work yourself, or is it better to hire hired workers.
How to determine the level of a new ceiling and the thickness of the plaster
If the ceiling is to be covered not with paint, but with decorative plaster, rough leveling does not require special care. It is only important to eliminate obvious defects and blockages, kinks, by first measuring the ceiling with a laser level, a regular level, or by pulling cords.
To accurately calculate the height of the new ceiling, you need to find the lowest point, which determines the maximum thickness of the layer. Then they make marks located in a single plane, which again a level will help with. Dowels are driven in according to the marks and cords are pulled, which will later help install beacons. It must be remembered that the minimum plaster layer should be 3-4 mm.
Mistakes made at work
Lack of reinforcement, improper priming and other errors lead to swelling and cracks. The plaster quickly falls off if the work is not done in good faith. Examples of errors:
- Too thin a solution may drain on a crooked base.
- The thick mixture does not adhere well to the surface, so the plaster bulges or falls off.
- The surface is not primed. In such cases, the plaster adheres less well to the surface. If you do not prime the putty before applying the 2nd layer, it is guaranteed to fall off during grouting.
- Many craftsmen believe that the primer is used only to moisten the surface, so they do not wait for it to dry or water the ceilings with ordinary water.
- Lack of reinforcing elements at the junctions of joints made of different materials.
- The absence of reinforcement often leads to the formation of cracks as a result of shrinkage.
- Some builders do not know that the reinforcement should be inside the plaster layer, and not under it. Because of this error, the solution is more easily deformed.
- Beacons cannot be left in the wall as they rust. Traces of corrosion appear on the surface after finishing.
- The solution hardens worse at temperatures below +5 degrees.
- Moisture evaporates from the mixture too quickly if the room is too hot.
When plastering, the thickness of the permissible layer must not be exceeded.
Before applying each new layer of finishing materials, you must wait until the previous one has completely dried. Haste is one of the main mistakes of inexperienced builders.
Surface preparation
The plaster should be applied to a previously prepared surface. This will be the key to its longevity.
- Using a metal spatula, we remove the remaining finishing, old paint and putty, and, if necessary, poorly adhering areas of finishing.
Note! Cleaning of the concrete base can only be done mechanically. Under no circumstances should you wash off the putty and whitewash; it will not be possible to completely remove them this way, and the residue after washing will interfere with the adhesion of the primer.
- After the old plaster is removed, we begin to apply the primer. It is optimal to use a primer for smooth surfaces such as “Knauf Betocontact” (price - from 650 rubles). The advantage is explained by the presence of quartz grains in its composition, which, when polymerized, form a fairly rough surface that feels reminiscent of sandpaper to the touch.
Today, plastering of concrete walls and ceilings is most often done using this particular primer.
Advice! When choosing a primer, pay attention to the manufacturer and give preference to well-known, popular brands.
- Once the surface is primed, leave it for 12 hours. It is better if the primer dries naturally, so give up the idea of speeding up the polymerization process by opening windows or turning on the heater.
This completes the preparatory work that our ceiling plastering technology provides for.
Advantages and disadvantages of plastering ceilings
Firstly, suspended ceilings always take up several centimeters of space, and if repairs are being made in a small area, then this nuance will be decisive. Secondly, the cost of suspended ceilings and mixtures for plastering surfaces cannot even be compared - the difference is very noticeable, and not in favor of modern structures. Thirdly, plaster is an absolutely environmentally friendly material that absorbs moisture and maintains a normal level of air humidity in the room.
If we talk about plasterboard ceilings, then we need to consider the following points:
- You will need skills or experience in construction;
- all work is carried out on the ceiling, so you will definitely need an assistant;
- Under no circumstances should you make mistakes when marking - it will be impossible to correct.
You may get the impression that ceiling plaster has no disadvantages at all - this is not the case. What are the negative aspects of such finishing of the ceiling surface that need to be taken into account:
- Working with plaster mixtures is necessary for those who have at least a minimal understanding of the process.
- The ceiling after plastering must be perfectly smooth, because any flaw will literally be “conspicuous”.
- If there is a gap of 2 cm or more between the floor slabs on the ceiling, then it is better to give preference not to plaster, but to some other finishing method.
- The work of hired craftsmen will be expensive. Although, on the other hand, it is a team of professional workers who will do the work quickly and efficiently, and the low cost of materials will remain just as attractive.
Application of decorative plaster (how to make the ceiling unique)
Finishing with decorative plaster allows you to increase the aesthetics of the ceiling in the room.
The work uses techniques for finishing other surfaces:
- imitation of “wet silk”;
- under a stone;
- Venetian plaster;
- "bark beetle", etc.
First, the ceiling is leveled, plastered with a starting mixture, dried and sanded. At the final stage, a decorative layer is applied. For each technique, the number of coatings and texture reproduction are provided. After treatment, the surfaces are dried.
If the decorative mixture is not tinted, the next step is sanding and painting the ceilings. Some techniques (“wet silk”, textured textures) use waxing.
Expert advice
If you follow the plastering technology, you will achieve excellent results, and the recommendations of the experts will help you avoid difficulties in your work:
- to eliminate small unevenness on the ceiling, you can use ready-made plaster mixtures;
- If you use lime plaster, protect your hands and eyes;
- for better adhesion of surfaces, use a primer from the “Betonkontakt” series;
- if you need to apply a plaster layer more than 5 cm thick, install a reinforcing mesh.