Installation of plaster beacons on the ceiling is necessary for precise leveling of the surface. With their help, you can adjust the thickness of the applied layer. This can be very necessary, especially when finishing large areas, since plastering the ceiling is a “wet” and rather labor-intensive process, and the cost of materials and work is not cheap. In addition, each additional 0.5-1.0 cm in thickness of the applied layer significantly increases the solution consumption. Therefore, using beacons when plastering the ceiling, you can save a lot on room renovations.
In addition to saving on materials, beacons allow you to speed up plastering work. When applying the solution to the ceiling, you will not need to monitor the thickness of the layer, since it (the level) will already be set according to the beacons. All that remains is to carefully level the mixture over the surface using the rule.
Thus, the use of plaster beacons when leveling the ceiling will bring the following benefits:
- saving on materials: reducing the consumption of plaster mixture due to precise determination of the layer thickness.
- evenness of the ceiling surface.
- increasing the speed of plastering work. True, laying and leveling the beacons will take much more time, but all this is compensated by the quality of the resulting surface.
The most important thing when installing plaster beacons is to accurately align them to the same level. This work is not that difficult; anyone can do it with their own hands. And we will look at how best to implement this in this article. In the meantime, you should familiarize yourself with the most common types of plaster beacons and choose the one most suitable for your premises.
How to level a ceiling with your own hands using beacons?
When performing leveling, an important parameter of the work will be not only the quality of workmanship, but also how difficult it will be to achieve a good result. When large surfaces have to be processed, many difficulties arise, primarily associated with obtaining an evenly and evenly applied layer of the composition.
This task can be made easier by using a simple device – a plaster beacon. They are used by everyone - from home craftsmen to professionals, since they are the ones who will allow you to obtain an even distribution of the composition over the surface.
We will tell you further about how to use such devices and how to level the ceiling or any other plane using beacons.
Comparison.
There are a huge variety of options on the market. Suspended ceilings of various colors and patterns, plasterboard structures defining unique shapes and decorative coatings. What is better: suspended ceiling or plaster? Often this question arises during a major overhaul.
As always, there are pros and cons on each side. A plastered ceiling is a reliable and complete coating that is difficult to influence by external factors. When there are children at home, it is better to choose plaster than a suspended ceiling. After all, throwing an object can make a hole in the stretched fabric.
But, stretch ceilings are much cheaper than plaster and can be done in a short time. In general, it’s just a matter of personal choice and it’s up to you to decide.
Before you start working with beacons
The entire surface to be processed must be cleaned of all traces of the old coating. Particularly firmly held areas do not need to be completely cleaned off; there will be no harm from their presence, as long as their thickness allows the necessary layer of solution to be applied, completely hiding them.
The next mandatory stage of work is priming. A primer with good penetrating properties is needed. Regular Betonkontakt will do just fine. After letting it dry, you can proceed to installing the leveling beacons.
What does the preparatory work include?
Preparing the ceiling surface requires special attention from specialists, because otherwise, the beacons and plaster may simply fall off. To avoid a negative result, some additional work must be done. Let's look at it in more detail:
- Maximum cleaning of the ceiling from various deposits, chips, and, of course, dirt. The fact is that it is these elements, if present, that can become the main cause of an undesirable result;
- Applying a primer, or, in other words, a primer. This solution will help to significantly increase the adhesion of the surface of the floor slab to the plaster mixture. In this case, you should not save money and purchase a budget primer. It is much more important to consult with specialists and buy a more expensive, but also higher quality impregnation, which will retain its properties for a very long time;
- Gluing a bandage, which is a regular nylon mesh, which is shown in the photo below. It is often used as a reinforcing material for penoplex and other similar materials. PVA can be used as an adhesive base for the mesh, applying it with a brush or spatula. Next, you should wait 48 hours, because this is the time it will take for the glue to dry completely and you can begin installing the beacons.
What is it and how is it used
The plaster beacon itself is usually a perforated metal strip, curved in a special way.
It is attached to the ceiling or wall, to areas of putty or plaster, applying them in dots, which are subsequently leveled with the entire plane.
In places where these plaster cakes are applied, the profile will be attached to the surface being treated.
The thickness of the plaster profile can be different - from 6 to 8 millimeters, but, the basic principle of operation, their thickness will not affect in any way. It only affects the rigidity of the product itself - the thicker it is, the stiffer it is.
Tools and materials
For work we will need:
RECOMMENDED ON THE TOPIC
- Decorative plaster for…
- Structural plaster for…
- deep penetration primer;
- gypsum plaster;
- plaster lath (beacon 6 mm);
- a construction mixer or a drill with a special attachment;
- serpyanka (plaster mesh) with a sticky side;
- wide plaster mesh (optional);
- narrow spatula (for applying the solution);
- wide spatula (for leveling the plaster);
- Master OK;
- rule;
- horizontal level;
- bath for painting;
- roller with extension;
- plastic bucket;
- protective glasses;
- respirator;
- gloves;
- headdress.
Installation of beacons
The plaster is diluted to a very thick sour cream state. With this mixture, dots or spots of solution are applied to the plane. Our simple device will be installed in them.
Since the ceiling will be leveled according to the installed profiles, the quality of the leveling depends on how accurately and correctly they are installed. Therefore, their precise alignment should be given special attention.
The part needs to be applied to the stains of the solution, and slightly pressed into its surface so that the device does not fall off, but at the same time, its protruding edge remains at the desired level.
To do this, use markings on the walls and a building level. It is advisable to take it longer so that long devices can be adjusted.
All parts are displayed and must be in the same plane. You can control this moment by using a thread or cord stretched from corner to corner of the room.
They begin their installation from the lowest corner in the room, retreating from the plane of the existing ceiling, about 1 centimeter. You can reduce this distance, but only by such an amount that the resulting layer of plaster hides all defects in the floor.
The first part is installed strictly according to the markings, constantly monitoring the horizontal position of the profile, therefore, it is necessary to use a longer level.
Next comes the turn of the next element, the guideline for the installation of which will be the already fixed beacon and markings on the walls, all of them must fall on the same level.
Then comes one more detail, and so on until you get a kind of lattice of profiles on the ceiling.
They are attached to the plaster mortar so that between the installed beacons there is a distance that will be 20 centimeters less than the length of the rule used.
When all the devices are set at the desired level, they are given time to “grab.” After this, you can apply the bulk of the plaster.
Which mortar to choose: gypsum or cement?
To make the right choice between cement and gypsum plaster, you need to have a good understanding of what both of these mixtures are used for, what their main advantages and disadvantages are.
Gypsum gives the finish greater plasticity. Plaster based on it has a lower density than cement plaster. It has a more attractive texture and there is practically no shrinkage. Gypsum mixtures are porous, the finish is vapor-permeable, which prevents the development of mold on it. In addition, such gypsum hardens quickly.
However, such mixtures have two drawbacks: they do not tolerate high humidity and cost 1.5-2 times more than cement ones. In this regard, the use of gypsum plaster for finishing the ceiling may be limited.
Mixtures based on cement binder have high strength. In addition, they have higher adhesion and are not afraid of water. The components from which such plaster is made cost less, which reduces the overall cost of repairs.
Cement compositions take a long time to harden. Due to its lower plasticity, the mortar is more difficult to level, and finishing putty is additionally required before painting. Large weight creates additional stress on the building structure. When cement plaster falls from the ceiling, it hits harder and poses a serious threat to those living in the house.
Based on the listed properties of these two finishing materials, it becomes obvious that cement mixtures are more suitable for plastering the ceilings of wet rooms, such as a bathroom, and also when you need to obtain high strength and good adhesion to the ceiling, for example, when sealing slab joints and cracks. Gypsum mortar is more often used for small uneven areas, as a finishing touch on beacons in rooms.
Plastering
Apply the plaster mixture using a regular trowel, achieving approximately the same layer thickness over the entire plane of the ceiling.
The rule, moistened with water, is pressed against the edges of the fixed profiles, and is applied with such pressure as to “remove excess plaster protruding beyond the limits of the layer limited by the height of the profile.
The entire ceiling area should be treated in this way. After plastering, it should be a continuous and smooth surface.
Which is better: heated floors or radiators?
Warm floorBatteries
If it is assumed that the total resulting layer should be more than 10 millimeters, it is necessary to plaster in two passes, leaving the first layer to dry for some time. You don’t have to level it, but simply spread the mixture on the ceiling. The next stage of leveling is carried out the next day, after the first layer has dried. It should already be applied according to all the rules.
To make it easier to understand the essence of the process, below is a video in which you can level the ceiling yourself. You can be sure that there are no particular difficulties here, but some dexterity and skills will be required.
The final stage of all plastering work will be the application of a thin layer of finishing putty, if planned. When leveling for painting, this step is necessary, but for gluing wallpaper or other decorative coverings, it can be skipped.
Briefly about the main thing
Plastering the ceiling can be easily done with your own hands. To ensure proper results, 3 main conditions must be met:
- Purchase a high-quality finishing mixture.
- Stock up on a set of necessary tools.
- All work should be carried out in strict accordance with the technological map given above.
Immediately after installing the plaster, it is necessary to check compliance with the horizontal plane using a building level. When carrying out work, it should be taken into account that plastering the ceiling is a dirty and dusty process, and therefore it is necessary to take care of personal protective equipment - masks and respirators.
Installation of beacons under ceiling plaster using a laser level
Expert builder Viktor Petrovich says:
Today we will look at the following questions: how to properly prepare the ceiling for plastering, how to correctly mark the beacons, and how to install the beacons correctly. The first thing you need to do is prepare the base of the ceiling, that is, you need to clean it of all dirt, dust, adhering solutions and everything else.
The second stage is to prime the ceiling surface. Completely and twice. At the same time, our goal is to ensure that the primer is absorbed into the surface as best as possible, and that, accordingly, less moisture from the solution goes into the ceiling. Next, the ceiling will need to be treated with concrete contact in order to give the monolithic ceiling roughness.
Cleaning the ceiling. Installing self-tapping screws using a laser level
Using a spatula, we clean the surface of the ceiling and remove excess mortar from it. In this case, we recommend using a stepladder, since you need to perform work at height. As a result, our ceiling becomes completely ready for further work.
Then you need to find the highest point on the ceiling (in other words, a dent) running along the wall, where the laser level will be located. We place it as high as possible: that is, it will be mounted on our wall, resting directly on the ceiling, and by its beam we will determine the evenness of the surface.
To mount a level on a wall, we make a hole in its surface, insert a dowel there, and then screw in a self-tapping screw. Please note that the laser level has an attachment that allows it to be mounted on a wall. We are talking about a special regulating mount. We also use a Sormat dowel for work, and our self-tapping screw is black for wood.
We mount the laser level on the wall under the ceiling
At the next stage, we make markings for the screws in those places on the ceiling where we should then have beacons. For this we use laser level beams. Then we make a hole in the ceiling, install a dowel there and screw in a self-tapping screw.
The most important thing is that the head of this self-tapping screw is in the middle of the laser level, that is, we should see that the level of the head is clearly highlighted. In order for it to be in the surface at the depth we need, which is determined with millimeter precision by a laser beam, we advise you to use a screwdriver. We also install other screws. For one beacon, in principle, two screws will be enough.
The screw head is aligned using a laser level
If you don't have a laser level, you can use regular household thread. We stretch it from one wall to another almost right up to the ceiling. It will also show us at what level from the ceiling the heads of the screws should be so that in the end we can get a perfectly flat surface. When using a laser level, in the end, all the caps should be illuminated with a red beam and should be in the same plane.
Primer of the ceiling surface
Next we prime the ceiling. It is better to do this with a roller and, accordingly, use a long telescope handle. Very comfortably. Also, to work, you need to have a roller (here is a trough): the primer is poured into it, and the inclined ribbed surface of the roller allows you to remove excess drops from the roller.
Please note that our ceiling was initially already treated with a primer. It has also already been treated with concrete contact to obtain roughness. But after we installed the screws and made holes for this, we need to go through the dirt again. Since we have been generating construction dust and now we need to nail it onto the ceiling with a primer so that later our plaster does not swell and fall off.
Prime the ceiling surface with a roller
But why do you need a primer at all? It penetrates the surface and prevents moisture from being absorbed from the plaster mortar, which prevents any cracking and peeling in our future plaster. After we have primed the ceiling, we need to wait 20 to 40 minutes for the primer to dry and we can start installing the beacons.
Installation of beacons
The installation of beacons on the ceiling begins with the fact that we take and stir the plaster solution with a construction mixer. You can work with the solution for 20-30 minutes, and then it hardens and can be thrown away. Therefore, you cannot mix large, huge buckets of plaster and leave them for a long time.
You need to mix as much solution as you can work out for 20-30 minutes. Pay attention to this. For example, for one person to work, as experience shows, a third of a standard large bucket is enough. For now, you can take this value as a guide, and then you can see for yourself how much solution you actually need to work in the specified time.
Mixing the plaster solution
Also, after you have mixed the solution, leave it for literally 2 minutes so that it becomes uniformly thick, that is, so that all the necessary chemical reactions occur in it, and then stir again. The plaster solution is ready for use. It should be homogeneous and have a fairly thick consistency.
In addition, even before starting work, you need to prepare the beacons. We take them perforated 6 mm. Usually they are 3 m long, so we need to cut them in advance to the size of our room.
So, for work, we take a rule, set it in the direction of the screws and our future installed beacons. We make marks on it, according to which we will then make “bloopers” or “slaps” (whatever you want to call it) from the plaster mixture. Subsequently, our beacons will be held on them on the ceiling.
Marks should be made approximately 20-30 cm apart so that the beacons do not fall, but are well fixed (or, as builders say, “frozen”) on the ceiling. After making the marks, we take the solution, take a spatula, and use the spatula to apply “plaster mixture patches.” In this case, it is convenient to work with two spatulas: one makes “blunders”, and the second serves as an auxiliary tool.
Using a spatula we apply “bloopers for beacons”
Then we take the beacons and embed them, as a rule, into patches of plaster mixture. At the same time, the self-tapping screws that we rigidly fixed at the height we need do not allow the beacons to go to greater depths. Our goal is to end up with a perfectly flat ceiling, so everything was initially installed using a laser beam, and the self-tapping screws are like fixers of the required distance of the beacons from the ceiling.
Moreover, our self-tapping screws are firmly screwed into the ceiling, and therefore they will not budge or become deformed. If you don’t use them, but rely only on the width of the “blap,” then you can easily get unevenness: an uncured plaster solution is pliable, you can easily sink a lighthouse into it to a great depth, and the plaster mixture itself can easily float.
We embed the beacons into the solution
And one last thing. After we have installed the beacons, we need to wait for the solution to set and for the beacons to stay on the ceiling so tightly that they can then be guided with a rule-level. In the future, you will need to apply plaster and level the surface of the ceiling along the beacons.
Recent Posts
Cost and expense.
The consumption of dry mixtures when plastering ceilings can be completely different. There are many influencing factors here, such as flatness of the plane and quality of cleaning. Focus primarily on the consumption prescribed in the instructions. As an example, consider the average value:
- plastering the ceiling with gypsum plaster has a consumption per 1 m2 of about 9 kilograms with a layer of 10 mm;
- for cement plaster the data is higher, on average almost 17 kilograms per 1 sq.m.
- Decorative dry and liquid mixtures have significantly lower consumption when plastering ceilings. About 5-6 kg per square meter. This is because there is no task of leveling the plane, you just need to decorate it. Application is made in a layer of 1-2 mm.
The cost of Rotband is 360 rubles.
for 30 kg bag. The price of other mixtures is approximately in the same category; the domestic manufacturer always dumps a little. Liquid compositions for decoration can cost 2500-3000 rubles. for a 25 kg bucket. data-matched-content-ui-type=”image_stacked” data-matched-content-rows-num=”2″ data-matched-content-columns-num=”3″ data-ad-format=”autorelaxed”>
Which water sockets are better: pressed or crimped?
What is the difference between water sockets for pressing and crimping? Why does our expert recommend installing water sockets specifically under the press? What are three reasons for this?
3 comments
Really valuable information. At the same time, everything is visible and understandable. It is especially useful to know how tools are held and how they are used.
So how to make markings for self-tapping screws? This is where it all begins, and this was not explained...
How do you mean “so that the plaster doesn’t sag on the ceiling -? :)))
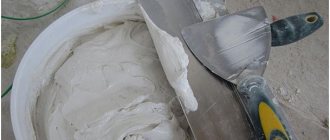
Preparation of plaster mixture
Experienced craftsmen recommend using gypsum plaster for finishing ceilings in residential premises, for example Khauf Rotband, VOLMA-Canvas, Prospector Optimum. Gypsum plaster is more flexible than cement plaster, which means it is easier to work with. It is less susceptible to cracking during the drying process, and gypsum plaster hardens faster.
Gypsum plaster Knauf Rotband
However, for rooms with high humidity (bathrooms, kitchens), the use of gypsum plaster is not recommended. In such rooms it is necessary to use plaster that is resistant to moisture, for example cement, cement-lime plaster.
How to level a ceiling
If you want to achieve such a result as a perfectly flat ceiling when carrying out repairs, then, of course, you need to make some effort. And, first of all, to achieve this effect, it is important to eliminate any differences and irregularities that are initially present on its surface. Leveling the ceiling is carried out using beacons, and also, contrary to controversial opinions on this matter, without them.
It is on consideration of both methods that we will dwell today.
To conclude this point, I would like to give a recommendation regarding a layer of putty, which should not be more than 50 mm. Otherwise, too thick a layer can lead to the collapse of the mixture, even if the layers are applied gradually, layer by layer. Taking this into account, monitor the thickness of the layer, and if it is exceeded, use additional reinforcement elements or a cement-sand mixture with mesh.
When plastering without the use of beacons, the relief of the ceiling is more or less repeated while simultaneously smoothing out its unevenness. As a result, both time and materials are saved, but the downside is that the ceiling is not leveled as such. This method may be suitable for large rooms where high quality is not required.
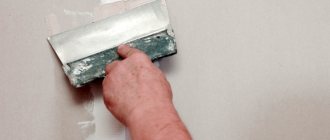
Before moving on to explanations on this topic, I would like to point out that in each specific case, specialists use their own, so to speak, proven method of puttying. Nevertheless, there are general principles that will allow you to determine how to do this correctly. These statements are also true regarding the tools used, not to mention specific materials or technologies. For example, the choice of spatulas. Spatulas used as the main tool can be selected that, in your opinion, will be more convenient to use, the main thing is that they are of different sizes.
Most often, large spatulas of 60 and 45 cm and small spatulas of 8-12 cm are used. The latter are more suitable for applying the mixture used on a large spatula.
Surface primer
Priming the ceiling is an important part of the job. It is needed for reliable adhesion of the plaster to the ceiling. It is best to use a deep penetration primer, as it provides the highest adhesion strength of the finishing layer to the concrete base. Another plus is that many types of this primer contain additives that prevent the growth of fungus.
Before proceeding directly to the primer, you should clean the ceiling of the old coating, if any (paint, whitewash, falling off plaster, etc.). If the work promises to be dusty, it is advisable to use special glasses and a respirator. They will protect your nose, mouth and eyes from construction waste. Clean the ceiling with a spatula, water and a rag. To remove paint, it is better to use a special metal brush.
After cleaning, the ceiling is washed and left to dry, and the room is also wet cleaned. This is necessary to prevent dust from settling on the primed ceiling.
Having carried out the preparatory work, we proceed to the primer.
- We protect all already finished surfaces by covering them securely with film.
- We put on gloves and a hat.
- Pour the primer into the prepared paint tray.
- We dip the roller in the primer, get rid of excess moisture using the ribbed part of the tray and coat the ceiling in one direction, leaving no gaps.
- We are waiting for the ceiling to dry.
- We do the same thing, applying the primer perpendicular to the previous layer.
- Washing tools.
If you suddenly drip primer on the floor or walls, immediately rinse them with warm water. Otherwise, there will be a stain that will be impossible to get rid of.
How to make a ceiling even
The technology for leveling ceilings and walls is very similar, therefore, having studied the theory of plastering ceilings, you can safely apply it to walls in practice.
Only overhead or pendant lamps and chandeliers can be installed on a plastered ceiling. Leveling the ceiling with plasterboard allows you to use any lighting devices (surface-mounted, spot).
It will perfectly hide all the irregularities and hide any communications passing under the existing ceiling.
It is important to know! If the ceiling difference is more than 5 cm, then plastering of such an area is carried out in two layers.
The second layer is applied after the first has dried.
- Water or laser level
- Upholstery painting thread
- Rule with a level of 1.5 m
- Electric impact drill or hammer drill
- Set of wood crowns
- Screwdriver
- Grinder or hacksaw for metal
- Tape measure and pencil
- Hammer
- Metal scissors
After the plaster is applied to the entire ceiling, it should dry and set. The beacons are removed and the seams are sealed with mortar. The entire surface of the ceiling is rubbed with a grater - this will remove small irregularities from the rule.
Our advantages
We carry out plastering work in Moscow and the immediate Moscow region;
any volumes – from 1 m2;
Slavic craftsmen with more than 10 years of experience;
we conclude an agreement;
3 year warranty;
no prepayment;
possibility of payment both in cash and by bank transfer;
We accept orders 7 days a week;
regular promotions and discounts.
We cover the wall with sheets of plasterboard without a profile
The method is called “dry plaster without profiles.” Moreover, when the wall is made of aerated concrete, installing drywall directly to the wall is the only acceptable option. After all, drilling into aerated concrete is highly not recommended: it is difficult to install an anchor into it, which will then serve as a fastener for a system of wooden slats or a profile.
If you decide to try the “dry plaster” method, you need to prepare the wall.
To do this, you need to clean it from the remnants of old plaster. Having cleaned the wall well, cover it with one or two layers of primer, allowing it to dry according to the manufacturer’s recommendations. Some packages even have a primer application diagram.
Here is a list of tools and materials you will need. We provide a list of professional tools that a home craftsman may not have.
After the description of the tool, it is indicated what can be used to replace it. We apply detailed markings to the wall, determining where and how the plasterboard sheets will need to be cut. If the distance from the floor to the ceiling is greater than the length of the sheet, then the cut piece must be inserted in a checkerboard pattern: the first one to the ceiling, the next one to the floor.
Don't forget about those places that we will need to leave open, for example, about the pipes coming out of the wall. Cleaning the wall from old plaster: a – cleaning with a scraper; b – smoothing with a float or an articulated grater; c – diagram of the movement of the working tool.
Installation of plaster beacons on the ceiling
Whatever type of beacons you choose, installation work begins with marking the ceiling surface. The exception is wooden blocks - for them it is necessary to carry out a number of preparatory work.
First you need to prepare a small amount of the plaster solution that will subsequently be used to level the entire ceiling. Next, you need to apply the mixture to the surface in small sections (in the form of “cakes”) along the marking lines under the places where the beacons are attached.
The step of laying the mixture is 30 cm.
Next, armed with a long ruler and a bubble level, you need to move the zero level mark to the opposite wall of the room. Although it is much more expedient to draw an even, continuous line along all the walls, forming a closed contour.
This will be a reference plane for placing beacons. If any irregularities are found, they should be corrected immediately. Depending on the type of deviation (above or below the intended level), the beacon is either pressed even further into the solution, or more mixture is placed under it.
Having completed all the above operations, we will receive a marked surface, ready for installation of plaster beacons. By the way, the work of marking the ceiling can be fully automated using our finishing calculator, and thereby save your time. In addition, this program will provide an accurate calculation of the quantity of all necessary materials and components.
How to plaster a ceiling using beacons
You can level the ceiling space with or without beacons. Plastering the ceiling without beacons is recommended if the surface has large differences in height. In this case, a layer that is too thick may simply fall off; even intermediate application of primer will not help.
Repairs to a house or apartment are very rarely complete without leveling any surface.
The ceiling space in this case is no exception. Among the many options, we can highlight leveling the ceiling by applying plaster mixtures. The process is quite simple, but requires patience and accuracy.
You can get a perfectly flat surface using plaster beacons.
The auxiliary elements are removed after the solution has set a little. The remaining grooves must be rubbed with plaster mixture and carefully leveled.
If you leave the guides, then after some time rusty spots will certainly appear near them, which can ruin the finish
At this stage, the ceiling space is cleaned of all types of finishing and dust is removed. Cover the entire ceiling with a layer of primer and wait for it to dry.
The better to plaster
To plaster the ceiling, you can use a regular cement-sand mortar, or the same one, but with the addition of lime. But it is advisable to apply a small layer. Although this mixture turns out to be the cheapest, recently it has been used infrequently - it may fall or crack.
The place of conventional mortar has been taken by plasters based on polymers, which have better adhesion and are less likely to crack. Their disadvantage is their high price. But redoing the ceiling after the applied layer falls will not be cheaper. Therefore, they prefer to immediately make flow plaster from modern mixtures. Some types of similar materials recommended for ceilings are shown in the table.
If you have little experience in plastering work, when choosing a composition, pay attention to the time before the mixed solution hardens. During this period, it is necessary to apply and level the entire solution, because then it begins to harden and loses its elasticity. Of the plasters listed in the table, Volma has the longest “life” period. But not everyone likes to work with it, many say that with Knauf it is easier, although they have a shorter drying time - 50-60 minutes, but it is more than enough even with no experience.
How to level a ceiling with your own hands using beacons
The next mandatory stage of work is priming. A primer with good penetrating properties is needed. Regular Betonkontakt will do just fine.
After letting it dry, you can proceed to installing the leveling beacons.
When performing leveling, an important parameter of the work will be not only the quality of workmanship, but also how difficult it will be to achieve a good result. When large surfaces have to be processed, many difficulties arise, primarily associated with obtaining an evenly and evenly applied layer of the composition.
Aligning the ceiling with beacons is not an easy task. You won't be able to learn this in a couple of hours. Therefore, to gain initial experience, it is better to seek advice from a professional or a person who has sufficient experience in such work. To make it easier to understand the essence of the process, below is a video in which you can level the ceiling yourself.
You can be sure that there are no particular difficulties here, but some dexterity and skills will be required. The part needs to be applied to the stains of the solution, and slightly pressed into its surface so that the device does not fall off, but at the same time, its protruding edge remains at the desired level. It is better not to rely only on visual inspection.
Use a laser level or the simpler method using thread. On the two extreme sides of the wall, screw screws into the wall from above and lower plumb lines from them to the floor. Most often, such profiles are installed on a mixture solution with which the walls will be plastered. Sometimes they are installed on dowels. Below we will look at how to do this.
Each first beacon should be slightly shorter than the big rule (a 2.5 m long tool will do for us). And the second lighthouse depends on the situation. Now we need to mark the places where we will screw the screws. This can be done with a marker/pencil.
A solution that is too thick will not adhere well to the ceiling. There is a possibility that it may sag, but this certainly cannot be allowed. It is better to choose the application method, depending on the thickness: up to 1.5 cm - we use a steel trowel, i.e. we apply plaster on it, and then carefully smooth it on the ceiling; if the thickness is more than 1.5 cm, then it would be much more logical and expedient to use a spatula.
How to treat the surface → Room decoration → How to choose the right paint → Surface treatment technologies → Leveling and finishing the walls → Selecting and applying a primer → Removal from the surface → Stretch ceilings and technologies → Reviews and testimonials
The first signs of defects and the beginning of repairs.
Defects from application errors.
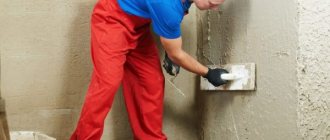
Such problems appear over a short period of time without obvious reasons. If you notice cracks or crumbling of the surface, start assessing the complexity. Tap the surface with a hammer or mallet, and go over it with an old spatula. The primary task is to remove pieces of plaster from the ceiling that do not adhere well. They had long since peeled off, and air voids had formed between them and the base. Such places are identified by a dull sound. For a small area, it is enough to simply remove the weak surface by re-covering the area with a solution of fine sand or putty. Be sure to prime the surface to be treated before applying again. This will significantly increase its adhesion.
Note: Over time, any ceiling tends to fade or simply change color. By replacing a small area, you may encounter a bright spot that stands out. This is critical only if the ceiling is finished with decorative plaster. In other cases, it will all close at the finish line.
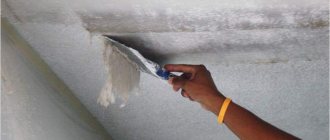
Problems after flooding from above.
Dampness appears pointwise, where the passage of moisture has less resistance. Partial repair of such ceilings is also possible. The weakened plaster in the problem area is removed, but you should additionally clean the area around 50 cm. This will protect you from peeling and unexpected weakening. In this case, the ceiling is often plastered with gypsum plaster.