Smooth walls in a city apartment are more a rarity than the norm. Before finishing work, they need to be leveled, which is why beacons are used.
Thirty years ago, instead of lighthouses, any available means were used, from wooden slats and stretched threads to pieces of cardboard. Such parts were cheap and easy to use, but the quality suffered greatly. In 2022, beacons are easy to find on the market - they are a (T)L-shaped aluminum profile that is glued to the wall surface with plaster.
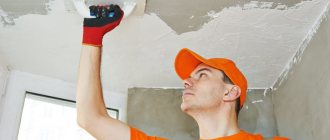
Leveling walls and ceilings with putty
Beginners in the construction business often doubt whether it is possible to level walls with putty. The craftsmen are sure that it is possible, but you should remember that only small defects can be smoothed out with putty. If the walls or ceiling are very problematic, then they are covered with plasterboard or pre-plastered with starting mixtures.
Note! Puttying is the penultimate stage of finishing, after which they immediately move on to painting or wallpapering.
Features and benefits
Leveling the walls with putty solves several problems at once.
- Eliminates depressions, cracks and uneven surfaces.
- Maximizes the usable area of the room. Uneven walls can simply be covered with sheets of plasterboard; this will take less effort and time, but will significantly reduce the space, which is especially important for small apartments, such as Khrushchev-era apartments.
- Improves adhesion to finishing materials (paint, glue, textured plaster, liquid wallpaper, etc.).
- If finishing painting is planned, then the paint consumption will be less and the color will be even, since after puttying a smooth base remains.
- If you have to glue wallpaper or foam tiles, then putty will save on glue. It has water-repellent properties, so it will not absorb excess glue.
Advantages of lighthouse plaster
To ensure a flat and smooth surface, two types of plaster can be used:
In the latter case, the ceiling or walls are covered with sheets of plasterboard. This finish is several times cheaper than wet plaster, but has a number of disadvantages. Its disadvantages:
Monolithic plaster is carried out by applying a working solution to walls, partitions and ceilings. Wet method:
Applying wet plaster is a labor-intensive process. But if you know the procedure for performing the work and the technology for applying the mixture, you will be able to create a high-quality base for finishing. Plastering beacons with your own hands will allow you to achieve a smooth surface, devoid of convex elements and roughness.
What types of putty are suitable for this?
First you need to find out what types of putty there are for leveling walls.
To eliminate serious defects and differences of up to one and a half centimeters, starting putties are used. They are coarse-grained, adhere well to the surface and are very durable. It is recommended to apply the mixture in two layers, or in one after preliminary plastering.
To prepare the base for applying decorative and finishing materials, use finishing putties. They are fine-grained and form a smooth and even surface. However, such a layer cannot be thicker than 5 mm, since the mixture is less durable than the starting one.
Universal mixtures are more expensive and are applicable both for eliminating serious defects and for correcting minor flaws. However, experts do not recommend using them for deep cracks and potholes.
Note! For substrates with strong differences and chips, it is optimal to use first the starting mixture and then the finishing mixture.
In addition, construction mixtures are dry and ready-to-use. The former are purchased more often: they have a long shelf life and low price. Such mixtures are easy to prepare, but there is a risk of disturbing the proportions and you need to immediately work out the batch before it dries out. The second ones cost more, but are immediately ready for work.
Which is better, composition and characteristics
Depending on the main components, leveling putties for walls and ceilings are divided into:
- Cement. Budget mixtures, very durable, frost-resistant, suitable for wet rooms, for work outside and inside the house. However, they shrink and may crack when drying. Cement mixtures are grey, which may require painting before decorative finishing. The disadvantages include the fact that this solution is not suitable for wooden surfaces, and also hardens quickly.
- Plaster. Universal materials: they do not shrink, are easy to work with, dry quickly, fit well even on wooden bases, and have antiseptic properties. Such mixtures are immediately white, which means there is no need to additionally paint the surface before finishing; even thin, light wallpaper can be glued immediately. The disadvantages are that they are not suitable for damp and cold rooms.
- Polymer. They contain various modified additives, which increases their price. Among the main polymer putties there are: acrylic, latex and polymer cement. The first is universal: it can be used on any surface, indoors and outdoors, for leveling and as a finishing touch.
- Latex putty is applied in a thin layer and only in warm rooms, so it is well suited for working with drywall.
- The polymer-cement mixture fits best on brick and concrete bases; it is similar to cement, but is more elastic due to the polymers in the composition.
Note! Plaster and putty from different manufacturers may adhere less well than from the same company.
Types of putty mixtures
Do-it-yourself wall putty can be done with cement, gypsum, or acrylic mixture.
Main qualities of putties:
- Cement ones are moisture resistant and inexpensive, but are subject to shrinkage and less elastic compared to gypsum ones.
- Plasters are easy to apply, elastic, do not shrink, but get wet easily. They are applicable only for finishing interior spaces in places without high humidity.
- Polymer acrylics do not have the disadvantages of the two previous types of putty, but are more expensive.
According to their function, putties are divided into starting (rough leveling), finishing (cleaning walls) and universal type mixtures.
- Starting mixtures are characterized by layer strength, high adhesion to the base, and granularity. They are applied after preliminary plastering of the walls. Recommended thickness is from 3 to 20 mm.
- To obtain a perfectly smooth surface, eliminating minor irregularities, use a putty finish. It is easy to grout and the layer should not exceed 4 mm.
- Universal putties can be used both at the start and finish stages. They are more expensive, although the quality is not superior to the first two types.
The market offers the client mixtures in dry and diluted form. Dry ones are cheaper and easier to store. Using ready-made putties saves a lot of time, but not everyone can afford them because of the cost. They are also subject to some shrinkage.
How to level an uneven surface with putty yourself
The puttying process requires a certain skill, however, having studied all the intricacies, you can do this work with your own hands.
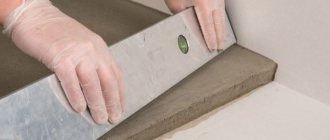
Before you putty on uneven ceilings and walls, you need to determine the degree of unevenness. To do this, you can use a rule. By applying it to the surface, you can see the gaps that need to be puttied. The rule is applied in different directions and the defects are marked with a pencil.
If the gaps are large, then before leveling the walls in the apartment yourself with putty, you can use beacons. Rigid slats are fixed across the entire area for the length of the rule perpendicular to the floor. Plumb lines are attached to the ceiling and lowered down along the slats, making marks on the floor. The slats are leveled vertically. Then the space between them is filled with putty starting solution and smoothed with the rule.
Description of the process step by step, how to do it yourself
Before leveling the walls with putty, you still need to study the technique of the process.
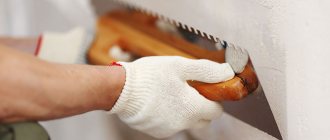
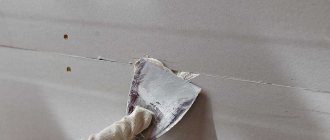
To do everything right, you need to start work from the corners. The corners themselves are formed last with a regular or corner spatula.
- The building mass is also leveled with a spatula, moving vertically and horizontally.
- Some masters advise smoothing the first layer in one direction, and the next in another.
- For convenience and speed, use two spatulas - long and short. The mixture is applied first, and the excess material is removed from it second. Also, use a short spatula to scoop up the solution and distribute it over the long one.
- Each time the movement of the spatula begins to overlap with the previous layer of solution.
- When an area of about a square meter is processed, they walk over it as a rule to remove excess mass.
- The first layer is ready, you need to wait until it dries completely.
- The finished surface is sanded with sandpaper and checked for evenness.
- Next, it is recommended to perform finishing putty to obtain perfectly smooth walls or ceilings. Now you can start decorating.
How to prepare the solution?
We recommend leveling the walls using a ready-made plaster mixture , because it already contains all the components in the required ratio and no special additives are required. The temperature of the cooking water should vary between +5-20 degrees.
Pour water into a container, then add the dry mixture there. It is important to use a clean container without any old plaster residue. First, mix the components with a spatula, then bring to a homogeneous consistency with a drill mixer.
Surface preparation, mixture application and finishing
Before you start puttying, you need to remove the old finish: wet the wallpaper and scrape it off with a spatula, remove the tiles and panels. Then the surface is cleaned with coarse sandpaper. If there are large defects in the form of cracks and depressions, they are plastered with starting solution. After the mixture has dried, the base is sanded again more thoroughly using fine-grained paper.
After this, remove the dust with a damp cloth and apply priming impregnation with a roller. The primer will collect small particles of debris and improve adhesion with the subsequent layer of putty.
Following the rules for performing the work, they begin to level the surface using a putty solution. When the finishing putty has dried, a primer is applied on top and now you can move on to the decorative finishing.
Craftsmen are often asked how to level a ceiling with putty with their own hands. The technique of work is no different from walls, but it is recommended to pay attention to the selection of primer. You need to take deep penetration impregnation and apply it in three layers to ensure maximum adhesion to the putty.
Puttying is a slow and thorough process, but not a single full-fledged repair can be done without it. Having once spent time and effort, the result will be a beautiful and even decorative finish.
How to properly putty a ceiling for painting
How to plaster a concrete ceiling correctly
Plasterboard ceiling putty for painting
Source
Applying putty
It is best to carry out this operation in two steps: first apply the base, rough layer, and then finish with the finishing one. This will take significantly more time, but it will be easier to create a good surface. First, they put on a rough layer and it is smoothed so that it does not reach the top of the beacons by 4 - 5 millimeters. When all the space between the profiles is filled, the mixture is allowed to dry completely, after which it is primed.
The resulting surface will be very far from the desired look and there is still quite a lot of work left to do. The second layer of putty is less thick and is applied more carefully. The thickness of the applied composition should be slightly greater than the thickness of the installed beacons. When leveling according to the rule, all excess will simply be cut off. The plane should be leveled by pressing the rule tightly against the beacons, moving it from bottom to top. Excess mixture collected on the instrument. Always remove cleanly with a cloth.
When this stage is finished, you need to wait a little until everything dries, then apply a primer and the thinnest one - the finishing layer of mortar, which will completely level everything. With this approach, even a not very experienced master can achieve good results. If you plan to paint the wall, you won’t be able to do without finishing leveling, however, if you need to simply get a flat base for wallpapering, you can eliminate the finishing stage of the work - the wallpaper will hide the small remaining flaws.
Source
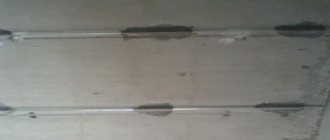
How to level walls with putty according to beacons
Smooth walls in a city apartment are more a rarity than the norm. Before finishing work, they need to be leveled, which is why beacons are used.
Thirty years ago, instead of lighthouses, any available means were used, from wooden slats and stretched threads to pieces of cardboard. Such parts were cheap and easy to use, but the quality suffered greatly. In 2022, beacons are easy to find on the market - they are a (T)L-shaped aluminum profile that is glued to the wall surface with plaster.
How to putty walls for the first time: tips for a beginner
In order for the wall decoration to last a long time and look beautiful, the surface must be prepared for work. Typically, preparation consists of covering the wall with a special compound - putty. This makes the wall even, smooth, and prepares the surface for further repairs. But in order to properly carry out the preparatory work before finishing, you need to know how to putty walls, as well as how to choose the right tools.
Which putty to choose to level the wall
In stores you can find compositions based on cement, gypsum and polymers, sometimes oil, adhesive and hybrid bases are used.
Consider the conditions (temperature, humidity) of the room and the location (wall, ceiling) of the surface.
- It is better to treat the walls of residential premises with normal humidity with gypsum putty.
- An acrylic/cement mixture is used in the bathroom and on façade work.
- Acrylic putty is effective when working with drywall, wood, and leveling the ceiling.
- For an even layer of paint, use polymer putty.
Putties on the market are divided into three groups: universal, starting and finishing. Starter ones are used for serious defects, finishing ones level the final surface, universal ones work in any conditions.
Working with different surfaces
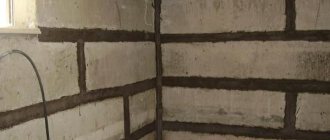
To plaster beacons on concrete surfaces, it is better to use lime mixtures with the addition of cement or simply cement mortar. The more cement is present in the composition, the more durable the plaster is. First you need to make notches on the wall and fix the plaster mesh on top. This is necessary for increased adhesion of the working solution and smooth concrete.
You should not use gypsum mixture to finish a concrete surface. Concrete components will react with gypsum, and the plaster will quickly crumble.
In terms of choosing the composition for plaster, brick walls are unpretentious. They can be coated with any type of mixture. But you will have to use a lot of plaster, and therefore, to save money, it is better to use a cement-sand composition. If the layer thickness is more than 5 cm, a reinforcing mesh must be applied.
Wooden surfaces are covered with a layer of plaster using reinforcing mesh on a mandatory basis. Clay is added to the prepared solution. It plays the role of a plasticizer. As an alternative, a plastic mixture based on gypsum and lime can be considered. It is important not to add too much clay as this can lead to increased cracking. Walls made of gas and foam blocks are the most problematic, as they have a low degree of adhesion. In order for the plaster to last a long time, you need to fill the mesh and use special additives.
For finishing surfaces consisting of gypsum blocks, gypsum plaster or compositions based on lime and gypsum are suitable. Cement mixtures are considered incompatible with gypsum bases. When working with such a surface, the use of a mesh is not necessary.
Leveling walls with putty mixture
You will need the following equipment:
- Spatulas - large, small, angled.
- Bucket.
- Construction mixer (attachment for drill).
- Sandpaper.
- Primer roller.
- Level.
- Rule.
The solution is mixed in a bucket until smooth, without lumps. The ratio of water and putty can be seen on the pack. After mixing, wash the tool immediately - hardened putty is difficult to clean.
Surface preparation
Clean the wall from any remaining wallpaper and cracked plaster using water and a spatula. You can use special paint cleaning products.
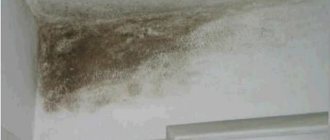
Before puttying, prime the surface - this will improve the adhesive properties of the solution. In damp areas such as bathrooms, use an antiseptic primer to protect against mildew.
It is enough to prime the walls in one layer; it is important not to leave any missing areas.
Installation of beacons
Beacons are attached to the wall with putty.
The procedure looks like this:
- Draw vertical lines on the wall and check them with a level.
- Clean the installation area thoroughly.
- Apply putty along the line, in increments of at least 1/3 meter.
- Glue the beacon to the wall, remove excess solution.
After installation, take a break to allow the solution to dry and secure the beacons. Please note that it will not be possible to correct errors and unevenness later, and beacons that are installed incorrectly will have to be torn off and reinstalled.
Applying putty in an even layer
After securely fixing the beacons, apply the solution to the wall and level from bottom to top. The layer should be uniform, dense and extend beyond the beacons. When the plaster is applied, level it from bottom to top, at right angles to the beacons. The collected excess is thrown on top with a spatula. If bubbles have formed in the area, it needs to be redone; the solution has not adhered to the wall.
Having reached the top edge of the beacons, run the rule along the wall again, smoothing the surface. You can move on to the next cell - the stops will help keep the solution in place until it hardens. At the end of the work, seal the gaps near the ceiling and floor.
Plastering technology
To apply the plaster correctly, you need to prepare consumables and tools:
Before buying plaster and mixing the solution, you need to calculate the material consumption. The simplest option would be orientation according to the area of the surface to be leveled. For example, if you have to treat walls with an area of 20 square meters with a solution whose layer thickness is 5 cm, you will need 1 cubic meter of solution.
Preparing the walls
Proper preparation of the base is a mandatory step in plastering walls with beacons. Includes several stages:
You can consider the markings for installing beacons ready. The next step is to prepare the surface for plastering.
The algorithm of actions is as follows:
Methods for placing beacons
Beacons can be placed on special fasteners or directly on the solution.
In the latter case, the beacons are placed on a solution prepared with the addition of a large amount of cement. To speed up the hardening process, you need to add gypsum. After this, the solution is applied to the wall. Make sure that the thickness of the layer is not greater than the depth of the beacon profile. To do this, you can use a building rule. When placing beacons on fasteners, they act in a slightly different way. When the level is set and vertical lines are drawn for mounting the profiles, it is necessary to drill holes every 35 cm for nails. The screw caps are screwed in at the same level with each other. Then the fasteners for the beacons are installed and the profiles are finally secured. The thickness of the applied layer is adjusted by protruding and screwing in the screws at the locations of the beacons.
Mixing the solution
Fill a container, say a plastic bucket, with water. Pour in the dry prepared composition. The exact ratio of ingredients is indicated on the packaging. Using a construction mixer allows you to achieve a homogeneous structure. To do this, you can use a powerful drill with a special attachment. When preparing the gypsum solution, you need to mix the components twice with an interval of about 2 minutes. The specified proportions should be strictly observed, since an excess of any component will lead to a decrease in the strength of the composition.
Depending on the required thickness of the applied layer, the density of the solution, which is desirable, is determined. If a thick layer of plaster is required, make a thick batch. It does not slip off the spatula.
Application of the solution
Before applying the solution to the wall, you need to make sure that the wall absorbs moisture well. If this indicator is reduced, you need to slightly moisten the wall, and then begin plastering.
Algorithm for applying the mixture:
Construction of slopes and corners
Using a large square falcon or corner trowel, you can form the inside corners of the walls. They are brought to evenness by passing a plastic pipe with a diameter of 60 to 100 mm along the beacons.
Door and window slopes must be formed with an expansion inward, in other words, leave the dawn of the slope, as the builders say. Obtuse angles are formed using wooden slats that are laid on the frame, or a special beacon for slopes. To level the surface, the corners are rolled with a pipe.
Mistakes and ways to avoid them
The most common problem with such work is beacons coming off the wall. The problem occurs when the primer is neglected or too much water is added to the solution. If the beacons stubbornly do not want to stick to the wall, repeat the preparation procedure again, more carefully.
Another difficulty is uneven beacons. This happens when they begin to be placed from the middle of the wall, and not from the corner of the room. The cause of the problem is often a level that is too short, which is not enough when working with the entire wall.
For large differences and unevenness, plastering must be done in two stages. The first layer is applied without leveling, with serifs. Then the wall is left for several days and after the primer, the second, final layer is applied.
Source
Applying putty using beacons allows you to eliminate unevenness and level the surface. The technology includes preparing walls and cleaning surfaces, filling, installing fasteners and applying decorative plaster in several layers. Cement building mixtures and gypsum putties are used.
Selection of guide elements
In the old days, the installation of beacons under plaster was carried out using mortar marks. First you need to find the most protruding area on the wall, which will be taken as a guide. Beacons are already being set up from it, which are made using slaps of mortar. In order for all the improvised beacons to be in the same plane, you need to take a thread and pull it to an equal distance. The distance between the landmarks should not exceed 15 centimeters, since otherwise it will not be possible to work with the standard rule that is used to level the plaster after throwing it on the wall.
But now such complex manipulations are no longer necessary, since iron products designed specifically for this purpose have become available for sale. With them, plastering under the lighthouse will go much faster. It will also be enough to choose the most convex place, and from there set up metal guides at the required distance from the wall. After this, it will be much easier to work, especially since the solution can be damaged when leveling, but this will not happen with metal.
So when choosing which lighthouse to place under the plaster walls, you should focus on your budget. Metal products will bring additional costs, but working with them will be much easier, and the result will be perfect. Therefore, if you have the financial opportunity, it is better not to refuse to purchase additional devices.
Preliminary work
Plastering walls along beacons is carried out after preparatory procedures to obtain a high-quality design of the premises.
- inspection of wall panels;
- surface measurement by level;
- cleaning surfaces from dust, dirt, old individual coatings;
- padding;
- fixation of reinforcing mesh.
It is necessary to inspect the wall panels for defects and protrusions. Irregularities are marked on the wall using a marker or pencil. Difficult areas will require careful leveling.
At the next stage, the walls are cleaned of old paint, plaster and other finishing materials to the base. The marked depressions are eliminated using putty, and the protrusions are leveled. Differences on the wall panel should not be more than 12 mm. The use of a laser level is recommended.
Then the level of the flat surface is changed and places for installing beacons are marked. The walls are cleaned of construction dust and can be vacuumed.
The next step is priming the base. The primer helps protect surfaces from moisture, mildew and mold. The composition is selected taking into account the surface material and the type of room (kitchen, living room). Priming increases the adhesion of the base and reduces the risk of delamination of the plaster.
When applying a dense layer of plaster mixture (more than 10 mm) and then laying tiles after drying, additional surface reinforcement will be required.
Applying putty
Puttying the walls is carried out in 2 stages. First, a rough (base) layer is applied, then the finishing coat. Step-by-step coating of the walls with the composition will provide a high-quality finish without peeling off the putty.
At the first stage, a dense layer of putty is thrown onto the surface and leveled, 4-5 mm should remain to the upper edge of the beacons. After filling the gaps between the profiles, the composition is dried. Then the surface is primed.
After the putty coating has dried, it is necessary to apply a thin finishing layer of primer. The coating needs to be leveled. Finally, painting and wallpapering are carried out.
If you plan to lay tiles, the base must be sanded and coated with a primer mixture. When wallpapering or painting, you need to make the walls smooth by treating them with sandpaper. Then 2 layers of putty are applied step by step. It is necessary to process the internal corner areas using a square and a corner spatula.
Source
When it comes to a comprehensive renovation of an apartment, the first thing that comes to mind is leveling the walls. When we builders talk about leveling walls, we usually mean plaster. And this is quite justified, since plastering walls is one of the most common methods of rough finishing them.
Why do you need to level the walls? This question worries many who are faced with repairs for the first time. As a rule, the task is set as follows: you want to do it quickly, inexpensively and, of course, with high quality. Most typical repairs involve covering walls with wallpaper, so the term “leveling” very often means preparing the surface of the walls for this interesting process. And this is where the catch lies, because customers mostly mean by leveling the walls that they are puttied. Knowing that the putty applies quickly and dries quickly, they expect the repair to take only a few days. And what a genuine surprise (sometimes distrust, less often anger) is caused by the words of the finishing craftsman or surveyor who arrived to inspect the facility, that the repair will take much longer than the customer initially expected, and the cost of the work and the volume of rough materials will increase significantly.
Why is this happening, and did the master deceive you when he said that renovating a room could take more than a month, despite the fact that on the Internet you can find hundreds of videos where lucky participants in a project get turnkey designer renovations done in 5 days? Let's figure it out.
So, puttying walls is a thin-layer application (1-2 mm) of material (putty) to eliminate minor irregularities (local pits, cavities, tubercles) and to create a smooth surface (base) for the application of finishing materials (paint, wallpaper) that require similar preparation.
Plaster, unlike putty, is used to roughly level the surface of walls and allows layers of up to 50 mm to be applied.
For dry rooms (living rooms, corridor, kitchen) a plaster mixture based on gypsum is used:
For wet areas (bathroom, laundry) – cement-based:
Plastering walls can be done in two ways: “under the rule” and “according to beacons.” Since plastering “to the rule” does not allow making the walls perfectly smooth, in this article we will no longer consider this type of work; let’s move on directly to plastering “by the beacons”.
First, let's define the terms. Plaster “beacon” is a galvanized metal T-shaped perforated profile 3 m long with a shelf height of 6 or 10 mm.
The “rule” is a plastering tool, a metal strip that is moved along the beacons, as if along guides, cutting off excess plaster between the beacons, thereby creating an even plane. The simplest rule has a trapezoidal shape:
The process of plastering walls using beacons is as follows:
As a result, we get a very smooth, vertical surface. It is worth noting: this method also allows you to bring out the corners of the room at 90⁰ if necessary.
It is also important that when there are large blockages in the walls, the layer of plaster is more than 2 cm, which allows all the electrical wiring to be installed under it in advance without chiseling the walls, and this saves a lot of time and effort.
The advantages of plaster on beacons are obvious:
The disadvantages include the following:
To be fair, it is worth noting that on large volumes a mechanized method of applying plaster is often used. It differs fundamentally from manual in that the master does not need to manually mix 1-2 bags with water with a mixer, apply the resulting mass to the wall, and then repeat the procedure over and over again. Everything is done much simpler: in a specialized plastering station, mixing and water supply occurs automatically; the master only needs to pour the dry material from the bag into the receiving hopper in time. In this case, the mixture is also supplied to the wall automatically under pressure.
electric door lock VAZ 2114
Labor productivity increases significantly, therefore, the speed also increases, which means the time for repair work is reduced.
So, let's summarize.
Did you like the material? Please support the author and share the link with others.
Author: Vladimir Omelchenko
Source
Tools
- beacons;
- primer mixture;
- construction mixer;
- set of spatulas;
- building level;
- drill with attachments;
- painting mesh;
- wide brush;
- plaster;
- sheets of sandpaper;
- rollers;
- rule;
- abrasive mesh;
- deep containers.
Depending on the base material and the putty application technique, beacons made of plastic, metal, string, reusable steel, etc. can be used.
Plastic beacons are lightweight, easy to fix and remove. They are not susceptible to mold or rust and can remain in the putty composition. Such products are not suitable for exterior decoration.
Galvanized ones are affordable and easy to install. The products are produced in standard sizes 6-10 mm.
Frame-free method
This procedure is quick and hassle-free. You will need special glue, but only one that is produced specifically for drywall. To begin with, the wall is freed from foreign particles.
The level of curvature is important. With a small indicator, you can safely start working. The sheets are coated with glue with a spatula and glued to the wall. If the curvature is more than 20 mm, then in this case frame plasterboard is more suitable.
If the wall is prepared using putty, you can safely glue the material to its surface. If the surface is treated with a primer, you need to wait until it is completely dry, then start working. The glue must be used immediately, as it dries quickly.
Installation of beacons
The beacons are designed to create a contour for applying the plaster mixture and subsequent leveling of the walls. The accuracy of the installation of beacons determines the parameters of a smooth surface.
At the next stage, the beacons are fixed. To install the profiles at a given level, you will need to stretch a strong thread or thin cord. Taking into account the tension level, screws are screwed into the wall, which will become the basis for the beacons. Then, using a small amount of putty, beacons are attached to the surface.
The arrangement of elements is carried out from the corner part. According to standards, the gap between the beacons should be 120-150 mm. The size of the gaps may vary depending on the method of applying the plaster, the quality of the finishing material and the dimensions of the room being decorated. On smooth walls with small uneven areas, the elements are installed only in a few places on the wall.
How to evenly putty walls with your own hands: a guide for beginners
For beginners, the process of leveling walls may seem labor-intensive and requires professional implementation. However, if you follow the basic rules for working with putty, mastering the procedures of mixing, applying and sanding yourself will not be difficult.
Where to start: how to putty deep holes and cracks
Severe damage to the surface must first be repaired locally, then the compound must be applied over the entire wall, which will help to avoid unevenness and differences. Large cracks can be easily dealt with by mixtures of gypsum, alabaster and the absolute favorite for such work - satengypsum. This material is as elastic as possible for filling deep unevenness and has a long drying time, which allows you to fill existing holes as tightly as possible and level the surface.
What layer is best to apply the starting mixture: maximum and minimum thickness
The composition of starting mixtures for putty is usually based on gypsum in combination with various admixtures to create certain qualities (viscosity, elasticity, quick drying, etc.).
This putty can be applied with either a minimum layer of 1-2 mm or a maximum layer of 15 mm, depending on the skill of skilled hands. Despite the large thickness of the layer, the starting compositions are designed for the possible application of duplicate layers, so a high-quality putty should withstand up to 3-4 layers of the mixture, each 1-1.5 cm thick. In addition, this overlay of layers allows you to level the surface using a painting mesh, which increases the degree of adhesion of the composition to the wall and combats the formation of cracks.
How to evenly apply the mixture along the beacons: application technology
Lighthouse puttying involves applying the composition in the following stages:
- Installation of beacon slats using a building level
- Filling beacons with mixture
- Leveling the entire surface with reference to the beacons
How to properly remove putty from the floor
The junction of the wall and the floor is processed differently depending on the following parameter - the presence/absence of floor covering:
- If the floor covering needs to be preserved, then the wall must be puttied, avoiding the formation of sagging of the mixture on the floor. To do this, movements with a spatula are carried out from the bottom up, starting from the floor. In this case, it is better to leave a small gap between the putty and the floor covering so that the finishing materials do not touch each other. Then this distance will be covered with a plinth.
- If the floors in the room are rough, then puttying the walls can be done with the expectation that the baseboard will not be needed. To do this, puttying the entire surface of the wall is carried out using any convenient technique, and the joint with the floor is worked out with an angled spatula. In addition to the obviously more convenient application, this finish allows you to additionally seal the seam between the wall and the floor, especially in the presence of cracks.
Types of flat roofs
The construction of a flat roof can take different routes. In one case, you will receive a roof that will protect you very well from precipitation, and walking on its surface will result in repairs. Another option offers a roof on which a recreation area, workshop, greenhouse or swimming pool can be freely installed.
According to their functional purpose, flat roofs are divided into two types:
- Unusable plane.
Such a roof is built from very thin, but at the same time high-quality materials. Its maintenance is associated with some difficulties, since in order to move on the surface it will be necessary to install special bridges and ladders. However, some materials can support the weight of an average person, but no more than that. As a rule, the roof plane is covered with a sprayed waterproofing coating, which makes it completely sealed. - Used surface.
This variety differs from the previous version not only in that several people can move along its plane, but also in the materials used. Such a roof is intended to contain heavy objects, which means that an alternative technology for laying layers must be used. In this regard, such a roof can easily withstand colossal loads in the form of swimming pools, restaurants or parking lots, although very massive superstructures require a foundation in the form of reinforced concrete slabs. Of course, it is not always advisable to build this in private construction, however, it can be arranged.
Based on the placement of layers, the roof can be divided into two types.
Traditional roofing. Here all the layers are placed in the usual order, which is why this structure has this name. Bituminous waterproofing is applied to the flat base, then thermal insulation boards are laid and the whole thing is covered with another layer of insulation. As a roofing covering on such roofs, you can most often see roofing felt.
Inversion roofing. Here, with the order of layers, everything is different. Waterproofing is laid on the prepared base, and a heat-insulating layer is mounted on it. A vapor barrier membrane is attached on top of all this, covered with a concrete screed. The last layer gives the roof the necessary rigidity, thanks to which massive objects can be placed on it.
A flat timber roof can be all of these types, as long as you understand what you want.
More details about corners and other hard-to-reach places
When puttingtying corners, the material must be rubbed in in small portions. For work, use a square/rectangular spatula. It is important that the mixture fills all the cavities. Even if marks from the tool remain on the surface, after drying they can be easily removed with sandpaper.
You can use this homemade device to clean consoles, slopes and niches.
- Remove a strip from the plastic corner, then cut it into several shorter pieces.
- Glue coarse and fine-grained “sandpaper” (1/3 + 2/3 of the total length) to each piece with double-sided tape.
- Trim the ends of the strips to form triangles.
Such a flattened “pencil” will allow you to easily sand various corners and other hard-to-reach places. Use a coarse abrasive first, then finish with a fine one.
How to plaster walls
There are a large number of types of mixtures on the Russian construction market, differing in the type of binder. In this role, gypsum, cement, clay, and lime are most often used. Gypsum or cement varieties of compositions are more popular, as they help to obtain perfectly leveled surfaces with minimal effort.
Before leveling the walls with plaster with your own hands, remember that the properties of the surfaces depend on the choice of composition:
- Cement-sand
- they are based on sand, which effectively fills all the unevenness and defects of the wall, and cement, which acts as a binding element. The undeniable advantage of CPS is the strength of the formed layer. - Gypsum
- such compositions are intended primarily for objects with a humidity of no more than 80%, since, when saturated with moisture, the plaster falls off. Gypsum mixtures dry quickly and are suitable for leveling walls, ceilings, and eliminating defects locally. - Limestone
- their use is justified in cases where plasticity is required. Most of the volume of such dry compositions is occupied by lime, which is supplemented in small quantities by sand. They are easy to apply, but the final layer is not particularly durable. Lime mixtures are intended primarily for plastering walls for painting and wallpaper. - Clay
- after drying, they form a durable layer that does not absorb moisture and has low thermal conductivity. In terms of its physical and chemical properties, it is an environmentally friendly coating, but it is susceptible to high humidity and is capable of absorbing toxic substances from the air. - Polymer
- if the surfaces have a minimum of defects, we recommend choosing compositions based on silicone, acrylic, siloxane and silicate:- acrylic
- they are easy to prepare, have excellent noise and sound insulation characteristics, the resulting layer allows air to pass through and retains heat; - silicone
- consist of various fillers that give different shades and texture effects; - silicate
- they are based on molten glass, which gives the final product the highest fire and moisture resistant characteristics; - siloxane
- they are distinguished by rapid drying, immunity to mechanical destructive influences, humidity and temperature fluctuations.
Rice. 1. Plaster compositions
Depending on the design of the object and the building materials from which it is built, the finishing that is planned, the type of plaster is selected:
- Lime, gypsum or cement-sand plaster is suitable for living rooms;
- Cement materials are suitable for use inside rooms with high air humidity (bathroom, bathroom, kitchen, industrial and public premises).
The optimal difference in heights, which can be eliminated by plastering, is 1–5 centimeters. If the planes are characterized by strong curvature, when leveling with plaster, internal reinforcement and a multi-layer coating will be required, but this significantly increases the consumption of material.
Which plaster to choose for different types of walls
| Limestone | Plaster | Cement-sand | Polymer | |
| Cost, rubles | From 300 | From 250–270 | From 210 | From 2400 |
| For brick walls | + | + | + | + |
| For aerated concrete | + | + | + | — |
| For wooden walls | — | + | + | — |
| For foam block | + | + | + | — |
| For concrete walls | + | + | + | + |
| Under the wallpaper | + | + | + | + |
| For painting | — | + | + | + |
| For residential and non-residential premises | Only for residential dry premises | Only for residential dry premises | + | + |